
Nội dung
In this article, AZDIGI will show you how to optimize parameters on OPcache to increase performance and help OPcache operate with the most outstanding power.
Overview
When installing OPcache on CyberPanel, the parameters set will be relatively low. RAM usage in OPCache on CyberPanel only stops at 32MB, the maximum amount of PHP files cached at the same time only stops at 4000. With the above parameters, OPcache will easily be used if it works on websites with large source code structures.
How to raise these parameters to suit the needs of use, please continue to see the steps below.
What is OPCache?
Originally called Zend Optimizer +, OPcache (introduced in PHP 5.5.0) is a powerful PHP extension built to enhance PHP performance, thus increasing overall application performance. It is available as an extension through PECL for PHP versions 5.2, 5.3 and 5.4. It works by storing precompiled script-bytecode in shared memory or RAM, thus eliminating the need for PHP to load and parse the script on each request.
Features of OPCache:
- Helps reduce %CPU usage for the server.
- Reduce TTFB of all PHP sites on the server.
- Increase website loading speed.
Change OPCache parameters on CyberPanel
To change OPCache parameters, you need to follow these steps:
Step 1: SSH into the VPS CyberPanel
To change the OPCache parameters, you need to SSH into your VPS CyberPanel with root information, if you don’t know how to SSH, you can see the instructions below:
After SSH into VPS successfully, you continue to step 2 to check OPCache parameters.
Step 2: Check OPCache parameters
To check the current OPcache parameters and the configuration file path, you use the command below:
php -i | grep opcache
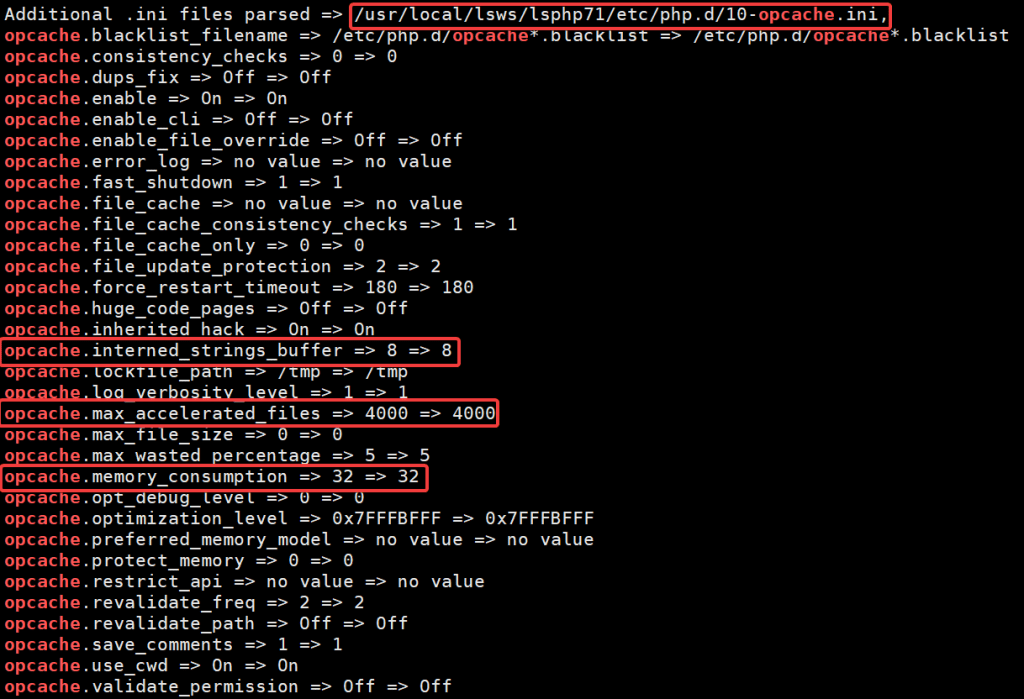
When running the above command, you will be shown the full path containing the configuration file and all the configuration files of OPcache. However, you just need to pay attention and adjust the 3 parameters below because it will directly affect the performance:
- opcache.interned_strings_buffer: Amount of memory used to store interlaced strings in megabytes. This configuration directive is ignored in PHP < 5.3.0. But we’re using newer PHP, so we’ll need this configuration. The default value in CyberPanel is “8”.
- opcache.max_accelerated_files: The maximum number of scripts that OPCache can cache. The minimum value is 200. The maximum value is 100000 in PHP < 5.5.6 and 1000000 in later versions. The default value in Cyber Panel is “4000”.
- opcache.memory_consumption: The RAM size allocated to OPcache for use in Megabytes. The default value in CyberPanel is “32”.
Step 3: Change OPCache parameters
In step 2, you have got the path containing the OPcache configuration file, now you need to edit that file with the command below. (Note: edit the exact path displayed on your VPS and replace 71 with the PHP version you are using)
vi /usr/local/lsws/lsphp71/etc/php.d/10-opcache.ini
After opening the configuration file, you find the parameters in step 2, click I or Insert to edit. After editing, press the ESC key and :x to save the editing.

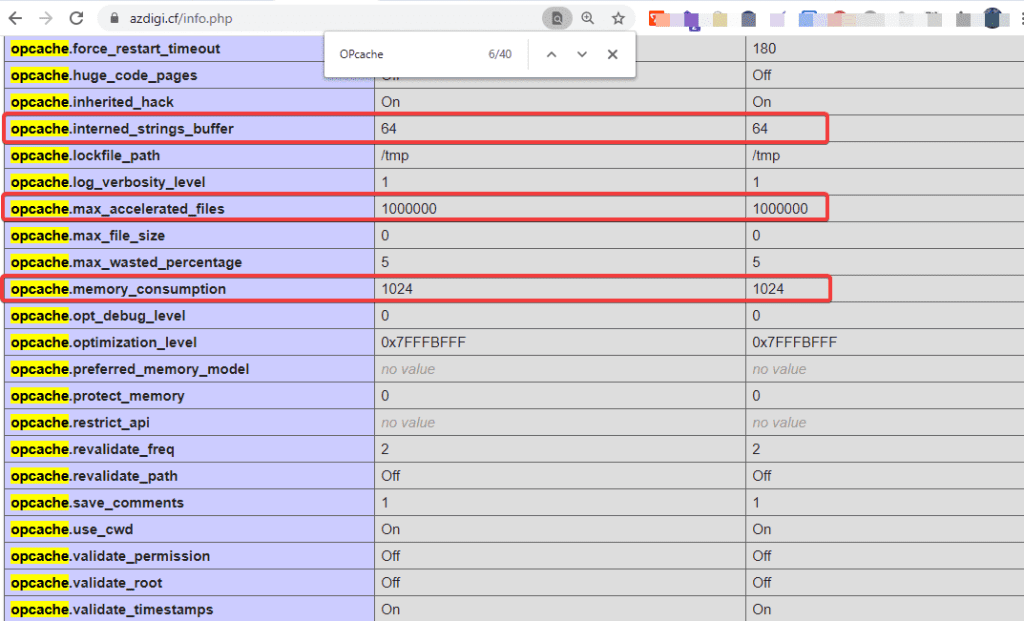
Depending on the amount of RAM in your system and tweak it accordingly. With my VPS, the amount of free ram is over 3Gb, so I set the parameter opcache.memory_consumption to use 1024MB ~ 1Gb of RAM and respectively, you also remember to increase opcache.interned_strings_buffer to about 64MB. Since I’m editing PHP 7.1, I’ll set opcache.max_accelerated_files to a maximum of 1000000.
After changing the parameters, you restart the LiteSpeed service with the command below to receive the new Opcache configuration.
killall -9 lsphp
systemctl restart lsws
systemctl restart lshttpd
Step 4: Check the configuration again after changing
You can quickly create the info.php file in the directory containing the website source code, then add the code below to the file content.
<?php
phpinfo();
?>
After creating, you can access the following: https://domain.com/info.php, press the key combination ctrl + F and quickly search for the word OPcache to check the parameters. As shown below, the parameters have been successfully updated.
Summary
So in this article, AZDIGI showed you how to change OPcache parameters on CyberPanel so that OPcache can work optimally on your VPS. This will help your VPS always operate more stably and smoothly. If you find the article interesting and useful, please share it widely.
