

Nội dung
Overview
CyberPanel is a new control panel, which is increasingly trusted by users with an intuitive and easy-to-use management interface, in addition to the developer constantly releasing updates with many new features to help users have a better experience. Don’t stop there, in addition to having an eye-catching interface, Cyber also knows how to please users when integrating Cyber Command Line (CLI) so that users have more options to manage their VPS.
In this article, AZDIGI will introduce you to some of the most common Cyber Command Line (CLI) so that you can understand and practice most simply. Specifically, please continue to follow the instructions below.
Some basic commands to administer SSL on CyberPanel
Create SSL for the website
Note: To install SSL, you must ensure that the domain is pointed to the server IP. If the IP is not pointed, the installation will not be possible because the DNS cannot be verified.
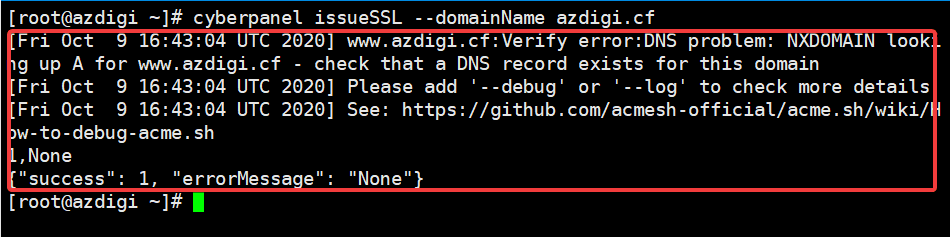
To install SSL for your website, use the following command:
cyberpanel issueSSL --domainName azdigi.cf
In there:
- domainName: Enter the domain to install SSL
After successful creation, you will receive the following message:
After the installation is complete, visit the website to check it. As shown below, the site has been successfully installed!

Create SSL for Hostname
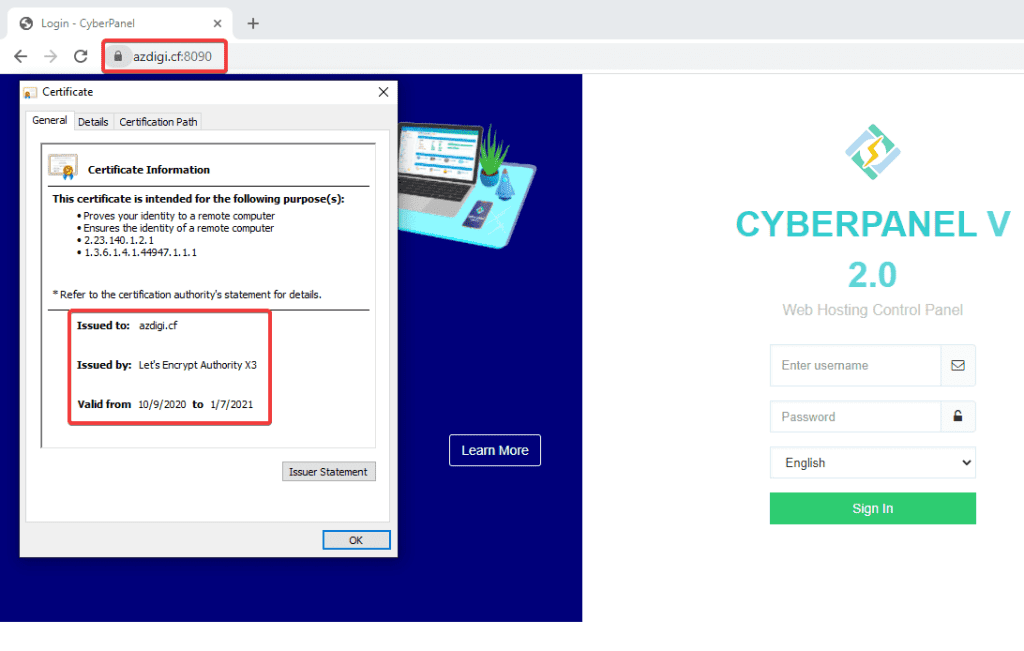
For example, instead of accessing CyberPanel under the default link: https://IPVPS:8090/, we will receive an unsecured warning that looks unfriendly when accessing. So to make it easier to remember and more beautiful, I will access CyberPanel with my domain like: https://azdigi.cf:8090/ and I will install SSL for this hostname to no longer display security warnings.
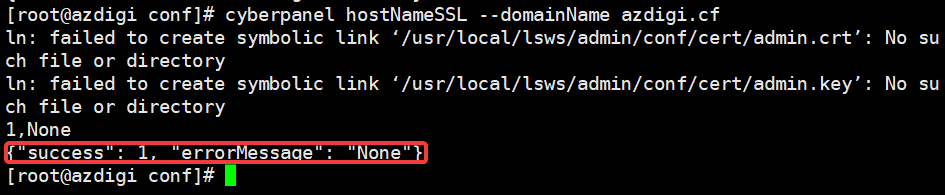
You install SSL for Hostname with the command below:
cyberpanel hostNameSSL --domainName azdigi.cf
In there:
- domainName: Enter the domain name you want to use as the hostname.
If successful, you will receive the following message:
After the installation is complete, please try to access it. As shown, I was able to access it with the link: https://azdigi.cf:8090/
Create SSL for Mail Server
To create SSL for Mail Server, execute the command below:
cyberpanel mailServerSSL --domainName azdigi.cf
In there:
- domainName: Enter the domain name you want to install SSL Mail Server.
If successful, you will receive the following message:

Summary
So in this article, AZDIGI has shown you how to install SSL on CyberPanel is the simplest and fastest way. With this implementation, you will easily install SSL without having to access the CyberPanel administration interface, you will save time and install SSL quickly with just one command. If you find this helpful article, please share it widely.
You can refer to some other useful CyberPanel articles below:
Wishing you success!
If you need assistance, you can contact support in the ways below:
- Hotline 247: 028 888 24768 (Ext 0)
- Ticket/Email: You use the email to register for the service and send it directly to: support@azdigi.com
