
Installing FileRun on Ubuntu 22.04 with 7 steps.
Introduction
What is FileRun?
FileRun is a full-featured PHP web-based file manager and a very easy-to-use ajax user interface. Upload and download large files for easy sharing.
In this article, AZDIGI will guide you to install FileRun on Ubuntu 22.04 servers running NGINX, PHP and MariaDB.
In addition, AZDIGI will guide you through configuring FileRun access with a specific domain name and installing SSL for that domain or installing any third-party software that FileRun may use to take advantage of it and enjoy all the features of FileRun on a secure server.
Implementation Guide
Step 1: Update the system
Before going into the installation, you should update the system according to the command:
sudo apt update -y && apt upgrade -y
Step 2: Install Nginx Web Server
Nginx is a prevalent and high-performance web server these days. Nginx is a prevalent and high-performance web server these days. You can run the commands below to install it.
- Install Nginx
sudo apt install nginx -y
- Start Nginx and enable system startup
sudo systemctl start nginx
sudo systemctl enable nginx
Now, open your browser and access with IP/Hostname/Domain, if successful, you will see the default Nginx interface as below:
Step 3: Install MariaDB Database Server
Next, we’re going to install a Database server to manage FileRun’s database, which will be where your application settings, user settings, and file information. You can run the commands below to install it.
- Install MariaDB Database Server
sudo apt install mariadb-server mariadb-client -y
- Start MariaDB and enable system startup
sudo systemctl start mariadb
sudo systemctl enable mariadb
- Advanced setup for MariaDB service
sudo mysql_secure_installation
You need to set up the following information:
root@ubuntu-2204:~# sudo mysql_secure_installation
Enter current password for root (enter for none): Nhấn Enter
OK, successfully used password, moving on...
Change the root password? [Y/n] y
New password:    Nhập passwd mới
Re-enter new password:  Nhập lại passwd mới
Password updated successfully!
Reloading privilege tables..
 ... Success!
By default, a MariaDB installation has an anonymous user, allowing anyone
to log into MariaDB without having to have a user account created for
them.  This is intended only for testing, and to make the installation
go a bit smoother.  You should remove them before moving into a
production environment.
Remove anonymous users? [Y/n] y
 ... Success!
Normally, root should only be allowed to connect from 'localhost'.  This
ensures that someone cannot guess at the root password from the network.
Disallow root login remotely? [Y/n] y
 ... Success!
By default, MariaDB comes with a database named 'test' that anyone can
access.  This is also intended only for testing, and should be removed
before moving into a production environment.
Remove test database and access to it? [Y/n] y
 - Dropping test database...
 ... Success!
 - Removing privileges on test database...
 ... Success!
Reloading the privilege tables will ensure that all changes made so far
will take effect immediately.
Reload privilege tables now? [Y/n] y
 ... Success!
Cleaning up...
All done!  If you've completed all of the above steps, your MariaDB
installation should now be secure.
Thanks for using MariaDB!- Set up a database for FileRun
After the setup is complete, you access MySQL with the root account with the command:
sudo mysql
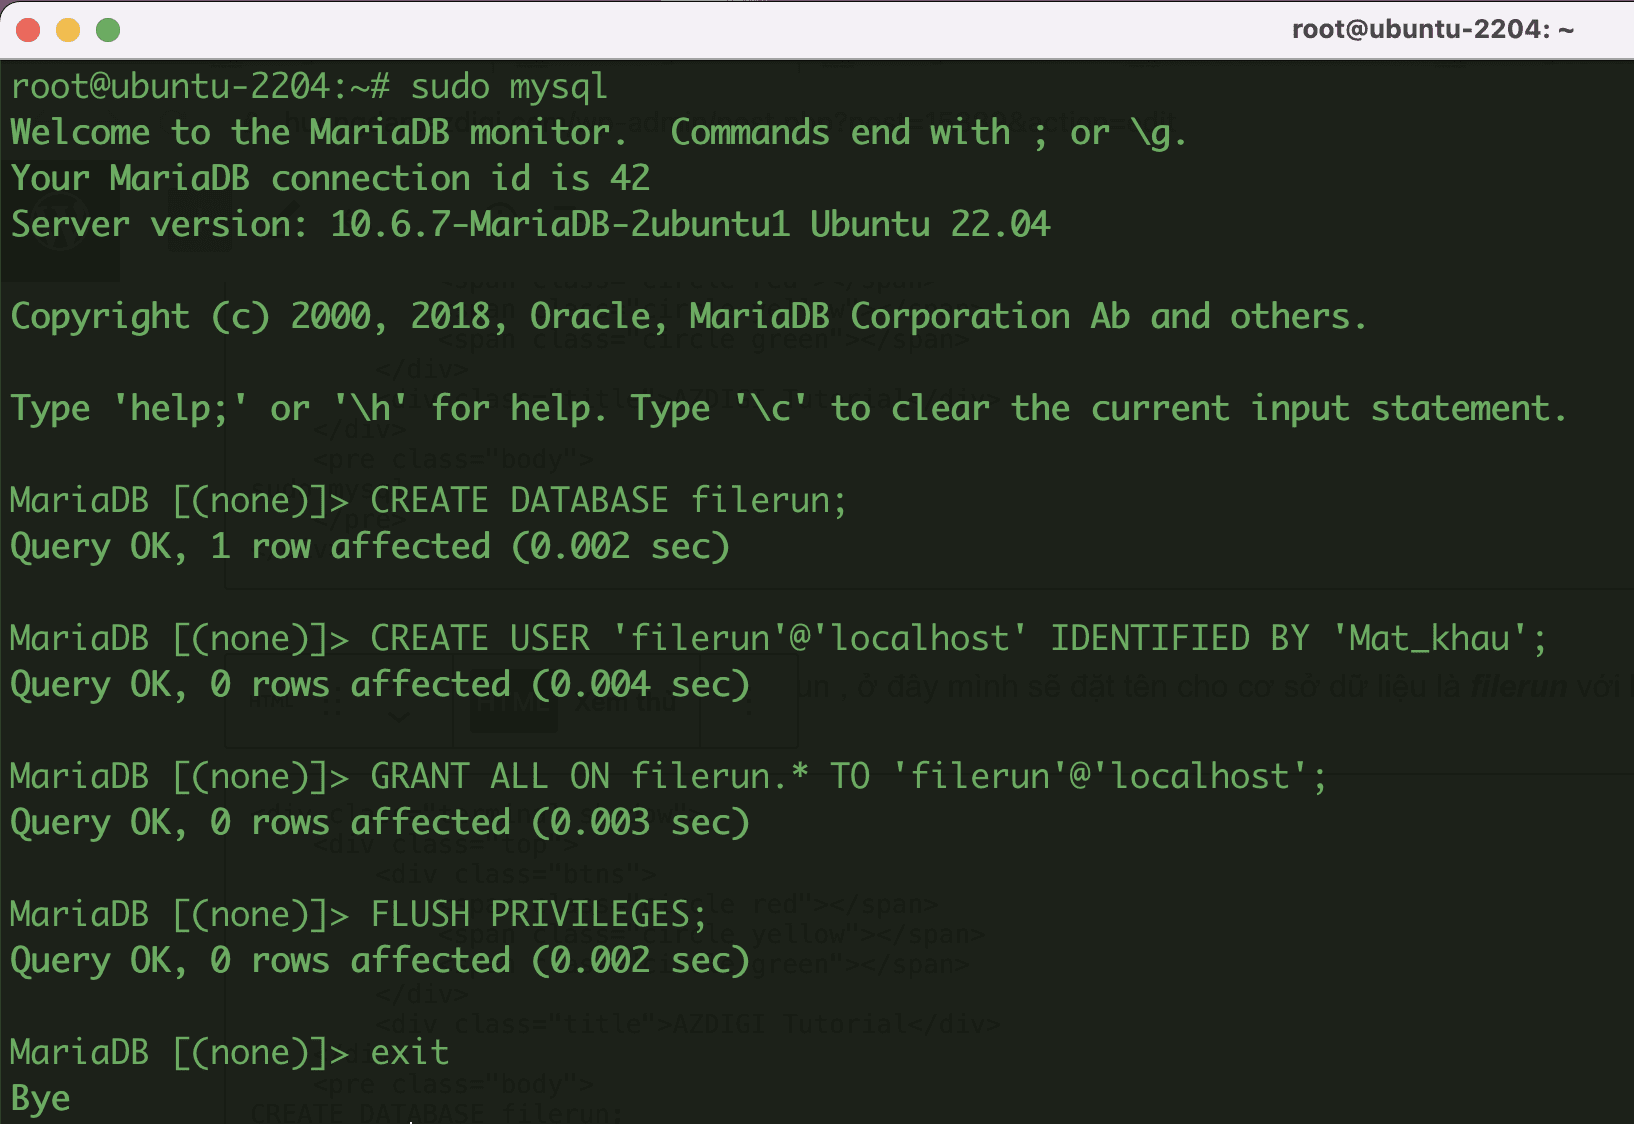
Next, you create a database for FileRun, I will name the database filerun with the following command:
CREATE DATABASE filerun;
CREATE USER 'filerun'@'localhost' IDENTIFIED BY 'Mat_khau';
GRANT ALL ON filerun.* TO 'filerun'@'localhost';
FLUSH PRIVILEGES;
exit
Step 4: Install PHP 7.4
Currently, FileRun is working most stable with PHP 7.4 version, so I will install PHP 7.4 to run with FileRun.
- Install PHP 7.4 and the extensions required by FileRun.
sudo add-apt-repository ppa:ondrej/php
sudo apt install php7.4 php7.4-fpm php7.4-mysql php7.4-cli php7.4-common php7.4-json php7.4-opcache  php7.4-mbstring php7.4-xml php7.4-zip php7.4-gd php7.4-curl php7.4-gd php7.4-ldap php7.4-imagick
- Install the ionCube PHP extension
With ionCube, we will need to install it manually with the command below:
Download the package (Linux 64 bit)
sudo wget https://downloads.ioncube.com/loader_downloads/ioncube_loaders_lin_x86-64.tar.gz
Extract the downloaded file:
sudo tar -xzf ioncube_loaders_lin_x86-64.tar.gz -C /usr/lib/php
Open the downloaded file and paste the content below:
sudo nano /etc/php/7.4/fpm/conf.d/00-ioncube.ini
zend_extension = /usr/lib/php/ioncube/ioncube_loader_lin_7.4.so And so the ionCube extension is installed, let’s create a file to be automatically added by PHP to its configuration. This will include all the necessary settings of FileRun.
sudo nano /etc/php/7.4/fpm/conf.d/filerun.ini
Add the following content to the newly created file:
expose_php              = Off
error_reporting         = E_ALL & ~E_NOTICE
display_errors          = Off
display_startup_errors  = Off
log_errors              = On
ignore_repeated_errors  = Off
allow_url_fopen         = On
allow_url_include       = Off
variables_order         = "GPCS"
allow_webdav_methods    = On
memory_limit            = 128M
max_execution_time      = 300
output_buffering        = Off
output_handler          = ""
zlib.output_compression = Off
zlib.output_handler     = ""
safe_mode               = Off
register_globals        = Off
magic_quotes_gpc        = Off
upload_max_filesize     = 20M
post_max_size           = 20M
enable_dl               = Off
disable_functions       = ""
disable_classes         = ""
session.save_handler     = files
session.use_cookies      = 1
session.use_only_cookies = 1
session.auto_start       = 0
session.cookie_lifetime  = 0
session.cookie_httponly  = 1
date.timezone = "UTC" 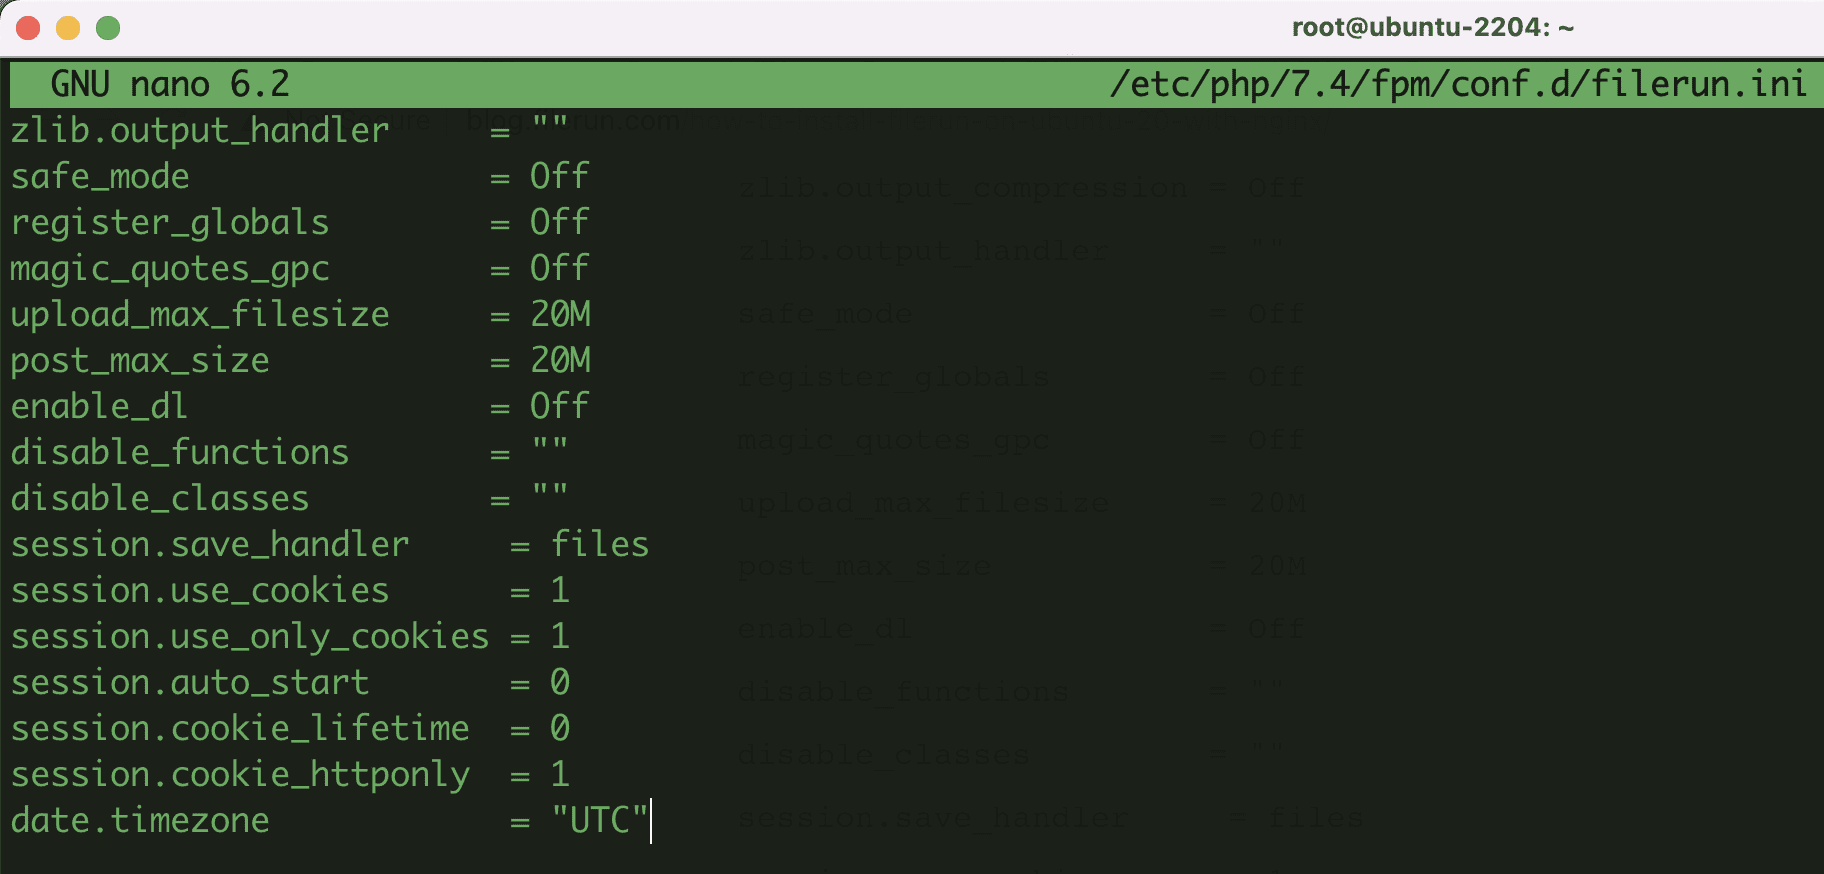
- Restart PHP-FPM and enable system startup
sudo systemctl restart php7.4-fpm
sudo systemctl enable php7.4-fpm
systemctl status php7.4-fpm
Step 5: Configure NGINX with PHP
First, delete Nginx’s default configuration file because it is unsuitable for use.
- Delete Nginx’s default configuration file
sudo rm /etc/nginx/sites-enabled/default
- Initialize a new block at /etc/nginx/conf.d/ with the command:
sudo nano /etc/nginx/conf.d/default.conf
Add the following content to the newly created file:
server {
  listen 80;
  listen [::]:80;
  server_name _;
  root /var/www/html/;
  index index.php index.html;
location / {
    try_files $uri $uri/ /index.php;
  }
location ~ [^/].php(/|$) {
    fastcgi_split_path_info ^(.+?.php)(/.*)$;
    if (!-f $document_root$fastcgi_script_name) {
        return 404;
    }
include fastcgi_params;
    include snippets/fastcgi-php.conf;
fastcgi_param SCRIPT_FILENAME $document_root$fastcgi_script_name;
    fastcgi_param PATH_INFO $fastcgi_path_info;
    fastcgi_pass unix:/run/php/php7.4-fpm.sock;
  }
# A long browser cache lifetime can speed up repeat visits to your page
  location ~* .(jpg|jpeg|gif|png|webp|svg|woff|woff2|ttf|css|js|ico|xml)$ {
       access_log        off;
       log_not_found     off;
       expires           360d;
  }
# disable access to hidden files
  location ~ /.ht {
      access_log off;
      log_not_found off;
      deny all;
  }
}
- Check Nginx configuration
sudo nginx -t

- Reload Nginx
sudo systemctl reload nginx
Step 6: Install FileRun
First, you need to delete the default files in the path /var/www/html/
- Delete default files
cd /var/www/html/
sudo rm index.nginx-debian.html
- Download FileRun
sudo wget -O FileRun.zip https://filerun.com/download-latest-ubuntu-nginx
- Install unzip
sudo apt-get install unzip
- Extract the downloaded FileRun file
sudo unzip FileRun.zip
After successfully extracting, you will get the source as shown below:
- Permissions for the /var/www/html/ directory
sudo chown -R www-data:www-data /var/www/html/
Step 7: Setup FileRun
After completing the installation steps above, now go to your browser and enter your address: http://YOUR-SERVER-IP to complete the FileRun setup.
If successful, the FileRun interface will display as shown below => click Next to go to the next setup step.
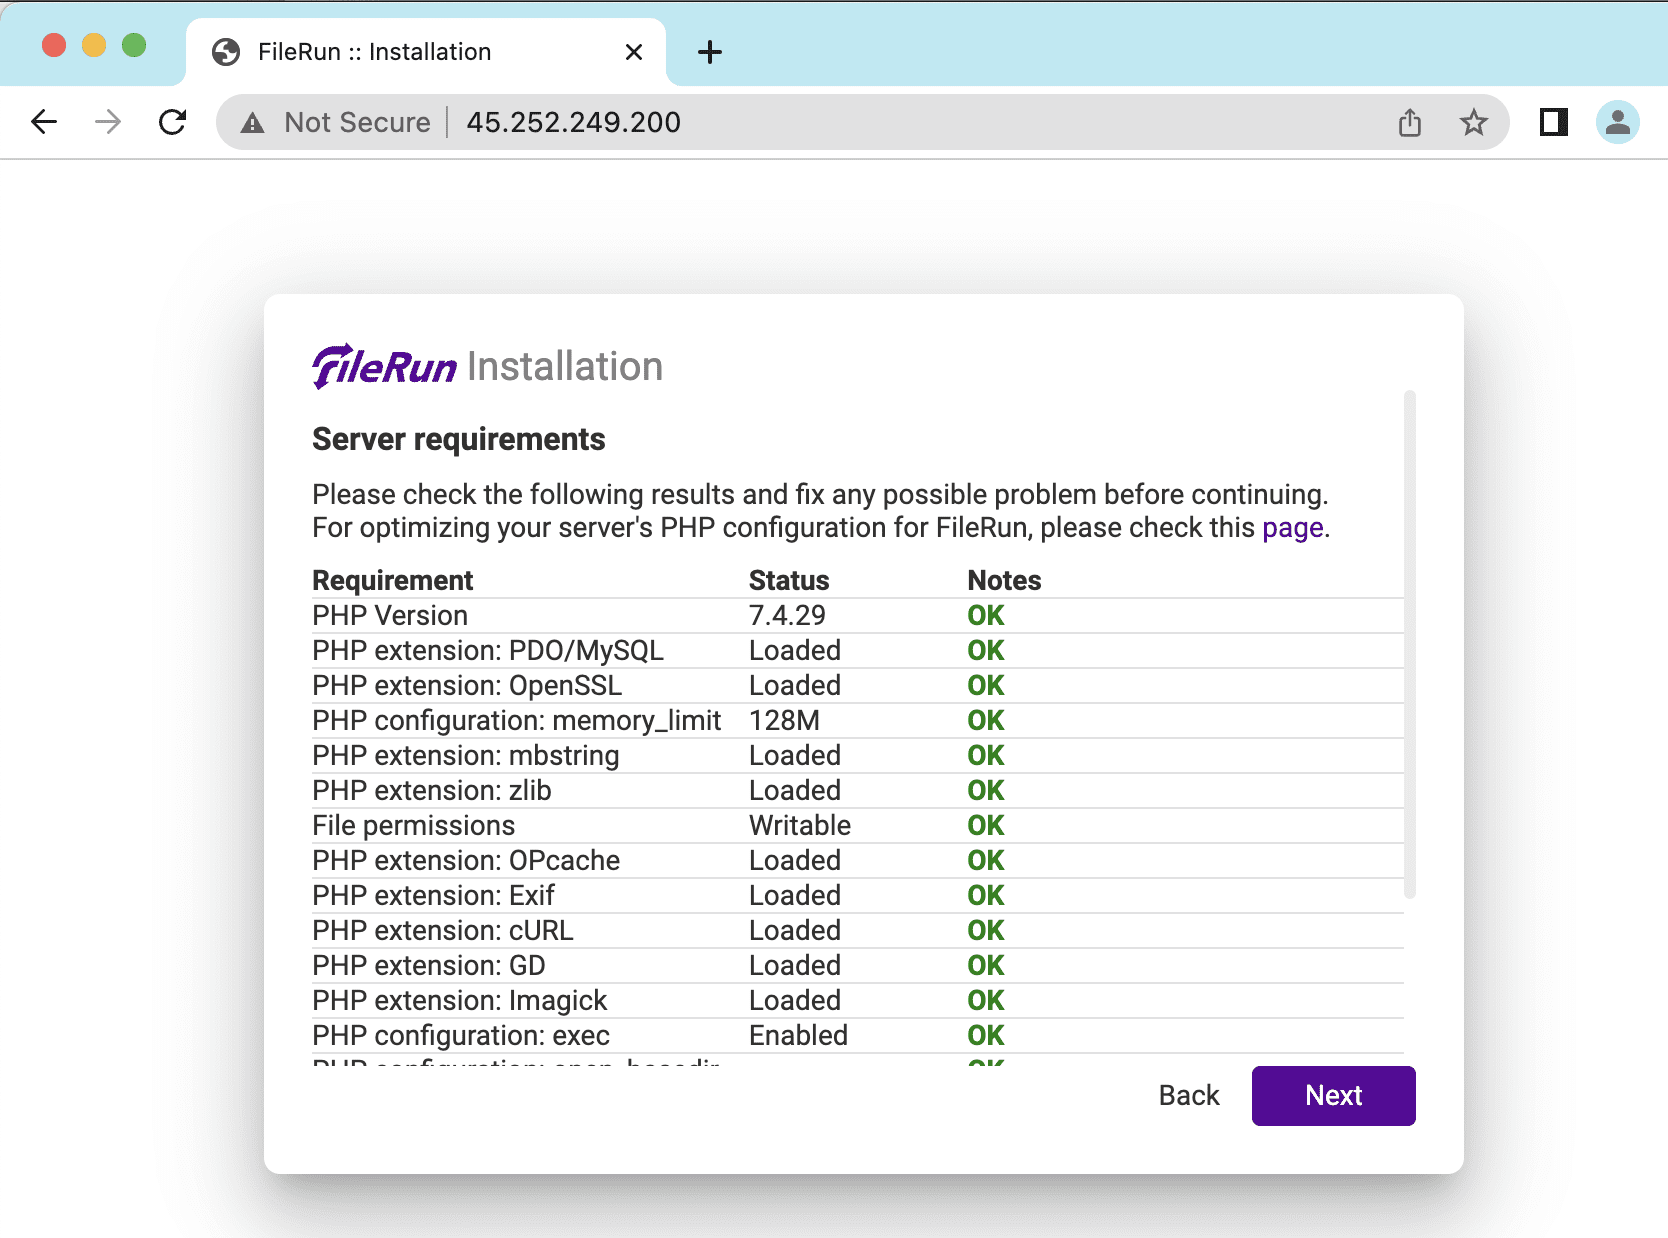
Next is to set up the Database for Filerun, you proceed to enter the database information created above (Step 3: Install MariaDB Database Server).

If the setup is successful, you will get Filerun login User/Password information.
Now use the above information to login to Filerun.

And below is the interface of Filerun.

So AZDIGI has shown you how to install Filerun on Ubuntu 22.04 server completely. Hopefully, with Filerun, you will have more file management solutions. Wishing you success!
You can refer to other instructions at the link below:
If you need support, you can contact support in the ways below:
- Hotline 247: 028 888 24768 (Ext 0)
- Ticket/Email: You use the email to register for the service and send it directly to: support@azdigi.com .
About the author

Thạch Phạm
Đồng sáng lập và Giám đốc điều hành của AZDIGI. Có hơn 15 năm kinh nghiệm trong phổ biến kiến thức liên quan đến WordPress tại thachpham.com, phát triển website và phát triển hệ thống.