
Setting up Nginx FastCGI Cache on NGINX reduces server response time for your WordPress website.
I. Overview
What is Nginx FastCGI Cache?
Before going into the installation process, let’s take a look at Nginx FastCGI Cache. If you are using LEMP, you probably know that Nginx handles static files very well, and Nginx cannot handle PHP code, so Nginx is configured to forward PHP requests to PHP-FPM. I will describe how LEMP works and the model for you to understand.
- When a client accesses the website, the browser sends an HTTP request to Nginx, and then it loads the page from the file system.
- If Nginx finds PHP code on the page, it will forward the request to PHP-FPM to process this PHP code. If necessary, PHP-FPM will query the MySQL/MariaDB database to search and retrieve what PHP-FPM needs.
- Then PHP-FPM will create a static HTML page and return it to Nginx, and finally, Nginx will send the static HTML page back to the web browser and return the result to the client.
When choosing a web server to build a website, I always prefer Nginx because it is very fast when serving static HTML pages. Instead of forwarding dynamic PHP requests to PHP-FPM to process and create HTML pages all the time, Nginx can cache the created HTML pages in memory to send the cached pages to the web browser, eliminating PHP and database requests.
- This can significantly improve server response time and reduce the load on PHP-FPM and the database server.
- It also allows Nginx to distribute web pages from the cache when the database server or PHP-FPM encounters problems (attached image).
- FastCGI is the protocol between Nginx and PHP-FPM, so the cache is called FastCGI Cache.
To save your time, let’s go through the steps together. In each step, I will provide detailed instructions with attached descriptions.
II. Implementation guide
To configure Nginx FastCGI Cache on NGINX, follow these steps sequentially. Since the operations involve editing configuration files, if you are new, I will add a cp (copy) command to make a copy for recovery in case of incorrect configuration or accidental deletion.
Step 1: Edit the NGINX configuration file
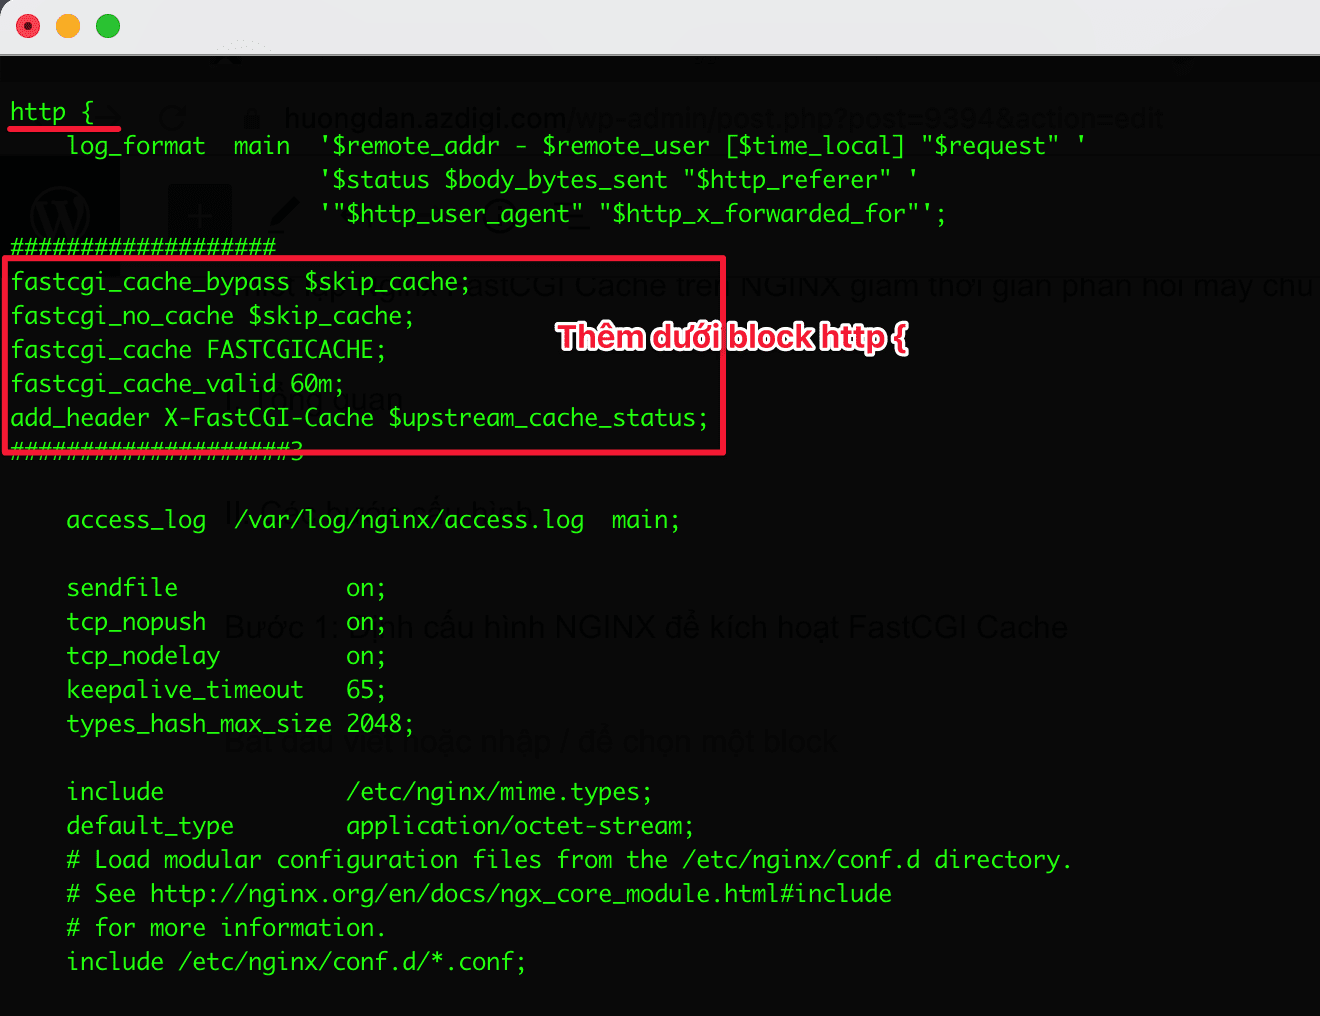
First, open the nginx.conf file and add the following lines inside the http { block as follows:
cp /etc/nginx/nginx.conf /etc/nginx/nginx.conf.bak
vi /etc/nginx/nginx.conf
fastcgi_cache_bypass $skip_cache;
fastcgi_no_cache $skip_cache;
fastcgi_cache FASTCGICACHE;
fastcgi_cache_valid 60m;
add_header X-FastCGI-Cache $upstream_cache_status;
In there:
- fastcgi_cache_bypass $skip_cache: Specifies the conditions under which a response will not be fetched from the cache memory. Whereas fastcgi_no_cache $skip_cache specifies the conditions under which a response will not be stored in the cache memory.
- fastcgi_cache FASTCGICACHE:
- fastcgi_cache_valid 60m: Sets the time depending on the HTTP status code cache memory. In this article, responses will be stored in the cache memory for 60 minutes (You can choose by day or hour, for example, 24h, 7d)
- add_header X-FastCGI-Cache $upstream_cache_status: This line is used to confirm whether the requests have been served from the FastCGI cache memory or not.
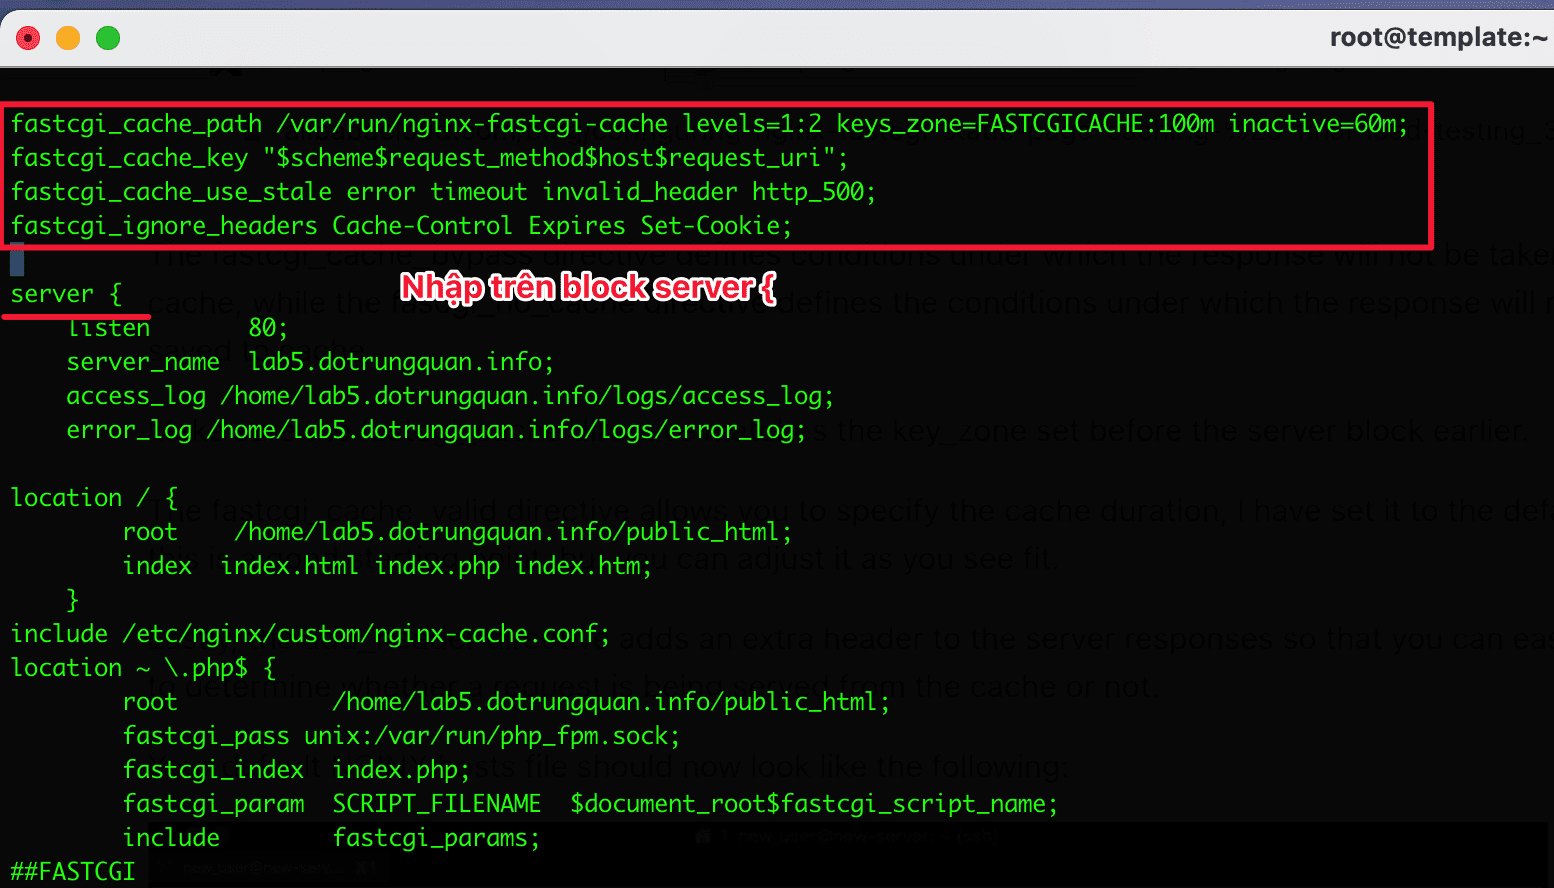
Step 2: Configure NGINX to enable FastCGI Cache
You need to open the vhost configuration file for your domain to configure the cache. First, you need to locate your domain’s vhost file. You can quickly search for it by opening the nginx.conf file and checking. Usually, files are included at include /etc/nginx/conf.d/*.conf;.
Note: Replace my_domain.conf with your domain name.
After you have located the file, open it and add the following lines:
cp /etc/nginx/conf.d/my_domain.conf /etc/nginx/conf.d/my_domain.conf.bak
vi /etc/nginx/conf.d/my_domain.conf
Please copy the 4 lines below and add them above the server { block as shown below:
fastcgi_cache_path /var/run/nginx-fastcgi-cache levels=1:2 keys_zone=FASTCGICACHE:100m inactive=60m;
fastcgi_cache_key "$scheme$request_method$host$request_uri";
fastcgi_cache_use_stale error timeout invalid_header http_500;
fastcgi_ignore_headers Cache-Control Expires Set-Cookie;
In there:
- fastcgi_cache_path: This line creates a FastCGI cache memory stored in the path
/var/run/nginx-fsatcgi-cache.- levels: Determines the hierarchy of cache memory.
- keys_zone (name:size): This allows the creation of a shared memory area where all active keys and data (meta) information are stored. Note that storing keys in memory speeds up the check by making it easier for NGINX to determine if it’s MISS or HIT without checking the disk state.
- fastcgi_cache_key: Identifies the key for caching memory lookup. Nginx will apply the MD5sum function to the cache memory key and use the hash result as the cache memory file name.
- fastcgi_cache_use_stale: Makes Nginx’s cache memory more robust. This requires Nginx to continue to serve cached versions of a page even if PHP encounters an error.
- fastcgi_ignore_headers: Disables the processing of certain response header fields from the FastCGI server (you can learn more about this on this page).
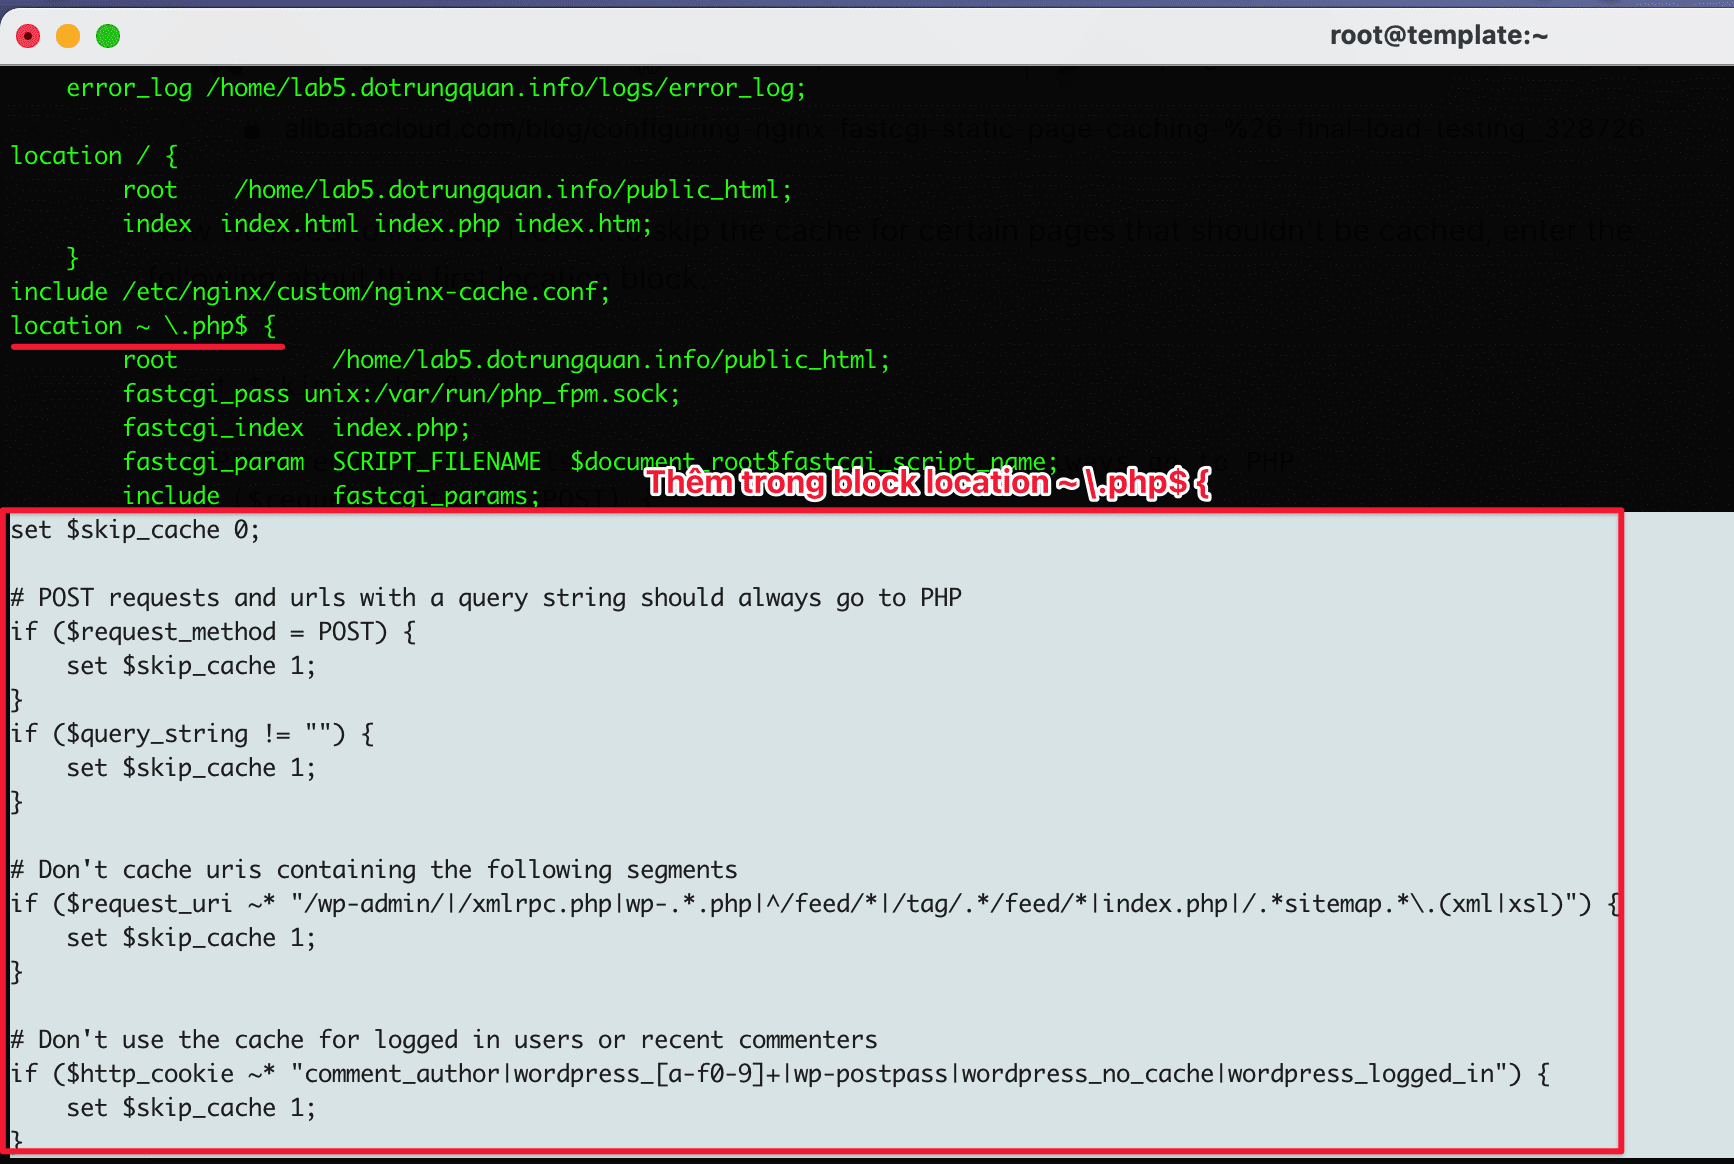
Step 3: Configure content not to be cached in memory
Login sessions, user cookies, POST requests, query strings, WordPress back-end, sitemap, feeds, and author comments should not be cached in memory. To turn off caching for these items, edit the nginx configuration file at nginx.conf. Here, add the following lines below the block location ~ .php$
set $skip_cache 0;
 POST requests and urls with a query string should always go to PHP
 if ($request_method = POST) {
 set $skip_cache 1;
  }
 if ($query_string != "") {
 set $skip_cache 1;
  }
 Don't cache uris containing the following segments
 if ($request_uri ~* "/wp-admin/|/xmlrpc.php|wp-.*.php|/feed/|index.php|sitemap(_index)?.xml") {
 set $skip_cache 1;
  }
 Don't use the cache for logged in users or recent commenters
 if ($http_cookie ~* "comment_author|wordpress_[a-f0-9]+|wp-postpass|wordpress_no_cache|wordpress_logged_in") {
 set $skip_cache 1;
  }
Actual illustrations:
After completing the configuration in the vhost configuration file, move on to the next step to complete setting up Nginx FasstCGI Cache on NGINX.
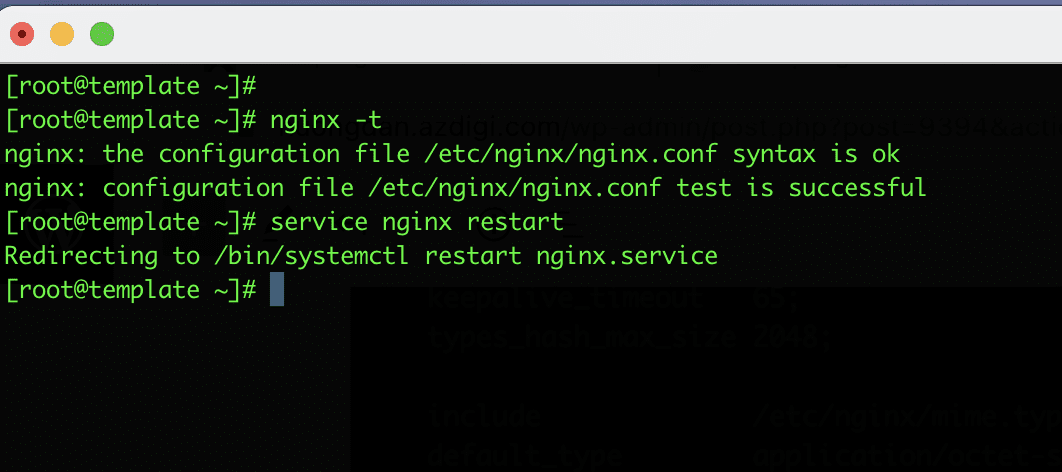
Step 4: Restart the NGINX service
Before restarting the service, test the nginx configuration file using the nginx -t command to check. If the result returns: nginx: configuration file /etc/nginx/nginx.conf test is successful, then restart the service.
nginx -t
service nginx restart
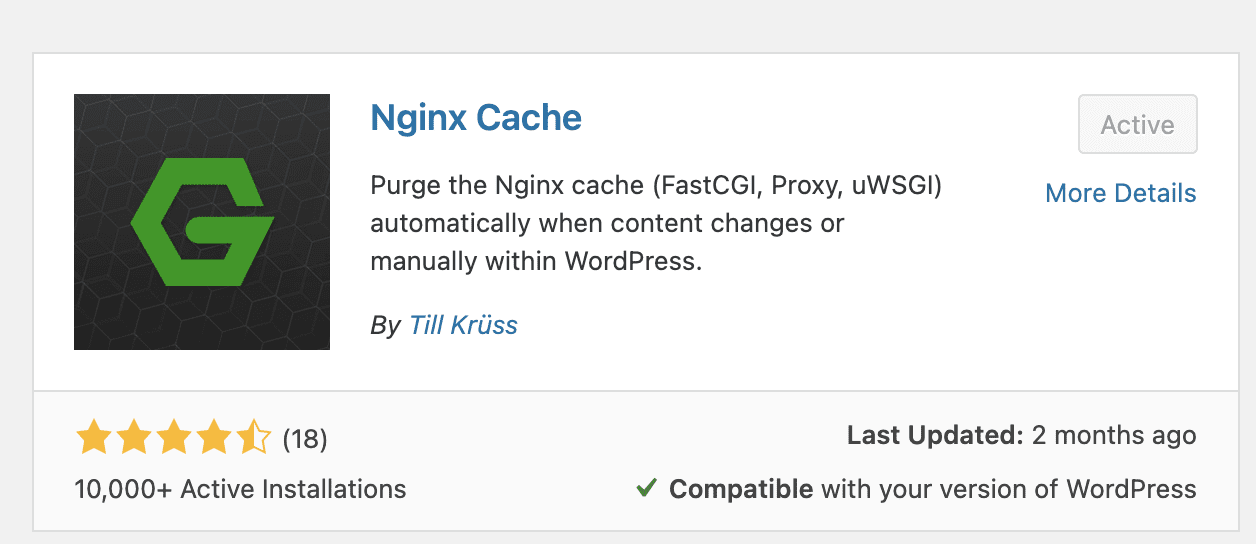
Step 5: Install Plugin and Check Cache
Install Cache Plugin
The final step you need to do is to install the NGINX Cache plugin for WordPress to automatically clear the FastCGI cache whenever your WordPress website content changes. There are many plugins to choose from, but in this article, I will use a plugin by Till Krüss, and that plugin is called NGINX Cache.
- See more: How to install a Plugin on WordPress
After the installation is complete, you activate the plugin to use it.
Next, you access Tools => Nginx Cache. In the Cache Zone Path section, enter the cache path that was created in Step 2 in the line fastcgi_cache_path /var/run/nginx-fastcgi-cache. After entering, click Save Changes to apply the changes.

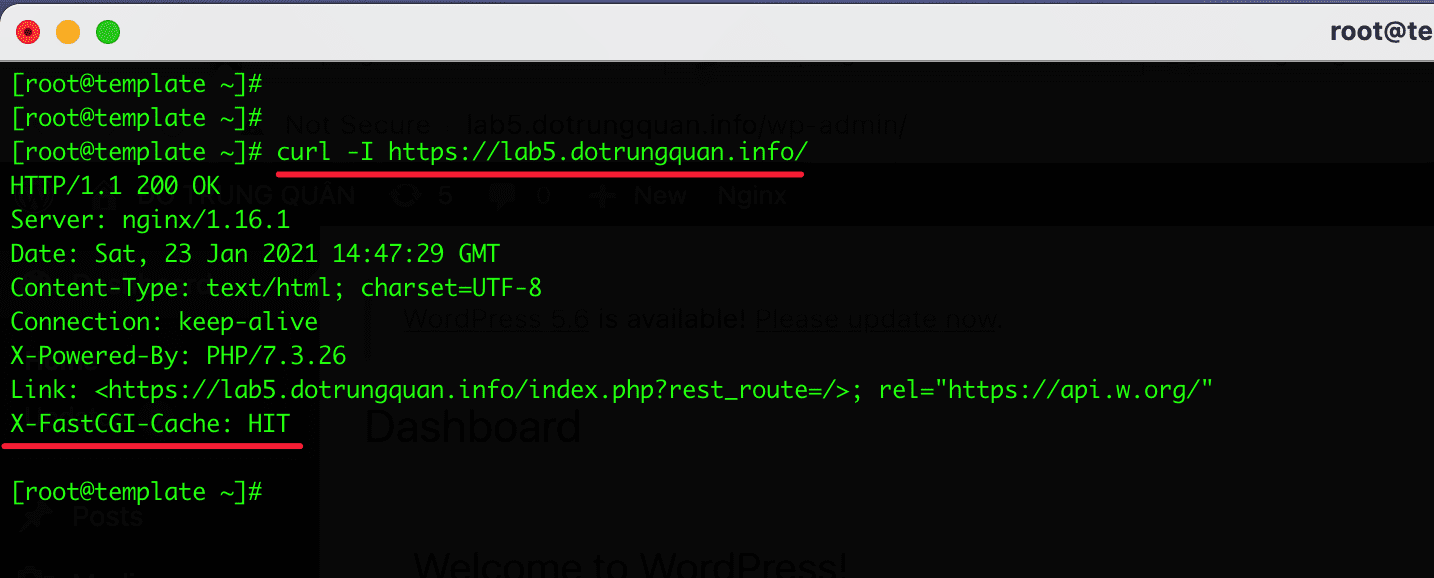
Check FastCGI Cache
In the terminal window, enter the command curl -I https://my-domain to check directly. If the line X-FastCGI-Cache: HIT appears, it means the caching has been successful. And if it shows X-FastCGI-Cache: MISS, it means the page has not been cached yet.
In addition, you can also check from the browser using the header check. Press F12 and switch to the Network tab, then reload the website. Then check the Response Headers section, if X-FastCGI-Cache: HIT appears, caching is completed.
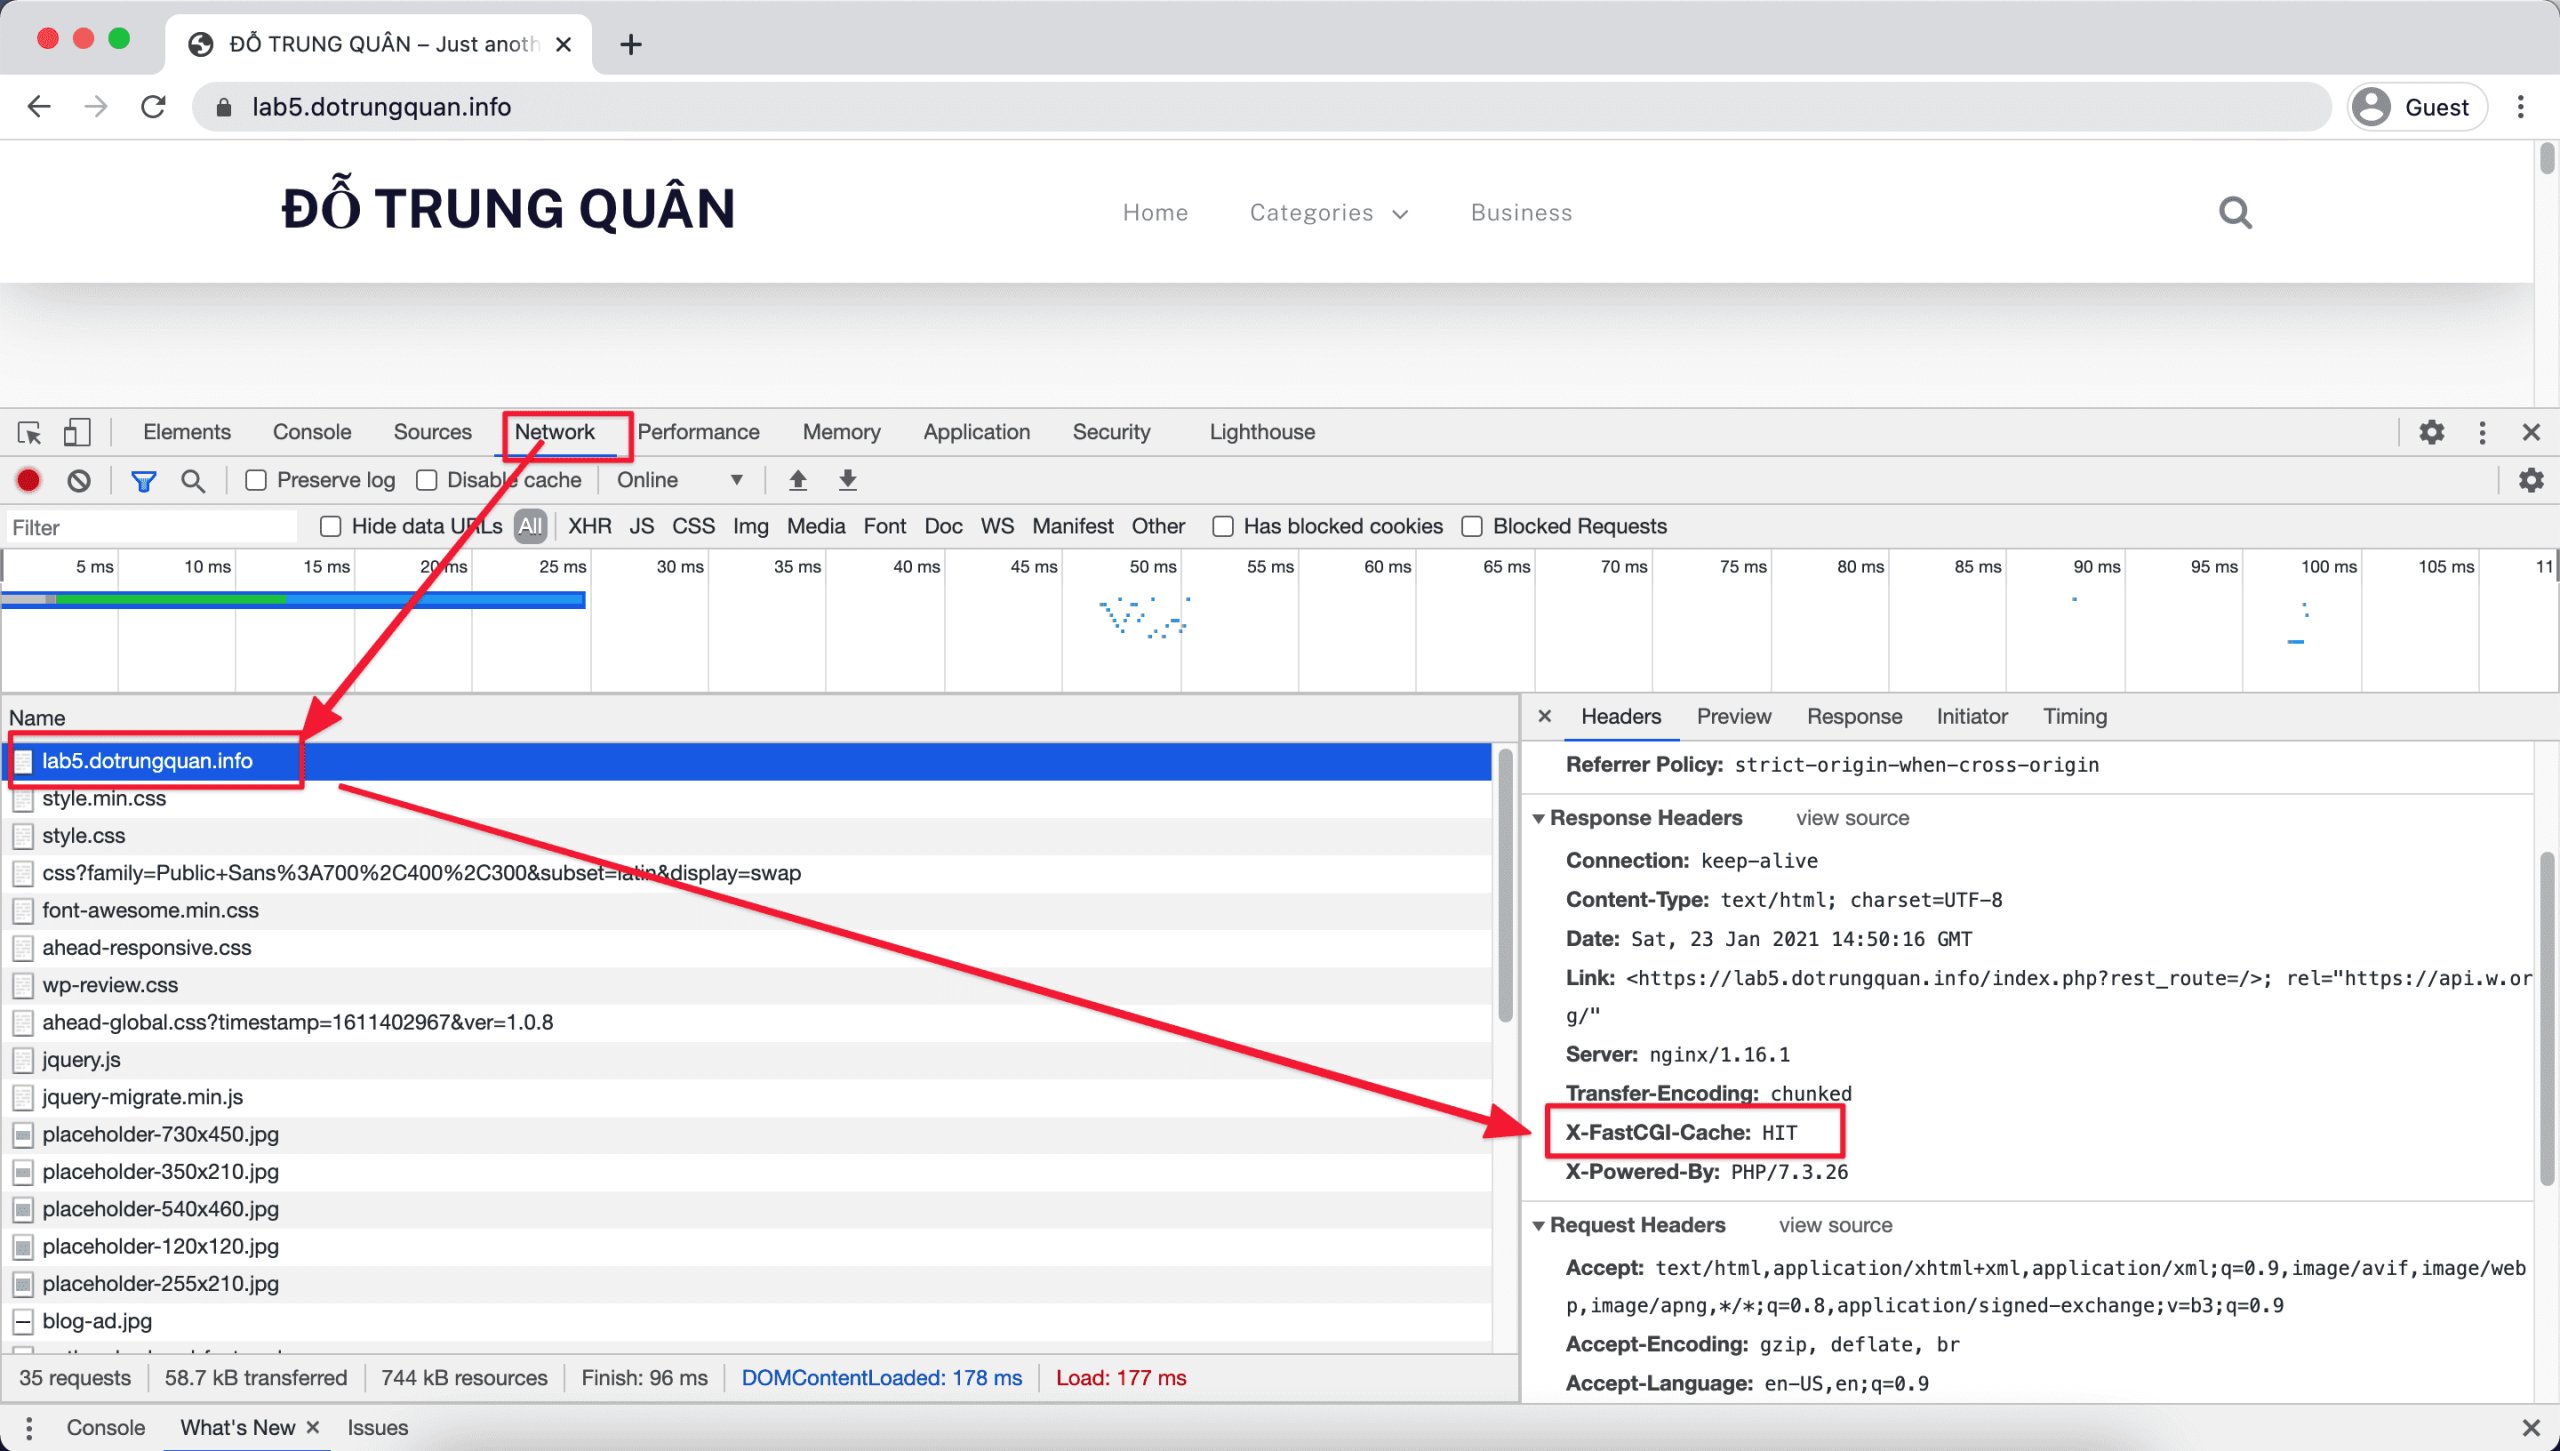
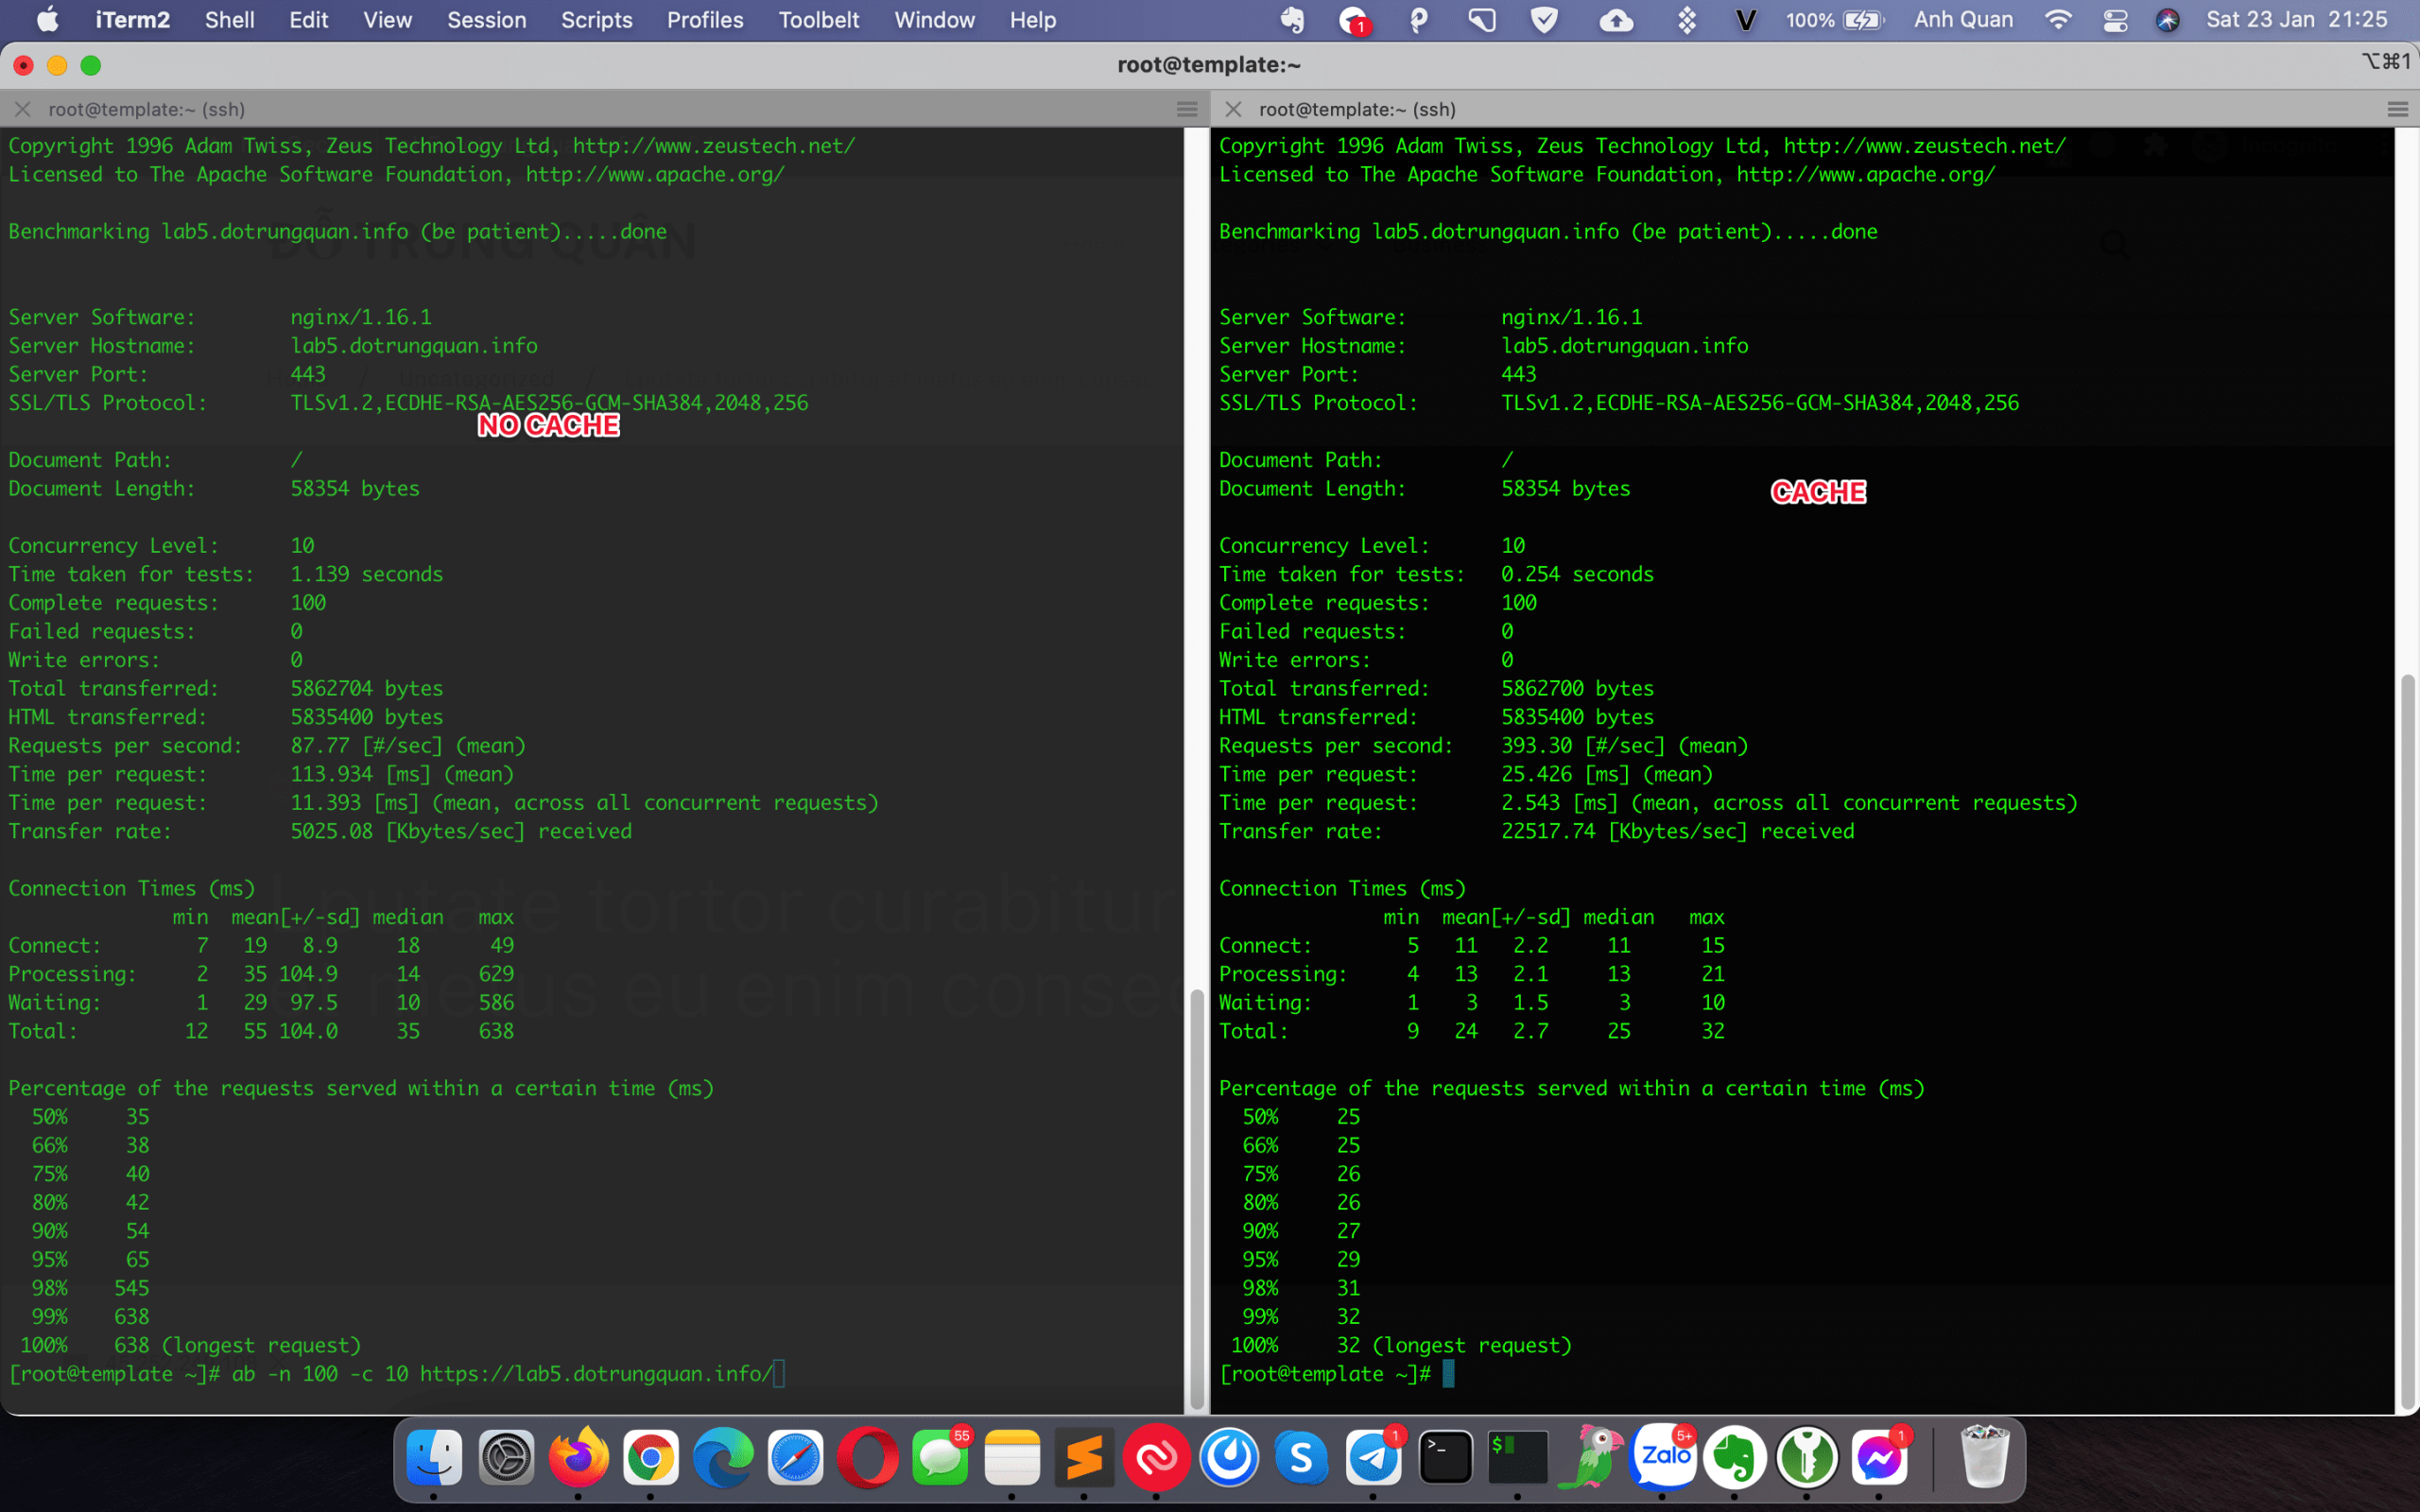
Table comparing before and after caching:
I use ApacheBench to check before and after cache.
ab -n 100 -c 10 https://lab5.dotrungquan.info/
This command means 100 connections from 10 different users. And the image below is my benchmark result. Please take a look at the parameters starting from Document Length, and the important parameters Requests per second:, Time per request:Time per request: before and after caching have a significant difference.
III. Summary
So, AZDIGI has completed the steps to set up Nginx FastCGI Cache on NGINX to reduce server response time. Wishing you success! See more useful articles about Linux VPS at the following link:
If you need assistance, you can contact support in the ways below:
- Hotline 247: 028 888 24768 (Ext 0)
- Ticket/Email: You use the email to register for the service and send it directly to: support@azdigi.com .
About the author

Thạch Phạm
Đồng sáng lập và Giám đốc điều hành của AZDIGI. Có hơn 15 năm kinh nghiệm trong phổ biến kiến thức liên quan đến WordPress tại thachpham.com, phát triển website và phát triển hệ thống.