

What is NextCloud?
Nextcloud is free open-source software like Dropbox, Google Drive, a fork of the ownCloud project. Nextcloud is written in PHP and JavaScript, it supports many database systems such as MySQL/MariaDB, PostgreSQL, Oracle Database and SQLite. To keep your files in sync between your Desktop and your own servers, Nextcloud offers apps for Windows, Linux, and Mac desktops and a mobile app for Android and iOS. Nextcloud is more than just a dropbox clone, it provides additional features like Calendar, Contacts, Task Scheduler and media streaming with Ampache.
How to install NextCloud on Ubuntu 20.04 with NGINX
Prepare:
- The server uses Ubuntu 20.04 (refer to the best VPS service here)
- RAM: 1GB (Minimum, but for better performance, you should use VPS with high RAM configuration)
- CPU: 1 Core
- Disk: 20GB
Step 1: SSH into the server
First, you need to SSH into the server to perform the installation. If you do not know how to do this, please refer to the documentation below:
Step 2: Update the system
sudo apt update
sudo apt upgrade
apt install unzip -y
Step 3: Install LEMP Stack
Instead of using APACHE (LAMP Stack), I always prefer to use NGINX as a web server. Please perform the installation with the following commands:
- Install NGINX
You can install NGINX with the following command:
apt install nginx -y
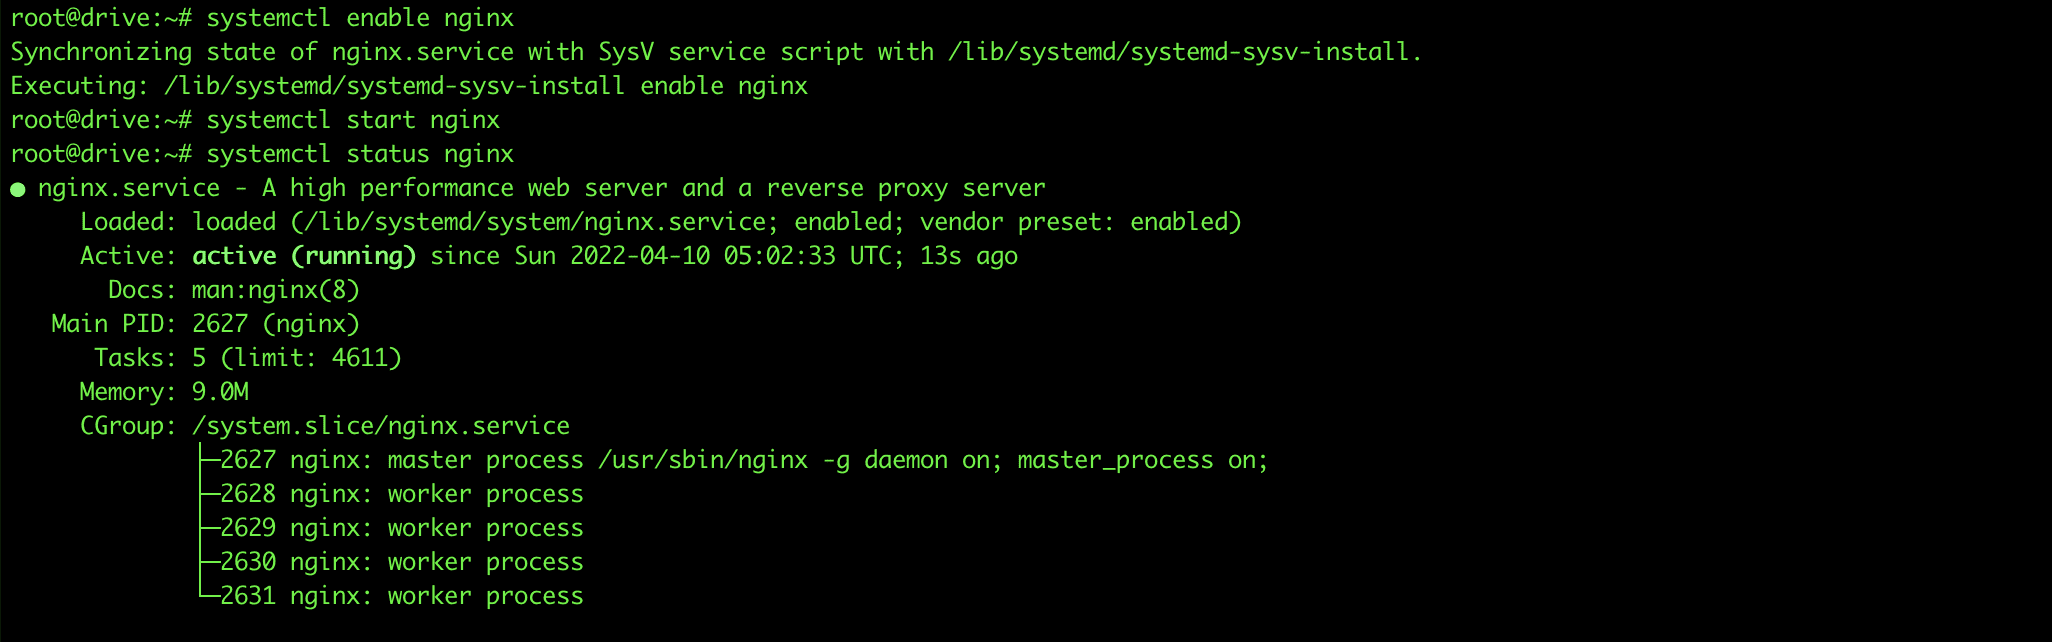
Enable & Start NGINX
systemctl enable nginx
systemctl start nginx
systemctl status nginx
- Install MariaDB Database Server
I will be using MariaDB as the database server. Please install with the following command:
apt install mariadb-server mariadb-client -y
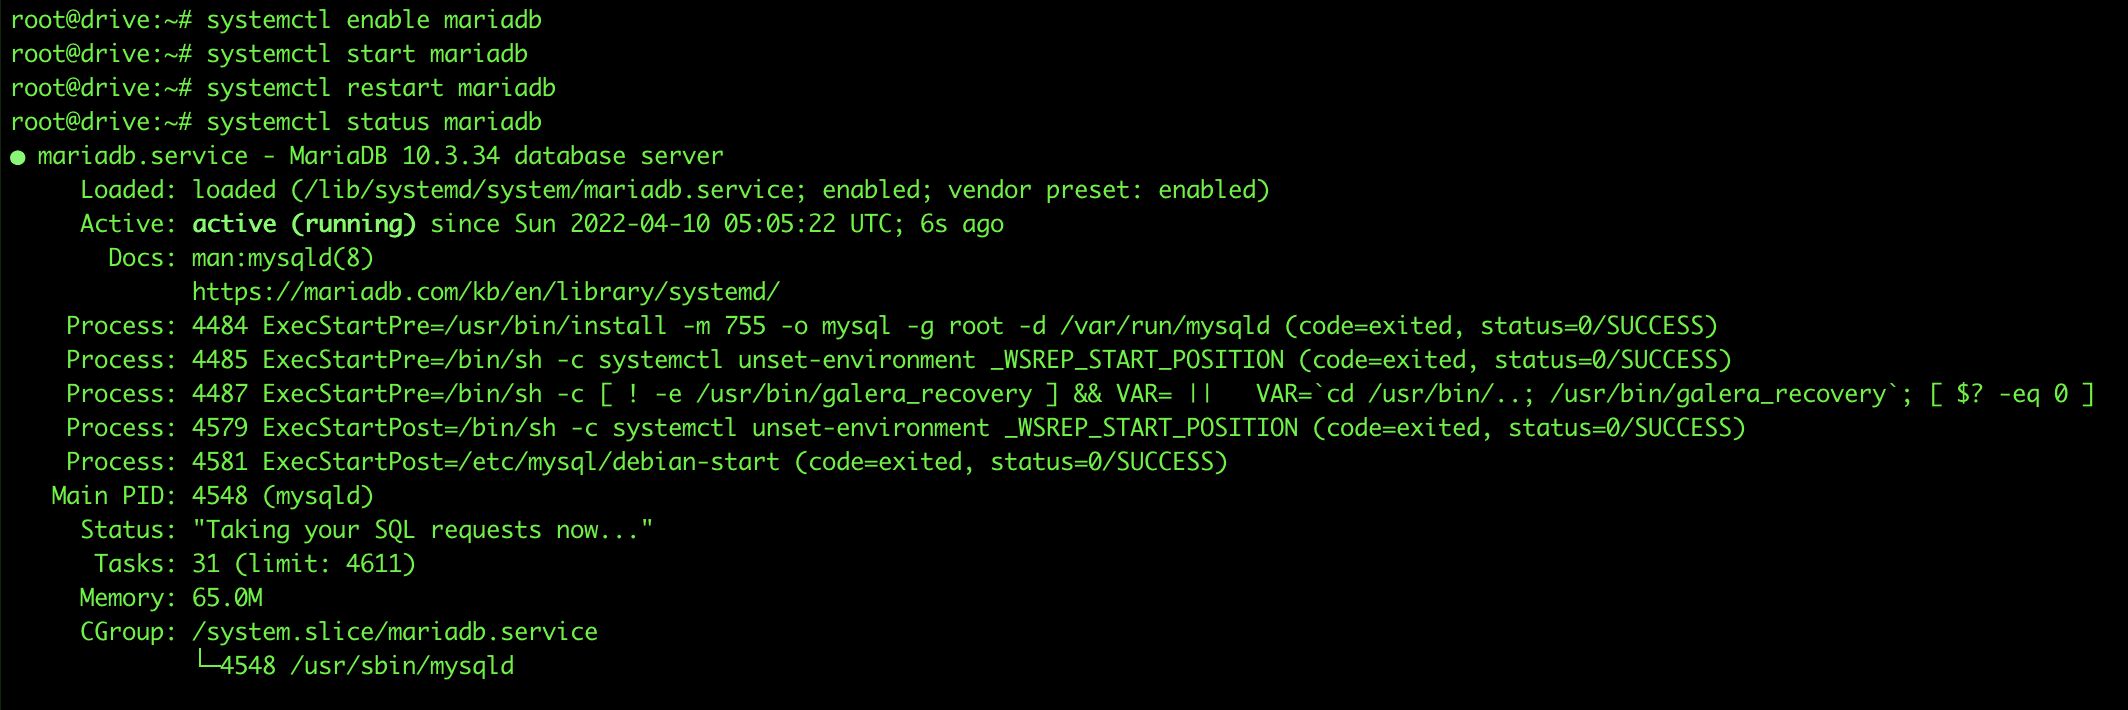
Enable & Start MariaDB
systemctl enable mariadb
systemctl start mariadb
systemctl restart mariadb
systemctl status mariadb
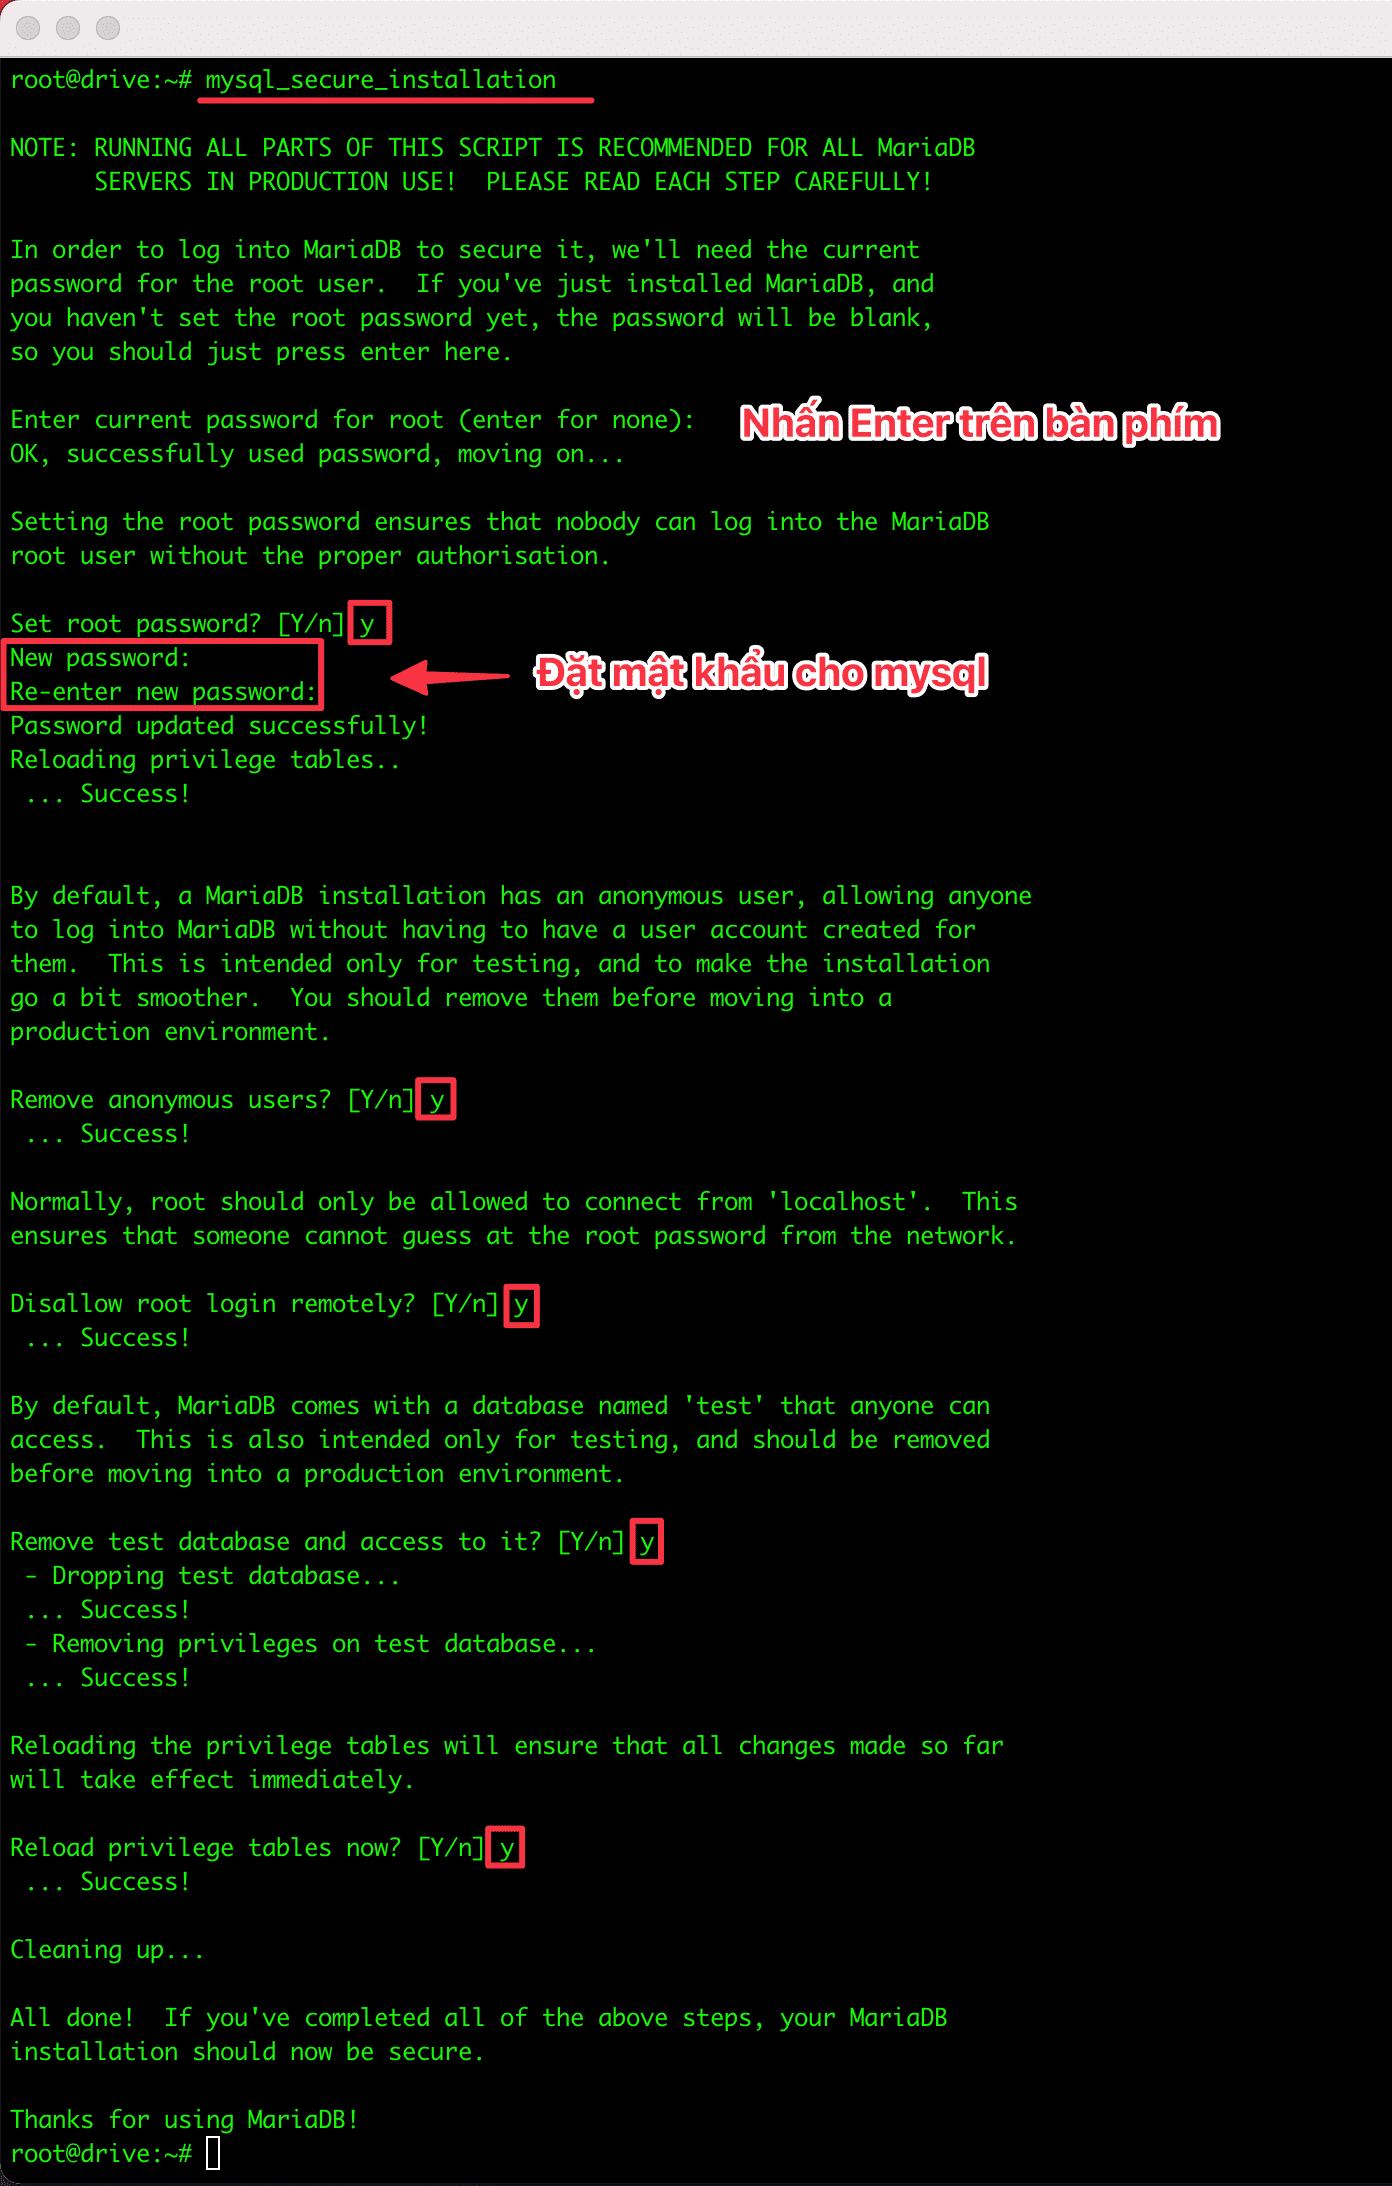
MariaDB Security Configuration
mysql_secure_installation
- Install PHP
I will install PHP7.4 and the included extensions.
apt install imagemagick php-imagick php7.4-imagick php7.4-common php7.4-mysql php7.4-fpm php7.4-gd php7.4-json php7.4-curl  php7.4-zip php7.4-xml php7.4-mbstring php7.4-bz2 php7.4-intl php7.4-bcmath php7.4-gmp php7.4-zip
apt install -y libmagickcore-6.q16-6-extra
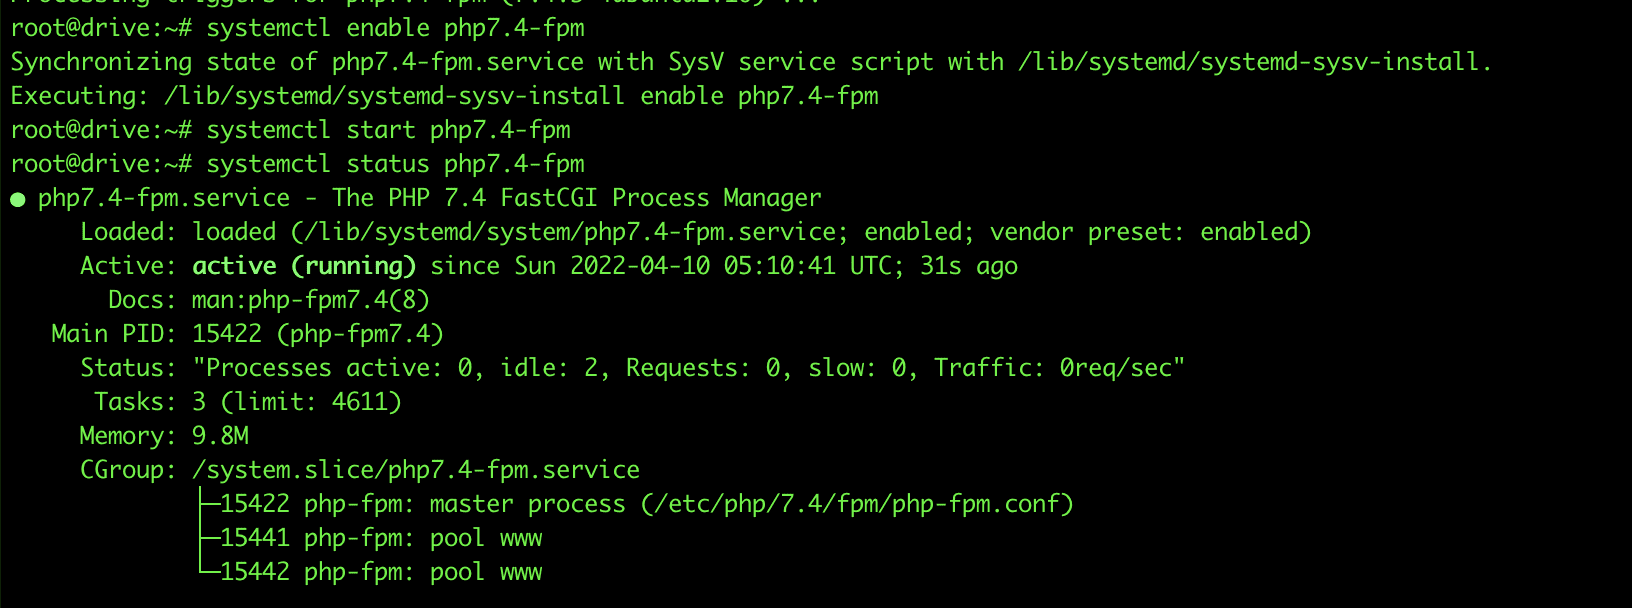
Enable and Start PHP with the system
systemctl enable php7.4-fpm
systemctl start php7.4-fpm
systemctl status php7.4-fpm
Step 4: Get an SSL certificate for NextCloud ServerName
I will show you to install SSL Let’s Encrypt using Certbot.
- Install Certbot
apt install certbot python3-certbot-nginx
Python3-certbot-nginx is an Nginx plugin for Certbot. Now run the following command to get and install the TLS certificate.
Note: Replace luutru.azdigi.online with your domain name.
certbot certonly --standalone -d luutru.azdigi.online

After the SSL certificate request is completed, you will receive 2 links, as shown in the image above. Copy this link to use for Step 5.
Step 5: Install NextCloud
After setting up the webserver and database server, we will start downloading the source and installing NextCloud.
- Download the NextCloud source from the homepage.
wget https://download.nextcloud.com/server/releases/nextcloud-23.0.3.zip
In this tutorial, I will install the latest version, currently 23.0.3.
- Extract the downloaded NextCloud file
unzip nextcloud-*.zip -d /usr/share/nginx/
chown -R www-data:www-data /usr/share/nginx/nextcloud/
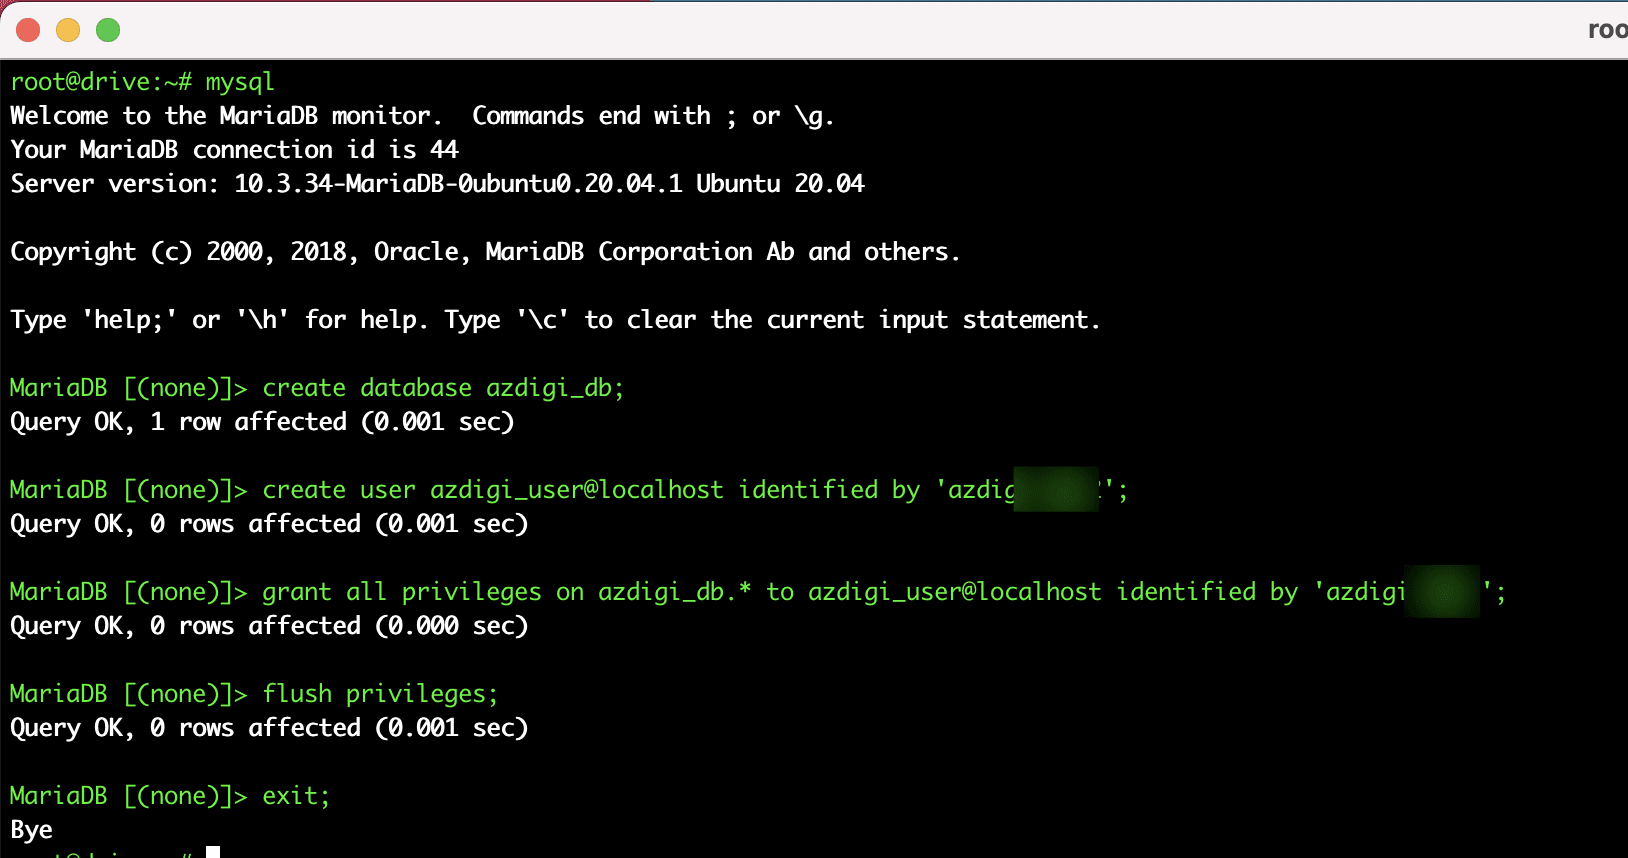
- Create a database for NextCloud
Next, you log in to mysql with the mysql command and create database_name and database_user for Nextcloud.
create database azdigi_db;
create user azdigi_user@localhost identified by 'my-passwd';
grant all privileges on azdigi_db.* to azdigi_user@localhost identified by 'my-passwd';
flush privileges;
exit;
- Create NGINX NextCloud configuration file
Now create an Nginx configuration file for Nextcloud to use.
vi /etc/nginx/conf.d/nextcloud.conf
Then you enter the content of the sample configuration file below:
Note: Replace server_name luutru.azdigi.online; with your server_name. Replace ssl_certificate and ssl_certificate_key with the SSL path you got in Step 4.
upstream php-handler {
    #server 127.0.0.1:9000;
    server unix:/var/run/php/php7.4-fpm.sock;
}
server {
    listen 80;
    listen [::]:80;
    server_name luutru.azdigi.online;
    # enforce https
    return 301 https://$server_name:443$request_uri;
}
server {
    listen 443 ssl http2;
    listen [::]:443 ssl http2;
    server_name luutru.azdigi.online;
# Use Mozilla's guidelines for SSL/TLS settings
    # https://mozilla.github.io/server-side-tls/ssl-config-generator/
    # NOTE: some settings below might be redundant
    ssl_certificate /etc/letsencrypt/live/luutru.azdigi.online/fullchain.pem; # managed by Certbot
    ssl_certificate_key /etc/letsencrypt/live/luutru.azdigi.online/privkey.pem; # managed by Certbot
    include /etc/letsencrypt/options-ssl-nginx.conf; # managed by Certbot
    ssl_dhparam /etc/letsencrypt/ssl-dhparams.pem; # managed by Certbot
# Add headers to serve security related headers
    # Before enabling Strict-Transport-Security headers please read into this
    # topic first.
    #add_header Strict-Transport-Security "max-age=15768000; includeSubDomains; preload;" always;
    #
    # WARNING: Only add the preload option once you read about
    # the consequences in https://hstspreload.org/. This option
    # will add the domain to a hardcoded list that is shipped
    # in all major browsers and getting removed from this list
    # could take several months.
    add_header Referrer-Policy "no-referrer" always;
    add_header X-Content-Type-Options "nosniff" always;
    add_header X-Download-Options "noopen" always;
    add_header X-Frame-Options "SAMEORIGIN" always;
    add_header X-Permitted-Cross-Domain-Policies "none" always;
    add_header X-Robots-Tag "none" always;
    add_header X-XSS-Protection "1; mode=block" always;
    add_header Strict-Transport-Security 'max-age=31536000; includeSubDomains; preload';
# Remove X-Powered-By, which is an information leak
    fastcgi_hide_header X-Powered-By;
# Path to the root of your installation
    root /usr/share/nginx/nextcloud/;
location = /robots.txt {
        allow all;
        log_not_found off;
        access_log off;
    }
# The following 2 rules are only needed for the user_webfinger app.
    # Uncomment it if you're planning to use this app.
    #rewrite ^/.well-known/host-meta /public.php?service=host-meta last;
    #rewrite ^/.well-known/host-meta.json /public.php?service=host-meta-json last;
# The following rule is only needed for the Social app.
    # Uncomment it if you're planning to use this app.
    #rewrite ^/.well-known/webfinger /public.php?service=webfinger last;
location = /.well-known/carddav {
      return 301 $scheme://$host:$server_port/remote.php/dav;
    }
    location = /.well-known/caldav {
      return 301 $scheme://$host:$server_port/remote.php/dav;
    }
# set max upload size
    client_max_body_size 512M;
    fastcgi_buffers 64 4K;
# Enable gzip but do not remove ETag headers
    gzip on;
    gzip_vary on;
    gzip_comp_level 4;
    gzip_min_length 256;
    gzip_proxied expired no-cache no-store private no_last_modified no_etag auth;
    gzip_types application/atom+xml application/javascript application/json application/ld+json application/manifest+json application/rss+xml application/vnd.geo+json application/vnd.ms-fontobject application/x-font-ttf application/x-web-app-manifest+json application/xhtml+xml application/xml font/opentype image/bmp image/svg+xml image/x-icon text/cache-manifest text/css text/plain text/vcard text/vnd.rim.location.xloc text/vtt text/x-component text/x-cross-domain-policy;
# Uncomment if your server is build with the ngx_pagespeed module
    # This module is currently not supported.
    #pagespeed off;
location / {
        rewrite ^ /index.php;
    }
location ~ ^/(?:build|tests|config|lib|3rdparty|templates|data)/ {
        deny all;
    }
    location ~ ^/(?:.|autotest|occ|issue|indie|db_|console) {
        deny all;
    }
location ~ ^/(?:index|remote|public|cron|core/ajax/update|status|ocs/v[12]|updater/.+|oc[ms]-provider/.+).php(?:$|/) {
        fastcgi_split_path_info ^(.+?.php)(/.*|)$;
        set $path_info $fastcgi_path_info;
        try_files $fastcgi_script_name =404;
        include fastcgi_params;
        fastcgi_param SCRIPT_FILENAME $document_root$fastcgi_script_name;
        fastcgi_param PATH_INFO $path_info;
        fastcgi_param HTTPS on;
        # Avoid sending the security headers twice
        fastcgi_param modHeadersAvailable true;
        # Enable pretty urls
        fastcgi_param front_controller_active true;
        fastcgi_pass php-handler;
        fastcgi_intercept_errors on;
        fastcgi_request_buffering off;
    }
location ~ ^/(?:updater|oc[ms]-provider)(?:$|/) {
        try_files $uri/ =404;
        index index.php;
    }
# Adding the cache control header for js, css and map files
    # Make sure it is BELOW the PHP block
    location ~ .(?:css|js|woff2?|svg|gif|map)$ {
        try_files $uri /index.php$request_uri;
        add_header Cache-Control "public, max-age=15778463";
        # Add headers to serve security related headers (It is intended to
        # have those duplicated to the ones above)
        # Before enabling Strict-Transport-Security headers please read into
        # this topic first.
        #add_header Strict-Transport-Security "max-age=15768000; includeSubDomains; preload;" always;
        #
        # WARNING: Only add the preload option once you read about
        # the consequences in https://hstspreload.org/. This option
        # will add the domain to a hardcoded list that is shipped
        # in all major browsers and getting removed from this list
        # could take several months.
        add_header Referrer-Policy "no-referrer" always;
        add_header X-Content-Type-Options "nosniff" always;
        add_header X-Download-Options "noopen" always;
        add_header X-Frame-Options "SAMEORIGIN" always;
        add_header X-Permitted-Cross-Domain-Policies "none" always;
        add_header X-Robots-Tag "none" always;
        add_header X-XSS-Protection "1; mode=block" always;
# Optional: Don't log access to assets
        access_log off;
    }
location ~ .(?:png|html|ttf|ico|jpg|jpeg|bcmap)$ {
        try_files $uri /index.php$request_uri;
        # Optional: Don't log access to other assets
        access_log off;
    }
}
After importing the configuration file, check for errors with the following command:
root@drive:~# nginx -t
nginx: the configuration file /etc/nginx/nginx.conf syntax is ok
nginx: configuration file /etc/nginx/nginx.conf test is successful
If you receive the message syntax is ok, please restart NGINX:
root@drive:~# service nginx restart
After restarting the NGINX service, you can open the browser and access the serer-ip or hostname to continue the NextCloud setup steps.
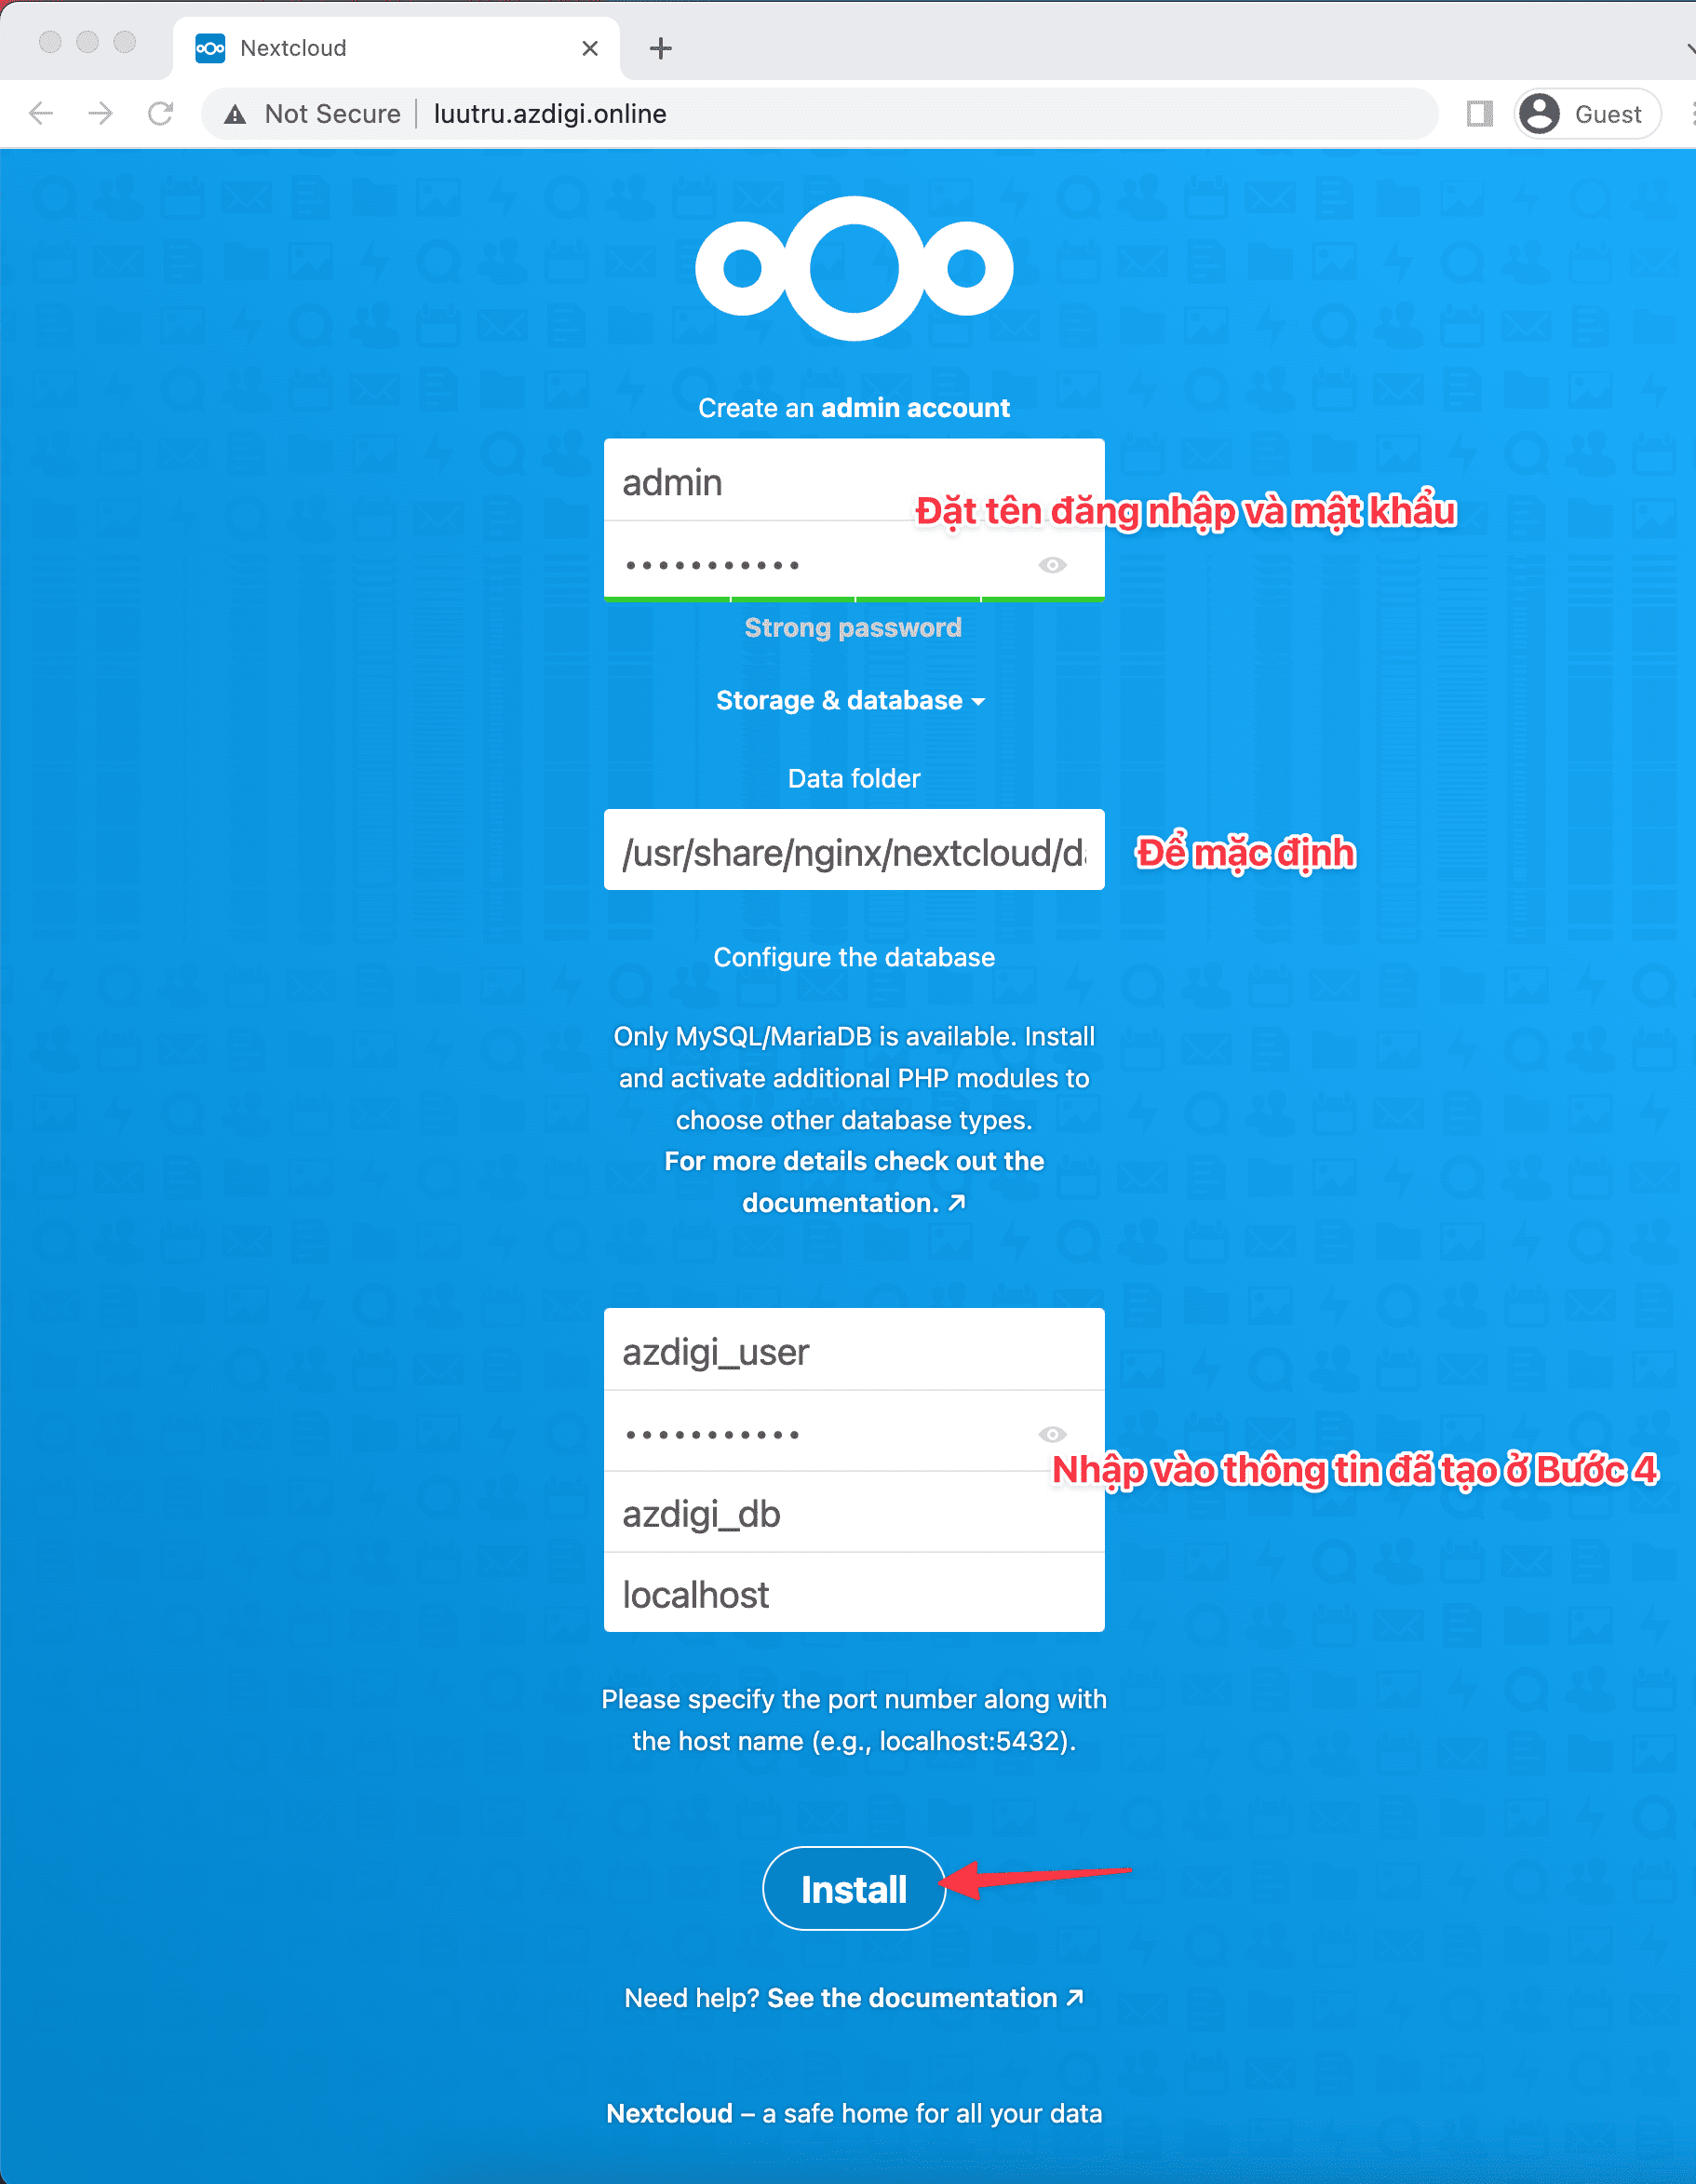
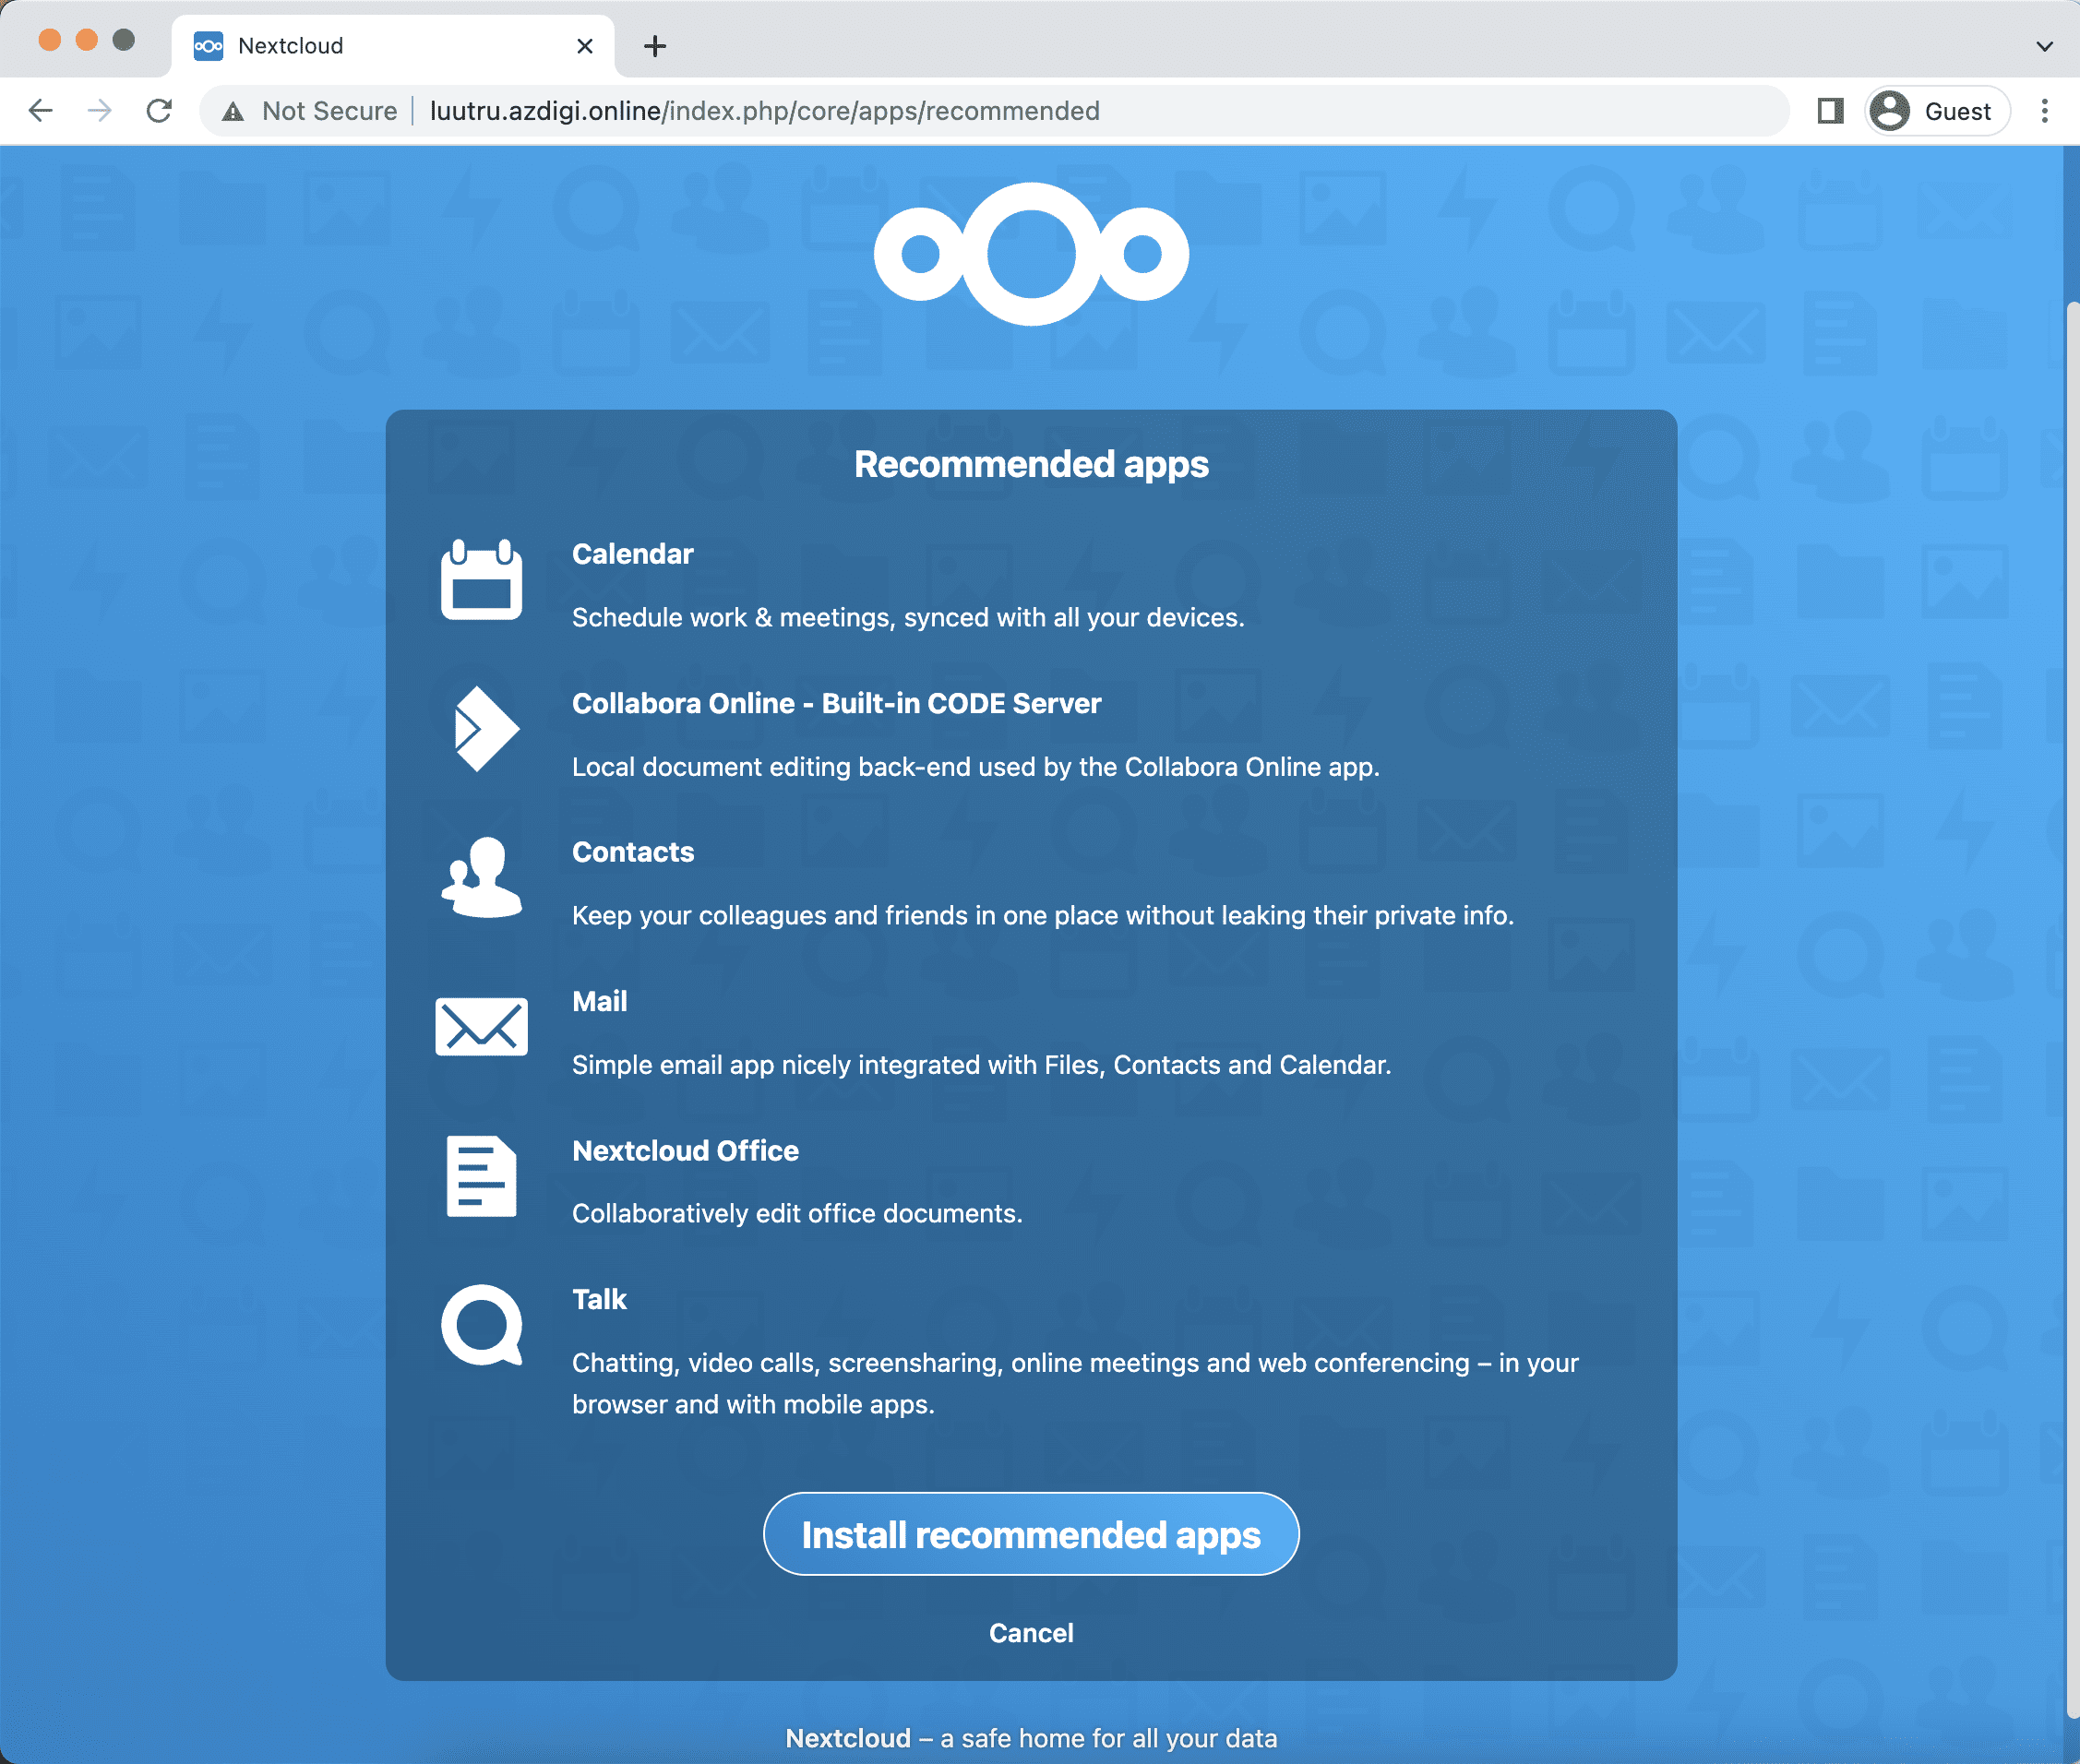
Click Install recommended apps to install the required apps.
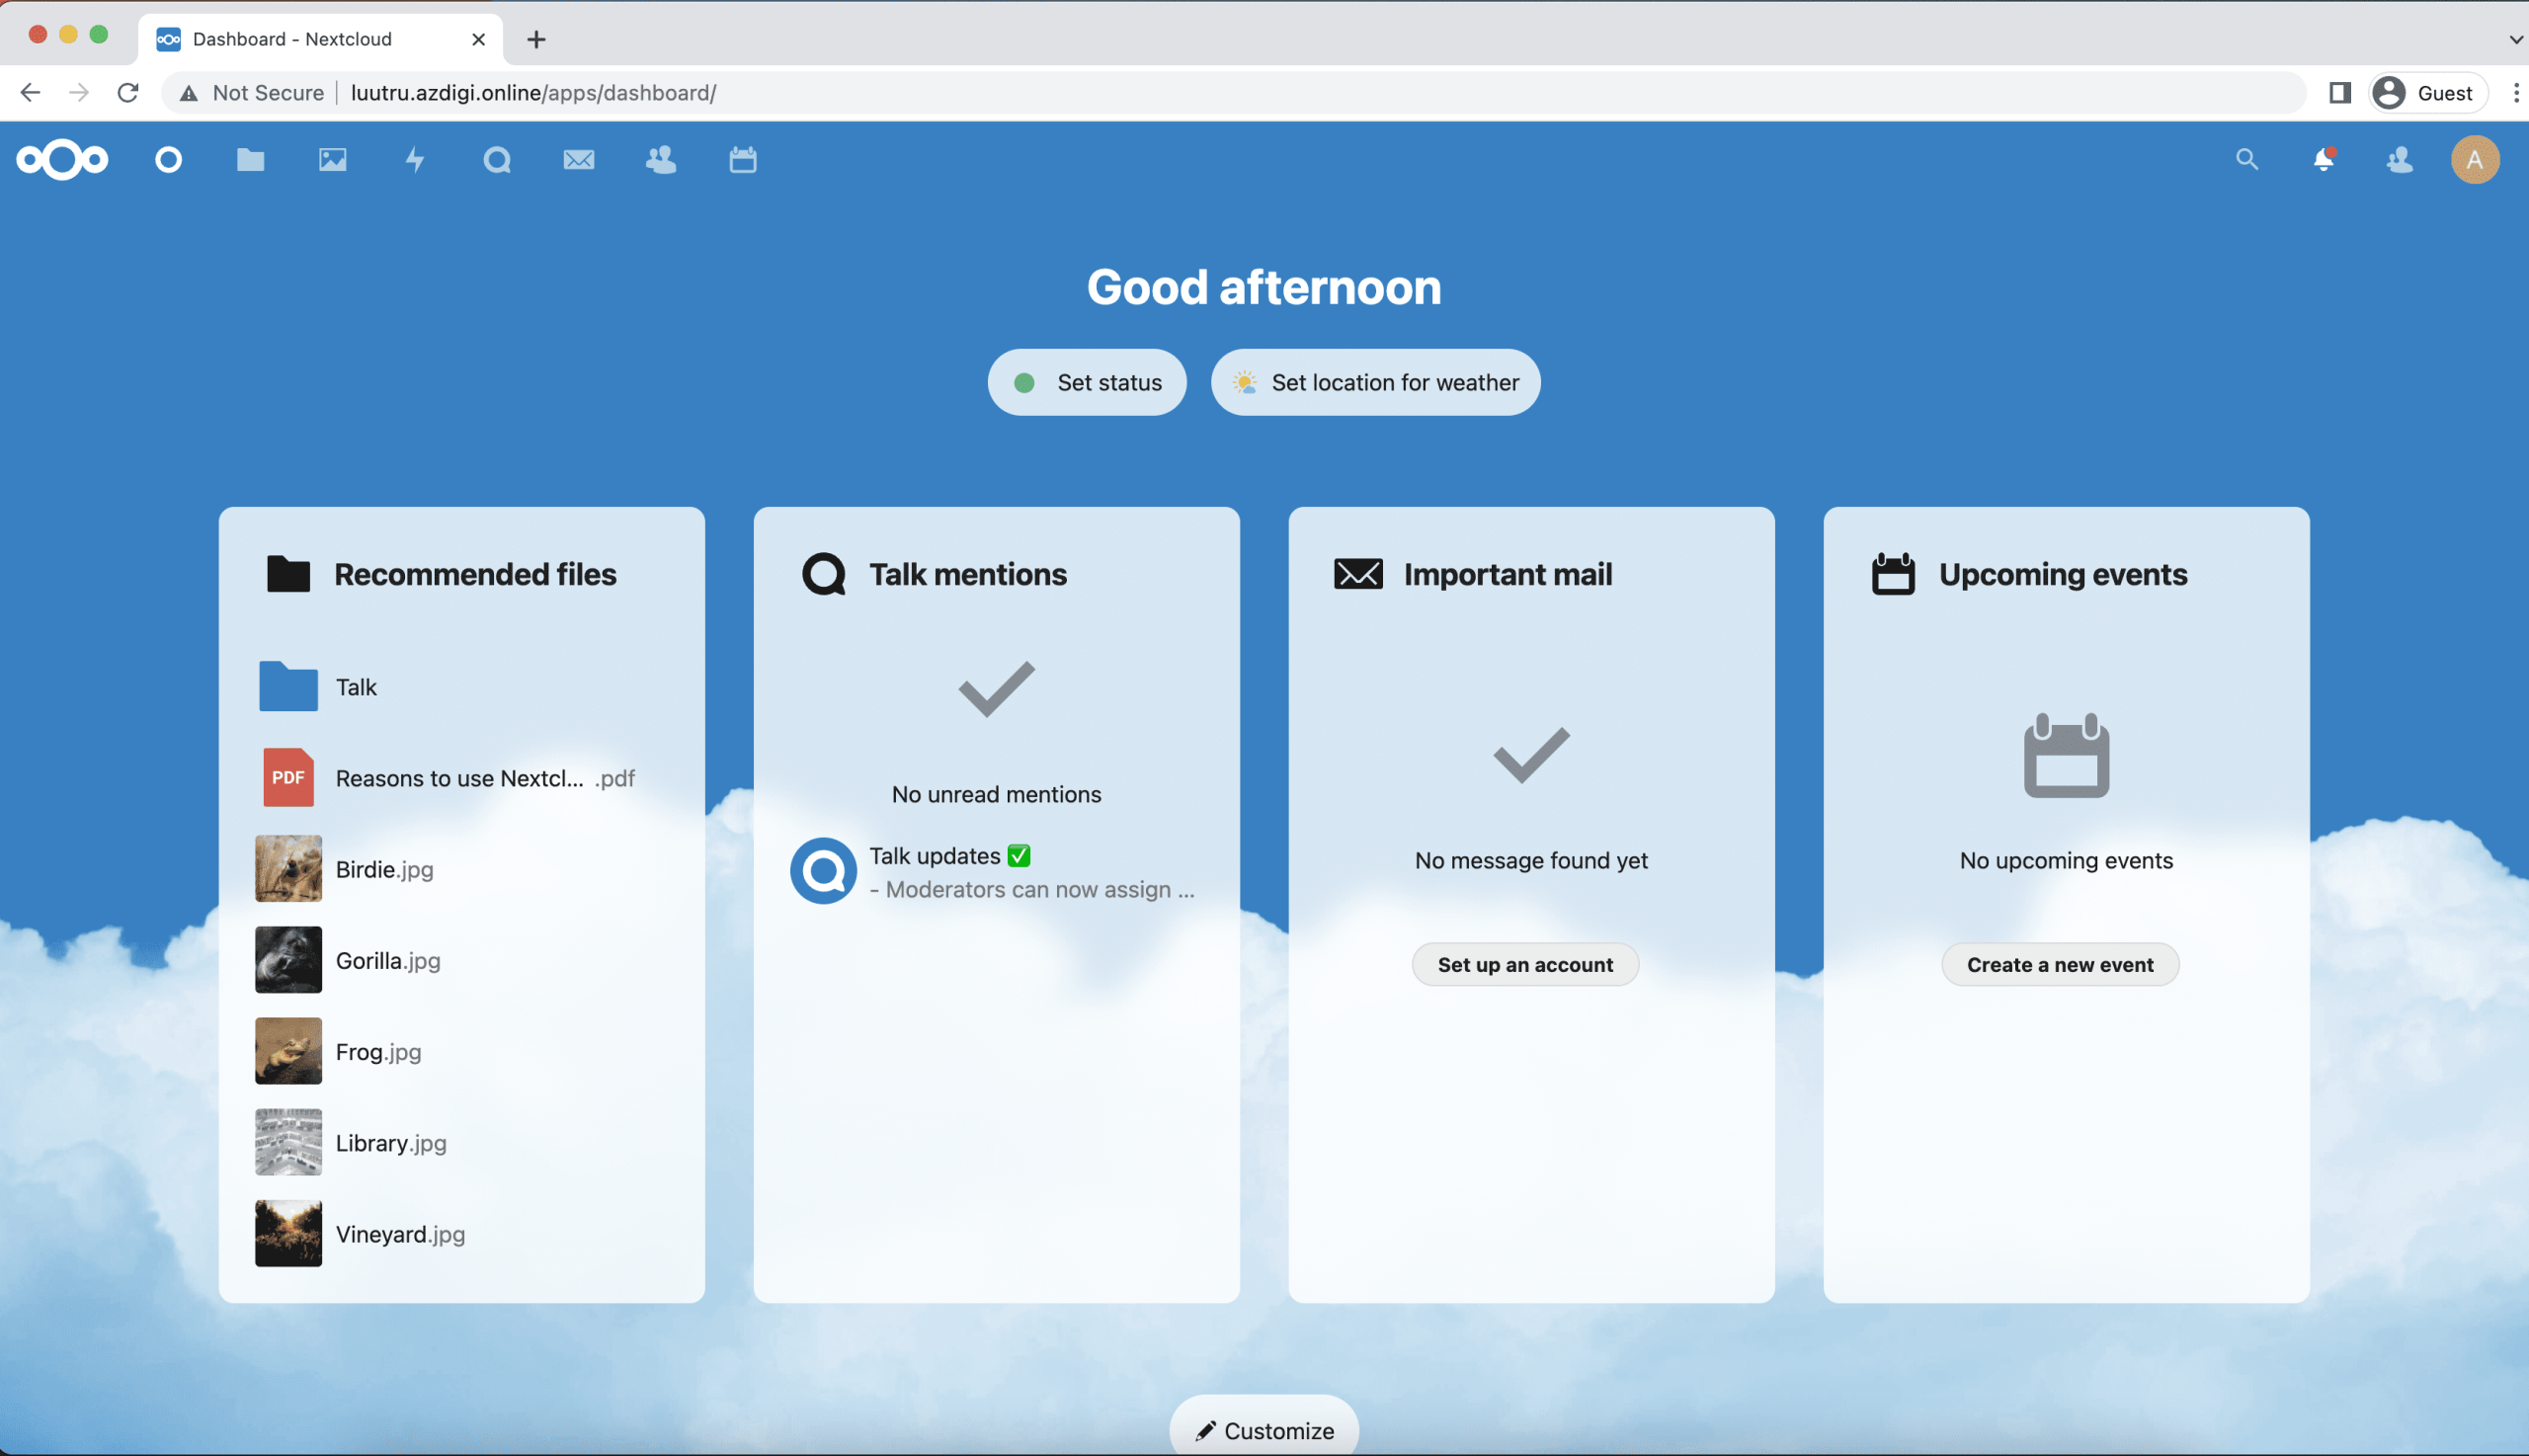
After completing the installation of the applications, if the admin interface screen appears as below, you have successfully installed the setup.
Step 6: Create a User and Upload File
To create a User, first, in the admin interface, you click on the Profile icon => select Users => New user
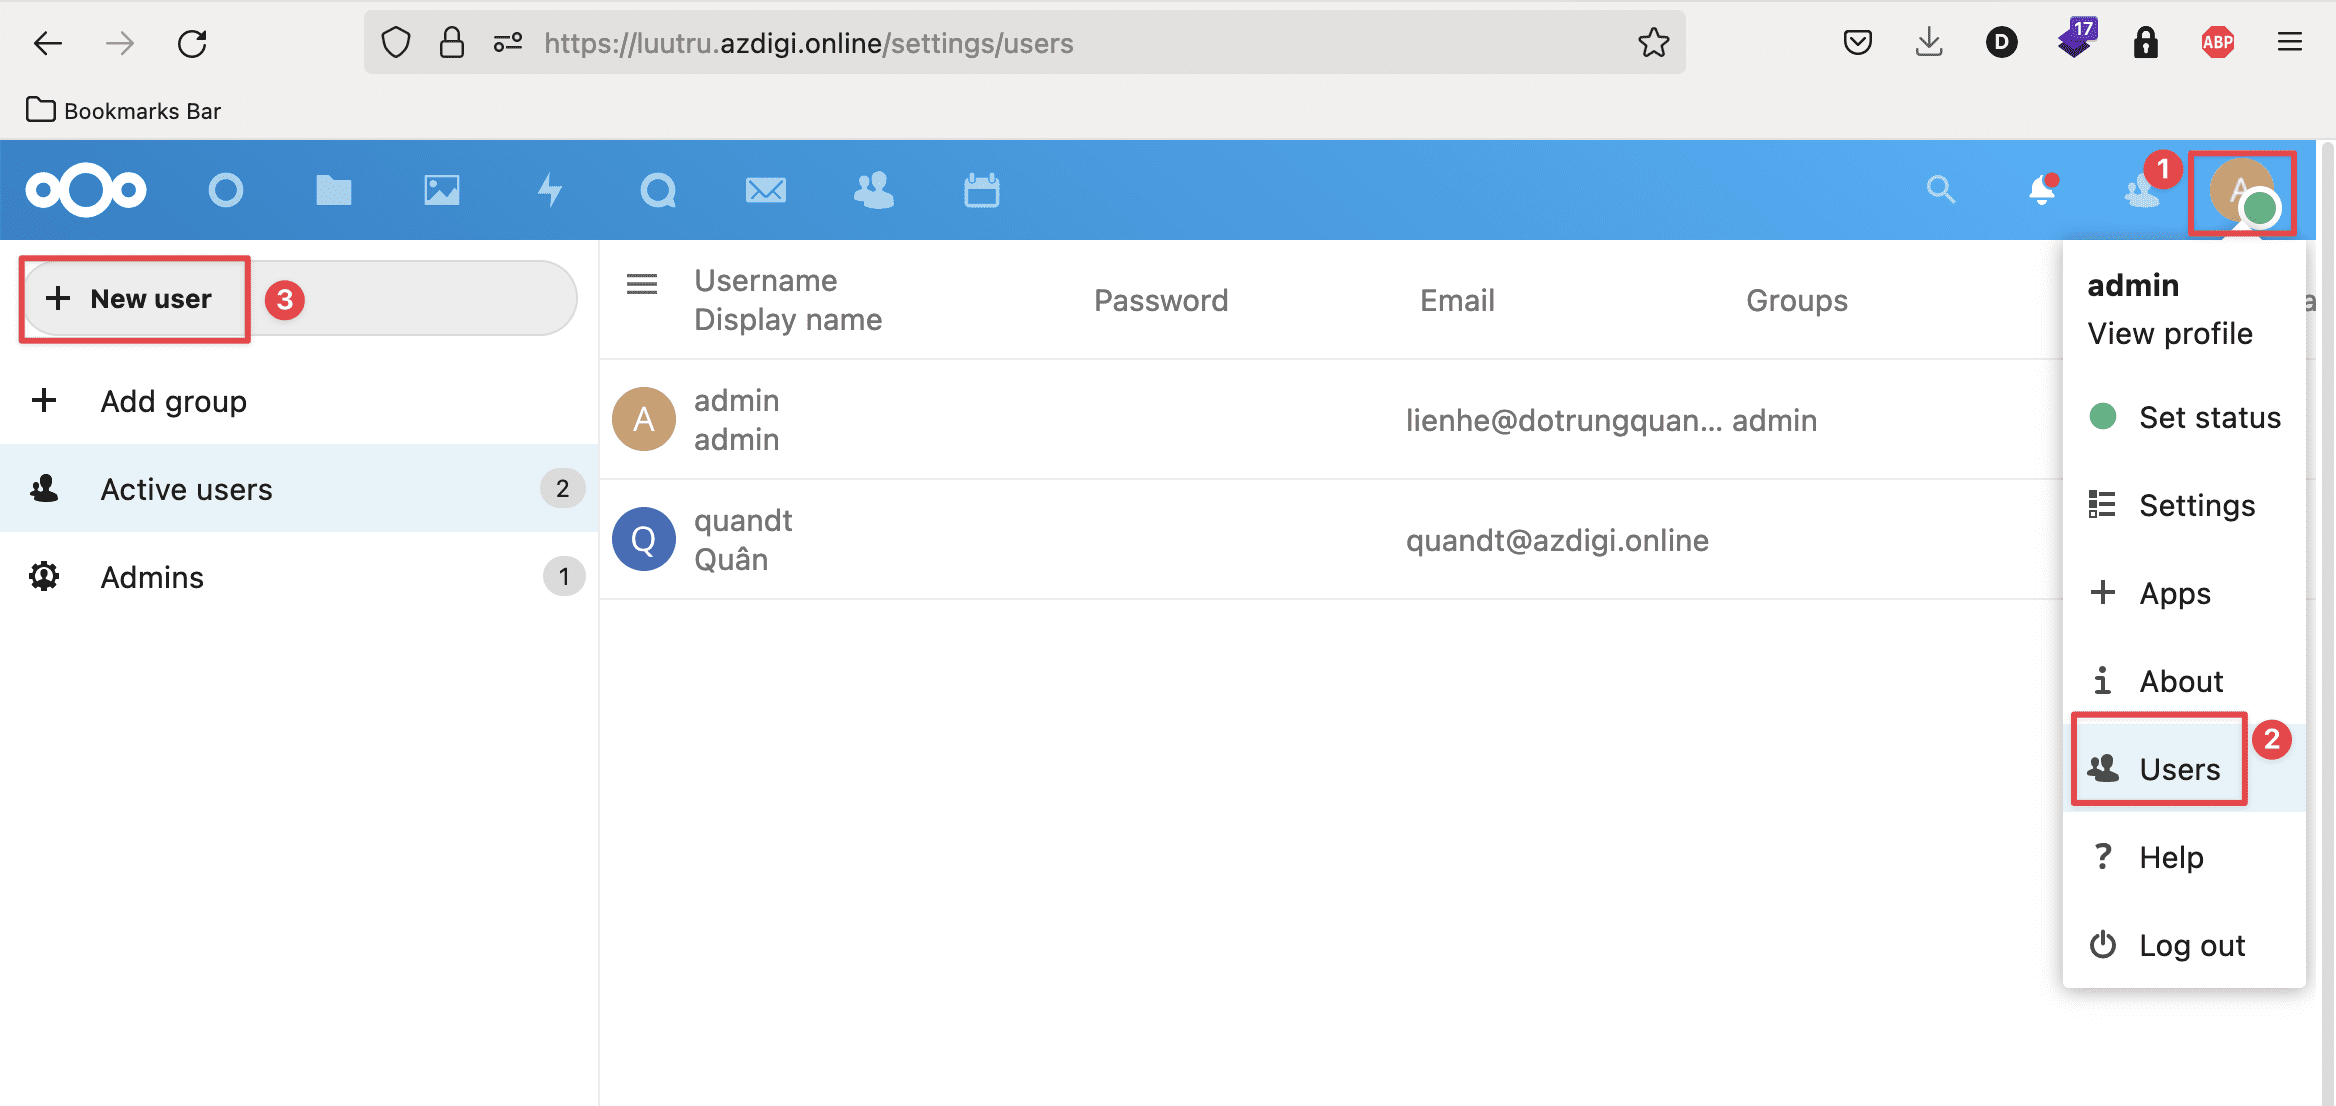
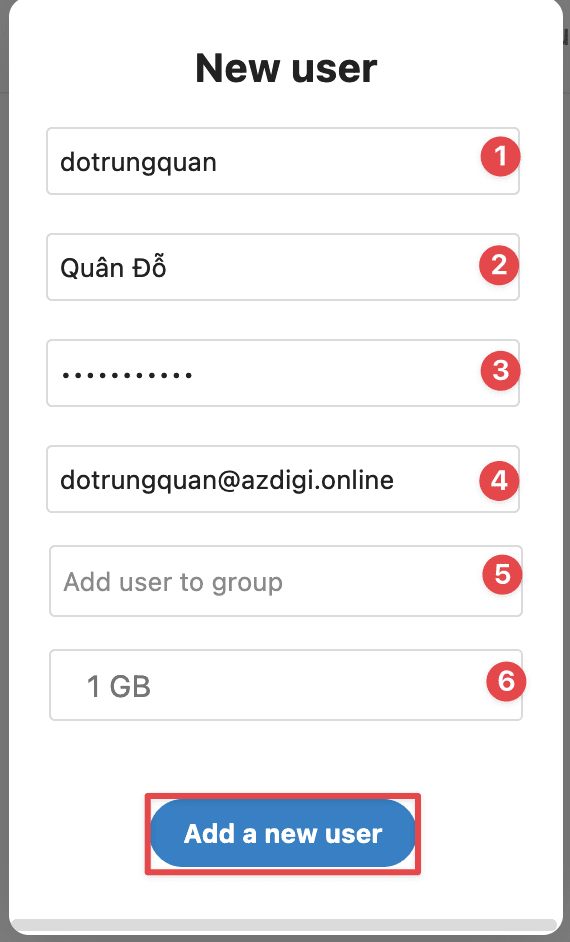
At the New user interface, you enter the information you need to set for that User, including:
- Username
- Display name
- Password
- Add user to group
- Select capacity for User
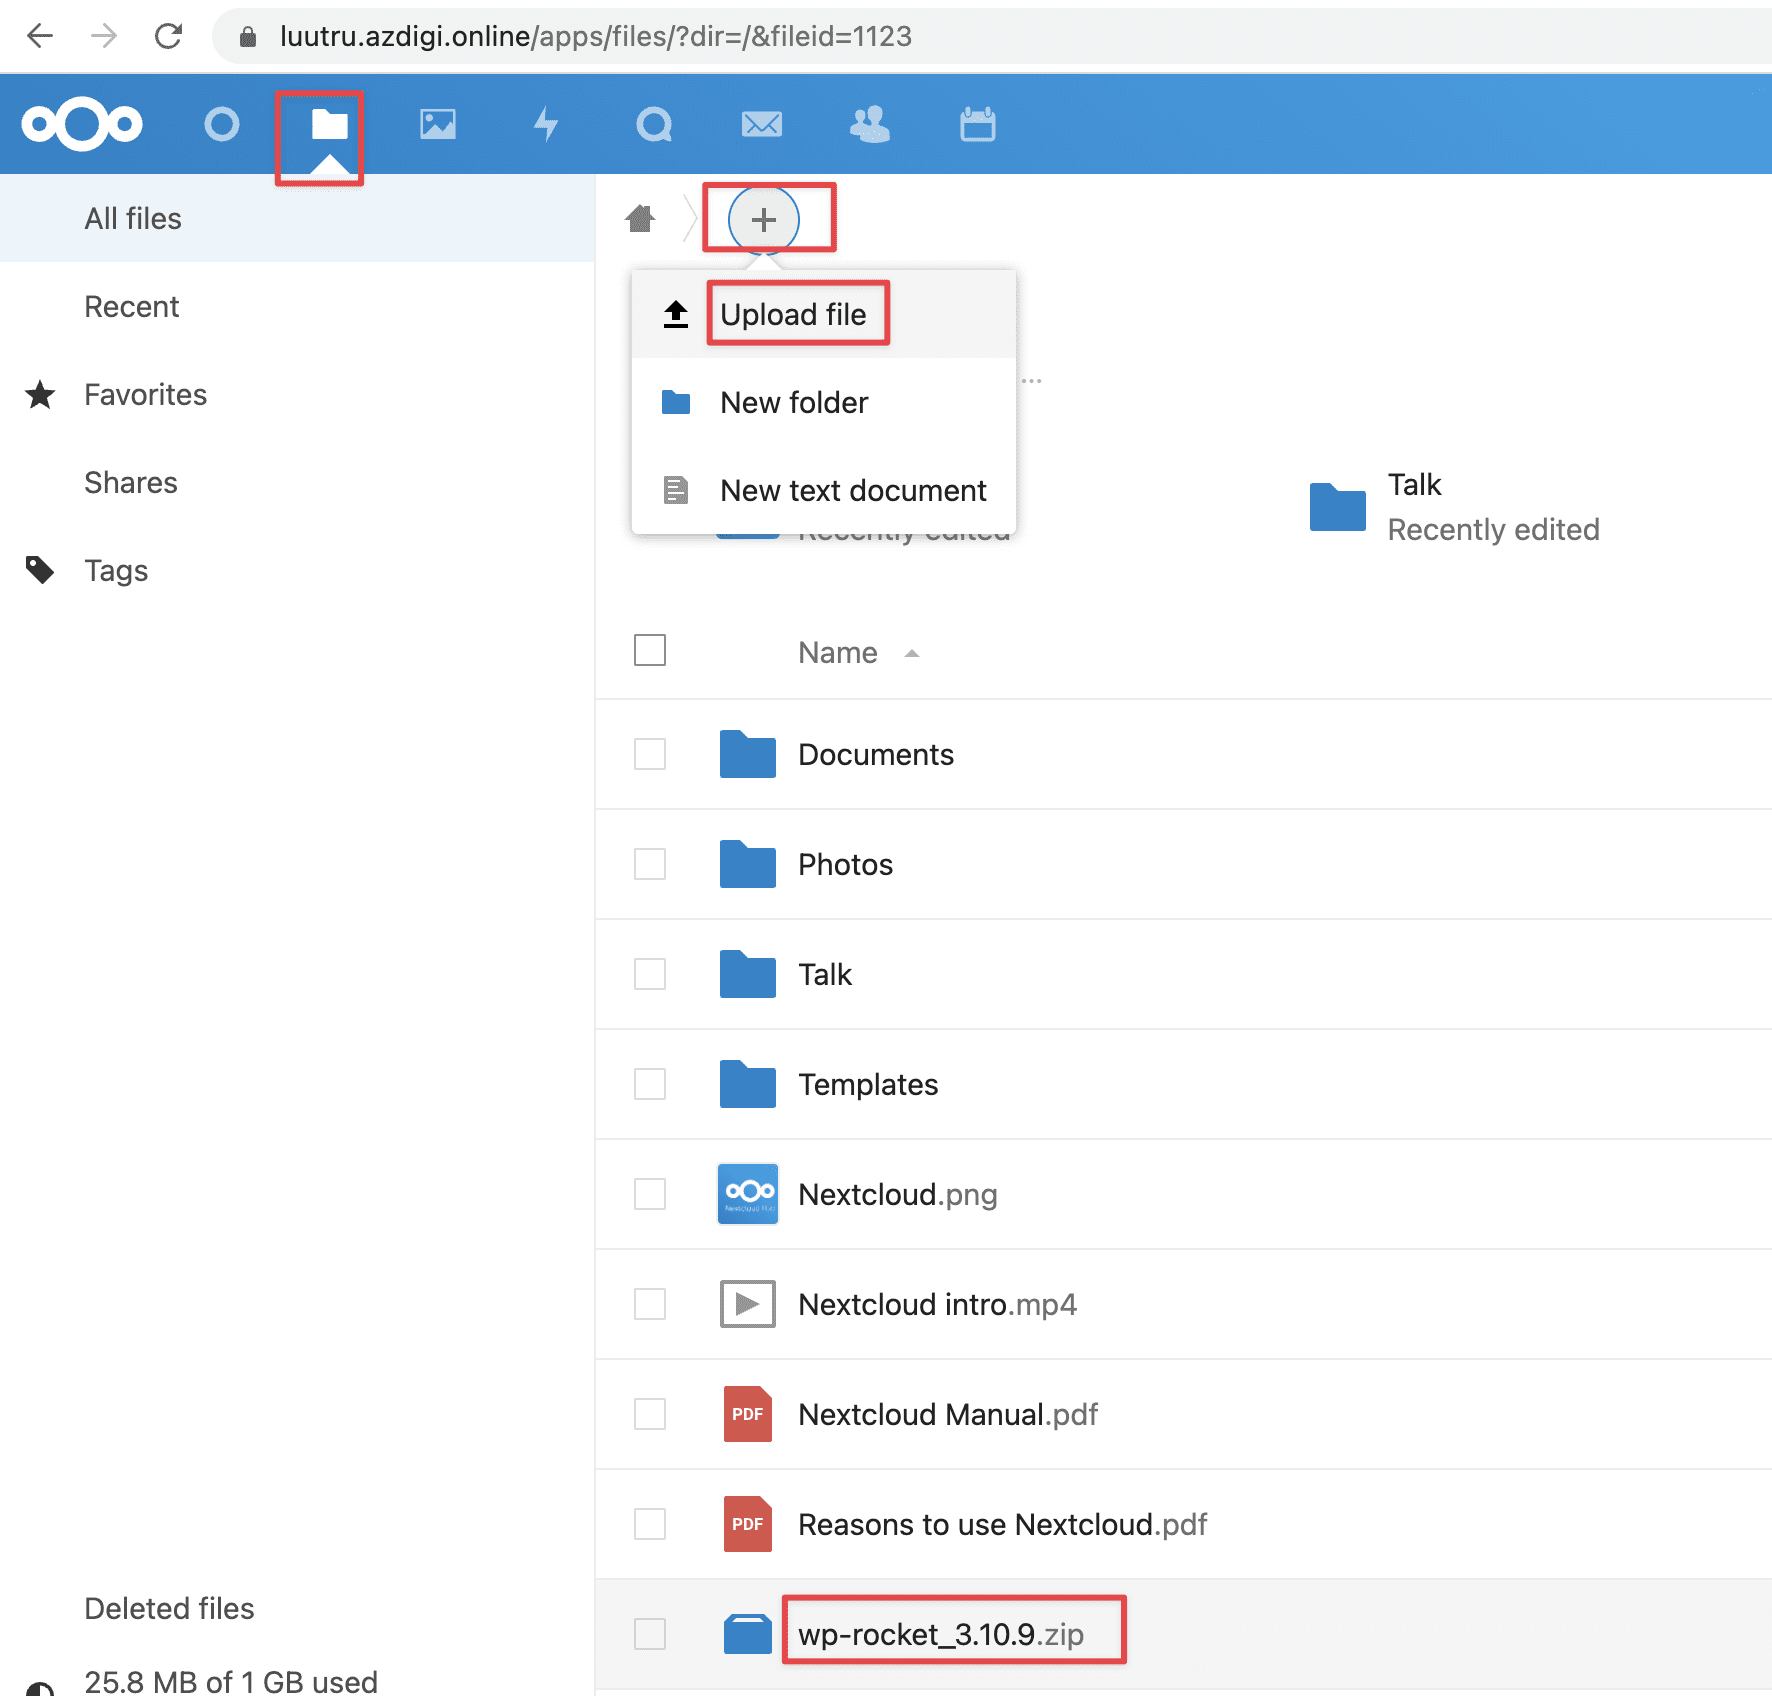
Once created, you can log in to the User and upload the file.
Step 7: Advanced Configuration
- Memory Limit configuration
NextCloud requires 512MB memory_limit. So you can make changes in php.ini with the following command:
sudo sed -i 's/memory_limit = 128M/memory_limit = 512M/g' /etc/php/7.4/fpm/php.ini
- Set up PHP to properly query system environment variables
sudo sed -i 's/;clear_env = no/clear_env = no/g' /etc/php/7.4/fpm/pool.d/www.conf
- Increase upload limit
sudo sed -i 's/upload_max_filesize = 2M/upload_max_filesize = 1024M/g' /etc/php/7.4/fpm/php.ini
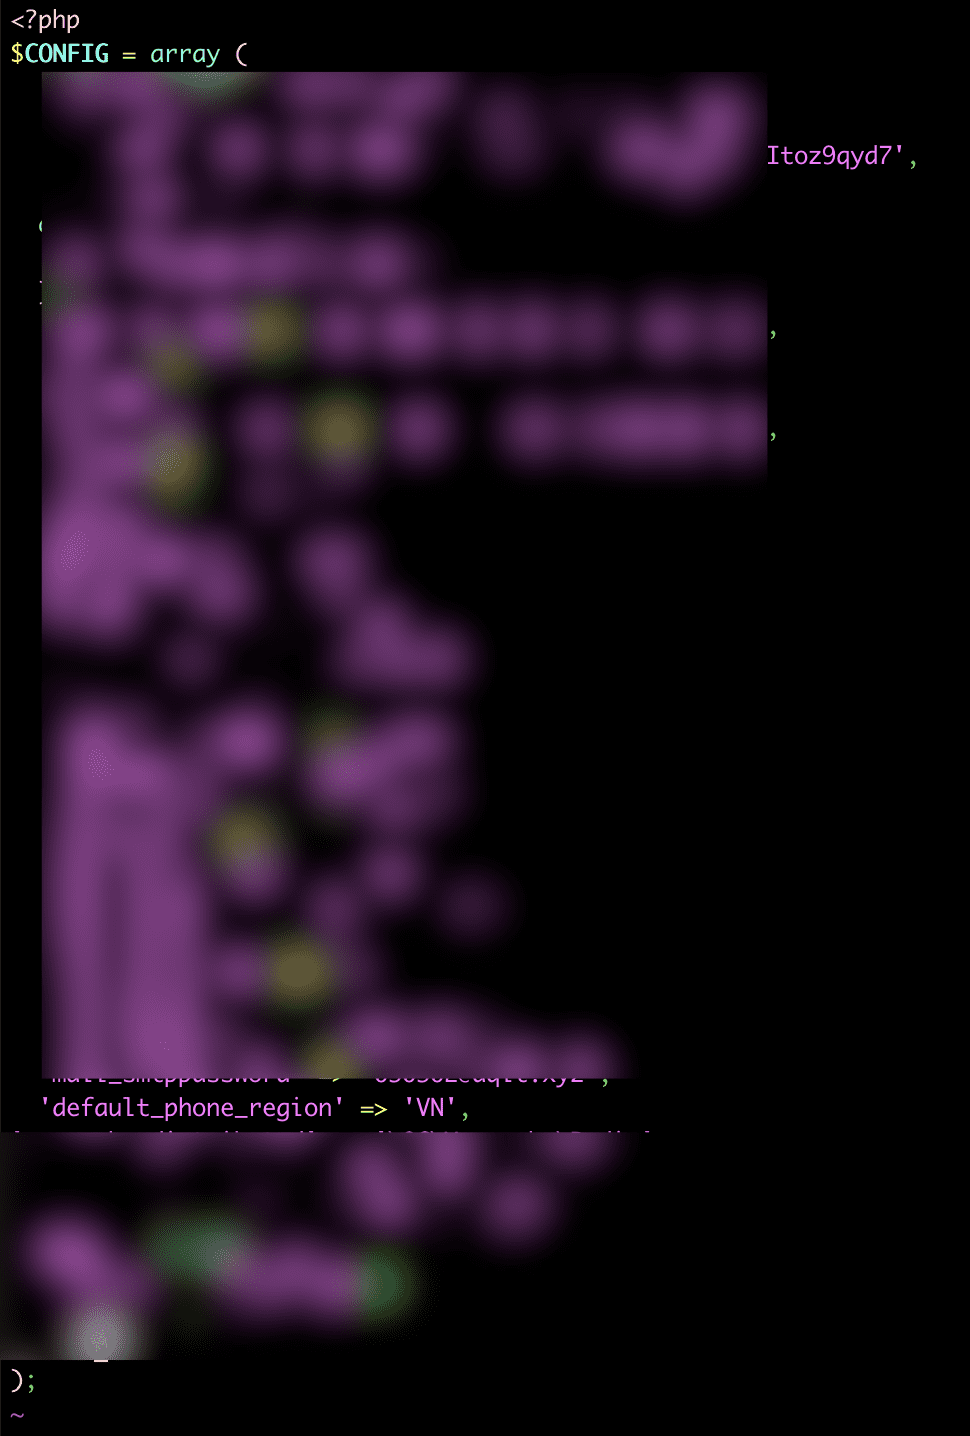
- Change default_phone_region
You open the file /usr/share/nginx/nextcloud/config/config.php and add the following line above );
'default_phone_region' => 'VN'
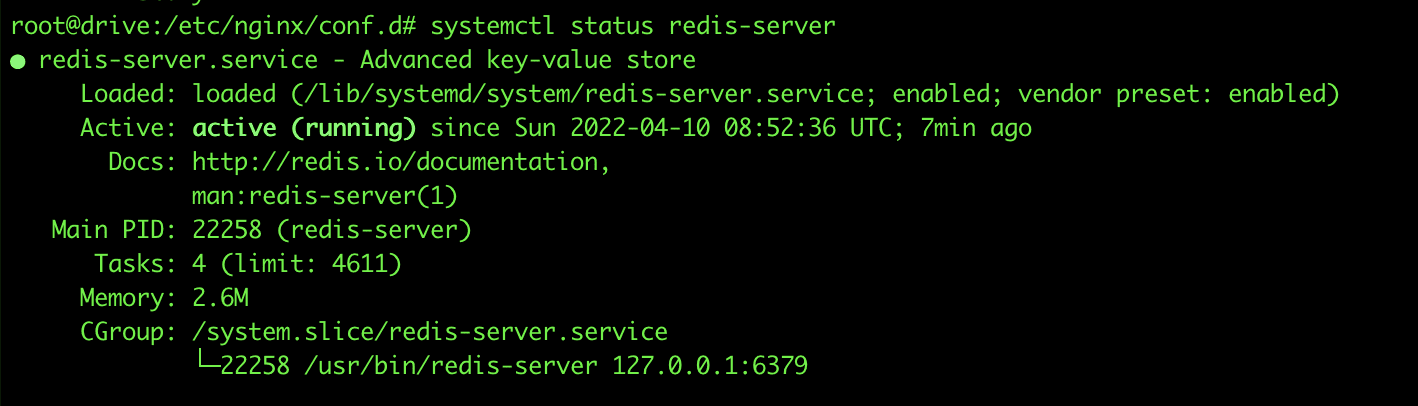
- Install Redis Cache
apt install redis-server -y
apt install php-redis -y
systemctl start redis-server
systemctl enable redis-server
systemctl status redis-server
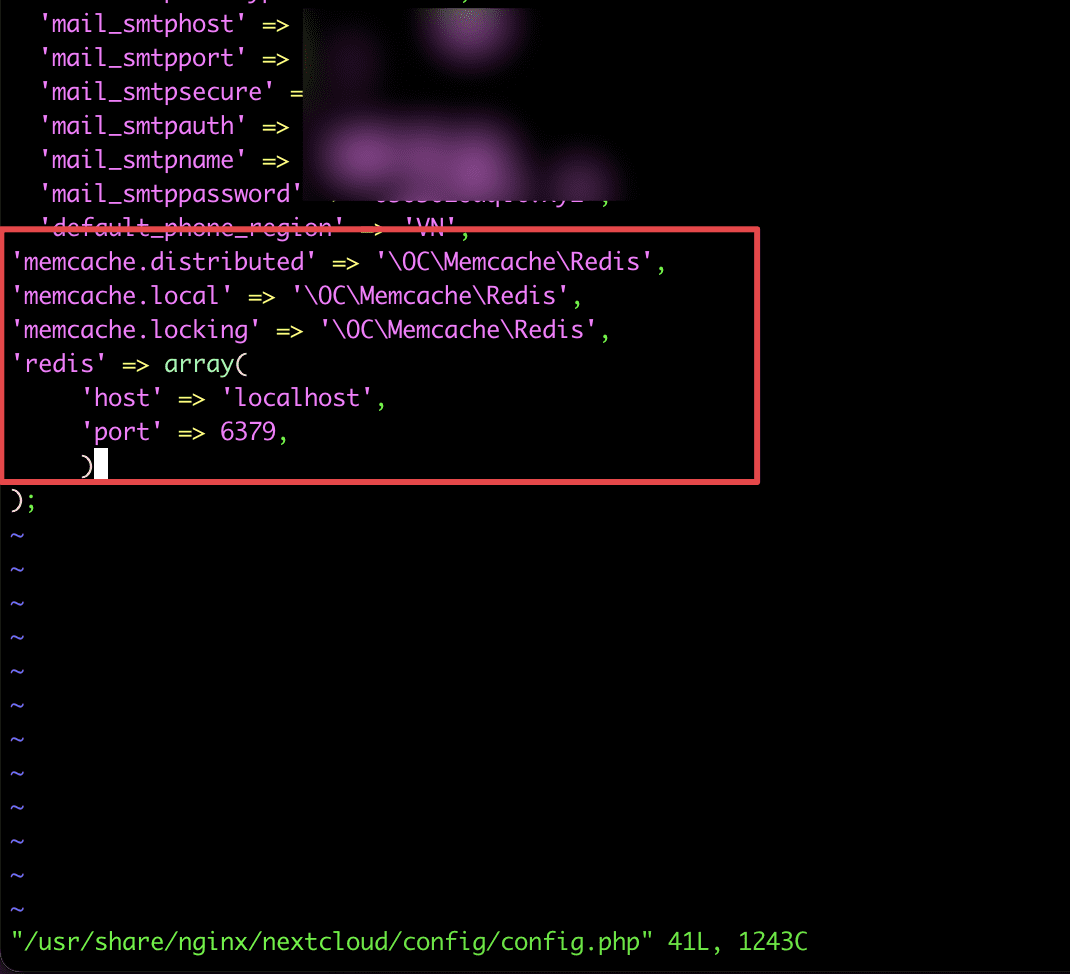
After the Redis installation is complete, open the file vi /usr/share/nginx/nextcloud/config/config.php and add the following lines to the file config.php
'memcache.distributed' => 'OCMemcacheRedis',
'memcache.local' => 'OCMemcacheRedis',
'memcache.locking' => 'OCMemcacheRedis',
'redis' => array(
     'host' => 'localhost',
     'port' => 6379,
     ),
Next, you restart the nginx and php-fpm services.
service nginx restart
systemctl restart php7.4-fpm
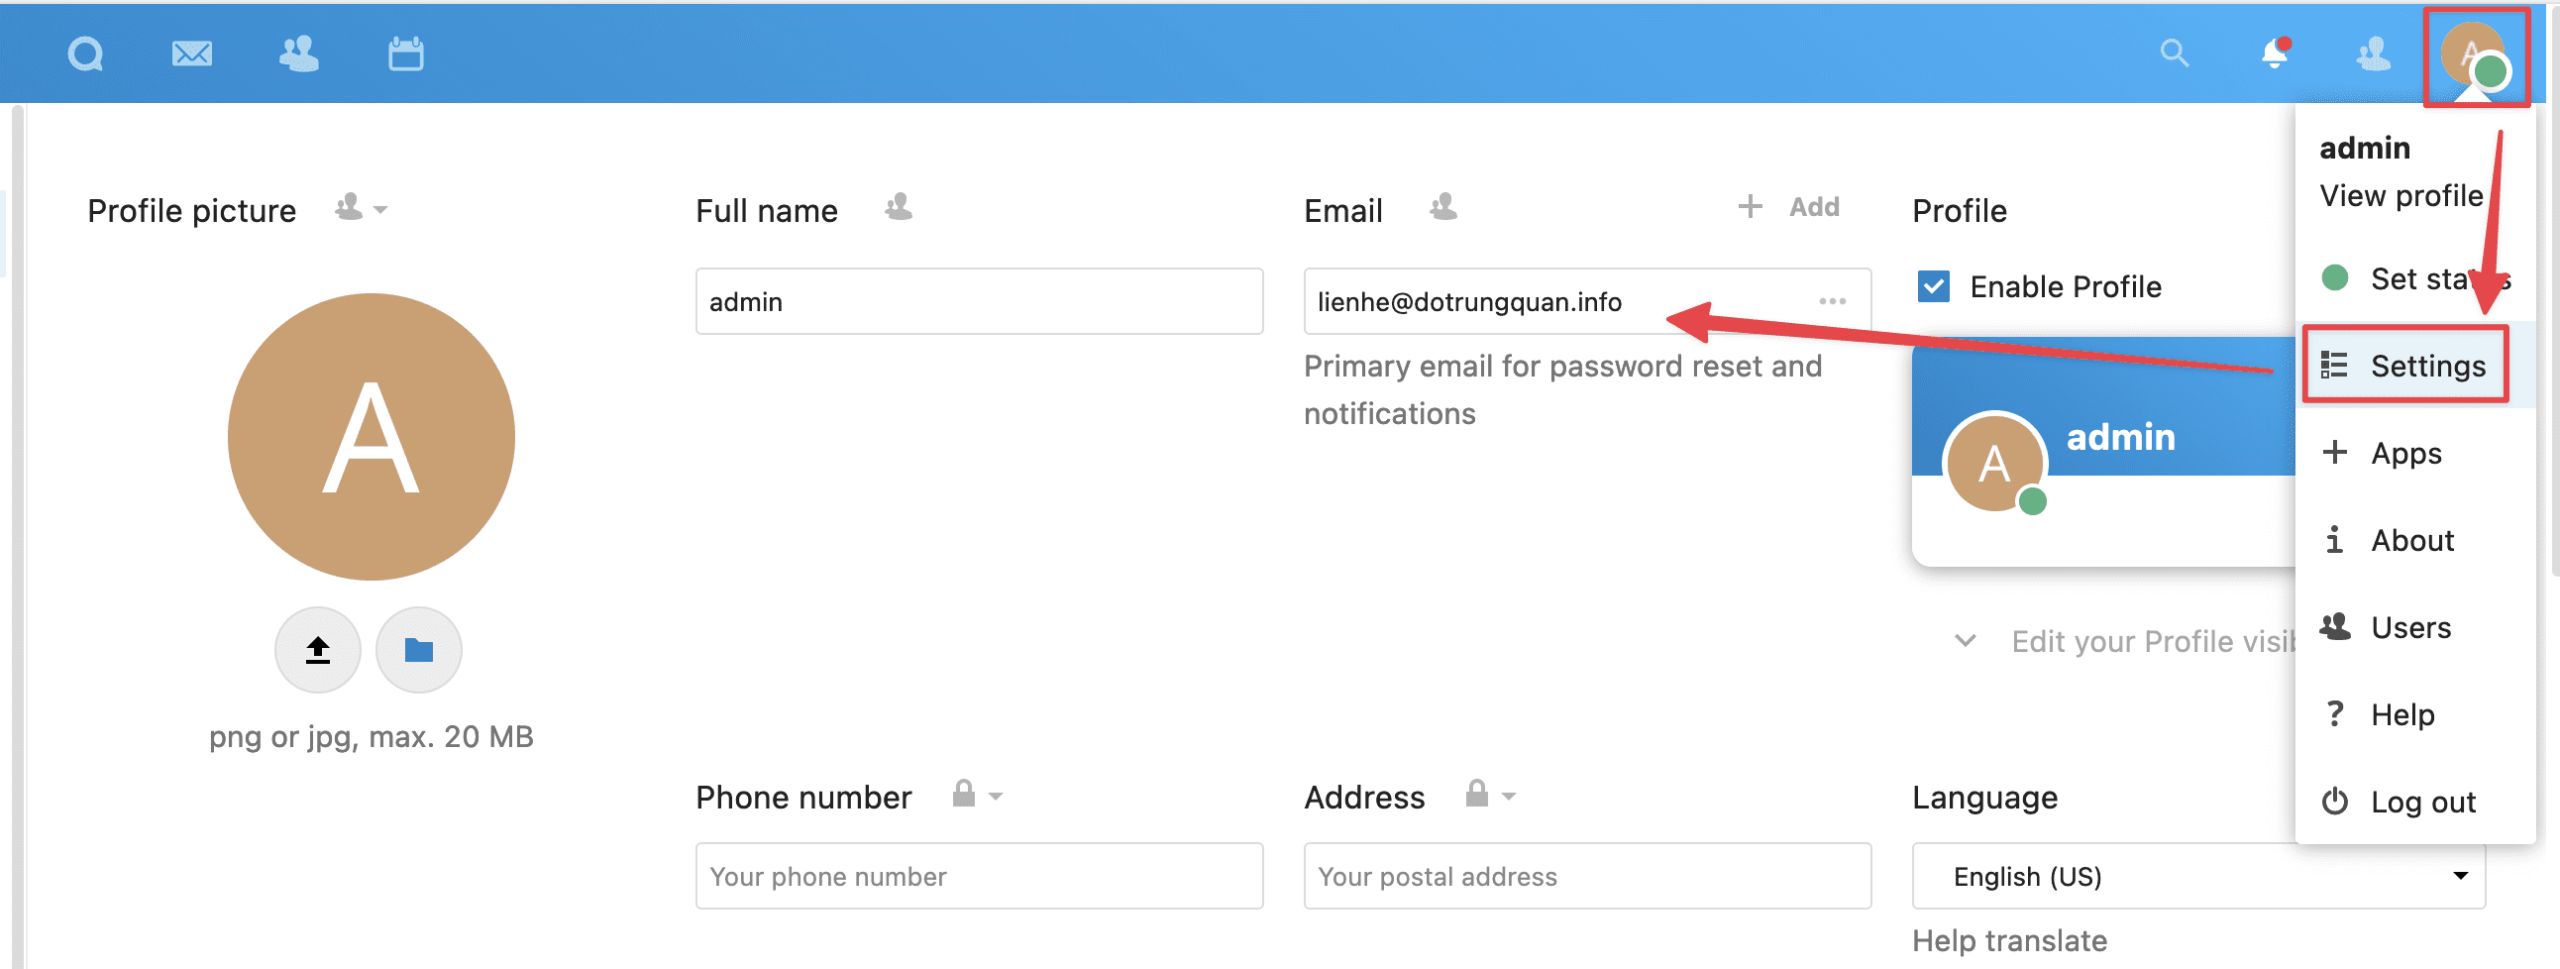
- Mail User Configuration
You access the Profile icon => select Settings => Email and enter the admin email you need to receive information.
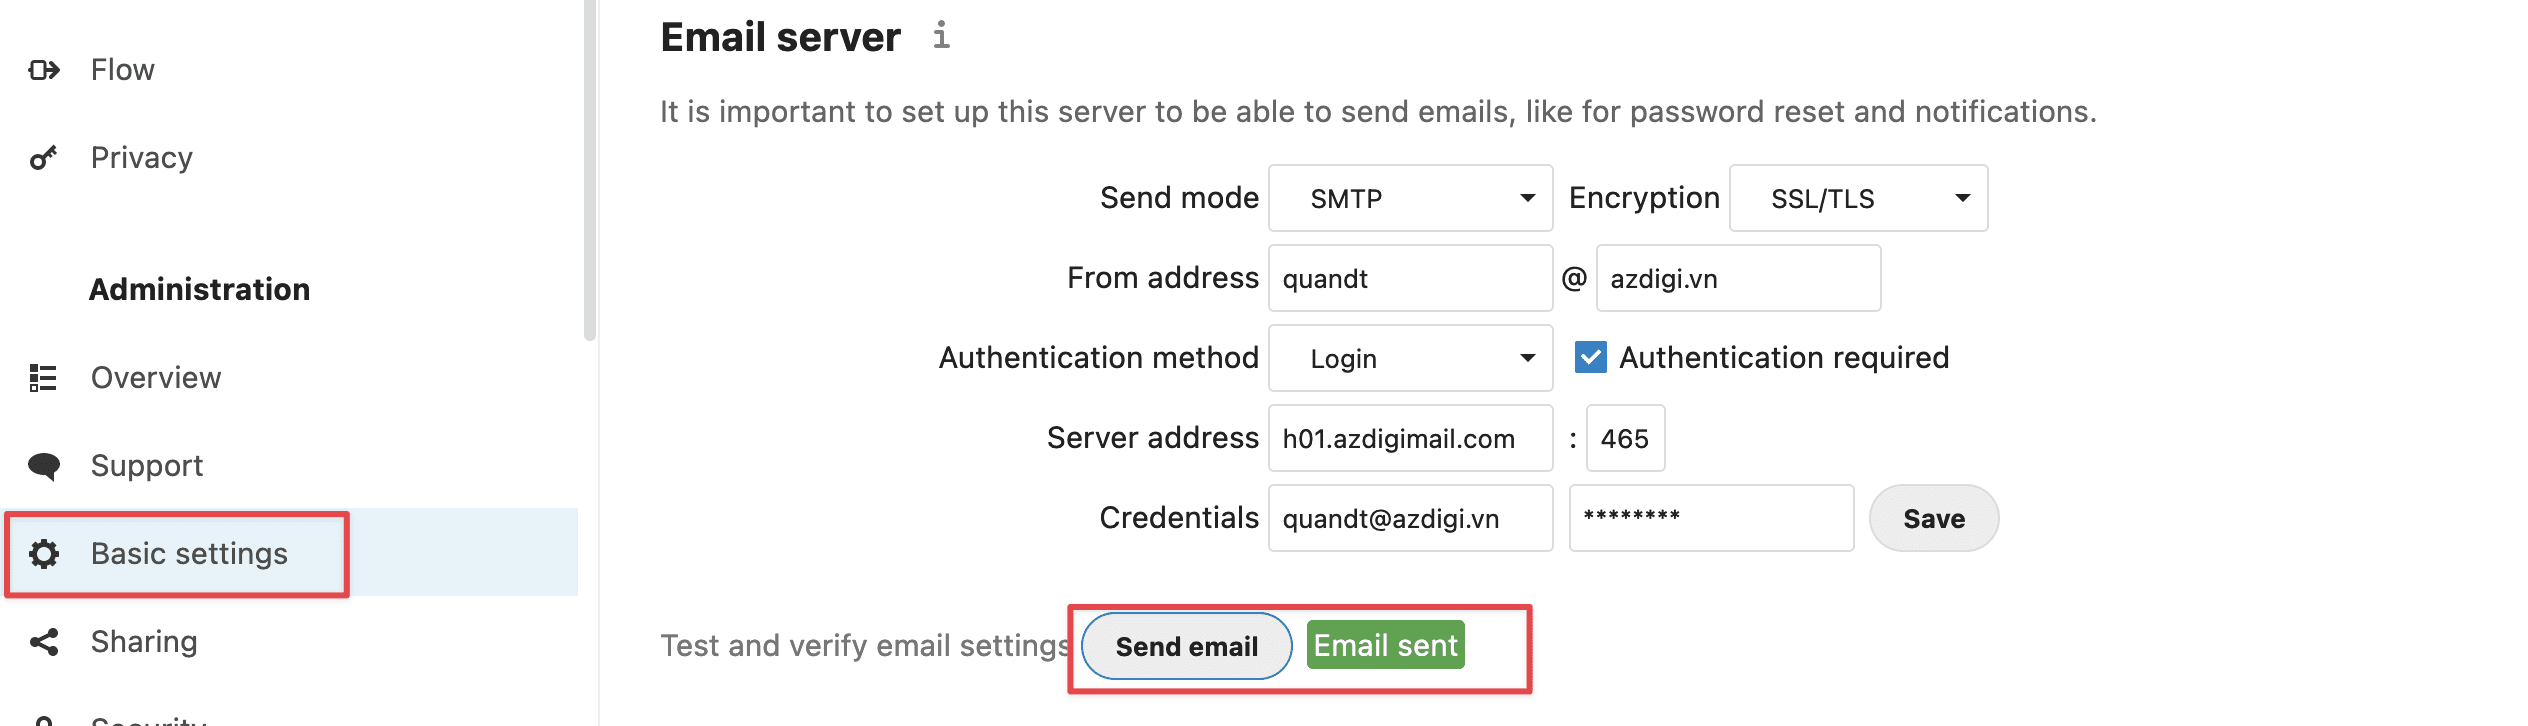
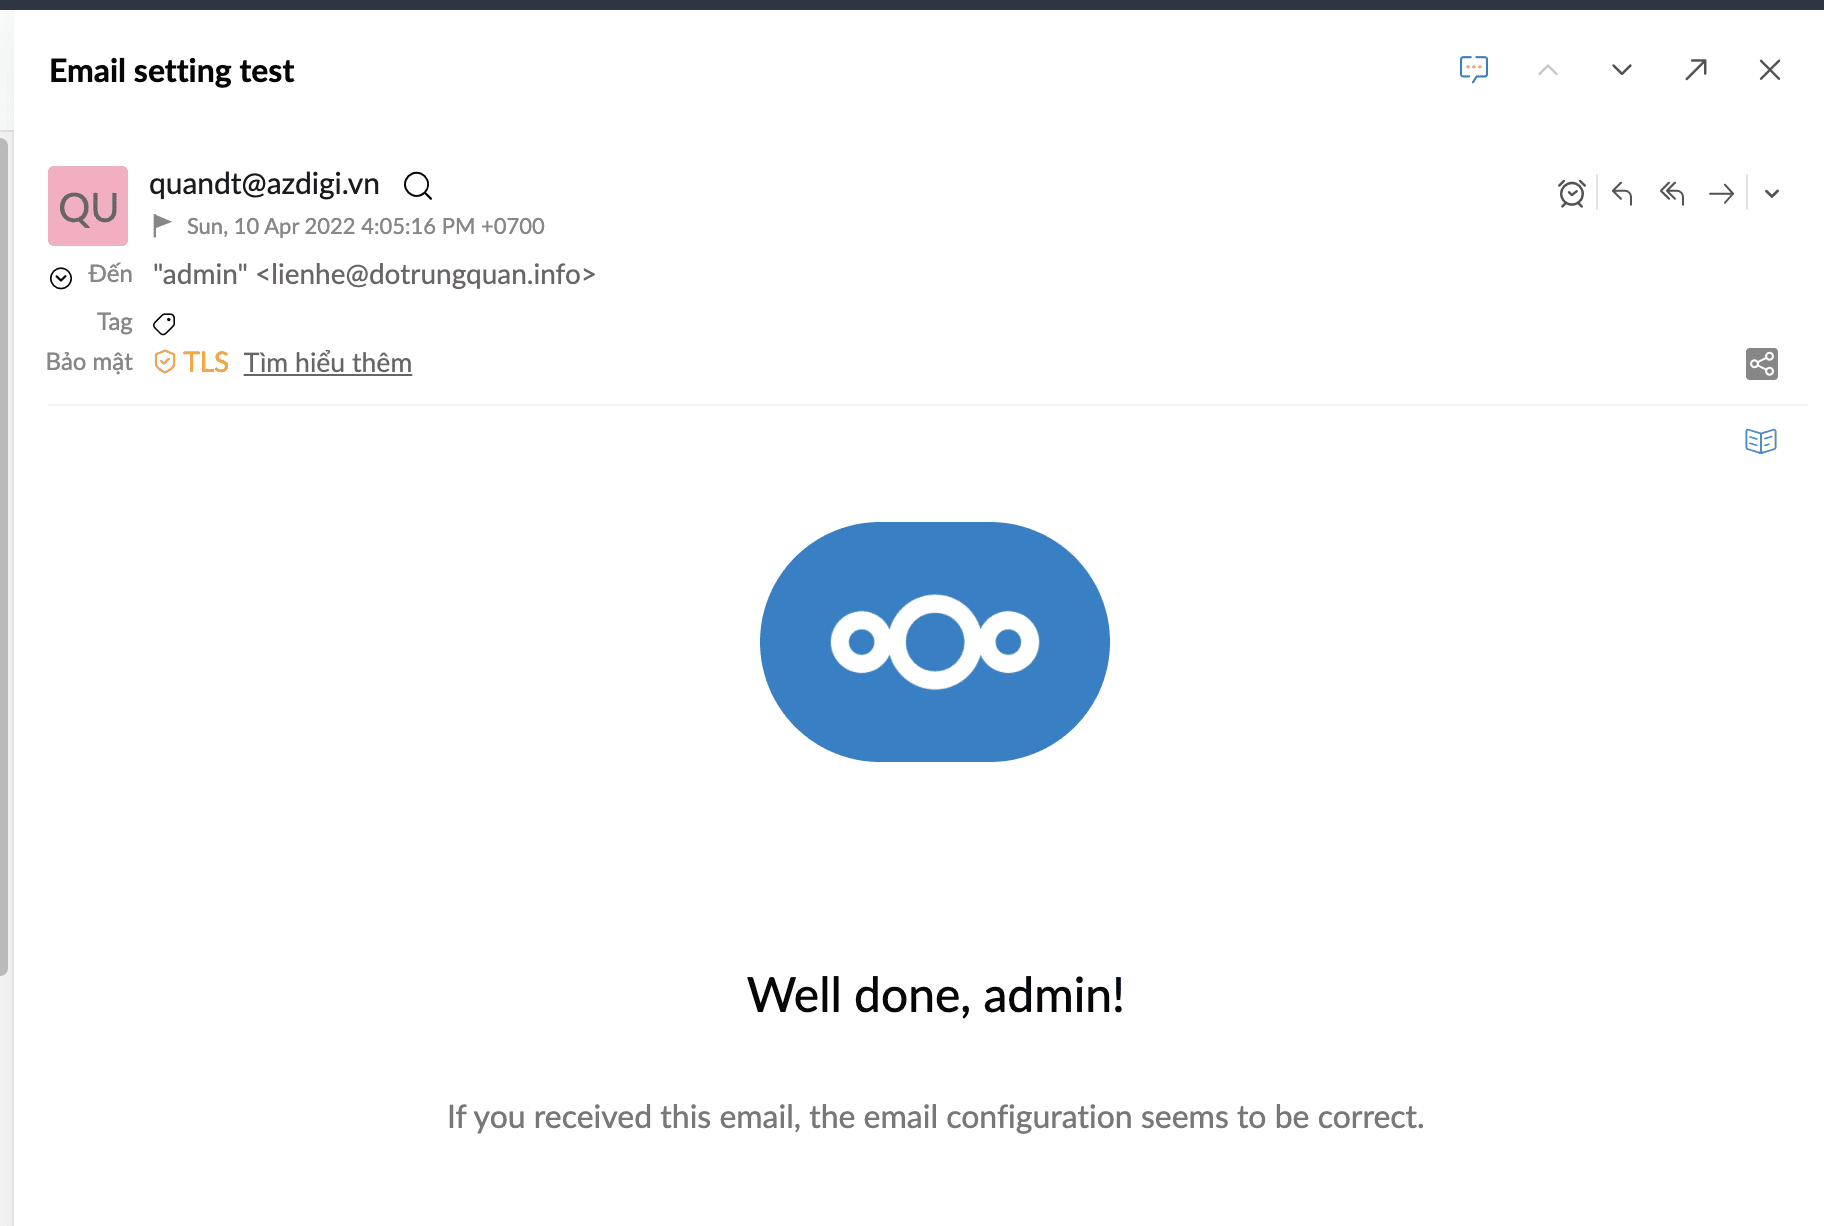
- SMTP Configuration
To configure SMTP, go to Basic settings => enter your SMTP configuration information. Next, click Send email and if it shows Email sent is successful.
Summary
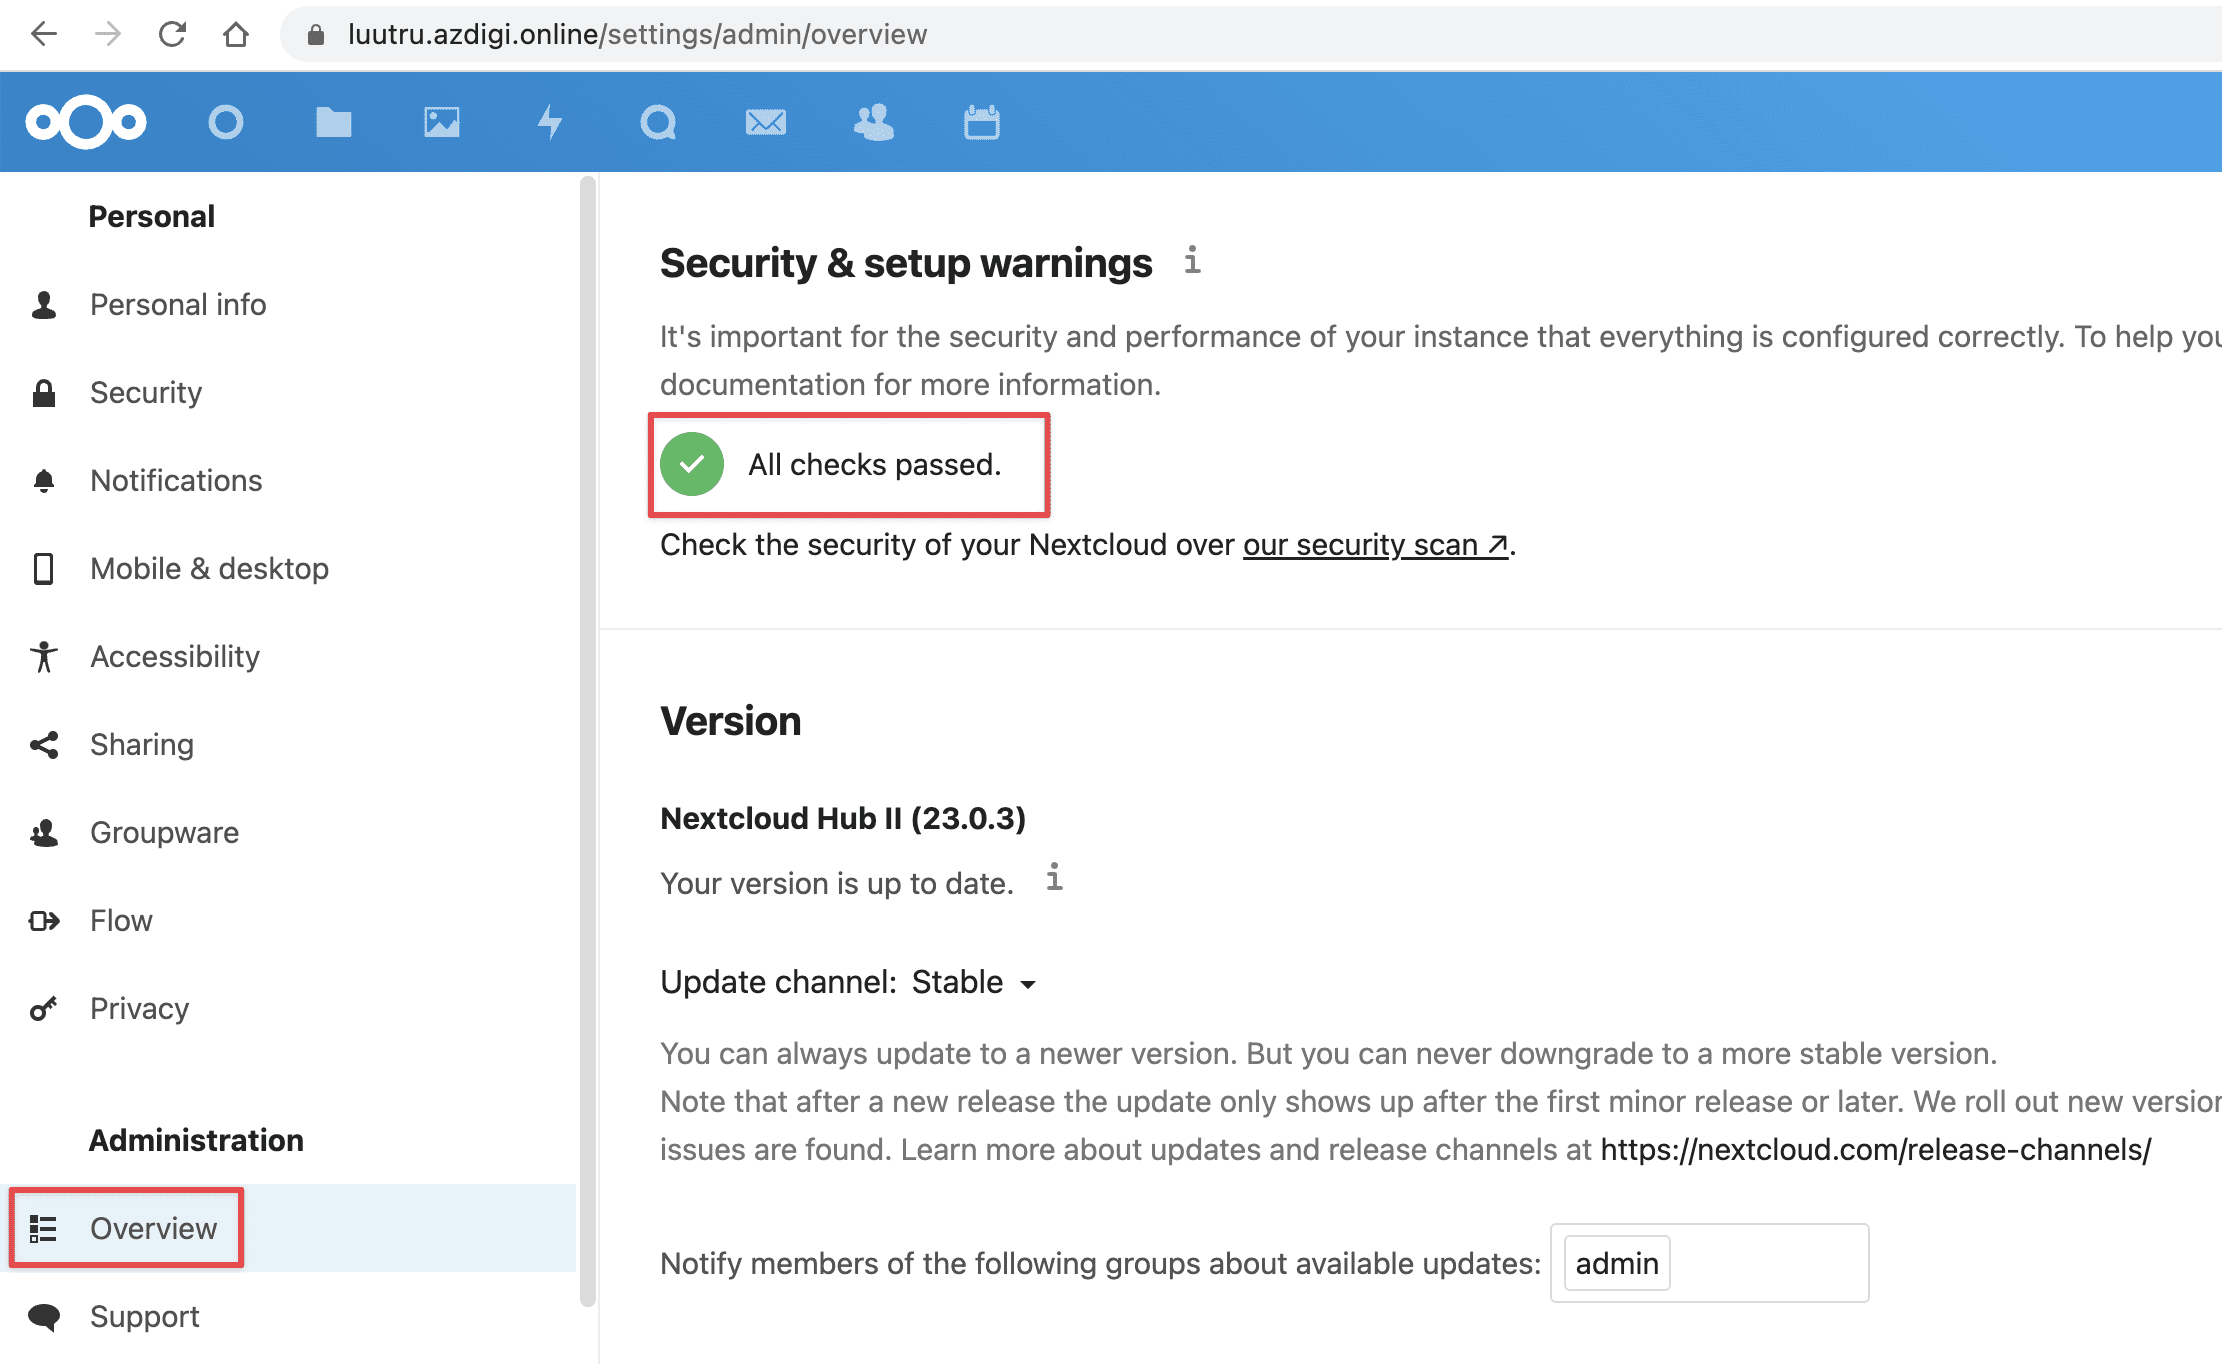
After the installation and configuration are complete, you go to your website and if it shows the Green Tick as shown below, it means everything is working fine and safely. So we have completed the steps to install NextCloud on Ubuntu 20.04 with NGINX.
Wishing you success!
You can refer to other user manuals at the link below
If you need assistance, you can contact support in the ways below:
- Hotline 247: 028 888 24768 (Ext 0)
- Ticket/Email: You use the email to register for the service and send it directly to: support@azdigi.com
You might also like
- How to install FileRun on Ubuntu 22.04
- How to install NGINX Proxy Apache 2.x
- How to install LEMP Stack on Ubuntu 22.04
- How to create a WordPress website with LEMP on Ubuntu 22.04
- How to Install Laravel with Nginx on CentOS 7 (LEMP)
- Setting up Nginx FastCGI Cache on NGINX reduces server response time
About the author

Thạch Phạm
Đồng sáng lập và Giám đốc điều hành của AZDIGI. Có hơn 15 năm kinh nghiệm trong phổ biến kiến thức liên quan đến WordPress tại thachpham.com, phát triển website và phát triển hệ thống.