Hướng dẫn cài đặt Zabbix Agent trên Ubuntu 20.04 với 3 bước vô cùng đơn giản..
1. Giới Thiệu
Ở bài hướng dẫn trước, mình đã hướng dẫn các bạn cách Cài đặt Zabbix 6.0 trên máy chủ Ubuntu 20.4 . Và ở bài viết này, mình sẽ tiếp tục giới thiệu và hướng dẫn các bạn về công việc giám sát của Zabbix với toàn bộ Cơ sở hạ tầng – hệ thống Linux, máy chủ Windows, bộ định tuyến mạng, thiết bị chuyển mạch mạng, v.v.
Zabbix Agent là một chương trình được phát triển bởi ngôn ngữ C. Zabbix Agent được cài đặt lên các máy chủ hoặc thiết bị phía client. Qua đó, Zabbix Agent sẽ thu thập các thông tin cần thiết từ máy client cần theo dõi, kiểm tra và thu thập dữ liệu liên quan đến CPU, Memory, Disk và Network interface..vv hoặc theo yêu cầu khác của quản trị viên. Sau đó gửi trả kết quả về cho Zabbix Server.
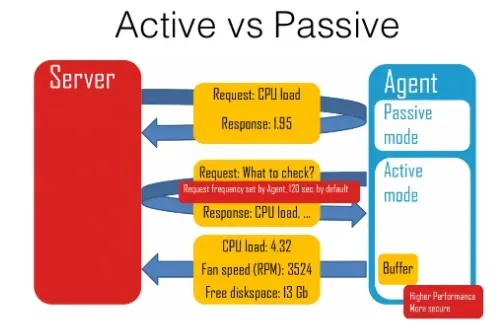
Cách thức hoạt động của Zabbix Agent
Zabbix Agent có thể thực hiện cả kiểm tra thụ động ( polling ) và kiểm tra chủ động (trapping). Việc kiểm tra có thể được thực hiện theo khoảng thời gian hoặc dựa trên lịch trình có thời gian cụ thể. Đây là sự khác biệt giữa kiểm tra thụ động và chủ động.
- Kiểm tra thụ động (Passive): Zabbix Server sẽ gửi yêu cầu cho Zabbix Agent . Zabbix Agent sẽ xử lý yêu cầu đó và trả về kết quả về cho Zabbix Server.
- Kiểm tra chủ động (Active): Với loại này thì yêu cầu xử lý sẽ phức tạp hơn. Zabbix Agent sẽ phải truy xuất danh sách các hạng mục cần xử lý để xử lý độc lập. Sau đó, sẽ trả kết quả định kỳ về Zabbix Server.
Hình ảnh dưới đây là mô tả chi tiết của Zabbix Agent để các bạn có thể hình dung các hoạt động kiểm tra thụ động và chủ động.
2. Hướng dẫn cài đặt
Để bắt đầu cài đặt Zabbix Agent, đâu tiên các bạn cần SSH vào máy Client cần theo dõi với quyền Root. Và hãy làm theo các bước dưới đây để cài đặt tất cả các dịch vụ cần thiết.
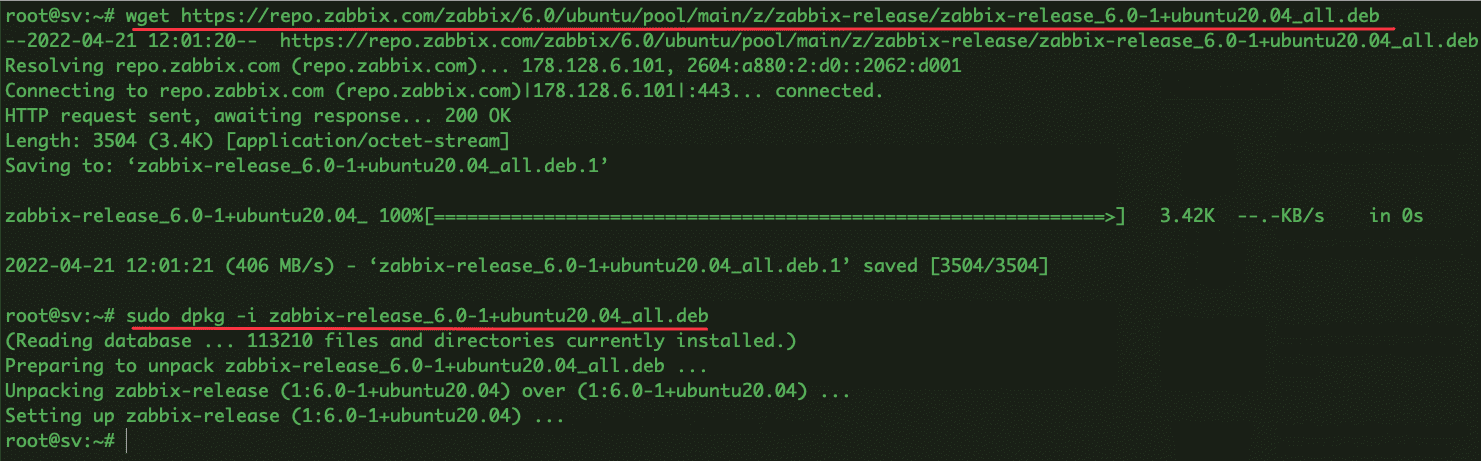
Bước 1: Thêm kho lưu trữ Zabbix
- Thêm kho lưu trữ Zabbix với lệnh sau:
wget https://repo.zabbix.com/zabbix/6.0/ubuntu/pool/main/z/zabbix-release/zabbix-release_6.0-1+ubuntu20.04_all.deb
sudo dpkg -i zabbix-release_6.0-1+ubuntu20.04_all.deb
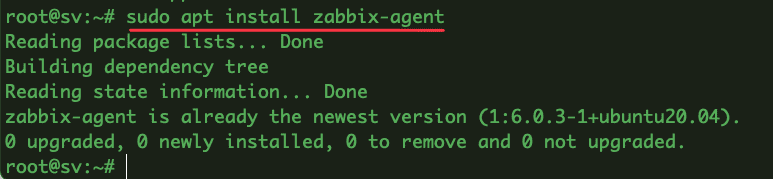
Bước 2: Cài đặt và cấu hình Zabbix Agent
- Bạn tiến hành cài đặt các packages sau:
sudo apt update
sudo apt install zabbix-agent
- Mở và sửa File cấu hình Zabbix Agent tại:
/etc/zabbix/zabbix_agentd.confnhư sau:
Ví dụ ở đây mình có:
– IP Zabbix Server = 45.252.248.159 : thì bạn thay vào IP vào phần IP_Zabbix_Server
Server=IP_Zabbix_Server
ServerActive=IP_Zabbix_Server
Hostname=Hostname_của_máy_Client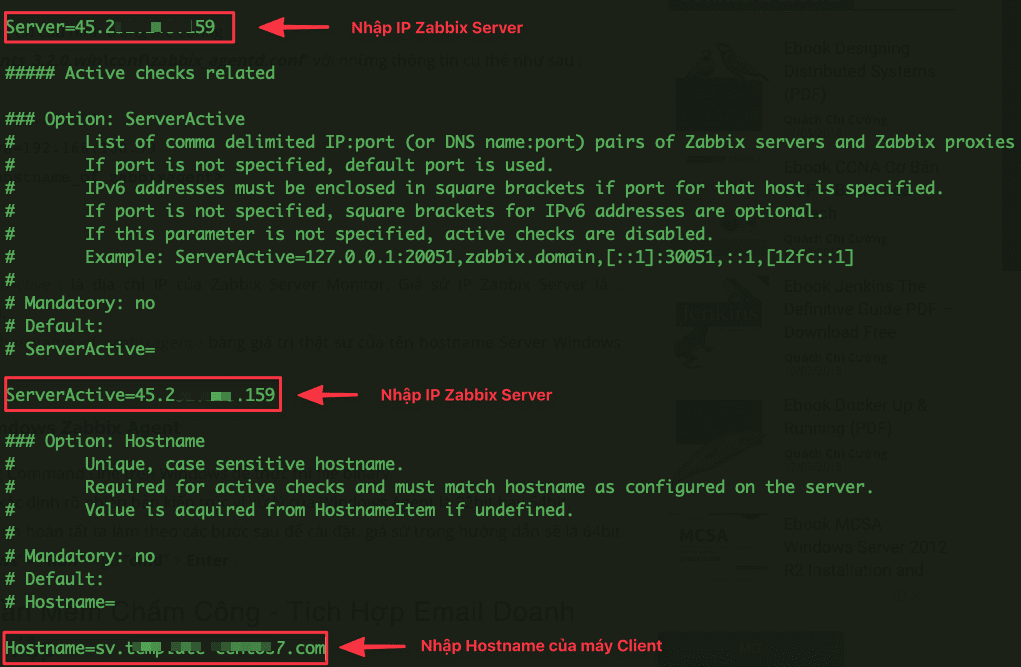
- Khởi động lại Zabbix Agen để áp dụng cấu hình.
sudo systemctl restart zabbix-agent
sudo systemctl enable zabbix-agent
sudo systemctl status zabbix-agent
- Mở Port
sudo ufw allow 10050/tcp
Ở bài viết này, mình chỉ hướng dẫn cụ thể các bạn cách cài đặt Zabbix Agen, còn về cách thêm Host vào Zabbix thì mình chỉ nói sơ qua để các bạn nắm cách thức thôi nhé. Ở các bài viết sau mình sẽ hướng dẫn thêm cụ thể các Templates và monitor từng thành phần chi tiết hơn.
Các bạn có thể tham khảo thêm các hướng dẫn sử dụng khác tại link bên dưới:
Nếu các bạn cần hỗ trợ các bạn có thể liên hệ bộ phận hỗ trợ theo các cách bên dưới:
- Hotline 247: 028 888 24768 (Ext 0)
- Ticket/Email: Bạn dùng email đăng ký dịch vụ gửi trực tiếp về: support@azdigi.com.
You might also like
About the author

Thạch Phạm
Đồng sáng lập và Giám đốc điều hành của AZDIGI. Có hơn 15 năm kinh nghiệm trong phổ biến kiến thức liên quan đến WordPress tại thachpham.com, phát triển website và phát triển hệ thống.