
This tutorial will guide you on how to upgrade to Kernel 5 on CentOS 7, helping the system operate more stable and be more compatible with hardware than the default kernel.
I. Introduction
Although some people use the term Linux to refer to the entire operating system, it is important to note that Linux is just a kernel. On the other hand, a distribution is a complete operating system (such as CentOS, Ubuntu, EHEL, etc.) built on top of the kernel with many tools and application libraries.
In normal operations, the kernel is responsible for two important tasks:
- Serving as the communication bridge between hardware and software running on the system.
- Managing system resources as efficiently as possible.
To do this, the kernel communicates with the hardware through drivers that are integrated into it or drivers that can be installed later as modules.
For example, when an application running on your server wants to connect to a wired network, it will send that request to the kernel, which in turn will use the appropriate driver to connect to the network.
With devices and technologies being introduced regularly, it is important to update the system’s kernel if we want to take full advantage of the latest features. dditionally, updating the system’s kernel helps protect the system from vulnerabilities discovered in previous versions.
At the time of writing this article, the newest and most stable kernel is 5.10.9.
You can track the kernel version at the following link:
If you are ready to upgrade to Kernel 5 on CentOS 7, continue reading this article!
II. Upgrade Kernel 5 on CentOS 7
To upgrade Kernel 5 on CentOS 7, you just need to follow 4 these steps.
Step 1: SSH into your CentOS 7 system
To upgrade Kernel 5 on CentOS 7, we first need to SSH or access your VPS or server with root privileges or at least with a user that has sudo privileges. If you don’t know how to SSH into your VPS/Server, you can refer to the following tutorial:
After successfully SSH with root privileges, we move on to step 2 to check the Kernel version on your system.
Step 2: Check the installed Kernel version
When we install CentOS 7, it already includes a specific version of the Linux Kernel. To display the currently installed version on our system, we can execute the following command:
uname -sr
Below is the result on my CentOS 7 system.
If we now access https://www.kernel.org/, we will see that the latest Kernel version is 5.1 at the time of writing this article.
With Kernel version 5.1, it will be a long-term release and will be supported for 6 years, whereas previous Linux Kernel versions were only supported for 2 years.
An important thing to consider is the lifecycle of the Kernel version – if the version you are using is about to reach its end-of-life, then no more bug-fix releases will be provided after that date. For more information, please refer to the Kernel release page.
Step 3: Perform Kernel 5 upgrade on CentOS 7
Most current distributions provide a way to upgrade the Kernel using the yum command and an officially supported repository.
However, this will only upgrade to the latest version available from the repository and not the latest version available at https://www.kernel.org/.
To address this issue, you need to install the ELRepo repository, which is a third-party repository that helps upgrade to the latest recent Kernel release.
To enable the ELRepo repository on CentOS 7, please execute the following commands:
rpm --import https://www.elrepo.org/RPM-GPG-KEY-elrepo.org
rpm -Uvh http://www.elrepo.org/elrepo-release-7.0-3.el7.elrepo.noarch.rpm
Once the ELRepo repository has been enabled, you can use the following command to list the packages related to the kernel.
yum --disablerepo="*" --enablerepo="elrepo-kernel" list available

Next, we install the latest stable official Kernel with the following command:
yum --enablerepo=elrepo-kernel install -y kernel-ml
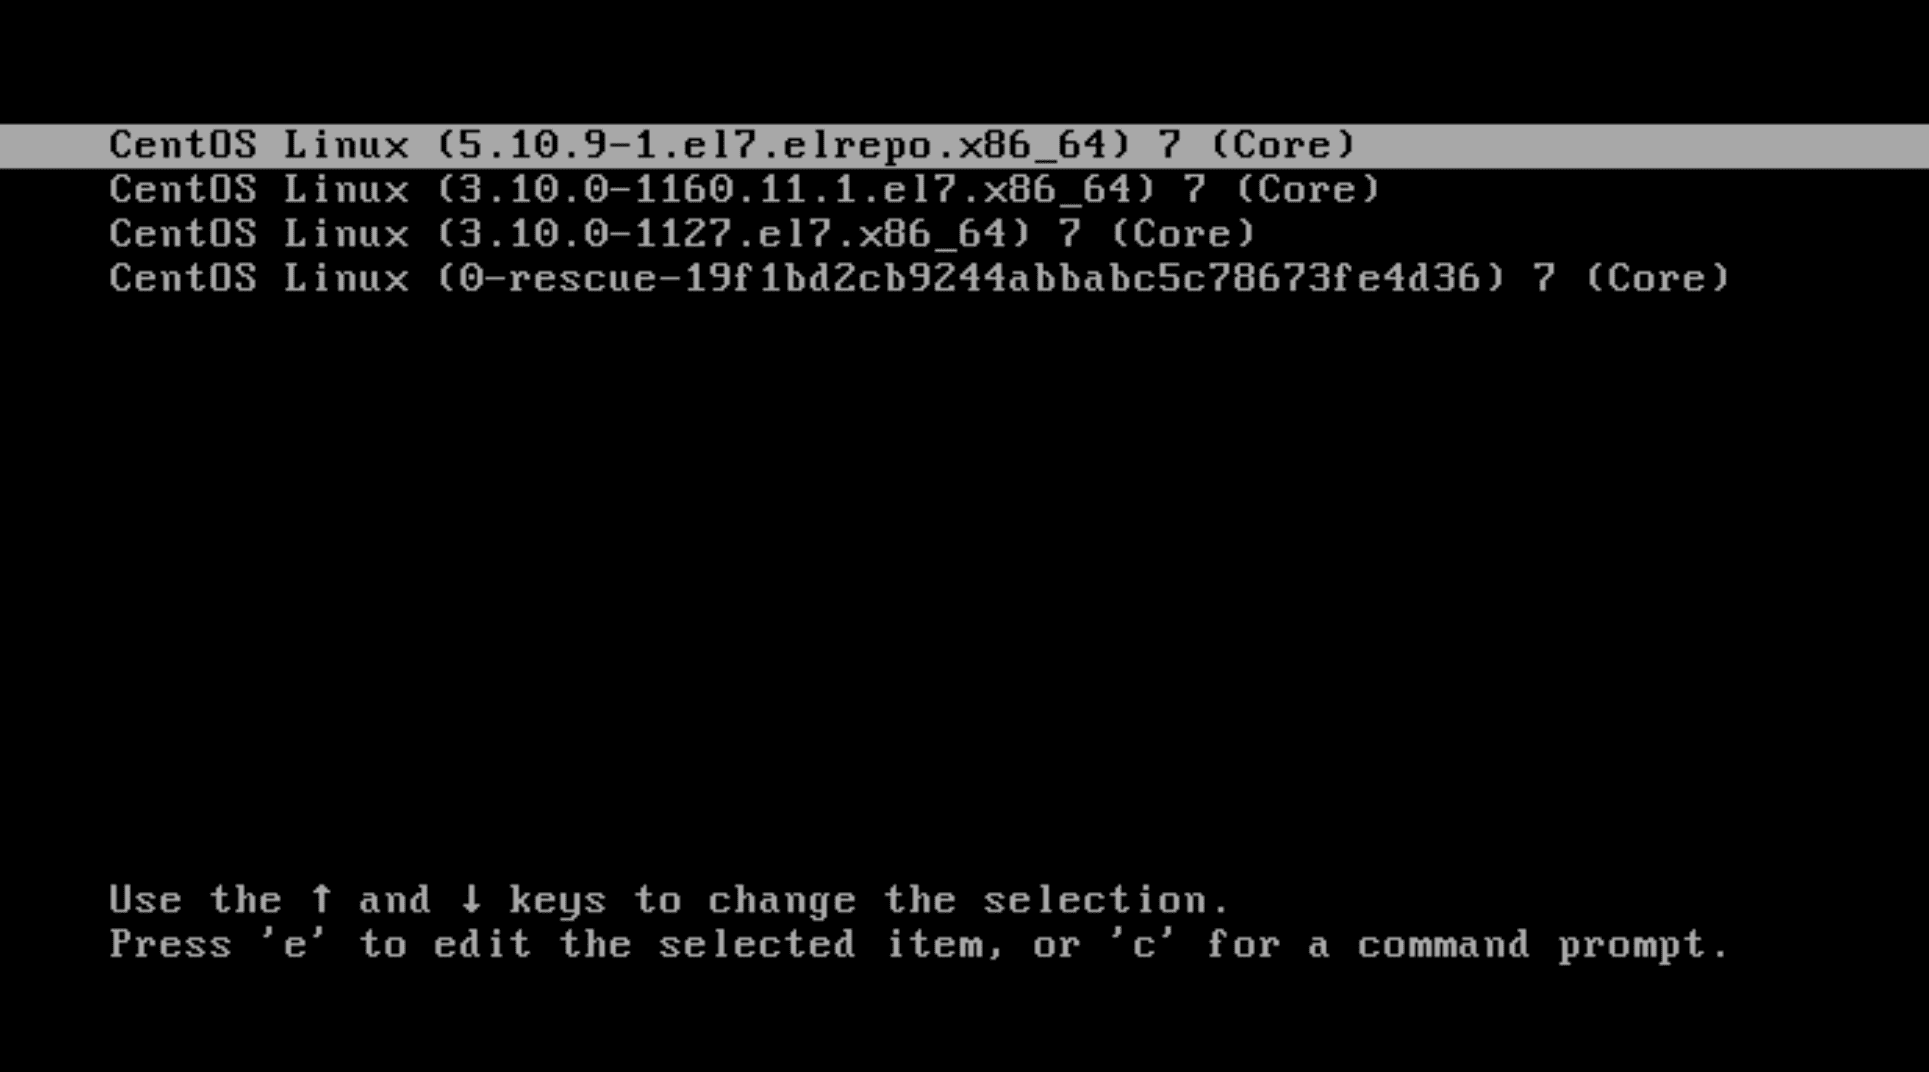
Finally, use the “reboot” command to apply the newly installed latest Kernel, and when the server restarts, select the latest Kernel from the menu as shown below. If you are using a VPS and cannot access the boot interface, please contact the technical department at the place where you registered to use the VPS.
Stay logged in as root and run the following command to check the Kernel version again:
uname -sr
However, we are not completely done yet at this point. Because upon restarting the server, it will still use the old version of the Kernel. Because upon restarting the server, it will still use the old version of the Kernel.
Step 4: Set the default Kernel version in GRUB
To set the newly installed version as the default boot option in GRUB, you will need to modify the GRUB configuration as follows:
sudo grub2-set-default 0
This means that the topmost Kernel in the initial GRUB screen will be used as the default.
Then you need to save and run the following command to regenerate the Kernel configuration:
grub2-mkconfig -o /boot/grub2/grub.cfg

Finally, let’s reboot with the “reboot“ command, and after the system has booted up, you can check the Kernel version again with the “uname -sr” command to ensure everything is working correctly.

Congratulations, you have successfully upgraded Kernel 5 on CentOS 7.
III. Summary
Hopefully, this article will help you better understand the Kernel and the importance of upgrading the Kernel of the system you are managing.
Wishing you success! See more useful articles about Linux VPS at the following link:
If you need assistance, you can contact support in the ways below:
- Hotline 247: 028 888 24768 (Ext 0)
- Ticket/Email: You use the email to register for the service and send it directly to: support@azdigi.com .
About the author

Thạch Phạm
Đồng sáng lập và Giám đốc điều hành của AZDIGI. Có hơn 15 năm kinh nghiệm trong phổ biến kiến thức liên quan đến WordPress tại thachpham.com, phát triển website và phát triển hệ thống.