
aaPanel is a new control that is being trusted and used by many users. A good-looking interface and the extremely simple operation of installing services with just a few mouse clicks have made administration easier for even inexperienced users. To be more familiar with aaPanel, in this article, AZDIGI will guide you on uploading a complete website to aaPanel.
You can go through the instructions to install aaPanel and how to add a website to aaPanel in the instructions below before starting today’s tutorial.
Step 1: Upload data
You can upload via FTP (if the size is about a few hundred MB => over 1GB, you should use FTP to upload) or use the Uploader directly from aaPanel following the steps:
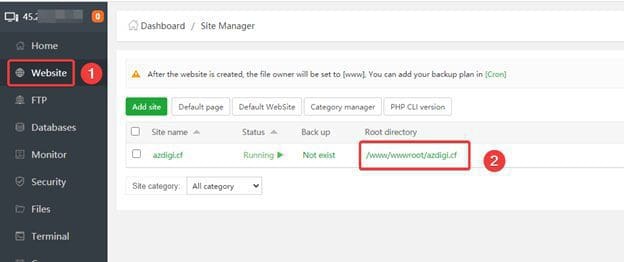
On the aaPanel admin page => select Website section (1) => go to the link to upload (2).
Next, click Upload (1) => Upload File (2) (select the source code file saved on your computer) => Start upload (3)

Right-click on the uploaded file (1) => Uncompress (2) to extract the file.

Step 2: Create a database
You access the Databases section (1) => Add database (2) => Fill in DBName/Username/Password (3) => Submit (4).

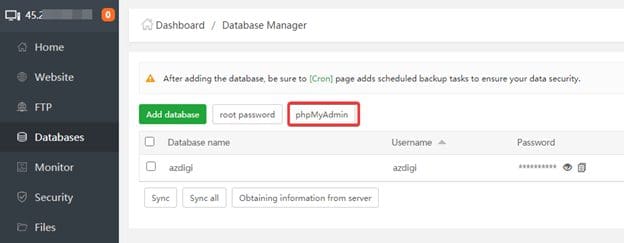
Now you need to import the database.sql file into the newly created Database by accessing phpMyadmin.

You enter the previously created database information => Go
At phpMyadmin, you access the created database (1) => Import (2) => click Choose File and navigate to the database.sql path from the computer (3) => Go (4).

Receive the message as shown below that you have succeeded.

Step 3: Connect Database with source code
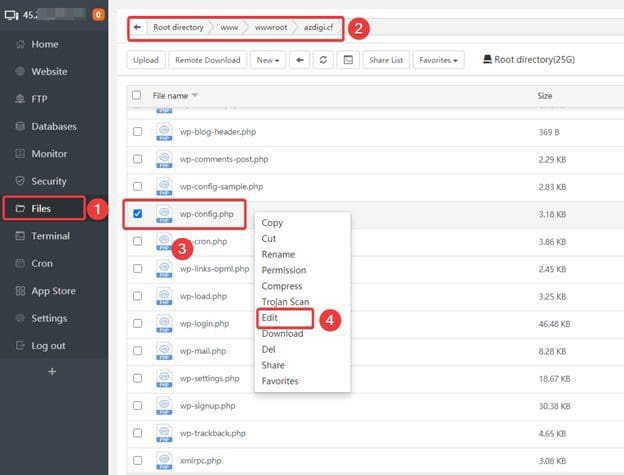
You go back to the path containing the uploaded source code in Step 1, go to the configuration file ( if using WordPress, the configuration file will be wp-config.php ) => Right-click (3) => Edit (4).
Go to the database connection section (1) and fill in the Database name/user/pass information made in Step 2 => click Save (2).

Now you can check the website to see if you can access it.

Errors arise
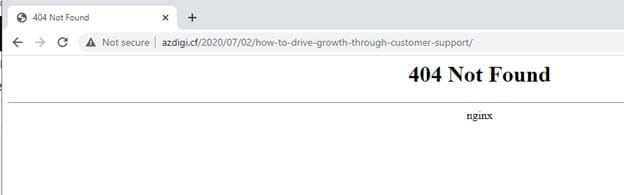
After uploading website data is complete, try to access some links on the website to see if there are errors, as shown below:
Note: Below is what I’m doing with NGINX Webserver.
If you encounter this error, do not worry, you can fix it as follows:

Now let’s check again.

Summary
So in this article, AZDIGI has shown you how to upload complete website data to aaPanel. If you find this helpful article, please share it widely.
Wishing you success!
If you need assistance, you can contact support in the ways below:
- Hotline 247: 028 888 24768 (Ext 0)
- Ticket/Email: You use the email to register for the service and send it directly to: support@azdigi.com
About the author

Thạch Phạm
Đồng sáng lập và Giám đốc điều hành của AZDIGI. Có hơn 15 năm kinh nghiệm trong phổ biến kiến thức liên quan đến WordPress tại thachpham.com, phát triển website và phát triển hệ thống.