1. Overview
When you use VPS, if you use multiple websites on the same VPS, you will probably need to customize separate PHP versions because not all PHP versions can run on all websites.
When most of the other free control panels are unable to customize different PHP versions, or if customizing is limited to 1 to 3 PHP versions. Then in CyberPanel, you can completely customize all PHP versions simply and completely freely.
So how to be able to customize, in this article, AZDIGI will guide you on how to customize a PHP version for a certain website.
2. Implementation steps
Step 1: Check your website’s current PHP version
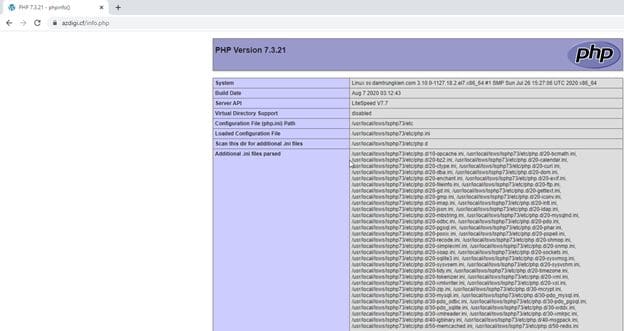
First, you need to check the website’s current PHP version by creating an info.php file in the directory containing your source code and inserting the code below.
phpinfo();
?>
Then visit the created path to check, for example, https://azdigi.cf/info.php and as shown, the site is running with PHP version 7.3.

Step 2: Customize the PHP version
You access the CyberPanel admin page, if you don’t know how to access CyberPanel, you can refer to the following article:
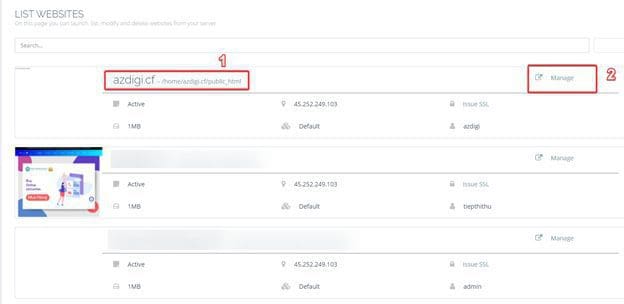
After accessing the admin page, you go to Cyber Panel => Websites => List Websites.

This section will show the existing websites on the VPS, you need to customize PHP for any website, then click Manage the corresponding website of that website.
At the menu, you click Change PHP => Select the PHP to change (you can fully customize the PHP versions from 5.3 => 7.4) => click Change PHP.
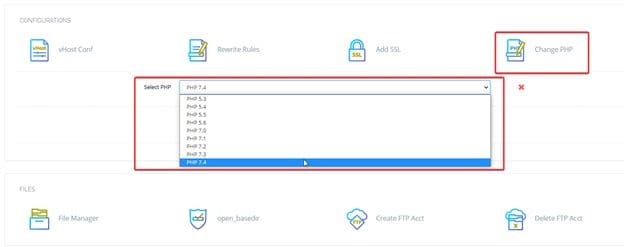
Here I choose PHP version 7.4.
If the above message is displayed, the PHP version has been changed. Now go back to the info file path created in Step 1 to check if the website has received the new version.

As shown below, I have successfully changed the PHP version.
Step 3: Customize PHP Parameters
In the process of using CyberPanel, there will be cases where you receive a notice from the website that you need to customize the PHP parameters on the VPS to be able to meet the operational requirements of the website, such as the following parameters:
memory_limit
max_execution_time
upload_max_filesize
post_max_size
max_input_time
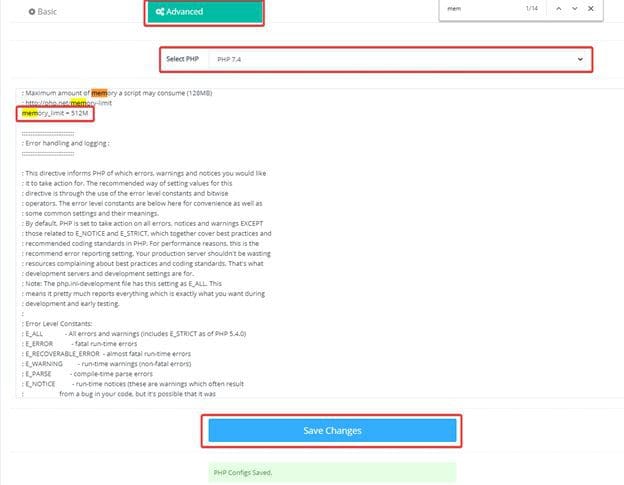
To be able to customize these parameters, at the admin interface, go to PHP => Edit PHP Configs.

Select the Advanced tab => Find the parameters to be raised and enter new parameters (as shown) => select Save Changes to update the parameters.
Note: Which PHP version your website uses, you must choose the correct version to customize the parameters to take effect.
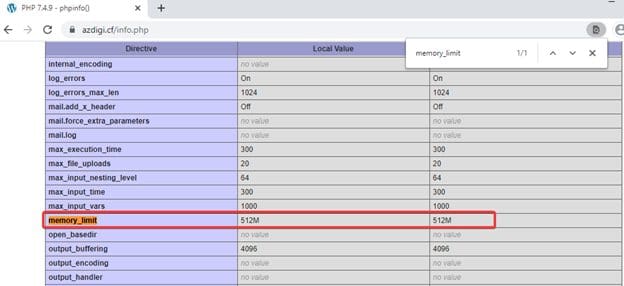
Now you can try accessing the info.php file to check if the parameter has been applied. As shown below, the parameters have been updated successfully.
3. Summary
So in this article, AZDIGI has shown you how to customize the PHP version most simply, this PHP customization will help you choose the correct PHP version for the unique structure of each website, helping to optimize the source code and works best. Hope the article is helpful to you. Wishing you success!
Wishing you success!
If you need assistance, you can contact support in the ways below:
- Hotline 247: 028 888 24768 (Ext 0)
- Ticket/Email: You use the email to register for the service and send it directly to: support@azdigi.com
You might also like
About the author

Thạch Phạm
Đồng sáng lập và Giám đốc điều hành của AZDIGI. Có hơn 15 năm kinh nghiệm trong phổ biến kiến thức liên quan đến WordPress tại thachpham.com, phát triển website và phát triển hệ thống.