In today’s article, AZDIGI will show you how to configure MX Record so that you can send and receive emails when using Google’s G Suite service.
Configure MX Record
To use G Suite, you need to configure the MX Record to the DNS domain. To do this, you need to log in to the Domain’s DNS administration and add the following records.
| Name/Host/Alias | Time to Live (TTL*) | Record Type | Priority | Value/Answer/Destination |
|---|---|---|---|---|
| Blank or @ | 3600 | MX | 1 | ASPMX.L.GOOGLE.COM. |
| Blank or @ | 3600 | MX | 5 | ALT1.ASPMX.L.GOOGLE.COM. |
| Blank or @ | 3600 | MX | 5 | ALT2.ASPMX.L.GOOGLE.COM. |
| Blank or @ | 3600 | MX | 10 | ALT3.ASPMX.L.GOOGLE.COM. |
| Blank or @ | 3600 | MX | 10 | ALT4.ASPMX.L.GOOGLE.COM. |
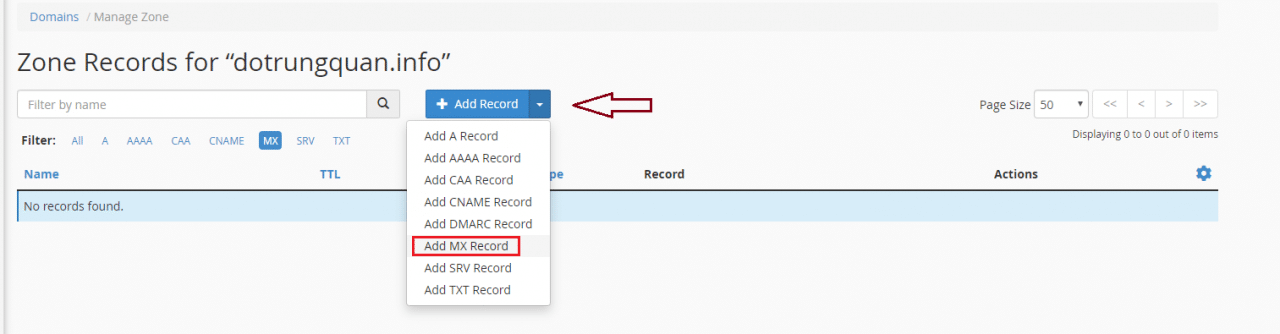
You add MX records as follows:
Note: Each provider will have a different DNS interface, so you just need to find and add the correct MX record!


After adding, check if the newly added Record has been successful at the link below.
- Link check DNS: Toolbox Google

Wishing you success!
This article has been reviewed by AZDIGI Team
About the author

Thạch Phạm
Đồng sáng lập và Giám đốc điều hành của AZDIGI. Có hơn 15 năm kinh nghiệm trong phổ biến kiến thức liên quan đến WordPress tại thachpham.com, phát triển website và phát triển hệ thống.
10+ years serving 80,000+ customers