Ở trong bài hướng dẫn này mình sẽ hướng dẫn sử dụng vi trên Linux để chỉnh sửa tệp tin.
I. Vi là gì?
Vi là trình soạn thảo văn bản toàn màn hình đầu tiên được viết cho Unix. Mặc dù nó được thiết kế rất nhẹ và đơn giản, nhưng nó có thể hơi khó khăn trong quá trình sử dụng đối với những người chỉ sử dụng các trình soạn thảo văn bản có giao diện, chẳng hạn như NotePad ++ hoặc gedit.
II. Tại sao bạn nên đọc qua hướng dẫn sử dụng vi trên Linux
Có ít nhất 2 lý do để bạn học cách sử dụng vi.
viluôn có sẵn trên tất cả các hệ điều hành Linux.vigần như không tiêu tốn tài nguyên hệ thống và cho phép các bạn thực hiện gần như tất cả tác vụ mà không cần nhấc ngón tay khỏi bàn phím.
Ngoài ra, vi có một bộ hướng dẫn được tích hợp rất phong phú, bạn có thể gọi bảng hướng dẫn ra với lệnh: vi –help.
vi --help

vi.III. Hướng dẫn sử dụng vi trên Linux
1. Khởi chạy vi
Để khởi chạy vi nhằm chỉnh sửa một tệp tin thì bạn chỉ cần sử dụng lệnh vi filename, ví dụ ở đây mình sẽ sử dụng vi để chỉnh sửa tệp tin anaconda-ks.cfg.
vi anaconda-ks.cfg
vi.Sau đó để vào chế độ chỉnh sửa bạn chỉ cần bấm i trên bàn phím là được. Khi vào chế độ này bạn sẽ thấy -- INSERT -- ở cuối giao diện sử dụng vi.
vi.2. Các lệnh khi sử dụng vi
Bảng sau đây cho thấy danh sách các lệnh vi thường được sử dụng. Các lệnh khi sử dụng vi với tệp có thể được thực thi bằng cách thêm dấu chấm than vào lệnh (Ví dụ: “:q!” Thực hiện thoát mà không lưu tệp).
| Lệnh | Mô tả lệnh |
| h hoặc mũi tên trái ⇦ | Di chuyển sang trái một ký tự. |
| j hoặc mũi tên xuống ⇩ | Di chuyển xuống một dòng. |
| k hoặc mũi tên lên ⇧ | Di chuyển lên một dòng. |
| l (chữ L viết thường) hoặc mũi tên phải ⇨ | Di chuyển sang phải một ký tự. |
| H | Lên đầu màn hình hoặc đầu trang. |
| L | Xuống cuối màn hình hoặc cuối trang. |
| G | Đi xuống cuối tệp. |
| w | Di chuyển sang từ tiếp theo. |
| b | Di chuyển về từ đứng phía trước. |
| 0 (số không) | Di chuyển đến đầu dòng đang đứng. |
| ^ | Chuyển đến ký tự đầu tiên ở dòng hiện tại. |
| $ | Di chuyển đến cuối dòng đang đứng. |
| Ctrl + b | Lùi lại một màn hình hoặc một trang. |
| Ctrl + f | Tiếp đến một màn hình hoặc một trang. |
| i | Vào chế độ chỉnh sửa dữ liệu tại vị trí đang đứng. |
| I (chữ i in hoa) | Vào chế độ chỉnh sửa dữ liệu tại đầu dòng đang đứng. |
| J (chữ j in hoa) | Nối dòng hiện tại với dòng tiếp theo. |
| a | Nối sau vị trí hiện tại |
| o (chữ O viết thường) | Tạo một dòng trống sau dòng hiện tại. |
| O (chữ hoa o) | Tạo một dòng trống trước dòng hiện tại. |
| r | Thay thế ký tự với ký tự mới ở vị trí hiện tại. |
| R | Ghi đè ở vị trí hiện tại. |
| x | Xóa ký tự ở vị trí hiện tại. |
| X | Xóa ký tự ngay trước (bên trái) của vị trí hiện tại. |
| dd | Cắt (có thể để dán sau này) toàn bộ dòng hiện tại. |
| D | Cắt từ vị trí con trỏ hiện tại đến cuối dòng (lệnh này tương đương với d $). |
| yX | Đưa ra lệnh di chuyển X, sao chép (kéo) số ký tự, từ hoặc dòng thích hợp từ vị trí con trỏ hiện tại. |
| yy hoặc Y | Sao chép toàn bộ dòng hiện tại. |
| p | Dán sau (dòng tiếp theo) vị trí con trỏ hiện tại. |
| P | Dán trước (dòng trước) vị trí con trỏ hiện tại. |
| . | Lặp lại lệnh cuối cùng. |
| u | Hoàn tác lệnh cuối cùng. |
| U | Hoàn tác lệnh cuối cùng ở dòng cuối cùng. Điều này sẽ hoạt động miễn là con trỏ vẫn ở trên dòng. |
| n | Tìm kết quả phù hợp tiếp theo trong một tìm kiếm. |
| N | Tìm kết quả phù hợp trước đó trong một tìm kiếm. |
| :n | Tệp tiếp theo; khi nhiều tệp được chỉ định để chỉnh sửa, lệnh này sẽ chuyển sang tệp tiếp theo. |
| :e file | Tải tệp vào vị trí của tệp hiện tại. |
| :r file | Chèn nội dung của tệp sau (dòng tiếp theo) vị trí con trỏ hiện tại. |
| :q | Thoát và không lưu các thay đổi. |
| :w file | Ghi bộ đệm hiện tại vào tệp. Để thêm vào một tệp hiện có, hãy sử dụng: w >> tệp. |
| :wq | Viết nội dung của tệp hiện tại và thoát. Tương đương với x! và ZZ |
| :r! command | Thực hiện lệnh và chèn đầu ra sau (dòng tiếp theo) vị trí con trỏ hiện tại. |
3. Tìm kiếm và thay thế
vi có khả năng di chuyển con trỏ đến một vị trí nhất định dựa trên kết quả tìm kiếm. Nó cũng có thể thực hiện thay thế văn bản và có bước xác nhận từ người dùng.
- Tìm kiếm trong một dòng: lệnh
ftìm kiếm một dòng và di chuyển con trỏ đến vị trí xuất hiện kết quả tìm kiếm.
Ví dụ, lệnh fo sẽ di chuyển con trỏ đến phiên bản tiếp theo của chữ o trong dòng hiện tại. Lưu ý rằng cả ký tự f và ký tự bạn đang tìm kiếm sẽ không xuất hiện ở bất kỳ đâu trên màn hình của bạn, nhưng ký tự trong kết quả sẽ được nằm trong con trỏ sau khi banh bấm Enter.

- Tìm kiếm trong toàn bộ nội dung tệp: Sử dụng lệnh
/, theo sau/là từ hoặc cụm từ cần tìm. Các kết quả trùng khớp tiếp theo sẽ hiển thị khi bạn tiếp tục bấm n hoặc xem lại các kết quả trước đó với N. Đây là kết quả của việc gõ /Setup trong chế độ lệnh.

- Thay thế dữ liệu:
visử dụng một lệnh để thực hiện các hoạt động thay thế trên một phạm vi dòng hoặc toàn bộ tệp. Để thay đổi từ “ Root ” thành “ admin ” cho toàn bộ tệp, chúng ta phải nhập lệnh sau.
:%s/Root/admin/g

vi.Nếu bạn muốn xác nhận trước khi thay thế dữ liệu thì thêm tùy chọn c ở cuối lệnh.
:%s/Root/admin/gc
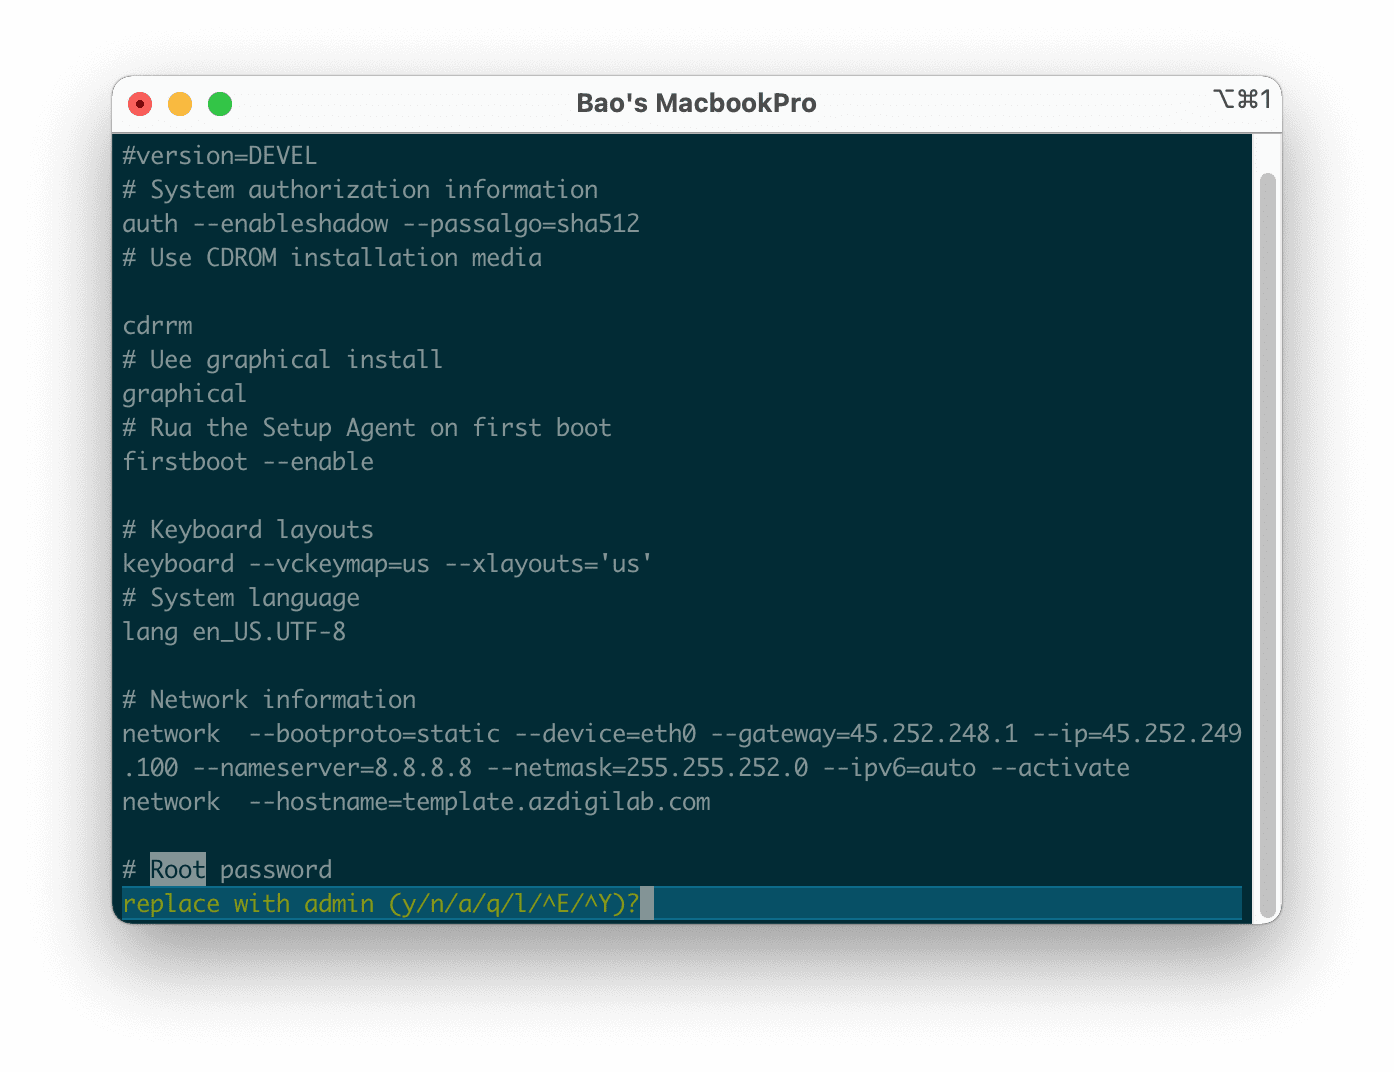
vi nhưng có yêu cầu xác nhận trước khi thay thế.Các tùy chọn khi được yêu cầu xác nhận thay thế:
- y : thực hiện thay thế (có)
- n : bỏ qua kết quả xuất hiện này và chuyển sang kết quả tiếp theo (hay còn hiểu là không thay thế)
- a : thực hiện thay thế trong tất cả các kết quả tìm thấy.
- q hoặc Esc : không thay thế và thoát hẳng lệnh thay thế.
- l ( L viết thường ): thực hiện thay thế ở kết quả đầu tiên mà thôi.
- Ctrl-e , Ctrl-y : Cuộn xuống và cuộn lên tương ứng để xem bối cảnh thay thế được đề xuất.
III. Tổng kết
Hy vọng với bài hướng dẫn sử dụng vi trên Linux này sẽ giúp các bạn hiểu hơn về nó cũng như dễ dàng quản trị các máy chủ của mình hơn.
Chúc các bạn có thể thực hiện thành công.
Nếu các bạn cần hỗ trợ các bạn có thể liên hệ bộ phận hỗ trợ theo các cách bên dưới:
- Hotline 247: 028 888 24768 (Ext 0)
- Ticket/Email: Bạn dùng email đăng ký dịch vụ gửi trực tiếp về: support@azdigi.com.
About the author

Thạch Phạm
Đồng sáng lập và Giám đốc điều hành của AZDIGI. Có hơn 15 năm kinh nghiệm trong phổ biến kiến thức liên quan đến WordPress tại thachpham.com, phát triển website và phát triển hệ thống.