
The most detailed guide to installing Python 3 and setting it as the default on Centos 7 with AZDIGI.
I. Introduction
What is Python?
Python is a powerful, high-level, object-oriented programming language created by Guido van Rossum. It’s easy to learn and is emerging as one of the best introductory programming languages for newbies. Python is completely dynamically typed and uses automatic memory allocation. Python has powerful high-level data structures and a simple yet effective approach to object-oriented programming. Python’s command syntax is a huge plus, its clarity, ease of understanding, and flexible typing make it an ideal language for scripting and application development in various fields on most platforms.
You can learn more about Python through each version and the structure and operating principles here.
II. Implementation Guide
To install Python 3, you can follow the following 3 installation steps.
Step 1: SSH into your VPS
First, you need to SSH into your VPS as root, if you don’t know how to SSH, you can see the instructions below:
Step 2: Check your Python version
By default Python installed on Centos 7 will be Python 2.7.x version, you use the following command to check the version:
python --version
So now my VPS is using Python version 2.7.
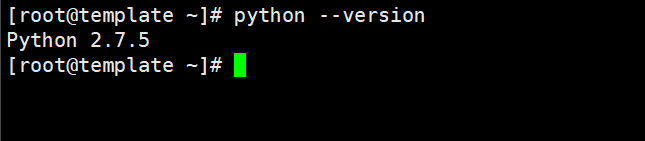
So to upgrade to Python 3 version, go to step 3.
Step 3: Update the Yum management tool
yum -y update                    (Cập nhật yum)
yum -y install yum-utils         (Cài đặt yum utils)
yum -y groupinstall development  (cài đặt các công cụ phát triển CentOS giúp xây dựng và biên dịch phần mềm từ mã nguồn.)
Step 4: Install Python 3
To check and download the latest Python versions, you can visit the homepage here.
- Since the standard yum repos don’t have the latest Python release, we will install the IUM (Inline with Upstream Stable) which will have the latest packages by running the following command:
yum install
https://repo.ius.io/ius-release-el7.rpm
https://dl.fedoraproject.org/pub/epel/epel-release-latest-7.noarch.rpm
- Now install Python 3, I will install Python 3.6 with the command:
yum -y install python36u

- Next, we will install PIP to manage software packages for Python.
yum -y install python36u-pip
- Then we will install the Python development packages.
yum -y install python36u-devel
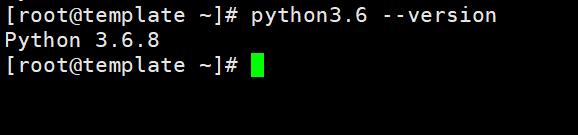
- Finally, check the Python version you just installed.
python3.6 --version
Step 5: Set Python 3 as the default
Although we have successfully installed Python 3, the VPS will still use Python version 2.7.5 as default. To change the default version, do the following:
- Check the location where Python 3 has just been installed, I previously installed Python 3.6 version, so I will use the following command:
which python3.6
The path will display as follows:
[root@template bin]# which python3.6
/usr/bin/python3.6
- Add the Alias in bash_profile.
This section means that we will add an Alias configuration so that when calling the python command, the system will load the specified path (here is Python version 3.6). You open and edit the bash_profile file with the command:
vi ~/.bash_profile
- Insert the following navigation into the .bash_profile file.
Remember to replace /usr/bin/python3.6 with the path on your VPS.
alias python='/usr/bin/python3.6'
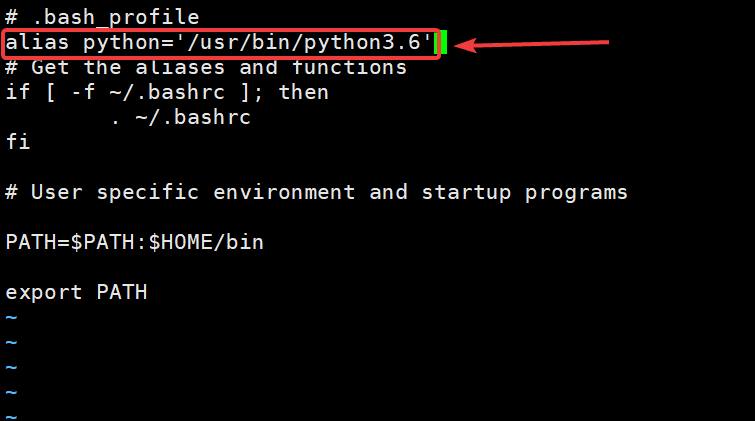
After editing, type :x to Save the configuration.
- Reload .bash_profile
source ~/.bash_profile
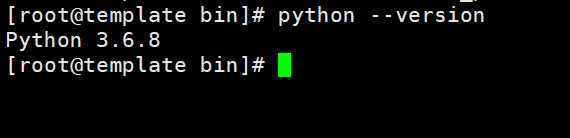
- Recheck the Python version .
python --version
III. Summary
So in this article, AZDIGI showed you how to install Python 3 and set this new version of Python as the system default. With this upgrade, you will be able to use many new packages from Python because each new package is developed they have conditions attached to the supported version. Hope this article will help you to install it successfully!
If you find the article helpful, please share it widely.
If you need assistance, you can contact support in the ways below:
- Hotline 247: 028 888 24768 (Ext 0)
- Ticket/Email: You use the email to register for the service and send it directly to: support@azdigi.com
About the author

Thạch Phạm
Đồng sáng lập và Giám đốc điều hành của AZDIGI. Có hơn 15 năm kinh nghiệm trong phổ biến kiến thức liên quan đến WordPress tại thachpham.com, phát triển website và phát triển hệ thống.