In an earlier post, AZDIGI had instructions for working with a git repository on cPanel with a local repository. In this article, AZDIGI will continue to guide more on how to sync data from a git repository on cPanel with another remote repository like Github, Gitlab,…
Before using this feature, AZDIGI recommends that you know how to use Git and Terminal before. You can refer to the series of Basic Git Tutorials to gain knowledge about Git.
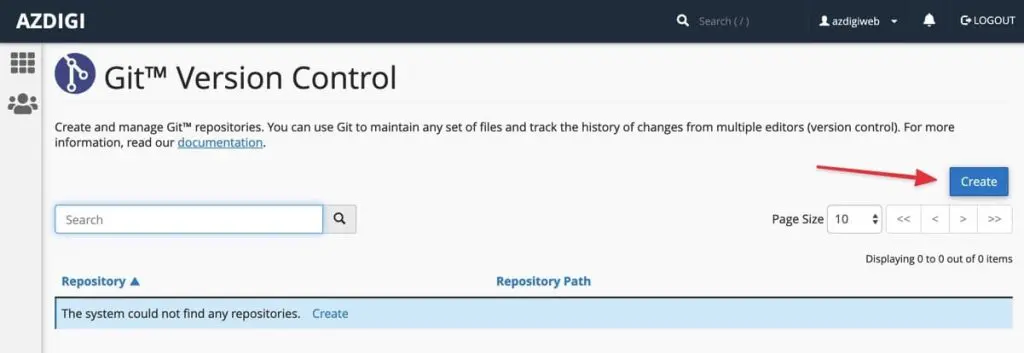
First, access cPanel => Git™ Version Control and press the Create button to create a repository on cPanel.

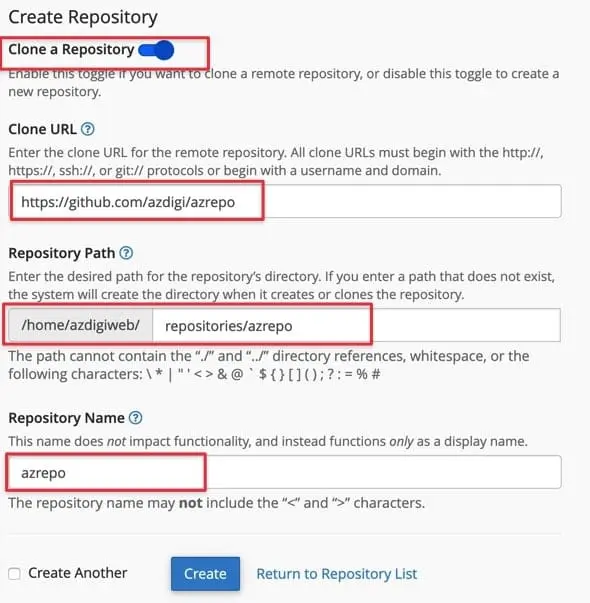
Then you turn on Clone a Repository and enter the following information:

- Clone a Repository: Clone this repository from another repository.
- Clone URL: Repository path to clone.
- Repository Path: The path of the repository on the host.
- Repository Name: Name of the repository, written immediately without accents, no spaces and no special characters.
Click the Create button to start creating. At this point your repository will begin to create and clone data.
Pull data – Update data from remote git to cPanel
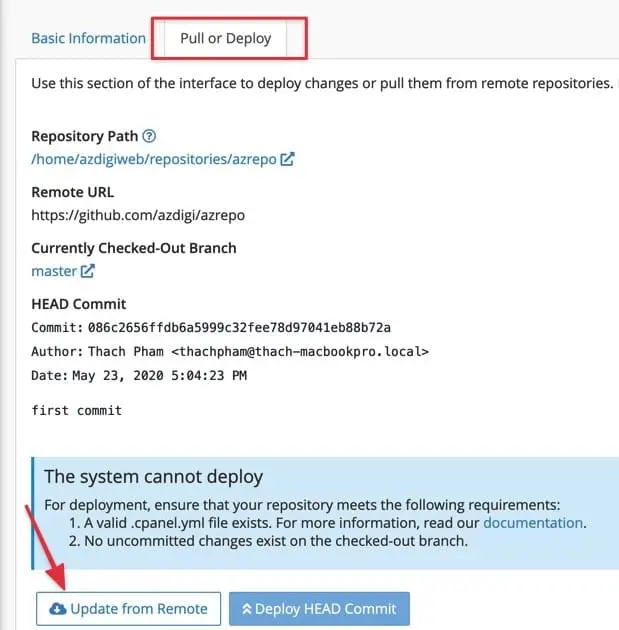
When there is new data on the connected repository, you can update it to the cPanel host (pull) by going to the Manage section of the working repository.

Select Pull or Deploy => click Update from Remote.

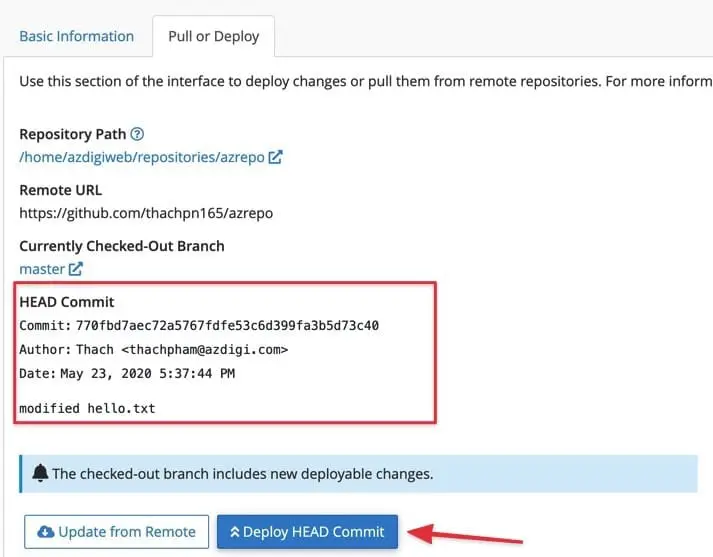
When pulling, there is a newly updated commit, it will be displayed in the HEAD Commit section.
Push data – From cPanel hosting to remote git
To use this feature effectively, AZDIGI would like to make an assumption as follows:
You have 2 websites on your cPanel host as below:
- demo.domain.com – The website address is in the final stage and is located in the git repository’s directory. As in this example is /home/azdigiweb/repositories/azrepo.
- domain.com – The address of the main website, running in the /home/azdigiweb/public_html directory.
And under your computer, there is a repository, you will push the completed changes to the git repository at Github, then to the hosting at cPanel to pull data from Github to the directory running demo.domain. com for a test run. After running without seeing any more errors, you proceed to deploy to the main website directory, domain.com.
To do so, we will use the push-deploy method on cPanel.
First, in the repository directory, you must have a .cpanel.yml file like this:
---
deployment:
  tasks:
    - export DEPLOYPATH=/home/azdigiweb/public_html/
    - /bin/cp -rf images $DEPLOYPATH
    - /bin/cp -rf content $DEPLOYPATH
In it, declare the variable DEPLOYPATH as the directory path of the main website, also known as the production site. And below it is the commands that it will execute when we deploy, the example above is that it will automatically copy the two folders images and content to the main directory of the website every time it sends the push-deploy command. You can place as many commands here as you like.
Then push this file to the repository.
git add .
git commit -m "added .cpanel.yml"
git push -u origin master
Then go to cPanel => Git™ Version Control => Manage => Pull or Deploy and press the Update from Remote button to update new data from the repository (which is the file .cpanel.yml that we just created).
Now check your cPanel repository directory and make sure that the .cpanel.yml file appears here.

This feature will deploy from the cPanel repository via the main website directory, so now to try it, go to the Terminal on the cPanel interface to proceed with adding some files and add it to git to try.
We run the following commands to access the repository directory on cPanel and create some test files:
cd /home/azdigiweb/repositories/azrepo
mkdir includes
touch includes/hello.txt
git add .
git commit -m "added hello.txt"
git push -u origin master
If you run the command git commit on cPanel with errors, then run the following 2 commands to set up a working name and email in Git.
  git config --global user.email "you@example.com"
  git config --global user.name "Your Name"
Now go back to the Git™ Version Control interface => Manage => Pull or Deploy and the Deploy HEAD Commit button lights up and can be clicked to start running the .cpanel.yml file and it will start deploying from the current commit (HEAD Commit).

After running it, you can try to check the main website directory and you will see that it copies the images folder and the files inside it according to the command we declared in .cpanel.yml.
So you have finished using the Git™ Version Control feature on cPanel to safely deploy the source code from the computer repository to the main website.
Wishing you success!

