Nội dung
Instructions for installing phpPgAdmin on CentOS 7 with just a few steps.
I. Introduction
What is phpPgAdmin?
phpPgAdmin is a great tool designed specifically for the PostgreSQL database management system. If you do not know about PostgreSQL, you can refer to the tutorial below.
phpPgAdmin is a web-based database management tool dedicated to the PostgreSQL database management system. phpPgAdmin is a web-based database management tool dedicated to the PostgreSQL database management system.
phpPgAdmin works well on most basic web servers: Apache, Nginx, etc. It offers a variety and convenience in database management through an intuitive interface.
Main functions:
- Administer multiple servers
- Support for PostgreSQL 8.4.x, 9.x, 10.x, 11.x
- Manage all aspects of:
- Users & groups
- Databases
- Schemas
- Tables, indexes, constraints, triggers, rules & privileges
- Views, sequences & functions
- Advanced objects
- Reports
- Easy data manipulation:
- Browse tables, views & reports
- Execute arbitrary SQL
- Select, insert, update and delete
- Dump table data in a variety of formats: SQL, COPY, XML, XHTML, CSV, Tabbed, pg_dump
- Import SQL scripts, COPY data, XML, CSV and Tabbed
- Supports the Slony master-slave replication engine
- Excellent language support:
- Available in 27 languages
- No encoding conflicts. Edit Russian data using a Japanese interface!
- Easy to install and configure
- Extendable with the use of plugins.
Installation conditions:
To be able to install phpPgAdmin, your server needs to meet the following:
- Web Service NGINX or Apache.
- PHP 5.6 or later and the php-pgsql extension enabled on the server side.
- PostgreSQL 8.4.x, 9.x, 10.x, 11.x…
II. Implementation Guide
To install phpPgAdmin, you can do it with the following 4 steps.
Step 1: SSH into your VPS
To install PostgreSQL, we first need to SSH or access your VPS/server as root. If you don’t know how to SSH into your VPS/Server, you can refer to the following tutorial:
After successful SSH, we continue with step 2 to Download phpPgAdmin
Bước 2: Download
- Download phpPgAdmin
At the time of writing, the latest version of phpPgAdmin is phpPgAdmin 7.12.0, so I will download this version, if you have a newer version at the time of installation, you can try it.
You can quickly download the source code through the following command:
wget https://github.com/phppgadmin/phppgadmin/archive/REL_7-12-1.tar.gz
- Extract the downloaded file:
tar -xvf REL_7-12-1.tar.gz
- After extracting the file, move the extracted folder data to the path /usr/share/phppgadmin
mv phppgadmin-REL_7-12-1 /usr/share/phppgadmin
- Assign permissions by the user with the command:
chown -R nginx:nginx /usr/share/phppgadmin     (Đối với Nginx)
hoặc
chown -R apache:apache /usr/share/phppgadmin   (Đối với Apache)
Step 3: Configure phpPgAdmin
- Before changing the configuration file, you should back it up first with the command:
cd /usr/share/phppgadmin/conf/
cp config.inc.php-dist config.inc.php
- Edit the config.inc.php file:
vi config.inc.php
You find and edit the following content:
//Hostname hoặc IP của Server
$conf['servers'][0]['host'] = 'localhost';
//Database port on server (5432 is the PostgreSQL default)
$conf['servers'][0]['port'] = 5432;
// If extra login security is true, then logins via phpPgAdmin with no
// password or certain usernames (pgsql, postgres, root, administrator)
// will be denied.
$conf['extra_login_security'] = true;
// Only show owned databases?
$conf['owned_only'] = false;
- Web Server Configuration
- With a server using Apache
vi /etc/httpd/conf.d/phppgadmin.conf
You add the content below:
Alias /phppgadmin "/usr/share/webapps/phppgadmin"

  DirectoryIndex index.php
  AllowOverride All
  Options FollowSymlinks
  Require all granted
  # phppgadmin raises deprecated warnings that lead

  # to parsing errors in JS
  php_flag display_startup_errors off
  php_flag display_errors off
  php_flag html_errors off
Restart the webserver with the command:
systemctl restart httpd
- With a server using Nginx
vi /etc/nginx/conf.d/your-domain.conf
location  /phppgadmin{
                 root /usr/share/;
                 index index.php index.html index.htm;
                 location ~ ^/phppgadmin/(.+.php)$ {
                         try_files $uri =404;
                         root /usr/share/;
                         fastcgi_pass unix:/var/run/php-fpm/php-fpm.sock;
                         fastcgi_index index.php;
                         fastcgi_param SCRIPT_FILENAME $document_root$fastcgi_script_name;
                         include /etc/nginx/fastcgi_params;
                 }
location ~* ^/phppgadmin/(.+.(jpg|jpeg|gif|css|png|js|ico|html|xml|txt))$ {
                         root /usr/share/;
                 }
}
         location /phpPgAdmin {
                rewrite ^/* /phppgadmin last;
         }
Restart the webserver:
systemctl restart nginx
Step 4: Check the operation of phpPgAdmin
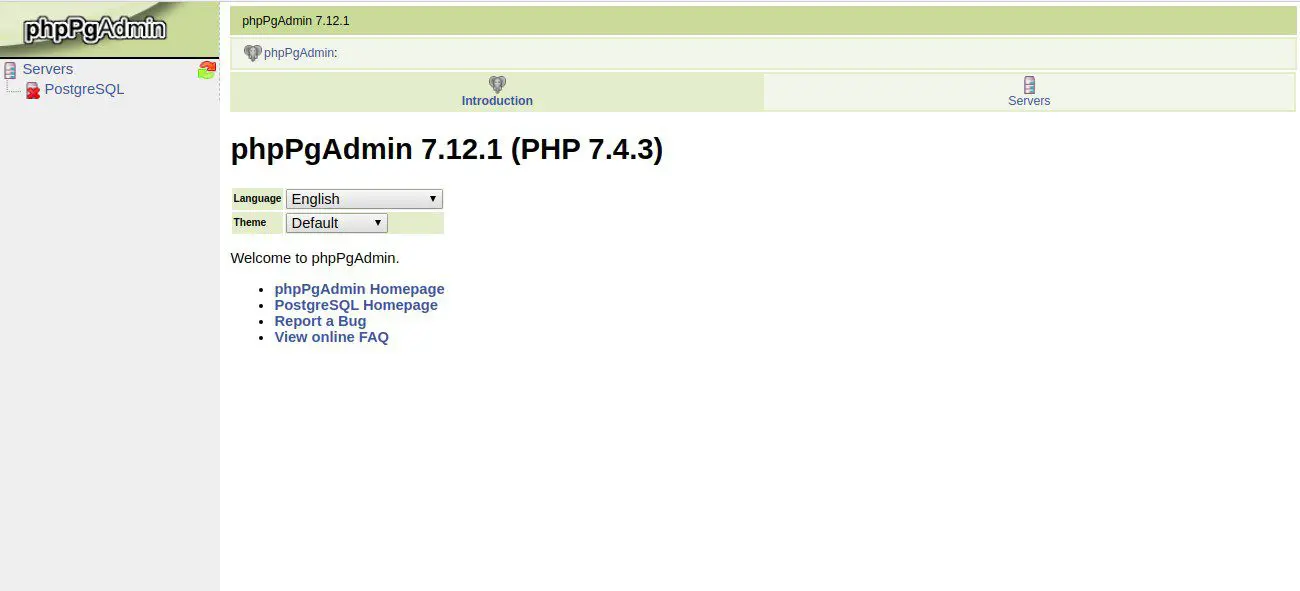
After the installation is complete, we proceed to recheck by opening the browser and accessing the path: http://domain.com/phppgadmin. If the screen shows as shown, you have succeeded.

III. Summary
Thus, in this article, AZDIGI showed you how to quickly install phpPgAdmin on CentOS 7. Installing phpPgAdmin will make your PostgreSQL database administration simpler and easier.
If you find the article helpful, please share it widely. Wishing you success.
In addition, you can refer to some other articles on Linux knowledge at the link below:
If you need assistance, you can contact support in the ways below:
- Hotline 247: 028 888 24768 (Ext 0)
- Ticket/Email: You use the email to register for the service and send it directly to: support@azdigi.com

