Nội dung
I. Overview
1. What is the Zimbra mail server?
Zimbra mail (Zimbra Collaboration Suite) is open source software with two parts, a mail server and a website client, and was developed with the goal of not only being used as mail but also a solution that can solve many problems, such as security, connecting members (chat) as well as managing and sharing work quickly and effectively for large and small businesses.
2. Functions of Zimbra mail
Functions of Zimbra mail:
- E-mail: Perfect email system with two parts: Mail Server (SMTP, POP3, IMAP, Backup, Antivirus… Besides, there are enough features such as auto-reply, forwarding …) and Mail Client (Zimbra Desktop and Zimbra Web Client).
- Contacts: Manage individual members’ books (Addresses, phone numbers, personal information,…) and the general book of the team.
- Tasks: List tasks, help track progress, and manage more optimally, as well as have the division of work priority and completed workload of each individual or team.
- Documents: Easily edit documents in the form of Wikis for each individual or team. Allows users to directly print finished drafted documents or exchange (send – receive) via Email.
- Briefcase: This tool can store documents and files for personal use or share with other groups or individuals.
- Chat: Chat internally with each other on LAN or on the Internet.
- Calendar: Information about personal and group calendars, support for creating appointments, automatically sending scheduled emails (such as pre-scheduled meeting times)…
- Preferences: Advanced editing with Zimbra, Including changing Themes, fonts, languages, shortcuts, signatures, mail filters…
3. Minimum configuration to install Zimbra
- Disk: Over 20GB
- Ram: 6GB
- IP (VPS or server), domain, mail domain
II. Steps to install the Zimbra mail server on CentOS 7
Step 1: SSH into the server
To install Zimbra, you first need to SSH or access your VPS/server as root. If you don’t know how to SSH into your VPS/Server, you can refer to the following tutorial:
Step 2: Check and update the server system
After SSHing into the VPS or server as root, you will need to check selinux and postfix because usually, on CentOS 7, it will enable, so it needs to be disabled.
- Disable
selinux
[root@sv ~]# vi /etc/selinux/config
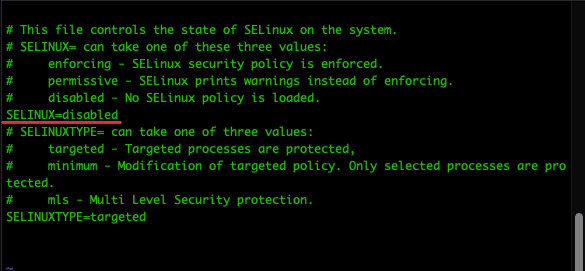
[root@sv ~]# sestatus
SELinux status: disabled
- Disable
postfix
Postfix is an open-source mail transfer agent (MTA) software for routing and sending mail. Released by IBM to replace the popular mail sender is sendmail. It is equipped with an operating system, so you can remove it to use Zimbra’s own service.
[root@sv ~]# systemctl stop postfix
[root@sv ~]# yum remove postfix -y
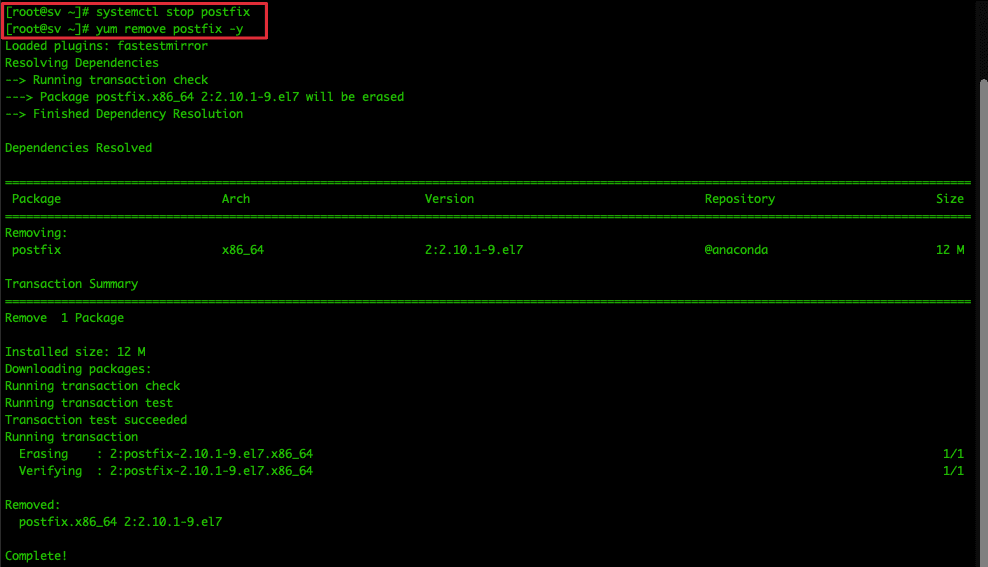
Next, update the system and reboot your VPS/server.
[root@sv ~]# yum update -y ; reboot
While waiting for the system to update and reboot, you can take the next step.
Step 3: Update the mail record
To install Zimbra, you need to point to 2 mail records as shown below:
| Type | Name | Value | TTL |
| A | webmail | ip-server | Auto |
| MX | @ or domain | webmail.domain | Auto |
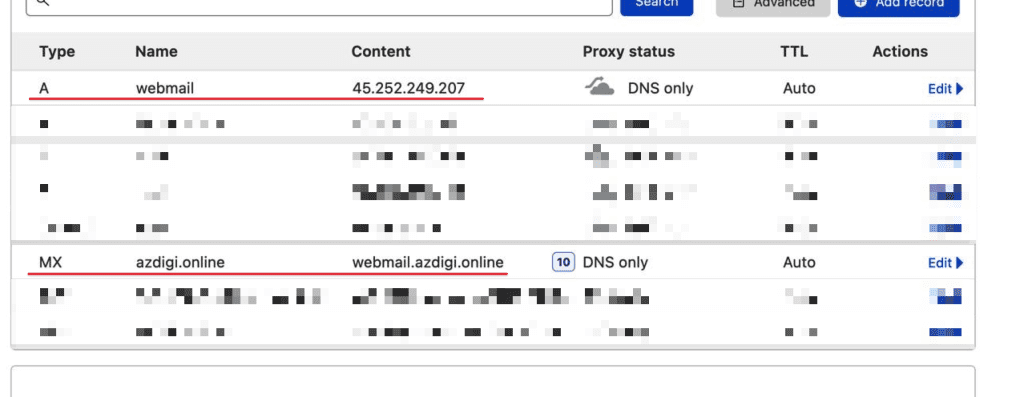
Step 4: Set up the hostname
You SSH back into the VPS or server (as in step 1). Then check if the current hostname of the VPS or server is correct and matches the record you pointed at in step 3, if not, you need to re-set the hostname.
[root@sv ~]# hostnamectl set-hostname webmail.azdigi.online
[root@sv ~]# exec bash
[root@webmail ~]#
After setting the hostname, go to the hosts file and add the following line: (remember to change the IP with your VPS or server IP)
[root@webmail ~]# vi /etc/hosts
127.0.0.1   localhost localhost.localdomain localhost4 localhost4.localdomain4
::1         localhost localhost.localdomain localhost6 localhost6.localdomain6
45.252.249.207 webmail.azdigi.online
Step 5: Install some necessary applications for Zimbra
You execute the following command to install the necessary applications for Zimbra installation:
[root@webmail ~]# yum install unzip net-tools sysstat openssh-clients perl-core libaio nmap-ncat libstdc++.so.6 wget -y
  perl-Net-Daemon.noarch 0:0.48-5.el7                                       perl-Object-Accessor.noarch 1:0.42-299.el7_9
  perl-Package-Constants.noarch 1:0.02-299.el7_9                            perl-Params-Check.noarch 1:0.38-2.el7
  perl-Parse-CPAN-Meta.noarch 1:1.4404-5.el7                                perl-Perl-OSType.noarch 0:1.003-3.el7
  perl-PlRPC.noarch 0:0.2020-14.el7                                         perl-Pod-Checker.noarch 0:1.60-2.el7
  perl-Pod-LaTeX.noarch 0:0.61-2.el7                                        perl-Pod-Parser.noarch 0:1.61-2.el7
  perl-Sys-Syslog.x86_64 0:0.33-3.el7                                       perl-Term-UI.noarch 0:0.36-2.el7
  perl-Test-Harness.noarch 0:3.28-3.el7                                     perl-Test-Simple.noarch 0:0.98-243.el7
  perl-Text-Soundex.x86_64 0:3.04-4.el7                                     perl-Text-Unidecode.noarch 0:0.04-20.el7
  perl-Thread-Queue.noarch 0:3.02-2.el7                                     perl-Time-Piece.x86_64 0:1.20.1-299.el7_9
  perl-Version-Requirements.noarch 0:0.101022-244.el7                       perl-autodie.noarch 0:2.16-2.el7
  perl-devel.x86_64 4:5.16.3-299.el7_9                                      perl-local-lib.noarch 0:1.008010-4.el7
  perl-version.x86_64 3:0.99.07-6.el7                                       pyparsing.noarch 0:1.5.6-9.el7
  systemtap-sdt-devel.x86_64 0:4.0-13.el7

Complete!
[root@webmail ~]#
Step 6: Install Zimbra Mail
After you have installed the necessary applications, you create a Zimbra folder to download and install Zimbra.
[root@webmail ~]# mkdir zimbra && cd zimbra
Next, use the command below to download Zimbra. You can access the homepage to download the Zimbra source directly.
[root@webmail zimbra]# wget https://files.zimbra.com/downloads/8.8.15_GA/zcs-8.8.15_GA_3869.RHEL7_64.20190918004220.tgz --no-check-certificate
--2022-04-11 01:28:24--  https://files.zimbra.com/downloads/9.0.0_GA/zcs-NETWORK-9.0.0_GA_3924.RHEL7_64.20200331010312.tgz
Resolving files.zimbra.com (files.zimbra.com)... 13.35.15.53
Connecting to files.zimbra.com (files.zimbra.com)|13.35.15.53|:443... connected.
HTTP request sent, awaiting response... 200 OK
Length: 493203719 (470M) [binary/octet-stream]
Saving to: ‘zcs-NETWORK-9.0.0_GA_3924.RHEL7_64.20200331010312.tgz’

57% [=======================================================>                                         ] 285,148,244 20.2MB/s  eta 13s
After the download is complete, extract the .tgz file and access the extracted folder to install Zimbra with the commands below:
[root@webmail zimbra]# tar zxpvf zcs*.tgz
...
  zcs-8.8.15_GA_3869.RHEL7_64.20190918004220/.BUILD_RELEASE_CANDIDATE
  zcs-8.8.15_GA_3869.RHEL7_64.20190918004220/.BUILD_TIME_STAMP
...
[root@webmail zimbra]# cd zcs* && ./install.sh
[root@webmail zimbra]# cd zcs* && ./install.sh

Operations logged to /tmp/install.log.bnyHvXPW
Checking for existing installation...
    zimbra-drive...NOT FOUND
    zimbra-imapd...NOT FOUND
    zimbra-modern-ui...NOT FOUND
    zimbra-modern-zimlets...NOT FOUND
    zimbra-patch...NOT FOUND
    zimbra-mta-patch...NOT FOUND
    zimbra-proxy-patch...NOT FOUND
    zimbra-license-tools...NOT FOUND
    zimbra-license-extension...NOT FOUND
    zimbra-network-store...NOT FOUND
    zimbra-network-modules-ng...NOT FOUND
    zimbra-chat...NOT FOUND
    zimbra-connect...NOT FOUND
    zimbra-talk...NOT FOUND
    zimbra-ldap...NOT FOUND
    zimbra-logger...NOT FOUND
    zimbra-mta...NOT FOUND
    zimbra-dnscache...NOT FOUND
    zimbra-snmp...NOT FOUND
    zimbra-store...NOT FOUND
    zimbra-apache...NOT FOUND
    zimbra-spell...NOT FOUND
    zimbra-convertd...NOT FOUND
    zimbra-memcached...NOT FOUND
    zimbra-proxy...NOT FOUND
    zimbra-archiving...NOT FOUND
    zimbra-core...NOT FOUND
...
zimbra-core...NOT FOUND
...
Do you agree with the terms of the software license agreement? [N] y
Use Zimbra's package repository [Y] y
Found zimbra-core (local)
Found zimbra-ldap (local)
Found zimbra-logger (local)
Found zimbra-mta (local)
Found zimbra-dnscache (local)
Found zimbra-snmp (local)
Found zimbra-store (local)
Found zimbra-apache (local)
Found zimbra-spell (local)
Found zimbra-memcached (repo)
Found zimbra-proxy (local)
Found zimbra-drive (repo)
Found zimbra-imapd (local)
Found zimbra-patch (repo)
Found zimbra-mta-patch (repo)
Found zimbra-proxy-patch (repo)
Select the packages to install
Install zimbra-ldap [Y] y
Install zimbra-logger [Y] y
Install zimbra-mta [Y] y
Install zimbra-dnscache [Y] y
Install zimbra-snmp [Y] y
Install zimbra-store [Y] y
Install zimbra-apache [Y] y
Install zimbra-spell [Y] y
Install zimbra-memcached [Y] y
Install zimbra-proxy [Y] y
Install zimbra-drive [Y] y
Install zimbra-imapd (BETA - for evaluation only) [N] y
Install zimbra-chat [Y] y
Checking required space for zimbra-core
Checking space for zimbra-store
Checking required packages for zimbra-store
zimbra-store package check complete.
Installing:
...
zimbra-core
...
zimbra-chat
...
The system will be modified.  Continue? [N] y
Beginning Installation - see /tmp/install.log.PtZTEKqZ for details...
zimbra-core-components will be downloaded and installed.
zimbra-timezone-data will be installed.
zimbra-common-core-jar will be installed.
zimbra-common-mbox-conf will be installed.
zimbra-common-mbox-conf-attrs will be installed.
zimbra-common-mbox-conf-msgs will be installed.
zimbra-common-mbox-conf-rights will be installed.
zimbra-common-mbox-db will be installed.
zimbra-common-mbox-docs will be installed.
zimbra-common-mbox-native-lib will be installed.
zimbra-common-core-libs will be installed.
zimbra-core will be installed.
zimbra-ldap-components will be downloaded and installed.
zimbra-ldap will be installed.
zimbra-logger will be installed.
zimbra-mta-components will be downloaded and installed.
zimbra-mta will be installed.
zimbra-dnscache-components will be downloaded and installed.
zimbra-dnscache will be installed.
zimbra-snmp-components will be downloaded and installed.
zimbra-snmp will be installed.
zimbra-store-components will be downloaded and installed.
zimbra-jetty-distribution will be downloaded and installed.
zimbra-mbox-conf will be installed.
zimbra-mbox-war will be installed.
zimbra-mbox-service will be installed.
zimbra-mbox-webclient-war will be installed.
zimbra-mbox-admin-console-war will be installed.
zimbra-mbox-store-libs will be installed.
zimbra-store will be installed.
zimbra-apache-components will be downloaded and installed.
zimbra-apache will be installed.
zimbra-spell-components will be downloaded and installed.
zimbra-spell will be installed.
zimbra-memcached will be downloaded and installed.
zimbra-proxy-components will be downloaded and installed.
zimbra-proxy will be installed.
zimbra-drive will be downloaded and installed (later).
zimbra-imapd will be installed.
zimbra-patch will be downloaded and installed (later).
zimbra-mta-patch will be downloaded and installed (later).
zimbra-proxy-patch will be downloaded and installed (later).
zimbra-chat will be downloaded and installed (later).
Downloading packages (11):
...
zimbra-core-components
...
zimbra-proxy-components
...done
...
Removing /opt/zimbra
Removing zimbra crontab entry...done.
Cleaning up zimbra init scripts...done.
Cleaning up /etc/security/limits.conf...done.
Finished removing Zimbra Collaboration Server.
Installing repo packages (11):
...
zimbra-core-components
...
zimbra-proxy-components
...done
...
Installing local packages (27):
...
zimbra-timezone-data
...
zimbra-imapd
...done
...
Installing extra packages (5):
...
zimbra-drive
...
zimbra-chat
...done
...
Running Post Installation Configuration:
Operations logged to /tmp/zmsetup.20220411-024200.log
Installing LDAP configuration database...done.
Setting defaults...
DNS ERROR resolving MX for webmail.azdigi.online
It is suggested that the domain name have an MX record configured in DNS
Change domain name? [Yes] yes
Create domain: [webmail.azdigi.online] azdigi.online  #Thay vào domain của bạn
MX: webmail.azdigi.online (45.252.249.207)
Interface: 127.0.0.1
Interface: ::1
Interface: 45.252.249.207
done.
Checking for port conflicts
Main menu
1) Common Configuration:
2) zimbra-ldap:                             Enabled
3) zimbra-logger:                           Enabled
4) zimbra-mta:                              Enabled
5) zimbra-dnscache:                         Enabled
6) zimbra-snmp:                             Enabled
7) zimbra-store:                            Enabled
+Create Admin User:                    yes
+Admin user to create:                 admin@azdigi.online
******* +Admin Password                        UNSET  #chưa set Password
+Anti-virus quarantine user:           virus-quarantine.oz1ioypute@azdigi.online
+Enable automated spam training:       yes
+Spam training user:                   spam.wnlas9fe1o@azdigi.online
+Non-spam(Ham) training user:          ham.97krutc9vl@azdigi.online
+SMTP host:                            webmail.azdigi.online
+Web server HTTP port:                 8080
+Web server HTTPS port:                8443
+Web server mode:                      https
+IMAP server port:                     7143
+IMAP server SSL port:                 7993
+POP server port:                      7110
+POP server SSL port:                  7995
+Use spell check server:               yes
+Spell server URL:                     http://webmail.azdigi.online:7780/aspell.php
+Enable version update checks:         TRUE
+Enable version update notifications:  TRUE
+Version update notification email:    admin@azdigi.online
+Version update source email:          admin@azdigi.online
+Install mailstore (service webapp):   yes
+Install UI (zimbra,zimbraAdmin webapps): yes
8) zimbra-spell:                            Enabled
9) zimbra-proxy:                            Enabled
10) zimbra-imapd:                            Enabled
11) Default Class of Service Configuration:
s) Save config to file
x) Expand menu
q) Quit
Address unconfigured (**) items  (? - help) 7
Store configuration
1) Status:                                  Enabled
2) Create Admin User:                       yes
3) Admin user to create:                    admin@azdigi.online
** 4) Admin Password                           UNSET
5) Anti-virus quarantine user:              virus-quarantine.oz1ioypute@azdigi.online
6) Enable automated spam training:          yes
7) Spam training user:                      spam.wnlas9fe1o@azdigi.online
8) Non-spam(Ham) training user:             ham.97krutc9vl@azdigi.online
9) SMTP host:                               webmail.azdigi.online
10) Web server HTTP port:                    8080
11) Web server HTTPS port:                   8443
12) Web server mode:                         https
13) IMAP server port:                        7143
14) IMAP server SSL port:                    7993
15) POP server port:                         7110
16) POP server SSL port:                     7995
17) Use spell check server:                  yes
18) Spell server URL:                        http://webmail.azdigi.online:7780/aspell.php
19) Enable version update checks:            TRUE
20) Enable version update notifications:     TRUE
21) Version update notification email:       admin@azdigi.online
22) Version update source email:             admin@azdigi.online
23) Install mailstore (service webapp):      yes
24) Install UI (zimbra,zimbraAdmin webapps): yes
Select, or 'r' for previous menu [r] 4
Password for admin@azdigi.online (min 6 characters): [JqA8eqasM] JqA8eqasM
Store configuration
1) Status:                                  Enabled
2) Create Admin User:                       yes
3) Admin user to create:                    admin@azdigi.online
4) Admin Password                           set #Đã set Password
5) Anti-virus quarantine user:              virus-quarantine.oz1ioypute@azdigi.online
6) Enable automated spam training:          yes
7) Spam training user:                      spam.wnlas9fe1o@azdigi.online
8) Non-spam(Ham) training user:             ham.97krutc9vl@azdigi.online
9) SMTP host:                               webmail.azdigi.online
10) Web server HTTP port:                    8080
11) Web server HTTPS port:                   8443
12) Web server mode:                         https
13) IMAP server port:                        7143
14) IMAP server SSL port:                    7993
15) POP server port:                         7110
16) POP server SSL port:                     7995
17) Use spell check server:                  yes
18) Spell server URL:                        http://webmail.azdigi.online:7780/aspell.php
19) Enable version update checks:            TRUE
20) Enable version update notifications:     TRUE
21) Version update notification email:       admin@azdigi.online
22) Version update source email:             admin@azdigi.online
23) Install mailstore (service webapp):      yes
24) Install UI (zimbra,zimbraAdmin webapps): yes
Select, or 'r' for previous menu [r] r
Main menu
1) Common Configuration:
2) zimbra-ldap:                             Enabled
3) zimbra-logger:                           Enabled
4) zimbra-mta:                              Enabled
5) zimbra-dnscache:                         Enabled
6) zimbra-snmp:                             Enabled
7) zimbra-store:                            Enabled
8) zimbra-spell:                            Enabled
9) zimbra-proxy:                            Enabled
10) zimbra-imapd:                            Enabled
11) Default Class of Service Configuration:
s) Save config to file
x) Expand menu
q) Quit
*** CONFIGURATION COMPLETE - press 'a' to apply
Select from menu, or press 'a' to apply config (? - help) a
Save configuration data to a file? [Yes] yes
Save config in file: [/opt/zimbra/config.15635] /opt/zimbra/config.15635
Saving config in /opt/zimbra/config.15635...done.
The system will be modified - continue? [No] yes
...
Operations logged to /tmp/zmsetup.20220411-024200.log
...
Finished installing common zimlets.
Restarting mailboxd...done.
...
Creating galsync account for default domain...done.
You have the option of notifying Zimbra of your installation.
This helps us to track the uptake of the Zimbra Collaboration Server.
The only information that will be transmitted is:
The VERSION of zcs installed (8.8.15_GA_3869_RHEL7_64)
The ADMIN EMAIL ADDRESS created (admin@azdigi.online)
Notify Zimbra of your installation? [Yes] yes/no
Notifying Zimbra of installation via http://www.zimbra.com/cgi-bin/notify.cgi?VER=8.8.15_GA_3869_RHEL7_64&MAIL=admin@azdigi.online
ERROR: Notification failed  #Nếu chọn yes, mà mail admin@domain chưa tồn tại thì sẽ báo failed, có thể bỏ qua
Checking if the NG started running...done.
Setting up zimbra crontab...done.
Moving /tmp/zmsetup.20220411-024200.log to /opt/zimbra/log
Configuration complete - press return to exit
After the installation is complete, restart the Zimbra service with the following command:
[root@webmail ~]# su zimbra
[zimbra@webmail root]$ cd && zmcontrol restart
[zimbra@webmail root]$ cd && zmcontrol restart
Host webmail.azdigi.online
Stopping zmconfigd...Done.
Stopping imapd...Done.
Stopping zimlet webapp...Done.
Stopping zimbraAdmin webapp...Done.
Stopping zimbra webapp...Done.
Stopping service webapp...Done.
Stopping stats...Done.
Stopping mta...Done.
Stopping spell...Done.
Stopping snmp...Done.
Stopping cbpolicyd...Done.
Stopping archiving...Done.
Stopping opendkim...Done.
Stopping amavis...Done.
Stopping antivirus...Done.
Stopping antispam...Done.
Stopping proxy...Done.
Stopping memcached...Done.
Stopping mailbox...Done.
Stopping logger...Done.
Stopping dnscache...Done.
Stopping ldap...Done.
Host webmail.azdigi.online
Starting ldap...Done.
Starting zmconfigd...Done.
Starting dnscache...Done.
Starting logger...Done.
Starting mailbox...Done.
Starting memcached...Done.
Starting proxy...Done.
Starting amavis...Done.
Starting antispam...Done.
Starting antivirus...Done.
Starting opendkim...Done.
Starting snmp...Done.
Starting spell...Done.
Starting mta...Done.
Starting stats...Done.
Starting service webapp...Done.
Starting zimbra webapp...Done.
Starting zimbraAdmin webapp...Done.
Starting zimlet webapp...Done.
Starting imapd...Done.
Step 7: Check Firewall and Open Port
So you have completed the installation of zimbra and you need to check if the VPS/server is using Firewall or not. If yes, you need to open the following ports to work.
- Ports you need to open
25,80,110,143,443,465,587,993,995,5222,5223,9071,7071After checking, you can access zimbra admin by IP:port via https protocol!
- For example, https://45.252.249.207:7071/
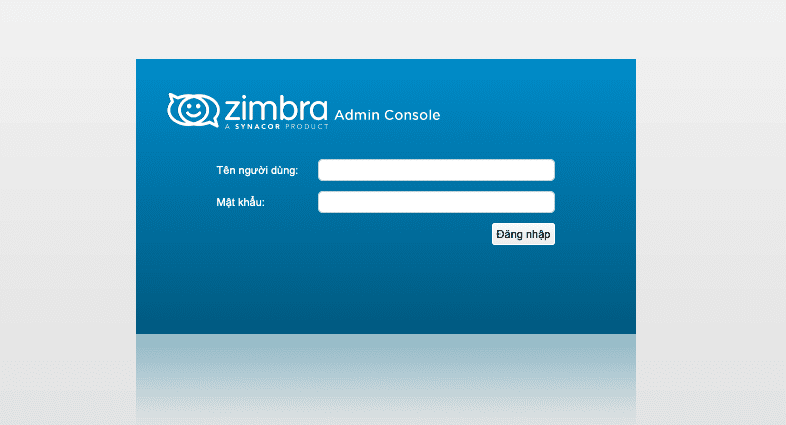
Login information includes:
- Username: admin@domain
- Password: Password is set in menu item 4
Note:
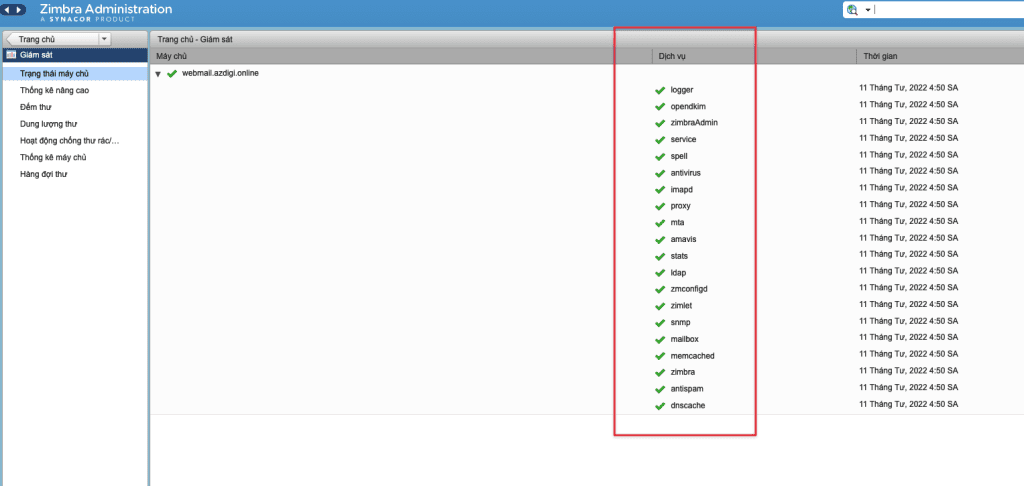
After you log in, if you see Trạng thái máy chủ of the services not working, please reboot the VPS or server.
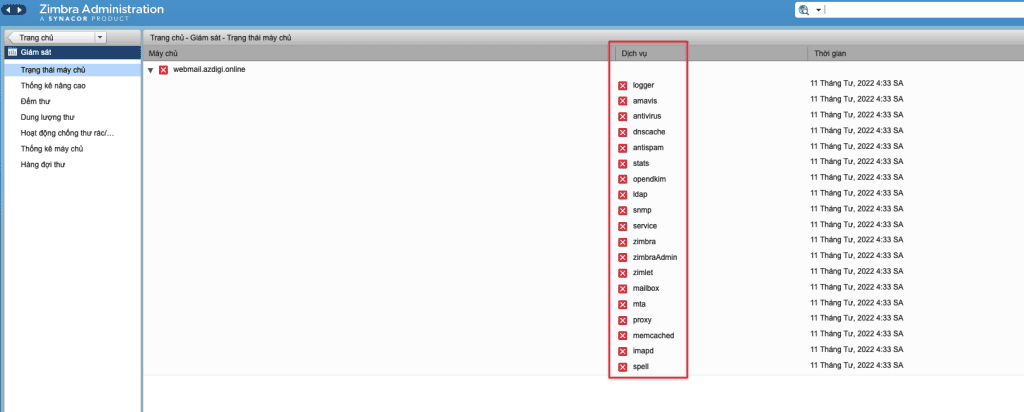
And here are the results of my installation steps.
Wishing you success!
If you need assistance, you can contact support in the ways below:
- Hotline 247: 028 888 24768 (Ext 0)
- Ticket/Email: You use the email to register for the service and send it directly to: support@azdigi.com .

