![[Cloudron – Phần 1] Introduction and Installation of Cloudron on VPS](https://img.azdigi.com/2026/01/cloudron-phan-1-gioi-thieu-va-cai-dat-cloudron-len-vps-1768556862.jpg)
While using a Virtual Private Server (VPS), utilizing software that creates a management interface for server software can save time and offer convenience. Some notable control panels include cPanel, DirectAdmin, CyberPanel, aaPanel, and more.
However, these control panels commonly support websites using PHP source code exclusively, limiting the ability to use various source codes simultaneously. In this article, AZDIGI introduces a free control panel software that allows the installation of multiple open-source applications on a server with ease and simplicity, known as Cloudron.
What is Cloudron?
Cloudron is a control panel software designed for Linux servers, facilitating the easy installation of various software on the same server. Unlike other control panels like cPanel, DirectAdmin, CyberPanel, which only support webserver applications like NGINX, PHP, Apache, MySQL for running PHP-based websites, Cloudron can install and operate a variety of software independently.
With Cloudron, you can install popular applications such as WordPress, Mautic, Mattermost, Adguard Home, BookStack, Jitsi Meet, etc., all on a single server without any conflicts regarding software versions.
Outstanding Features of Cloudron
Supports various open-source applications
Cloudron allows you to install numerous popular open-source applications on your server, including WordPress, Mattermost, BookStack, Confluence, Vaultwarden, Mautic, Rocket chat, Redmine, and more. You can view the list of supported applications by Cloudron here.
Resource allocation for CPU and RAM for each application
You can easily control the consumption of CPU and disk resources within each application by allocating CPU and RAM resources individually. This helps prevent applications from exceeding defined resource limits.
User-friendly interface
Cloudron provides a web-based interface that is intuitive and easy to use. This allows users to focus entirely on using applications without worrying too much about server administration tasks.
Timely updates
Cloudron claims to provide timely patches and updates for applications as soon as they change. Therefore, the supported application versions on Cloudron are always the latest.
Convenient external backup support
Cloudron comes with built-in tools for managing and scheduling automatic data backups for all applications or customized backups for each application separately. It supports external backup destinations such as Google Drive, Amazon S3, S3 API, Minio Storage, DigitalOcean Space, etc.
User permissions
Cloudron allows user permission assignment, enabling users to manage their own applications. This is particularly useful for applications that support direct login to their respective admin interfaces through the Cloudron account.
100% Portable
When using Cloudron and wanting to switch to another server, you can package and move the entire Cloudron data and its contained applications to another server seamlessly.
Comprehensive Email Server Support
Cloudron can serve as a comprehensive email sending/receiving server with professional features including spam prevention through self-learning mechanisms, automatic setup of DKIM, DMARC, SPF, ensuring high email security standards.
Installation Guide for Cloudron
To install Cloudron, you can register for NVMe VPS or Platinum VPS services with AZDIGI, which fully supports this software. Your VPS must meet the following requirements:
- Minimum 1GB of RAM
- Minimum 20GB of available disk space
- Brand new VPS
- Ubuntu 22.04 operating system
- AVX support. If you are using a VPS at AZDIGI that hasn’t enabled AVX, you can contact the technical department to switch the CPU Mode to Host Model for AVX support (not applicable to Pro SSD VPS services).
Once you have ensured that your VPS meets these conditions, run the following three commands to install Cloudron:
wget https://cloudron.io/cloudron-setup
chmod +x cloudron-setup
./cloudron-setup
If you encounter the following error, it means your VPS has not enabled AVX. Please contact your provider’s technical support to address this:
Cloudron version 7.6.2 requires AVX support in the CPU. No avx found in /proc/cpuinfoThe installation process may take approximately 10-20 minutes. After installation, reboot your VPS and access the provided URL to start the setup.
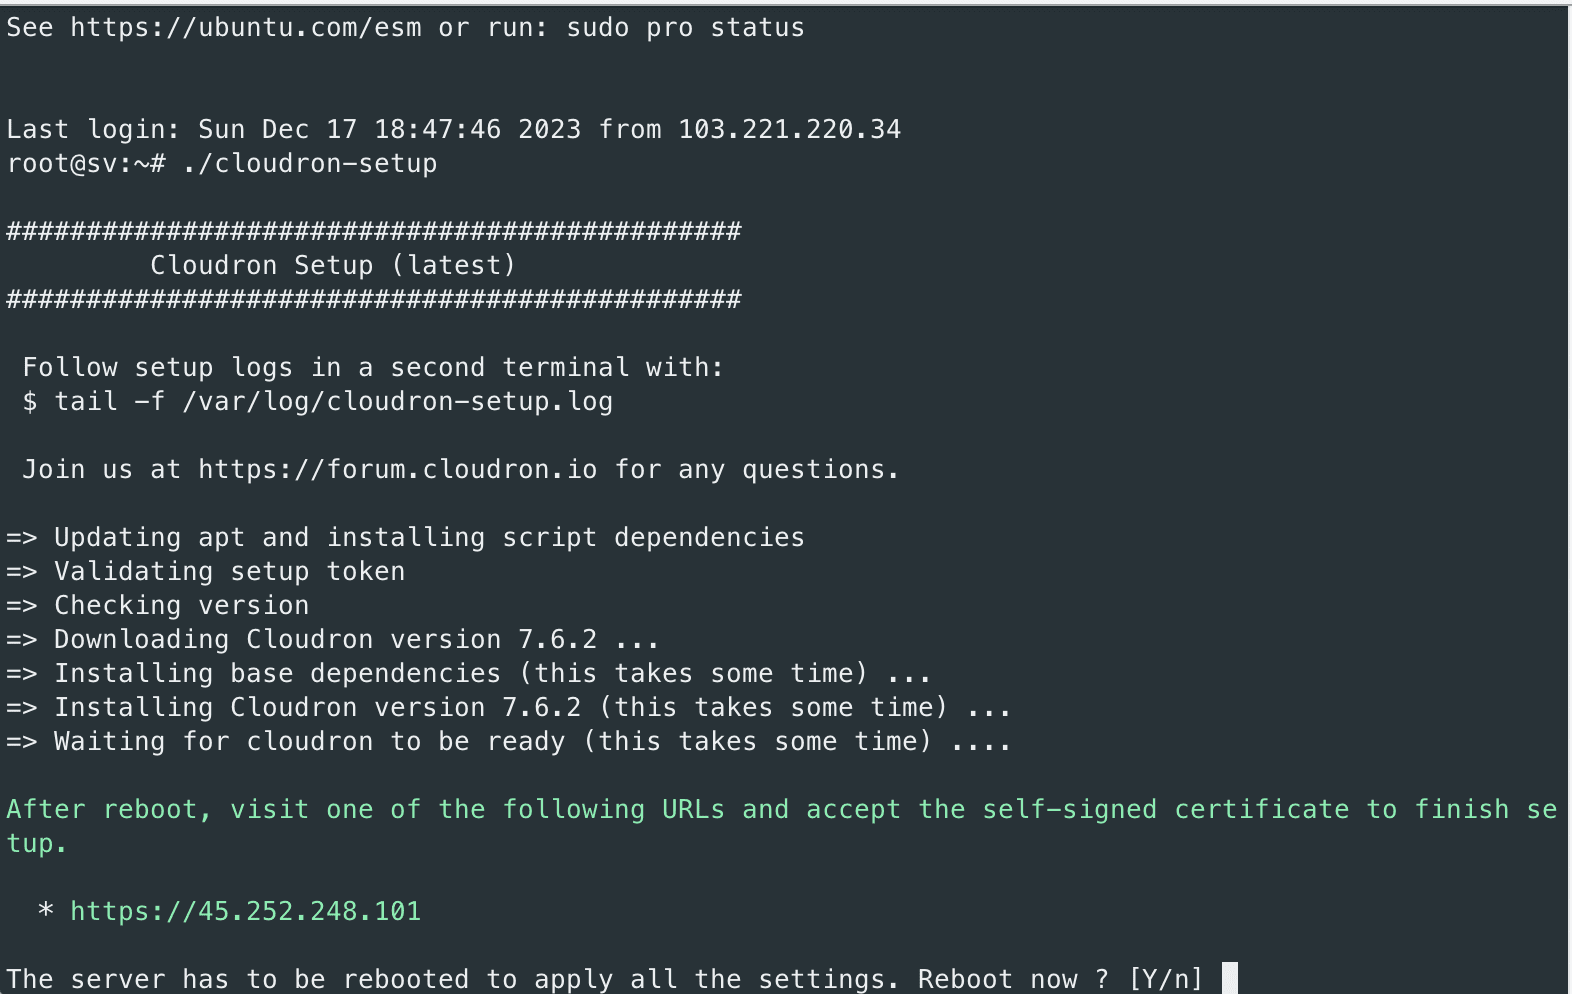
After the reboot, access the website using the VPS IP address to begin the configuration.
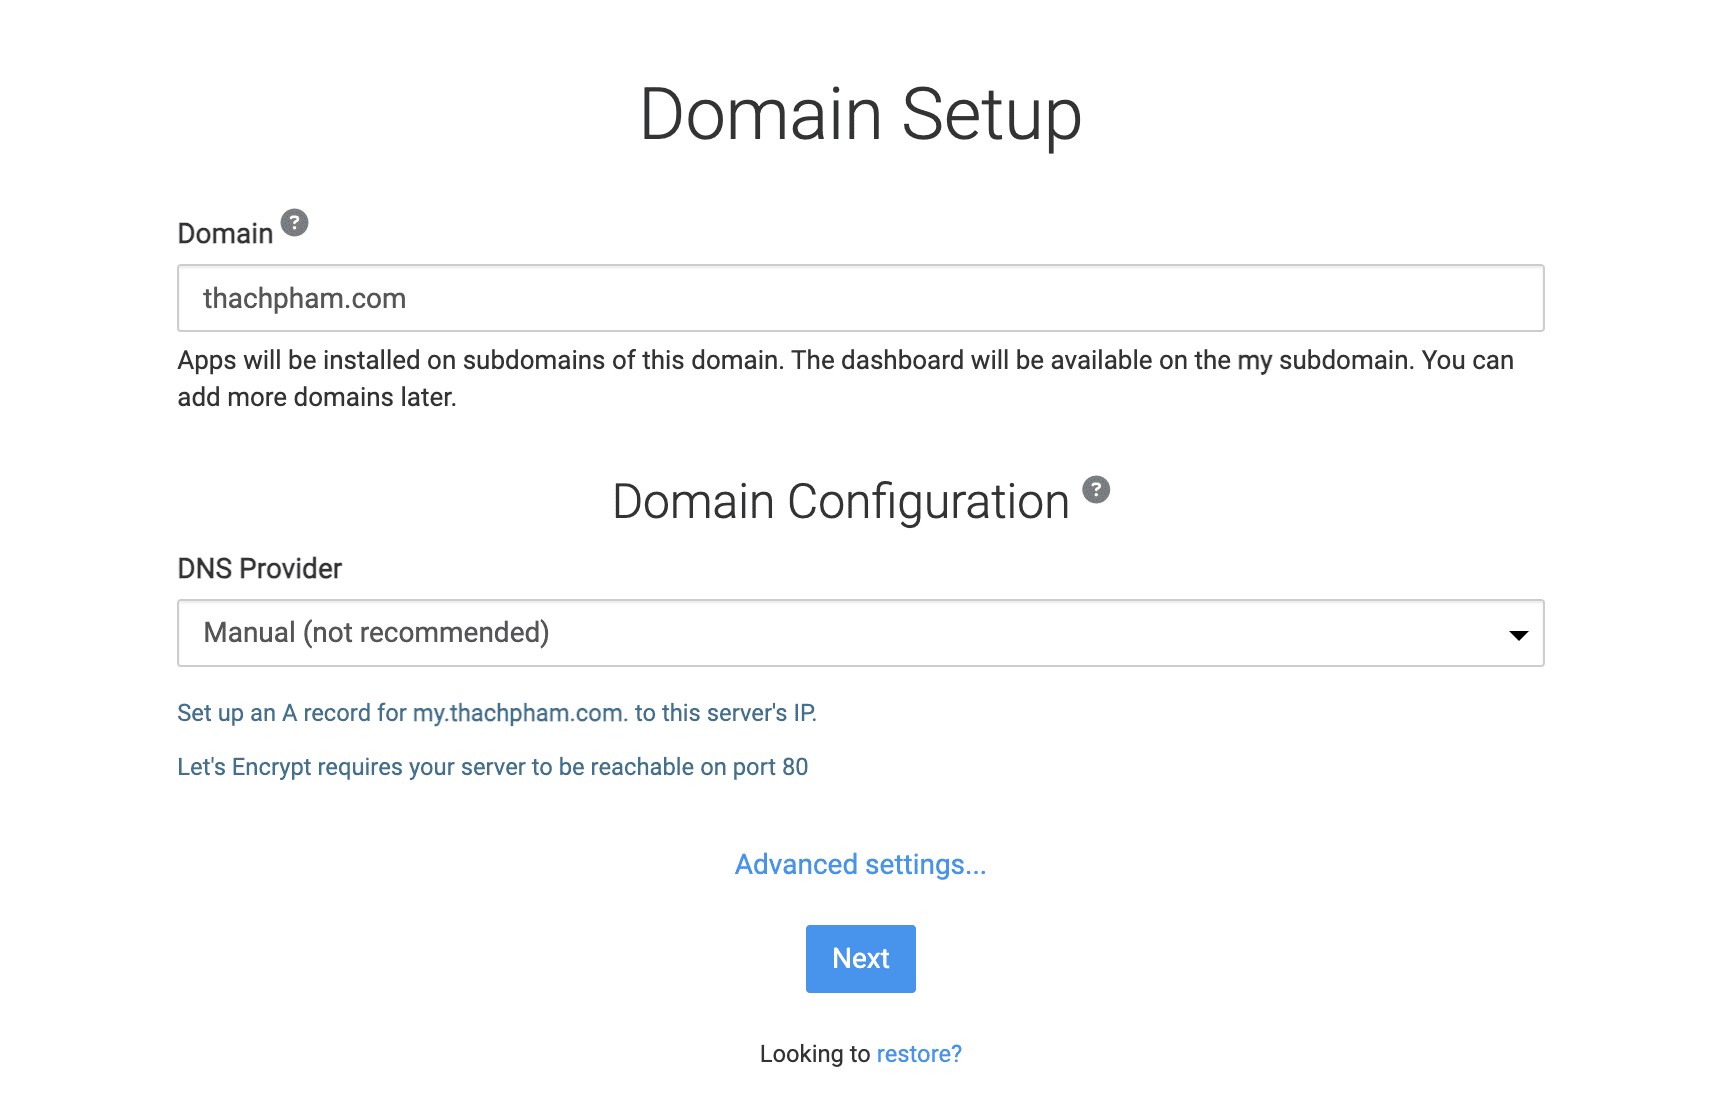
First, enter the domain you want to use on this server, providing only the root domain. Cloudron will automatically use a sub-domain in the form of my.tên-miền-của-bạn to serve as the Cloudron admin page. For example, if you enter the domain azdigi.com, the Cloudron address will be my.azdigi.com.
In the DNS Provider section, choose Manual and then create a record for my.tên-miền-của-bạn pointing to the IP address of the server.
Press Next to proceed.
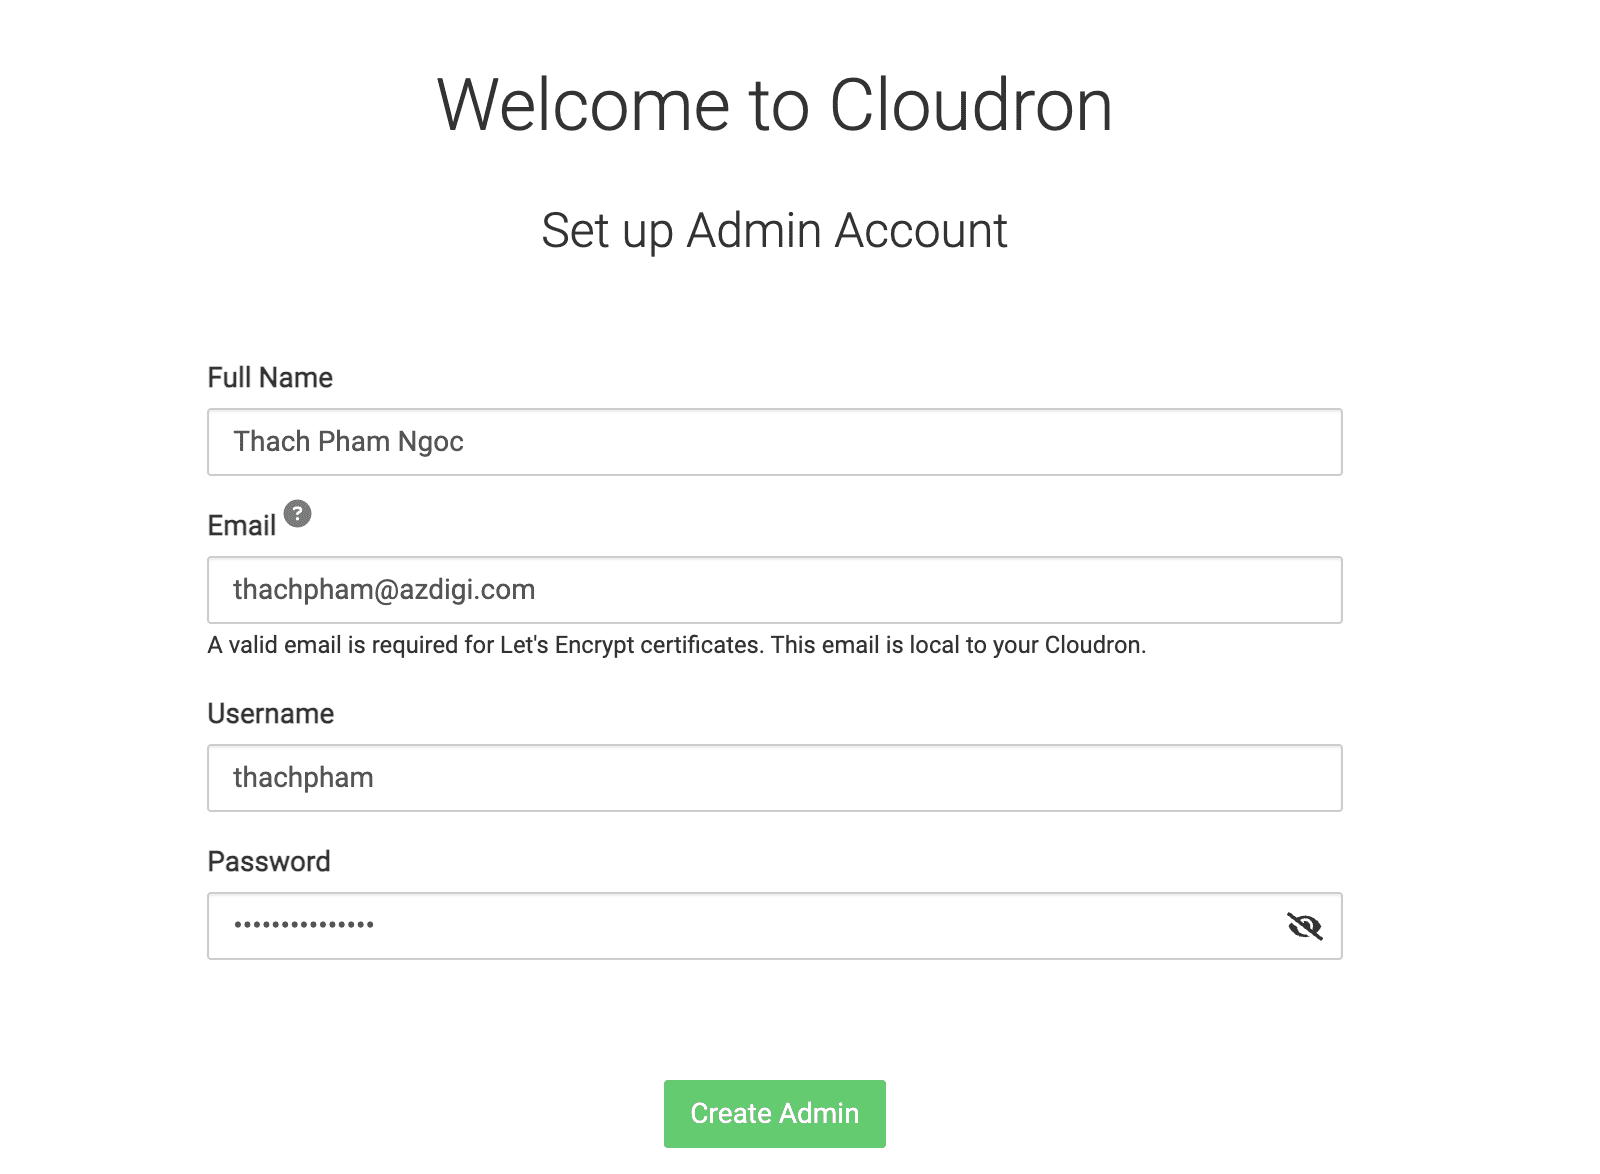
In this step, you will create the highest-level administrative account (Admin) for Cloudron.
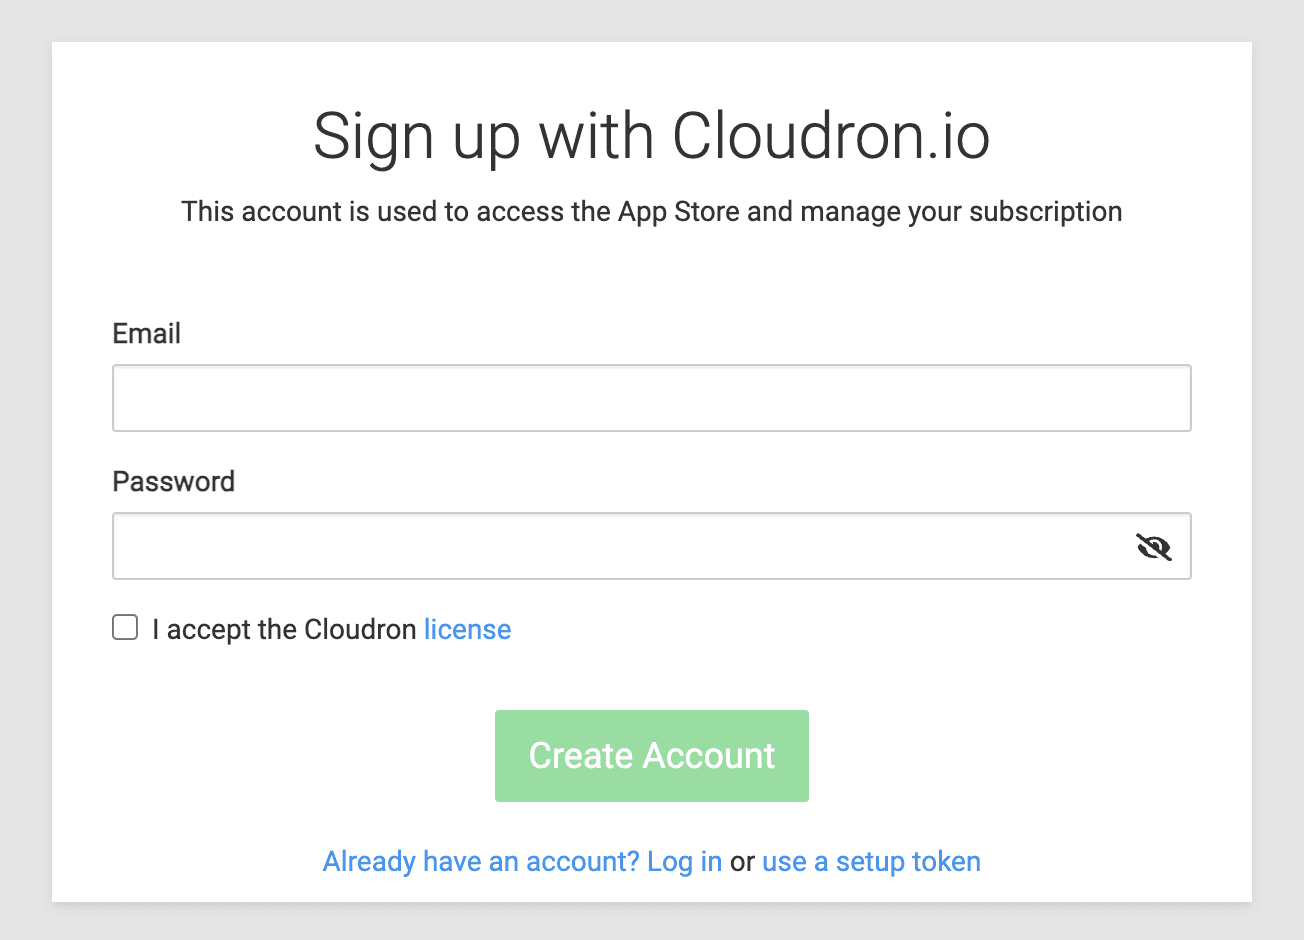
Finally, after completing the setup, go to the App Store. Cloudron will prompt you to connect your Cloudron account to the server. You can create an account here and log in to your Cloudron account.
Once the setup is complete, you can proceed to install the applications you need on Cloudron.
In future Cloudron tutorials, AZDIGI will guide you on adding another domain, setting up additional features, and installing WordPress applications while migrating existing WordPress website data to Cloudron.
You might also like
- How to Choose a Budget VPS: Specifications, Costs and Common Traps
- [Cloudron - Phần 2] How to adding a domain to the server
- How to Rent a VPS: Choose a Configuration and Set It Up Safely
- Comparing free control panels for Linux VPS
- How to install CloudLinux OS for DirectAdmin on CentOS 7
- Ottomatik - Convenient automatic backup for MySQL and files on the server
About the author

Thạch Phạm
Đồng sáng lập và Giám đốc điều hành của AZDIGI. Có hơn 15 năm kinh nghiệm trong phổ biến kiến thức liên quan đến WordPress tại thachpham.com, phát triển website và phát triển hệ thống.