Nội dung

About SSH Proxy
Welcome back to the documentation channel of AZDIGI. In today’s article, AZDIGI will introduce you to SSH Proxy so that you can build it on your own server for monitoring the work history of employees, logging executed commands and their returned results.
SSH Proxy Functions
- Log employee SSH information such as login time, user login, server IP…
- Log the commands typed through SSH and their output.
- The administrator can check the rta log in case of need.
SSH Proxy Operation Model
For example, your unit is a large system, every morning when employees go to work, they will use personal devices with the granted user to access the system to work. Therefore, all employees must SSH via SSH proxy to get inside and the specific methods of logging information on the SSH proxy server are:
- The servers/VPS that need to log in must implement IP restrictions to allow login and only login from the SSH Proxy’s IP
- On SSH Proxy, grant the user staff to SSH into the Proxy server before SSHing into another server
- On the server, the SSH proxy implements measures to log SSH information, commands and output…
For example:
- SSH Proxy Server has IP: 123.123.123.1
- Server needs SSH to work: 123.123.123.2
Steps to install SSH Proxy server
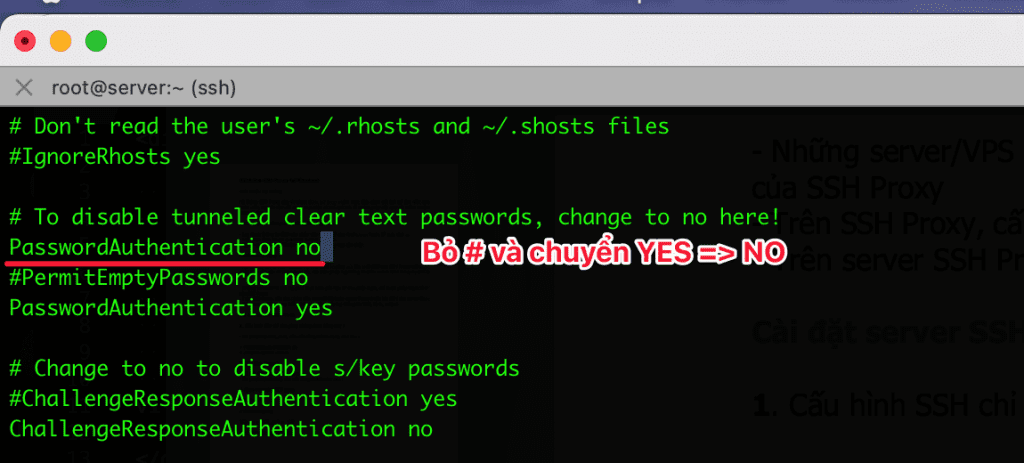
Step 1: Configure SSH to only allow authentication with SSH key
To configure to allow SSH Key authentication and not use the root password, you need to open the file sshd_config and edit it as follows:
vi /etc/ssh/sshd_config

After fixing it, restart the sshd service with the following command:
systemctl restart sshd
Step 2: Configure Firewall
Please install the CSF firewall on the SSH Proxy server. If you haven’t done the installation, you can refer to the following instructions:
- Install and configure CSF (Config Server Firewall) on CentOS 7
- Explain and use CSF (ConfigServer & Firewall)
Then you open the /etc/csf/csf.conf file and correct it as follows:
vi /etc/csf/csf.conf
# Allow incoming TCP ports
TCP_IN = ""

# Allow outgoing
TCP por ts TCP_OUT = "53"

# Allow incoming UDP ports
UDP_IN = "53"

# Allow outgoing UDP ports
UDP_OUT = "53"
Next, configure it to only allow SSH users whose IP is VPN IP at /etc/csf/csf.allow
tcp | in | d=22 | s=123.123.123.123 # VPN IP (Thay IP này bằng IP VPN của bạn)
Note: You can also create a file-name.allow file. Then include in /etc/csf/csf.allow
To configure not to track these VPN IPs in the file /etc/csf/csf.ignore
Note: You can also create a file-name.ignore file. Then include in /etc/csf/csf.ignore
Step 3: Install scripts to log the SSH session
1. log-session
- Please create a
/usr/local/sbin/log-sessionfile and paste the following content:
vi /usr/local/sbin/log-session
- File content
log-session
!/bin/sh # NOW=date +%Y -%m -%d.%H%M%SIP=echo $SSH_CLIENT | sed 's/ .*//'USER=whoamiLOGDIR="/log -session" LOGFILE=$LOGDIR/$USER/$USER.log echo ======================================== >> $LOGFILE echo Starting interactive shell session by user $USER - IP: $IP - $NOW >> $LOGFILE echo ======================================== >> $LOGFILE exec script -a -f -q
- File permissions
/usr/local/sbin/log-session
chmod 755 /usr/local/sbin/log-session
This script when run will get information about the user that is ssh in via the whoami command and get the ssh time using the date command. The script command will copy an SSH terminate copy to the log file.
This log-session script is called first when the SSH user enters by specifying the command in the public key file ($HOME/.ssh/.authorized_keys)
2. Script adduser
Create script vi /root/adduser.sh. This script is used to create users for technical members, the content is as follows:
vi /root/adduser.sh
- Content
adduser.sh
/bin/bash
 Script add user to log ssh session
 LOG_DIR="/log-session"
 PASSWORD=< /dev/urandom tr -dc _A-Z-a-z-0-9 | head -c12;echo
 USER=$1 KEY_TYPE=$2 SSH_KEY=$3
 if [ -z "$USER" ] || [ -z "$KEY_TYPE" ] || [ -z "$SSH_KEY" ]; then
 echo Error. User or SSH key is not empty exit 0
 fi
 useradd $USER -p $PASSWORD && echo Success create user $USER || echo Fail create user $USER
 mkdir -p /log-session/$USER
 touch $LOG_DIR/$USER/$USER.log && chmod 200 $LOG_DIR/$USER/$USER.log && chown $USER. $LOG_DIR/$USER/$USER.log && chattr +a $LOG_DIR/$USER/$USER.log && echo Success create and change permission log file || echo Fail create and change permission log file
 mkdir /home/$USER/.ssh && chown $USER. /home/$USER/.ssh && chmod 700 /home/$USER/.ssh && echo Success create /home/$USER/.ssh directory || echo Fail create /home/$USER/.ssh directory
 echo command=\"/usr/local/sbin/log-session\" $KEY_TYPE $SSH_KEY> /home/$USER/.ssh/authorized_keys && chmod 400 /home/$USER/.ssh/authorized_keys && chown -R $USER. /home/$USER/.ssh && chattr +i /home/$USER/.ssh/authorized_keys && echo Success create /home/$USER/.ssh/authorized_keys file || echo Fail create /home/$USER/.ssh/authorized_keys file
 echo Done!
This script is used to add a user when it is necessary to grant a user to a proxy user, and at the same time to add a public key, create a log file, and authorize the log file to prevent users from viewing and editing the log file. Detail:
- Read user information, input the public key with the read command
- Add user information via useradd
- Create a directory containing log files for each user via the command
mkdir -p /log-session/$USER - Create a log file for that user via touch
Authorization:
- 200 with logfile
- change the owner user/group to be that user
- chattr +a log file so that users only add content without having the right to edit or delete content
- Create directory /home/$USER/.ssh, give permission 700 for this directory.
- Create the file /home/$USER/.ssh/authorized_keys, choose user/group as root.$USER with permission of 750. Permissions as above will help users only read files in /home/$USER/.ssh directory and cannot create more files in this directory. Add the content of the user’s public key in the format: command = “/usr/local/sbin/log-session” ssh-rsa AAAQE…… user@quandt@azdigi.vn
- chattr +i /home/$USER/.ssh/authorized_keys so that users cannot edit this file
3. Create script log_rotate.sh
- Create rotate log script at
/root/log_rotate.shand the following content:
vi /root/log_rotate.sh
!/bin/bash
 TIMESTAMP=date +%d-%m-%Y
 LOGDIR=/log-session/
 MAX_SIZE=100M
 find $LOGDIR -name '*.log' -type f -size +$MAX_SIZE | while read LOGFILE
 do
done - Permissions for scripts
/root/log_rotate.sh
chmod 755 /root/log_rotate.sh
- Add cronjob to automatically rotate log
Script used to rotate the log file, log files larger than the $MAX_SIZE variable will be rotated
0 2 * * * /root/log_rotate.sh > /dev/null
Step 4: Install on server/VPS need to log SSH session
On the server/VPS that needs to log SSH, it is necessary to limit SSH login, allowing only the SSH Proxy’s IP to be allowed in. Do the following:
On the server/VPS need to log SSH, go to/etc/ssh/sshd_config, add the following value to the end of the file.
vi /etc/ssh/sshd_config
Match AddressPasswordAuthentication no PermitRootLogin yes
Step 5: Create a user
To create a user, SSH into the proxy to work, and to create a user you do it with the following syntax:
In there:
- username: Is the user of the user
- ssh-dss AAAAB3…: That user’s public_key
./root/adduser.sh username ssh-dss AAAAB3...
Once the creation is complete, the user can use private key and user to ssh into the Proxy. And upload the Private key to ssh to other servers.
Summary
Hopefully, this article will help you set up a proxy system. from which you can better monitor the activities of employees when they log in to their work sessions.
If you need assistance, you can contact support in the ways below:
- Hotline 247: 028 888 24768 (Ext 0)
- Ticket/Email: You use the email to register for the service and send it directly to: support@azdigi.com .


