How to set up Zabbix alerts via Telegram with 4 simple steps.
Introduction
Currently, the use of the Telegram application as a communication channel & notification channel is increasingly popular and gradually becoming an indispensable application for most users worldwide. With the Telegram application, the developer has done a great job in developing an application where the privacy and security of the user come first and is not under the control of any organization.
And in addition to being a secure chat application, it has high stability. Telegram is also a perfect, fast and supported notification channel on many platforms by creating and connecting exclusively via API/Token… And in this article, AZDIGI will guide you to use Telegram in combination with Zabbix Agent as a channel to receive alerts quickly and accurately.
And on the new versions of Zabbix, they have understood and satisfied users when they have built-in Telegram Templates to make it very simple to set up alerts via Telegram, you can check out the instructions below to set it up.
Implementation Guide
Step 1: Create a Bot on Telegram
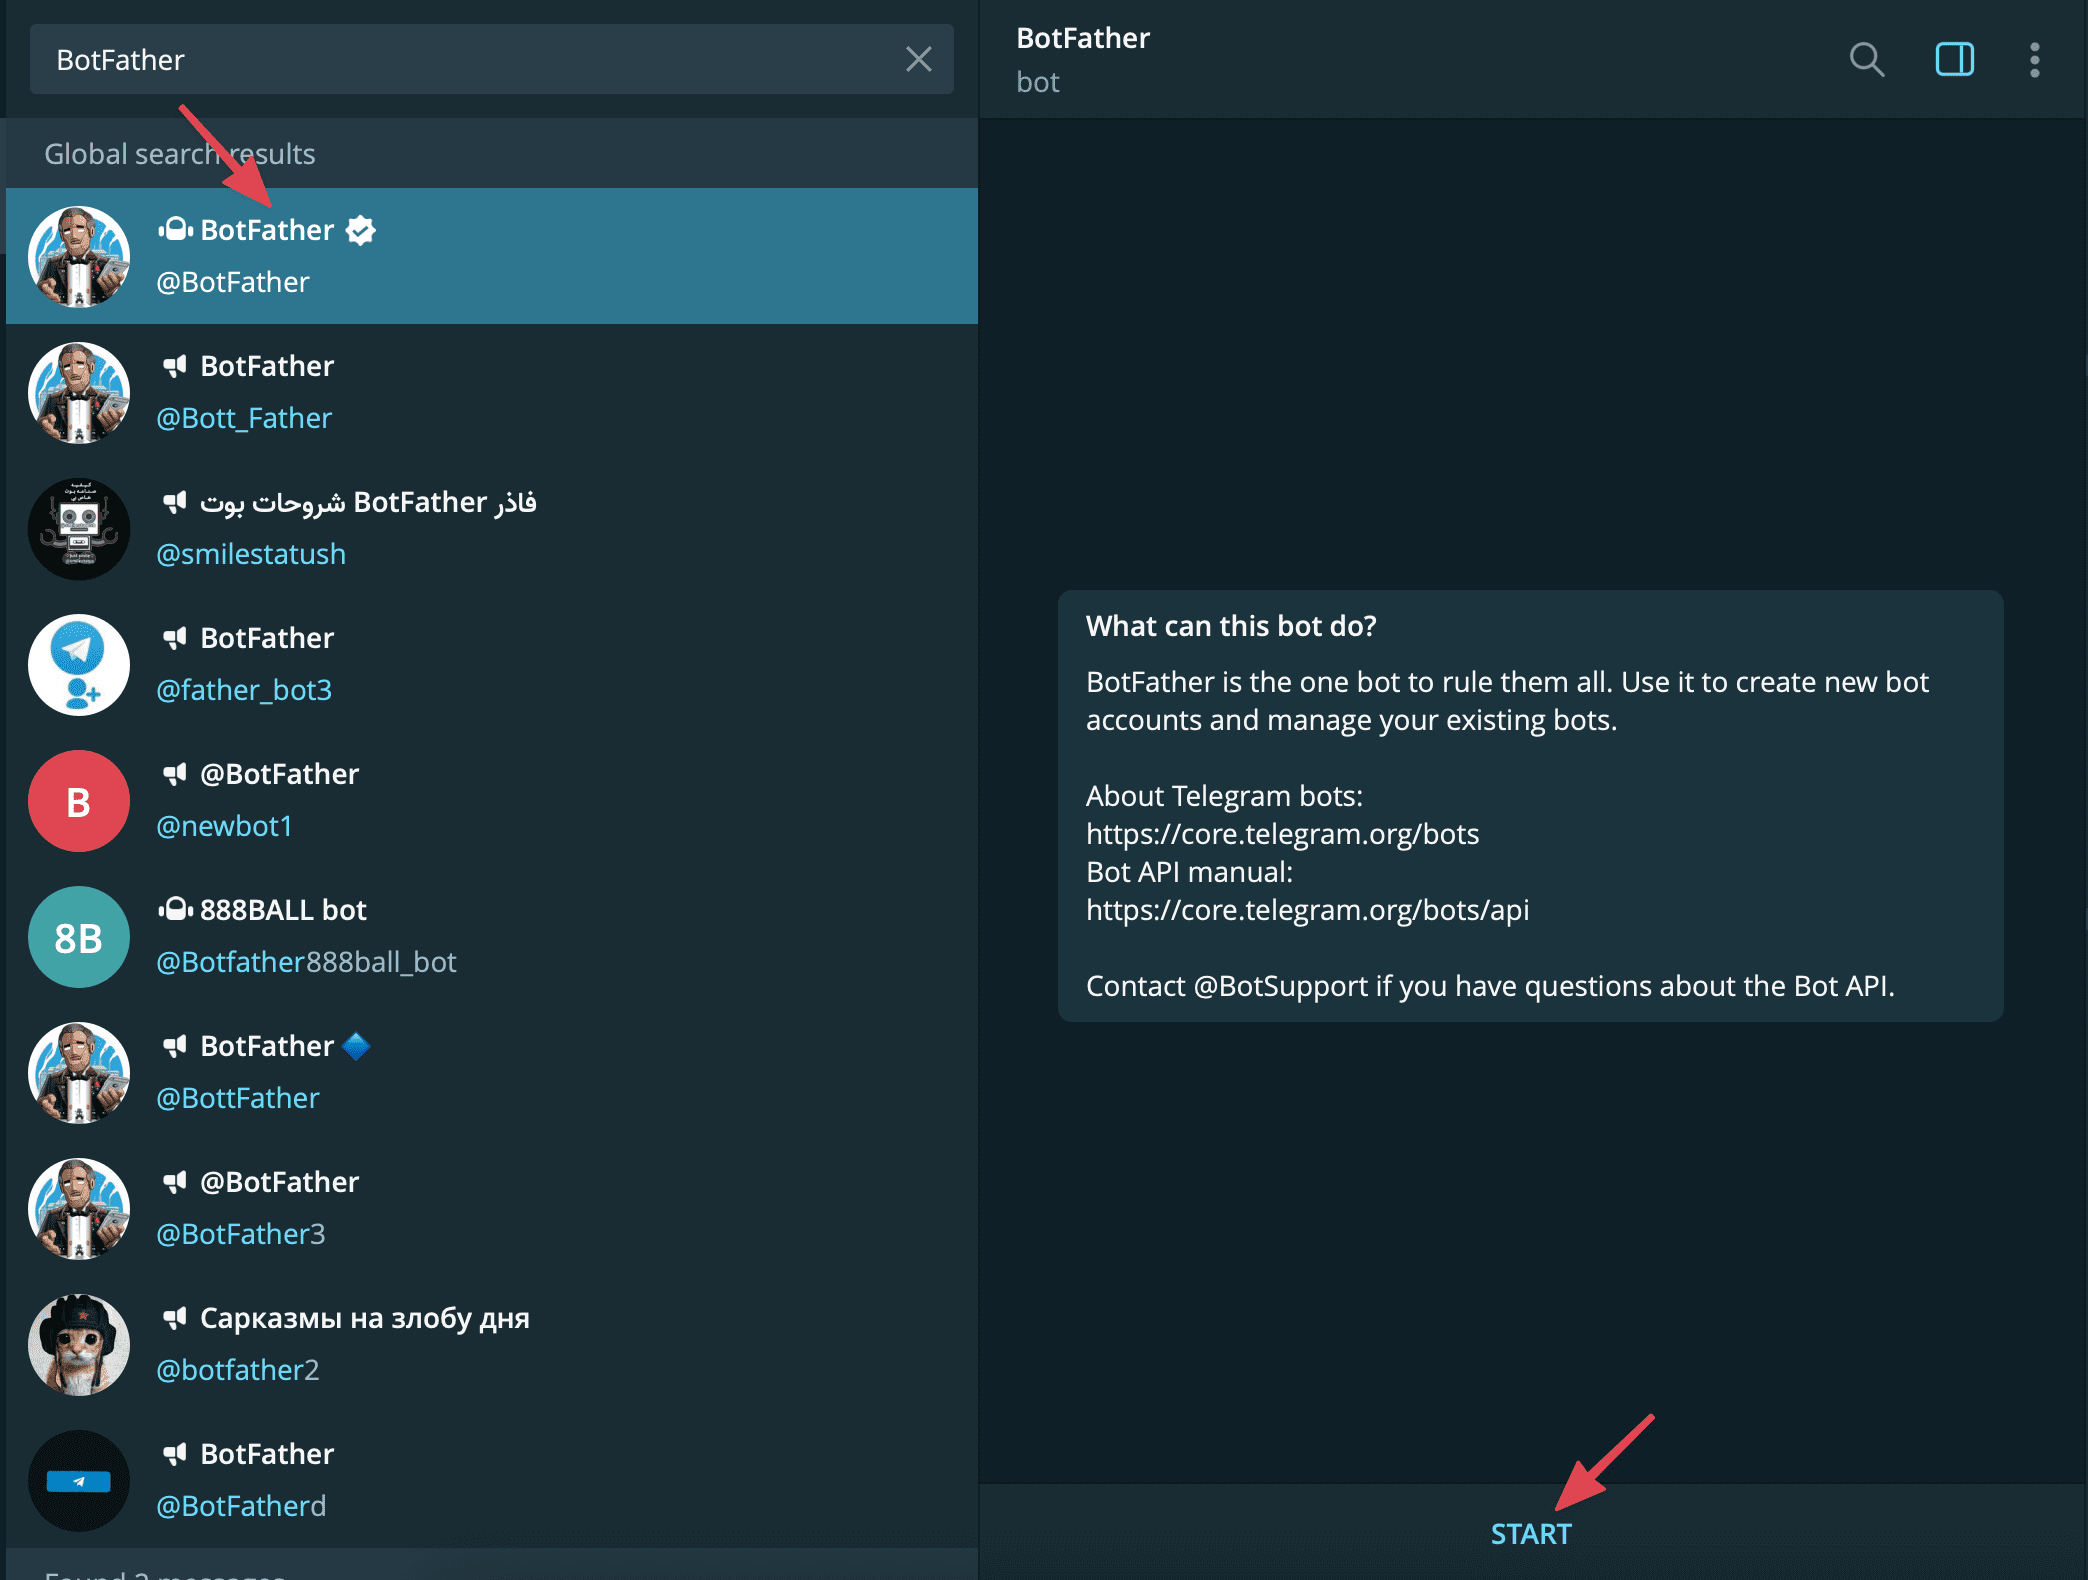
To connect with @BotFather to get a Token, go to Telegram => search @BotFather and select @BotFather with a tick √ as shown below. Or you can go directly to https://telegram.me/BotFather link to connect with @BotFather.

Type /newbot to create a new bot.

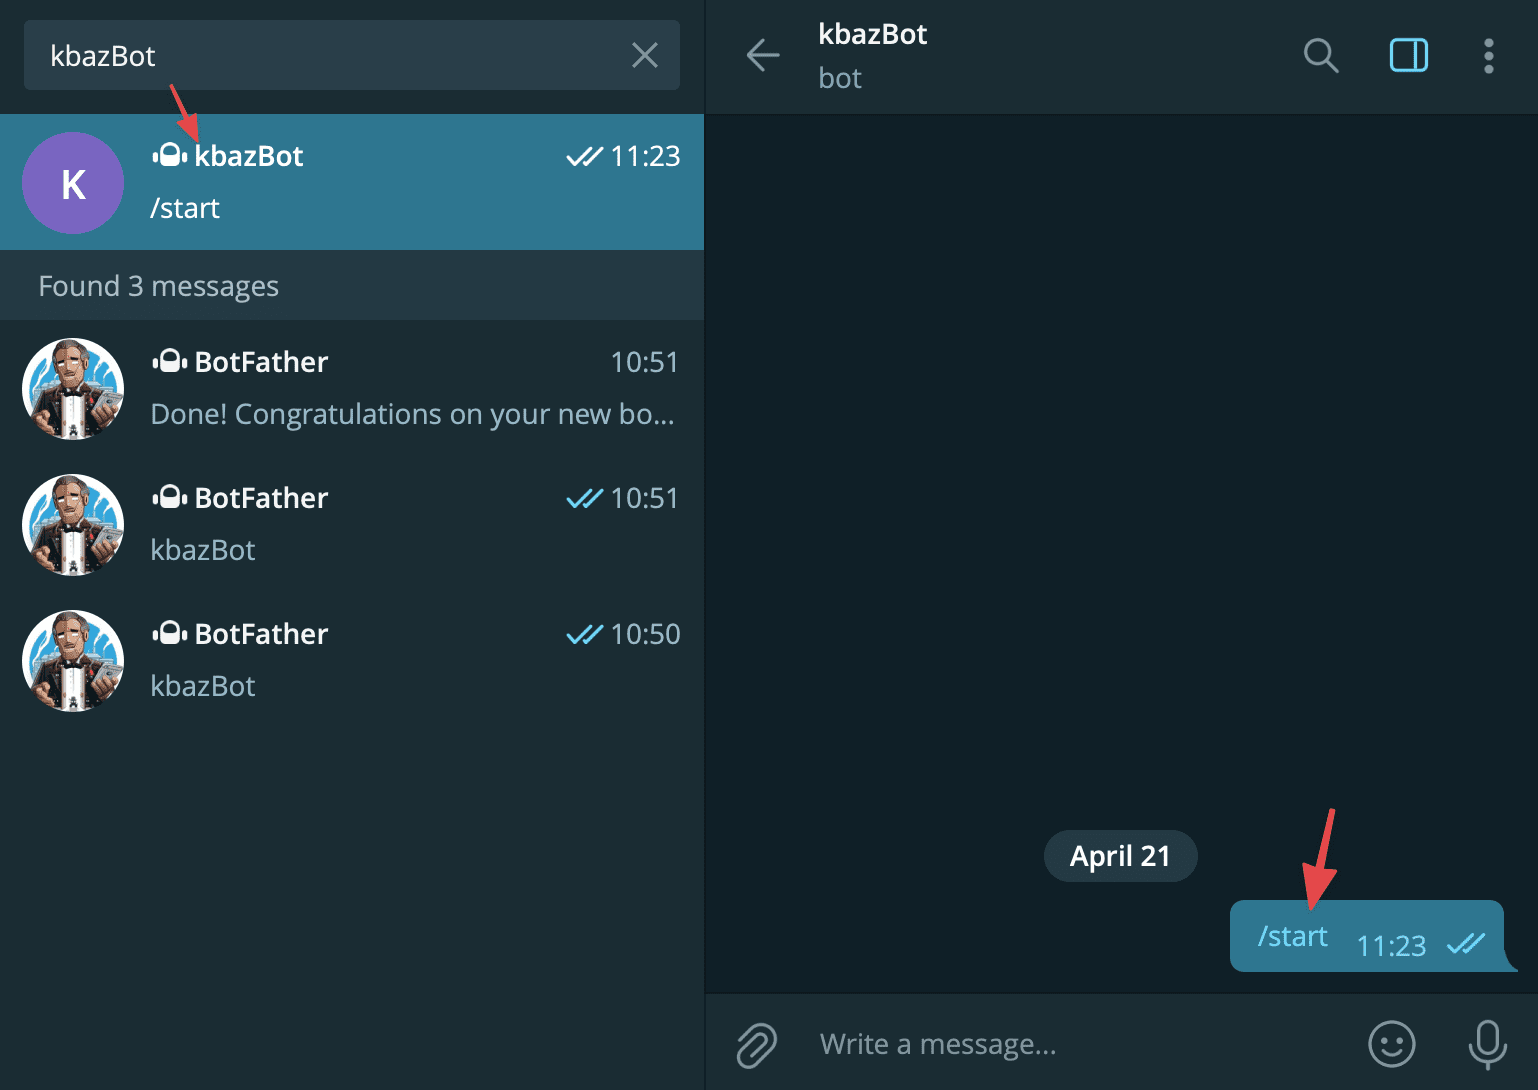
Next, you enter a name for the bot to create (Note: the bot name must end with the word Bot. For example, kbazBot )

After successfully entering the Bot name, you will be provided with Token to access HTTP API as shown above (red frame). You proceed to save this Token segment.
Then you press START bot just created for it to work.
Step 2: Instructions to get ChatID on Telegram
Next, you need to get the Bot ID and ID Groups.
- Get Bot ID
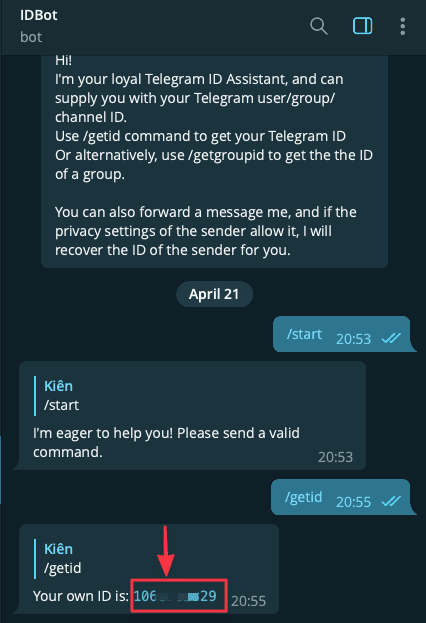
To get IDBot, go to Telegram => search for IDBot and press START to start chatting.
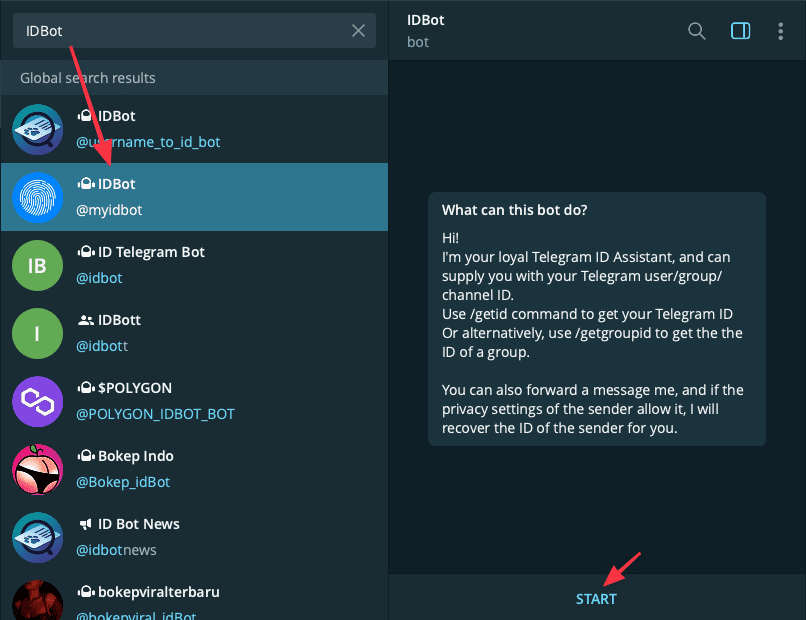
Next, type /getid to get the Bot’s ID, the ID will be in the form of numbers as shown below:
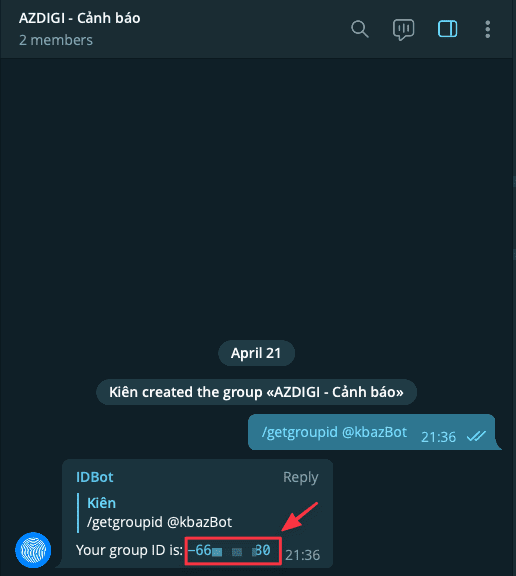
- Get Group ID
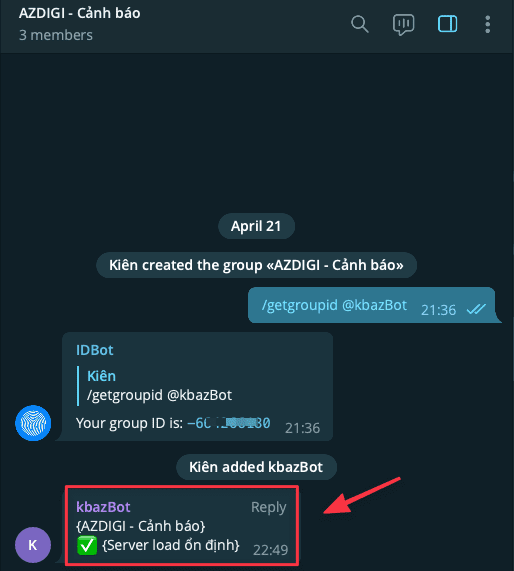
To get the Group ID, you first need to have a certain Group to receive warnings or if you don’t have one, you can create a new Group. For example, I already have Groups named “AZ – Cảnh báo” and I will do a demo with this Group.
Now you proceed to add the Bot @myidbot to the member of the Group. After adding, type /getgroupid @enter_your_bot_name.
If entered correctly, you will receive Group ID as shown below:
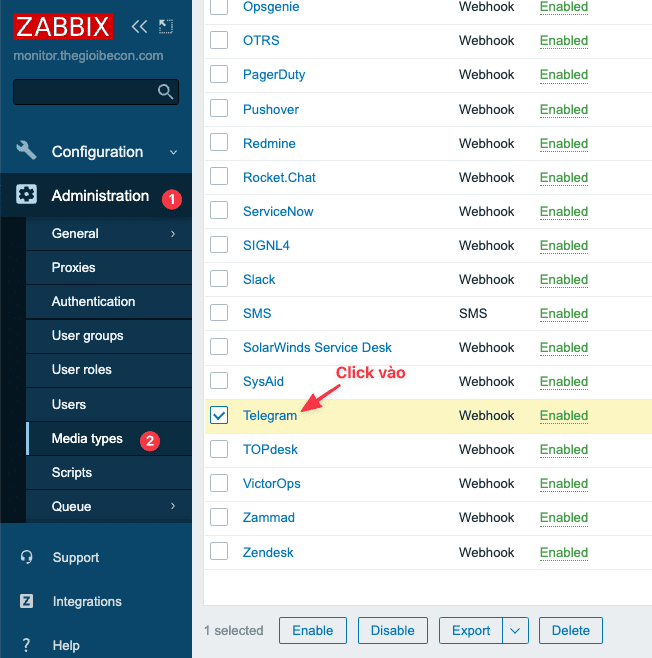
Step 3: Set up Telegram on Zabbix
- Set up Media types
First, you need to log in to the Zabbix admin page, continue to access Administration >> Media types >> Telegram
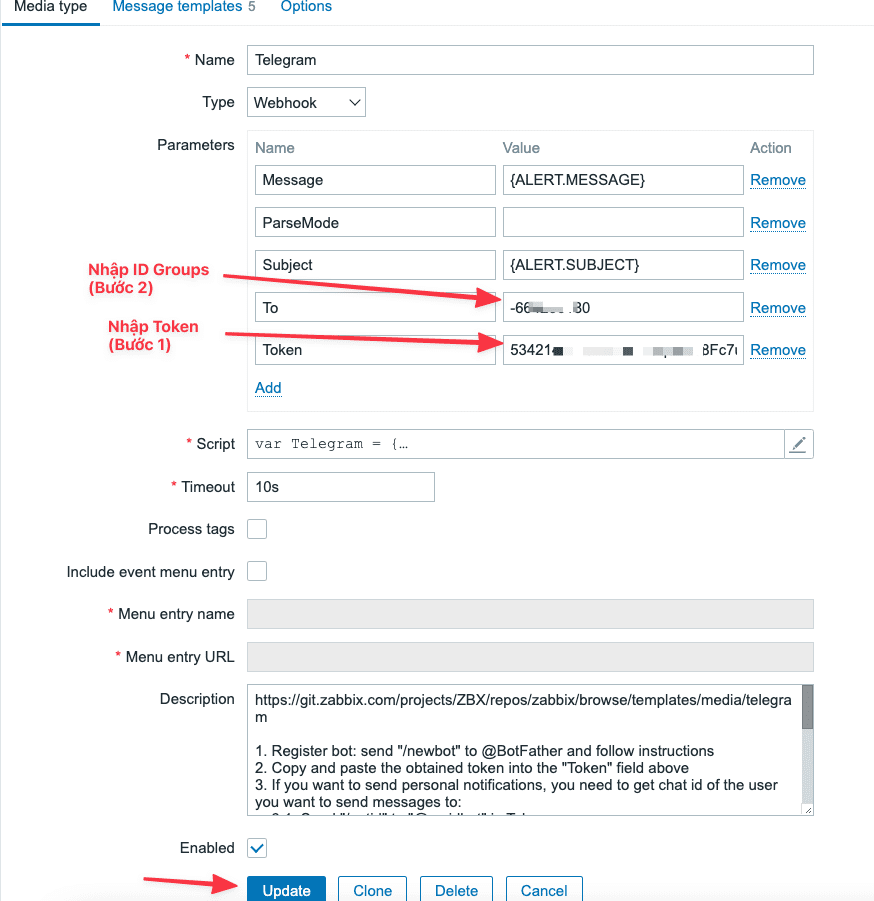
In this setup section, you just need to pay attention and fill in the To & Token information according to the content of the image below:
To check if the configuration is successful, you can do a quick test as shown below:
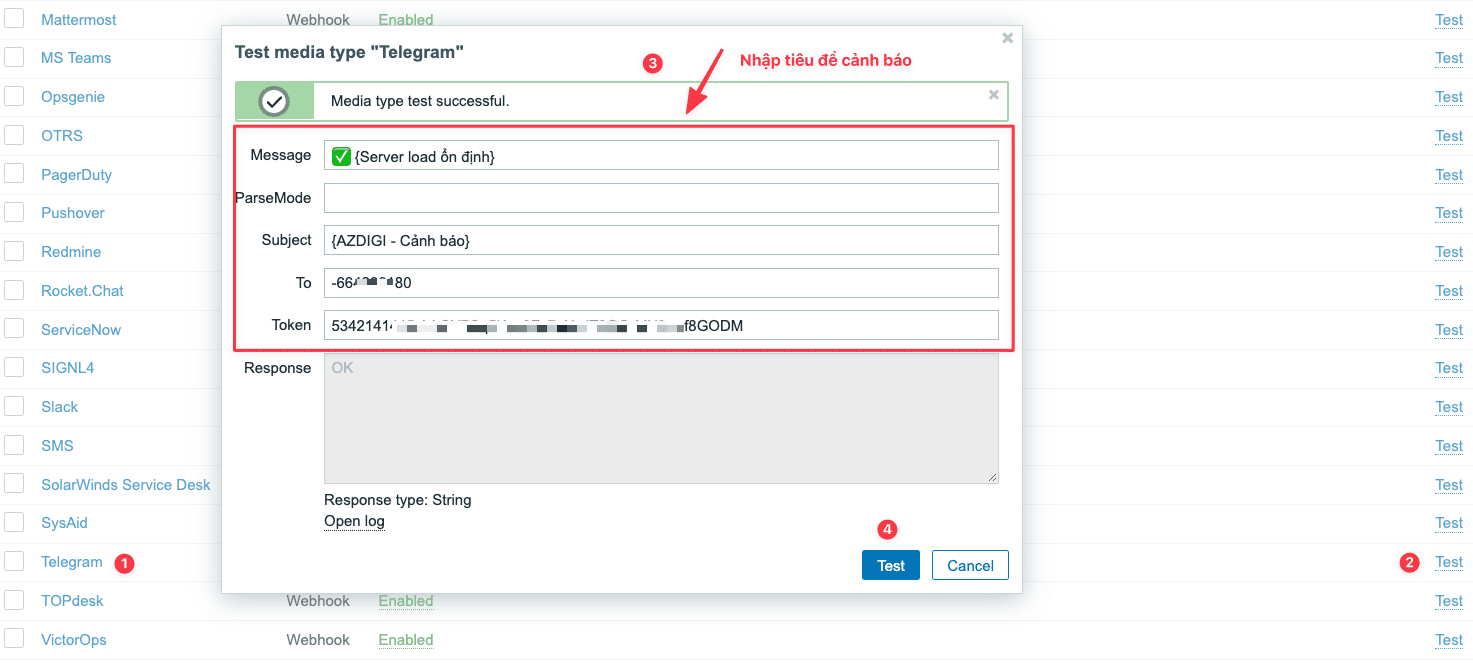
If you receive a warning sent to Group on Telegram as shown below, it is successful.
- Create user alert via Telegram
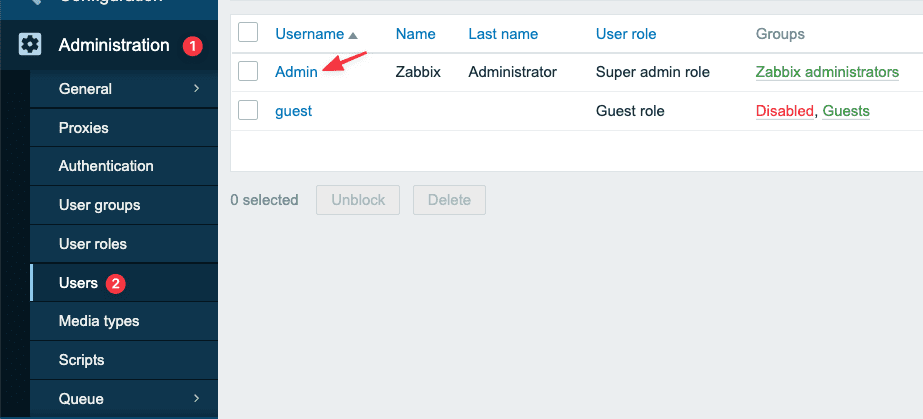
At the Zabbix interface, go to Administration >> Users >> Admin
Next, press the Media tab => click Add.
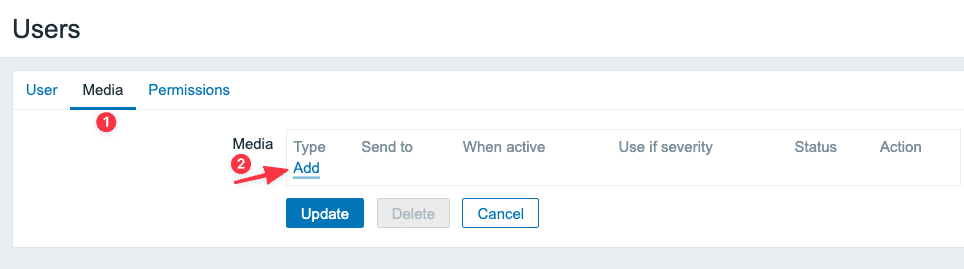
In the Media section, you will specifically fill in the following information:
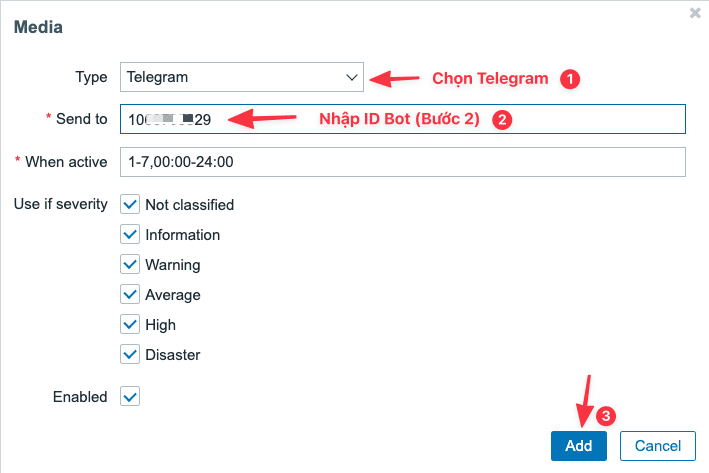
After the configuration is complete, click Update.

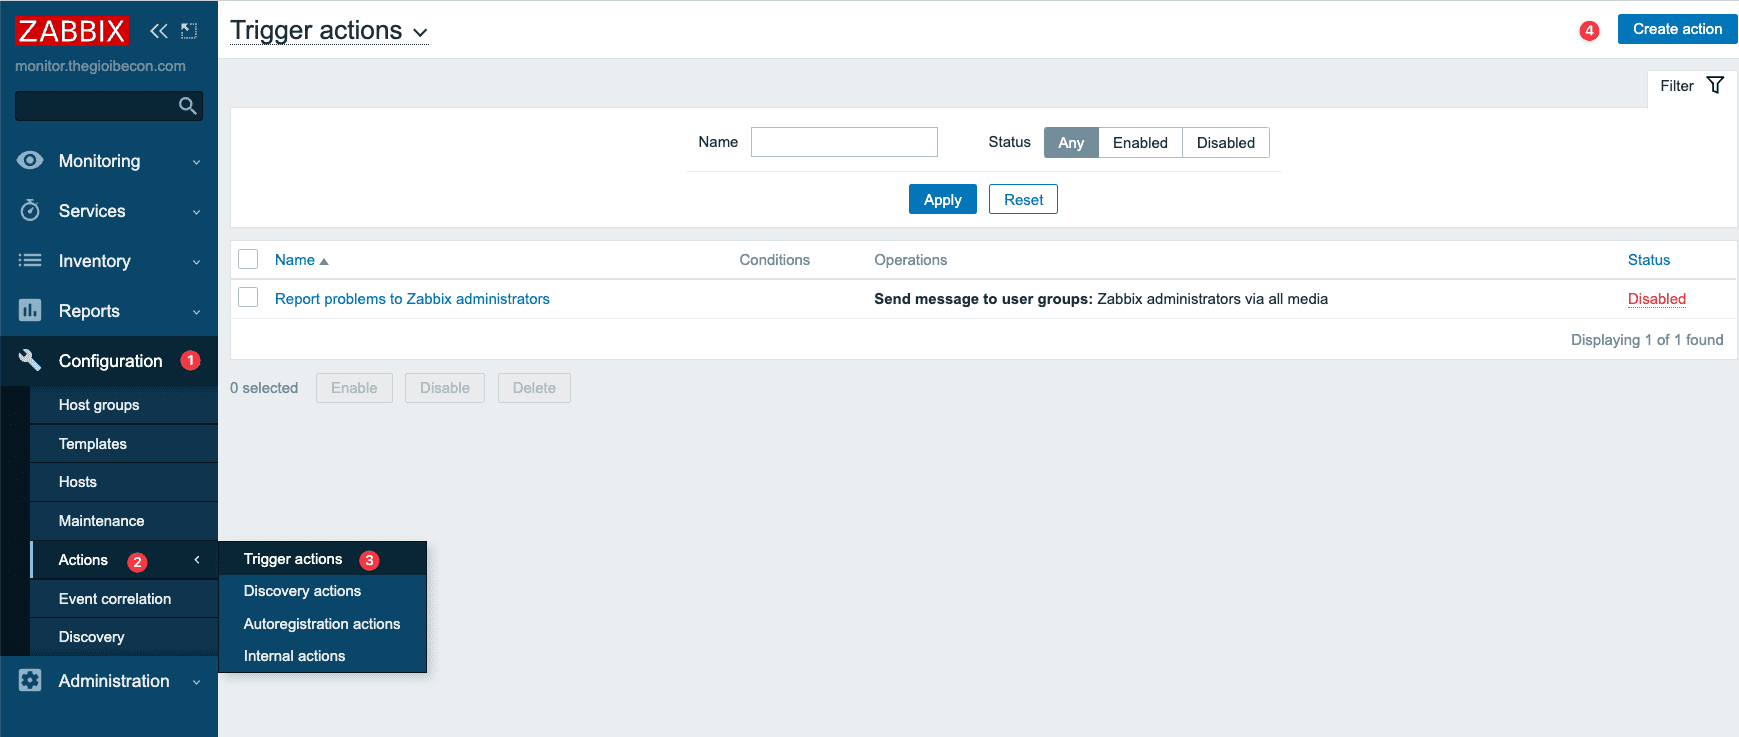
- Create Action to send notifications via Telegram
Now you need to create an Action to send notifications to Telegram. Because if you don’t create it, the system will only notify you in the Zabbix interface.
Go to Configuration >> Action >> Trigger actions >> Create action.
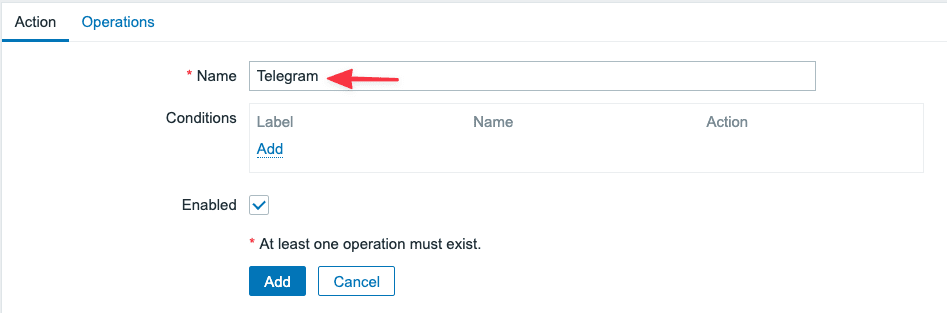
At the Action tab, you name the Action.
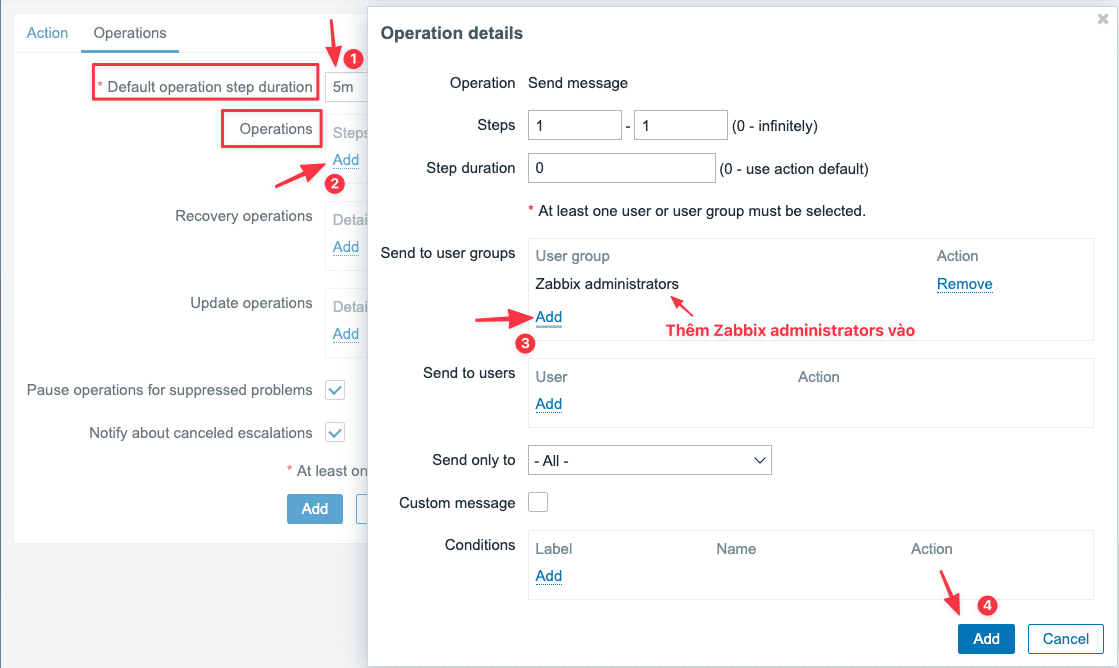
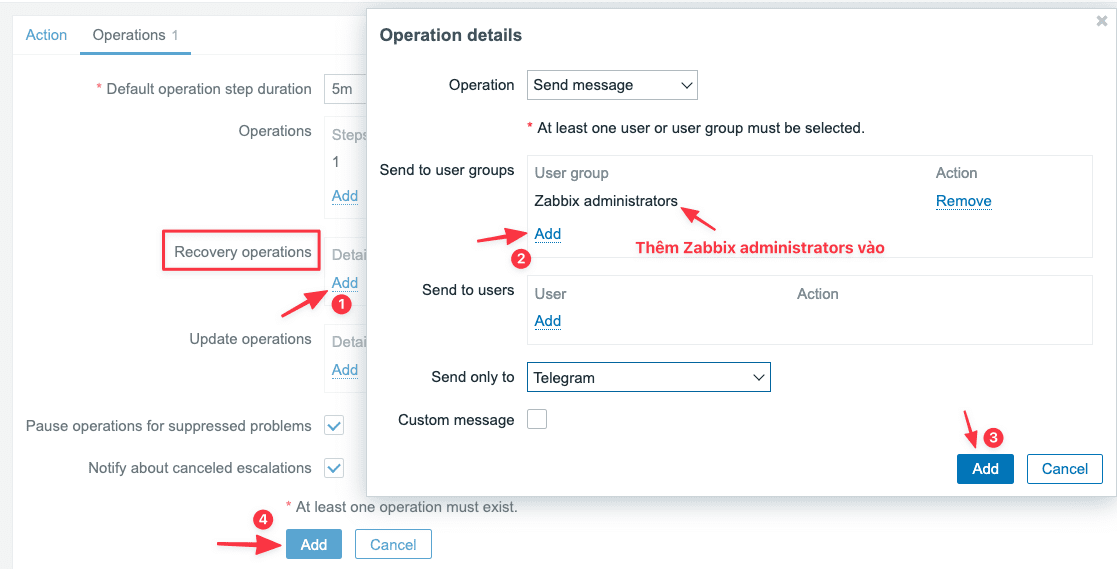
Next, you switch to the Operations tab and fill in the following information:
– Default operation step duration: I will set 3m, corresponding to 3 minutes.
– Operations: You select Add, and in the Send to user groups section, seclect Add and add Zabbix administrators.
– Recovery operations: You select Add, in the Send to user groups section, select Add and add Zabbix administrators.
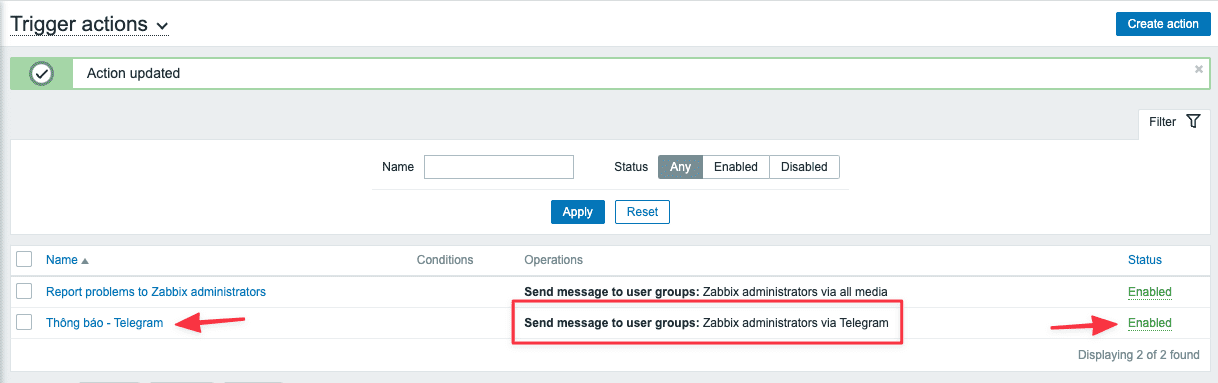
After completing the configuration, you will see Action Telegram and if the status: Enabled is done.
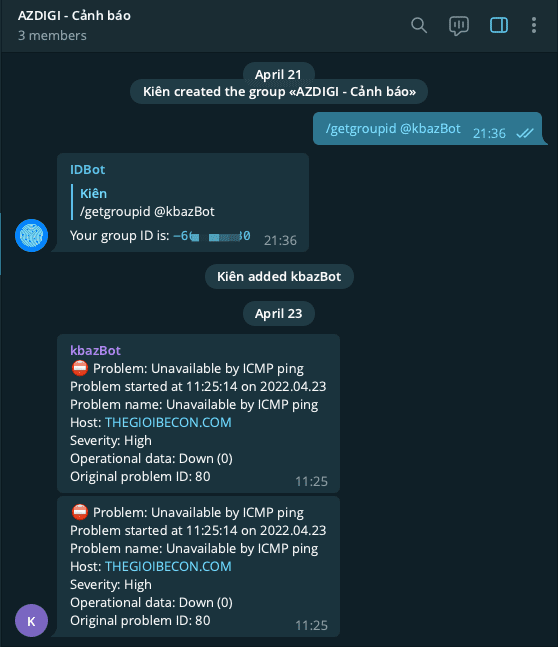
After setting up everything, I will test Zabbix to see if it will send a warning about Telegram by turning off Ping on the Client server that I’m monitoring. And below is the warning Zabbix sent to my Telegram when it couldn’t Ping to the other server.
So AZDIGI has completed the steps on setting up Zabbix alerts via Telegram. If you have any questions during the process, you can leave a comment below. Hopefully, this article will help you and next time AZDIGI will continue to write more articles about Zabbix so that you can better understand how to use and operate Zabbix.
You can refer to other instructions at the link below:
If you need assistance, you can contact support in the ways below:
- Hotline 247: 028 888 24768 (Ext 0)
- Ticket/Email: You use the email to register for the service and send it directly to: support@azdigi.com .
You might also like
- Notifying Woocommerce orders via Telegram.
- Setting up notifications on aaPanel
- What is Claude Code Channels? Complete Guide to Connecting Claude Code with Telegram and Discord
- Complete OpenClaw Guide: Step-by-Step Tutorial from A to Z
- Set up server monitoring with Zabbix Server
- How to install Zabbix 6.0 on Ubuntu 20.04
About the author

Thạch Phạm
Đồng sáng lập và Giám đốc điều hành của AZDIGI. Có hơn 15 năm kinh nghiệm trong phổ biến kiến thức liên quan đến WordPress tại thachpham.com, phát triển website và phát triển hệ thống.