Let’s install SSL for Webadmin Console OpenLiteSpeed quickly with only 2 steps with AZDIGI.
I. Introduction
Surely when talking about CyberPanel, you are no stranger to OpenLiteSpeed, OpenLiteSpeed is a free version for server/user who wants to experience LiteSpeed Webserver but has not had the conditions to use the paid version like Litespeed Enterprise. And of course, with the free version, we will be limited to some advanced features, but in general, OpenLiteSpeed is almost enough to meet the needs of general/individual users.
You can see more detailed support features of OpenLiteSpeed and Litespeed Enterprise here.
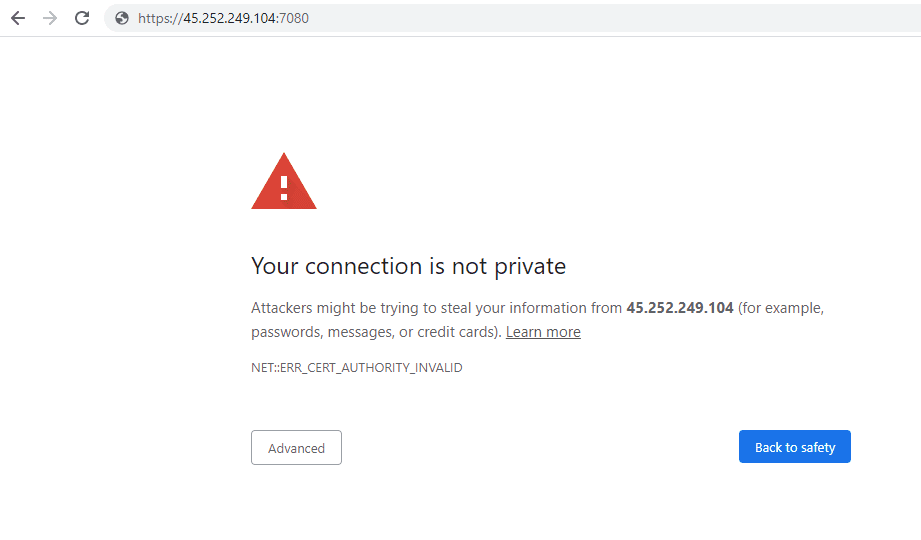
And in OpenLiteSpeed, there is a small limitation that sometimes makes users feel uncomfortable when access to Webadmin Console OpenLiteSpeed, you will receive a security warning as follows, which is unsightly and very annoying.

So is there any other method that we can easily access the OpenLiteSpeed Webadmin Console without getting stuck in the security step above? Then the answer is yes and please continue reading the article to refer to this method.
II. Implementation Guide
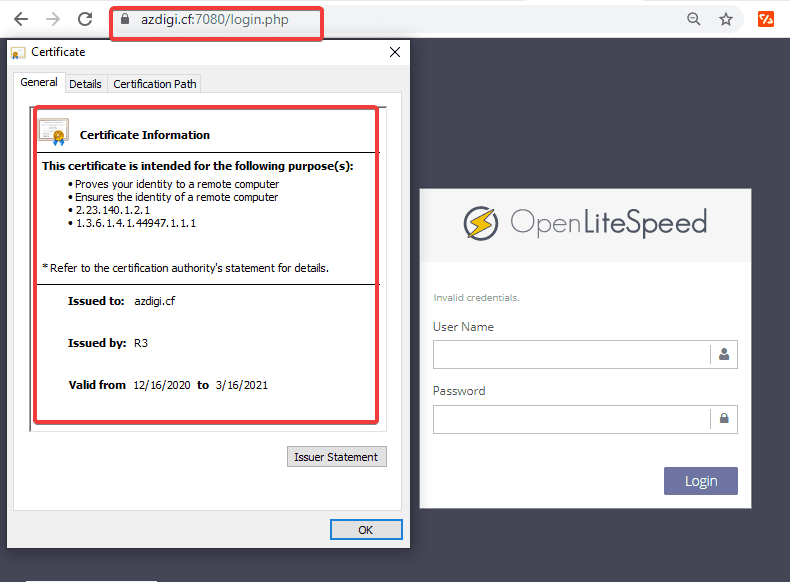
To bypass the security warning, we can use the way to access Webadmin with domain:7080 instead of having to use IP:7080 as before. You can understand that Webadmin will use the SSL certificate of the domain you replace to access and of course, that domain must be installed with SSL already.
If you have not installed SSL for your domain, you can refer to the instructions below:
After you have ensured that the domain is installed with SSL, continue with the steps below.
Step 1: SSH into the CyberPanel server
To install SSL for Webadmin, you need to SSH into your CyberPanel VPS with the highest root privileges. If you do not know how to SSH, you can refer to the following instructions:
Step 2: Install SSL for Webadmin Console OpenLiteSpeed
Note: During the implementation process, remember to replace azdigi.cf with your domain name.
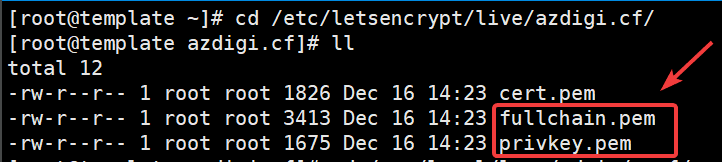
After SSHing into VPS successfully, you access the path containing the SSL certificate file of the website that you want to use to replace the IP when accessing Webadmin. For example, I will use azdigi.cf to replace IP and currently, azdigi.cf is using Let’s Encrypt SSL, so we will access the following path:
cd /etc/letsencrypt/live/azdigi.cf/
Here you will see and note the following 2 files: fullchain.pem and privkey.pem
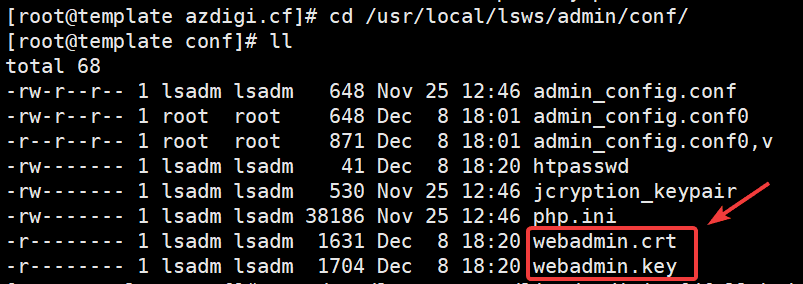
Next, you need to access the path containing the certificate file of the Webadmin Console OpenLiteSpeed at the following path:
cd /usr/local/lsws/admin/conf/
In this section, you will see and note the following 2 files: webadmin.crt and webadmin.key
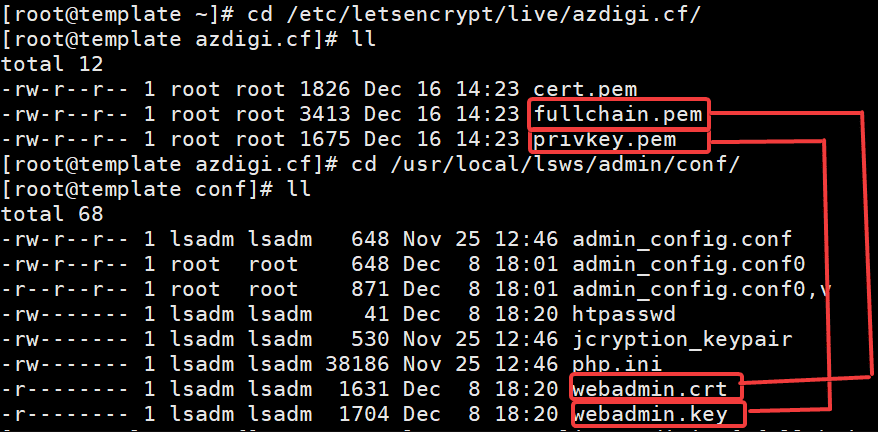
After accessing the two paths above and seeing the necessary files, you will now proceed to copy the corresponding content as follows:
Copy the content of the fullchain.pem file (at path /etc/letsencrypt/live/azdigi.cf/) => Paste into webadmin.crt (at path /usr/local/lsws/admin/conf/)
Copy the content of the privkey.pem file (at the path /etc/letsencrypt/live/azdigi.cf/) => Paste it into webadmin.key (at the path /usr/local/lsws/admin/conf/)
Or you can use the following commands in turn to make this faster:
cat /etc/letsencrypt/live/azdigi.cf/fullchain.pem > /usr/local/lsws/admin/conf/webadmin.crt
cat /etc/letsencrypt/live/azdigi.cf/privkey.pem > /usr/local/lsws/admin/conf/webadmin.key
systemctl restart lsws
Step 3: Check Webadmin Console OpenLiteSpeed
After replacing the Webadmin certificate file with the domain certificate file, try accessing the Webadmin Console again with the addressed Domain:7080 to check the results. As shown below, I was able to access Webadmin with the addressed Domain:7080 and no longer received the same security warning as before.
III. Summary
So in this article, AZDIGI has shown you one of the ways to remove security warnings when accessing Webadmin Console OpenLiteSpeed. With this approach, we will easily access and make the interface more beautiful. With this way, we will easily access and make the interface more beautiful.
If you find the article interesting and useful, you can share it widely with everyone! You can refer to some other CybePanel tutorials at the link below:
If you need assistance, you can contact support in the ways below:
- Hotline 247: 028 888 24768 (Ext 0)
- Ticket/Email: You use the email to register for the service and send it directly to: support@azdigi.com .
You might also like
- Install Let's Encrypt SSL on OpenLiteSpeed
- How to add the website to OpenLiteSpeed WebAdmin GUI
- Install SSL Let's Encrypt with Certbot on Apache
- Install WordPress with OpenLiteSpeed using Docker Compose on Ubuntu 22.04
- How to optimize OpenLiteSpeed WebAdmin GUI
- How to install eXtplorer on OpenLitespeed
About the author

Thạch Phạm
Đồng sáng lập và Giám đốc điều hành của AZDIGI. Có hơn 15 năm kinh nghiệm trong phổ biến kiến thức liên quan đến WordPress tại thachpham.com, phát triển website và phát triển hệ thống.