
What is Imunify?
Imunify360 is a new generation security solution specially designed for servers on Linux platform, it is developed by CloudLinux Inc. With 6 factors of security, Imunify360 provides a comprehensive security solution against malicious attacks on the server system.
Installation Requirements
The operating system, hardware, host panel and browser requirements for installing Imunify360 are listed below:
Operating system
- CentOS/CloudLinux 6 and above.
- RHEL.
- Ubuntu 16.04 or 18.04.
Hardware
- RAM: 1GB.
Control panels have built-in interfaces
- cPanel.
- Plesk – But Plesk 12.5 is not supported with Imunify360 3.8.5.
- DirectAdmin – Supports Imunify360 version 3.1.3 and above.
Browser Requirement
- Safari version 10 and up.
- Google Chrome version 39 and up.
- Firefox version 28 or later.
- Edge version 17 or later.
Why should you use Imunify360?
For along, malware/virus has been a dilemma for website users, especially popular open-source like WordPress. Websites using open source code like WordPress are often vulnerable to malware/viruses from plugins, themes of unknown origin being pre-installed by hackers or exploited from a vulnerability when installing them on your website.
So in case your website is infected or suspected of being infected with malware/virus, what should you do? Most of today’s ShareHosting services have pre-installed scanning and malware removal features directly on the host, specifically at AZDIGI, you will have a built-in Imunify360 to process this problem. However, if you use VPS, things will be much more difficult because when using VPS, most of these services will not be supported with pre-installed malware/virus scanning software that you have to install yourself to protect as well as handle your VPS without using additional server administration services.
How can I integrate more Imunify360 software into VPS, specifically VPS using DirectAdmin control, so I can easily handle malware/viruses on time? In this article, AZDIGI will guide you through the steps to install Imunify360 on DirectAdmin in the simplest way, please follow along.
Implementation Guide
Step 1: Prepare Key Imunify360
To install Imunify360 on DirectAdmin, you must have a license key to be able to install it. If you want to try it first, you can register for the Trial License of Imunify360 at the link below:
I have completed the Key Trial License registration and been given the Key information as below:
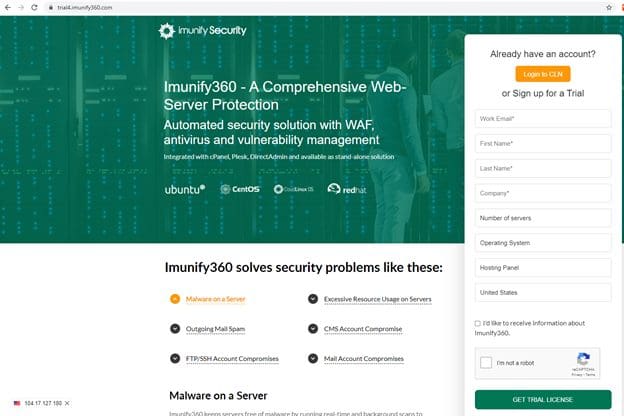
You need to fill in the following information:
- Work Email: enter your email
- First Name
- Last Name
- Company: enter your comapy name
- Number of servers: you choose the number of servers you want to install Imunify360 on (For example, if I install on 1 server, I choose option 1-4 servers)
- Operating System: you choose the version of the operating system (OS) running on your server.
- Hosting Panel: you choose the control panel you are using
- United States: select your country
After filling in all the necessary information, tick the last and press GET TRIAL LICENSE to activate the key. After successful registration, you will receive information as shown below:
- Your Key Information.
- The information includes the link and user/pass to log in to the Imunify360 service administration page.

Step 2: Install Imunify360
First, you need to access to your VPS as root, if you don’t know SSH into VPS, you can refer to the following article:
After SSH successfully, you need to run the following commands:
cd ~
wget http://repo.imunify360.cloudlinux.com/defence360/i360deploy.sh
bash i360deploy.sh --key IMUNxxxxxxxxePJWMr
Command annotation:
- Move to the root folder.
- Download the installation file from the Imunify360 homepage.
- Run the setup file. (replace IMUNxxxxxxxxePJWMr with your key)


The installation process will take about 15-30 minutes depending on each VPS. If the installation is successful, you will receive a message like Complete as shown below: So this completes the installation.
You can refer to some more commands with Imunify360 below:
- Update new version of Imunify360.
Command annotation:
- Move to the root folder.
- Download the update file from the Imunify360 homepage
- Run the update file.
cd ~
wget https://repo.imunify360.cloudlinux.com/defence360/imunify-force-update.sh
bash imunify-force-update.sh
- Check operation status, start, stop Imunify360.
Command annotation:
- Check status
- Start Imunify360
- Stop Imunify360
service imunify360 status
service imunify360 start
service imunify360 stop
- Uninstall Imunify360
cd ~
bash i360deploy.sh --uninstall
Command annotation:
- Move to the root folder.
- Uninstall the Imunify360 installation file.
Step 3: Set up Imunify360 on DirectAdmin
You access DirectAdmin with the Admin user by the following path: http://IP:2222/, if you do not know how to log in to DirectAdmin, you can refer to the article below:
After successfully logging in to DirectAdmin as Admin, you access Extra Features => Imunify360 Plugin

In the next interface, select ACCEPT to accept the installation terms.

Next, Imunify360 will ask you if you want to receive their new information during use, if you agree, enter your Email and click Save, otherwise if you do not want to receive these notifications, click SKIP.

Thus, we have completed setting up Imunify360 on DirectAdmin.
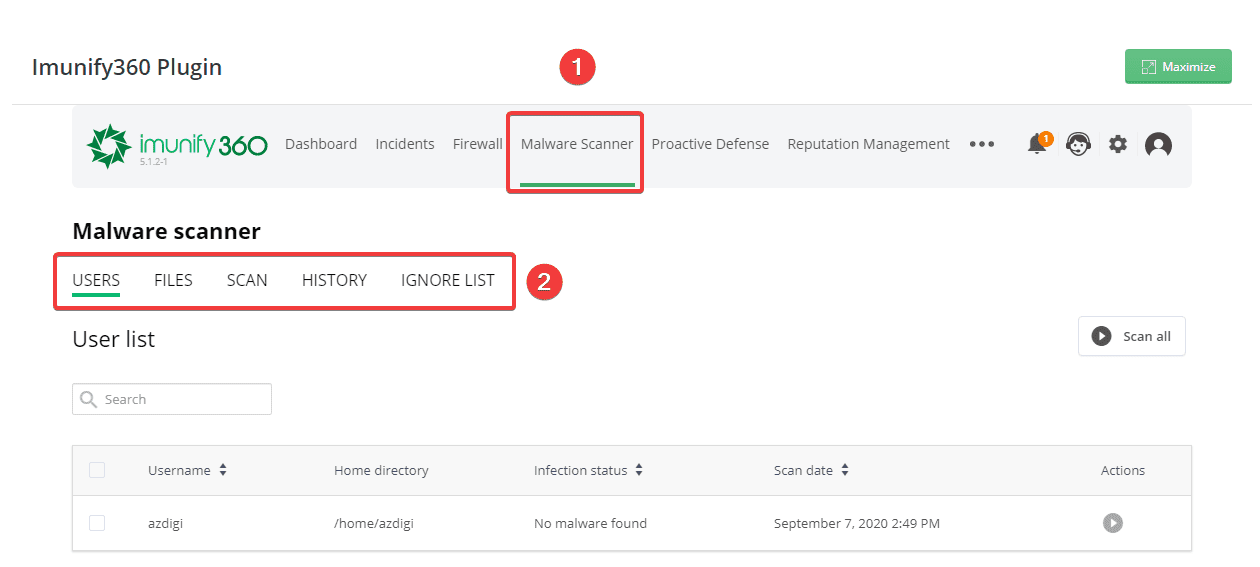
To use the basic feature of Imunify360 to scan malicious code, you can click on the Malware Scanner tab, where there will be features:
- USER: Scan by the user.
- FILES: Displays malware files to the scannable system.
- SCAN: Scan according to the specified path.
- HISTORY: Scanning history.
- IGNORE LIST: Set the path for Imunify360 to ignore when scanning.
In more detail about how to use it as well as learn other features, AZDIGI will guide you later in another article.
Summary
AZDIGI has shown you how to completely install Imunify360 on VPS using DirectAdmin most simply, Imunify360 will help you a lot in the early detection of malicious code, so you have an early solution to your website. If you find this helpful article, please share it widely.
Wishing you success.
If you need assistance, you can contact support in the ways below:
- Hotline 247: 028 888 24768 (Ext 0)
- Ticket/Email: You use the email to register for the service and send it directly to: support@azdigi.com
About the author

Thạch Phạm
Đồng sáng lập và Giám đốc điều hành của AZDIGI. Có hơn 15 năm kinh nghiệm trong phổ biến kiến thức liên quan đến WordPress tại thachpham.com, phát triển website và phát triển hệ thống.