
Continue with the series of web tutorials with AZDIGI, In this article, AZDIGI will guide you to build and deploy a sales website with MyThemeShop, one of the theme stores AZDIGI is giving away for free when you use the service at AZDIGI.
Advantages of MyThemeShop
- Themes from MyThemeShop are designed Responsive (Automatically optimize display well on all screen sizes such as laptops, phones, tablets).
- Optimized for loading speed, helping to increase user experience.
- Optimizing the theme structure helps SEO standards, making on-page SEO easier.
- Help users install and set up the interface quickly and easily due to the accompanying detailed documentation.
- Install themes quickly with just one click.
- Customize the look and feel easily through Theme Options even if you don’t know CSS, HTML, JS and PHP.
- Customizable colors, background unlimited.
- Optimizing ads, especially Adsense ads, helps increase CPC, CTR and RPM for maximum advertising efficiency.
- Customize the font to suit your taste and language.
- The interface is friendly to mobile devices, displayed with a beautiful layout, easy to navigate.
- Theme provided by MyThemeShop built on the latest HTML5 and CSS3.
- Built-in most popular social network icons today.
- The theme on MyThemeShop supports creating Child Theme for you to freely customize without fear of losing when updating to a new version.
- Easily update to the new version with one click.
- Integrate Schema to set up content maps for users, search engines, crawlers.
Requirement
Performed Part 1 and Part 2
- Part 1: Guide to domain and hosting registration
- Part 2: An overview of the functionality of WordPress
I. Install Theme in MyThemeShop
1. Select and install Theme
Each type of business will have corresponding themes according to that type, you need to choose a suitable theme for your business. Mythemeshop supports multiple types and you can see the details on the Mythemeshop homepage to start choosing for your website.
- Check out the demo from the website: https://mythemeshop.com/themes/
- Download the Theme installation file here
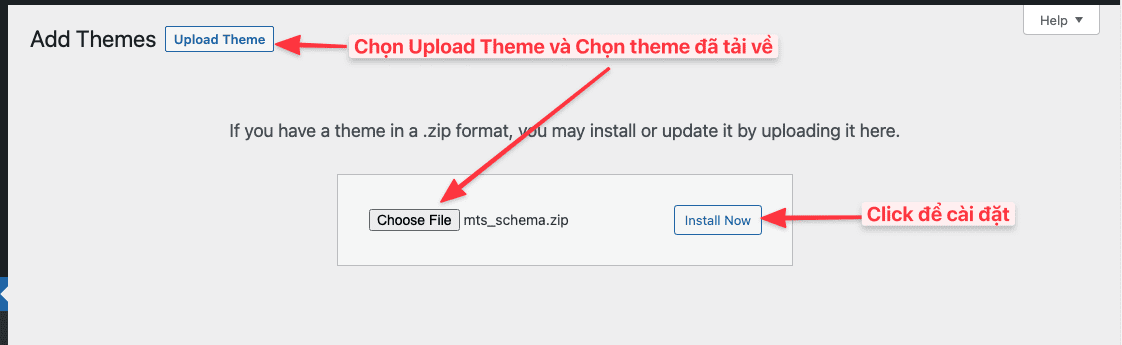
You log in to the WordPress admin => Appearance => Theme and select Add New to start the installation.
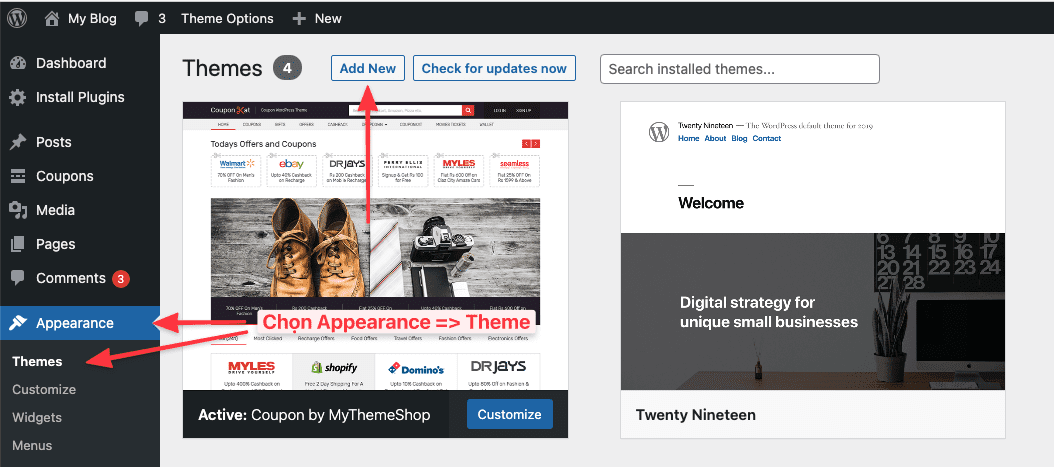
Then, you choose Upload Theme => Choose File => Theme you downloaded earlier. And this theme file will be in zip format.
After installation is complete, click Activate to activate the theme.
2. Install the required Plugin
- Install MyThemeShop Default Plugin
After activating the theme, MyThemeShop will suggest some required Plugins that come with the Theme. Please select Install Plugins => tick the Plugins => Install => Apply to start the installation.

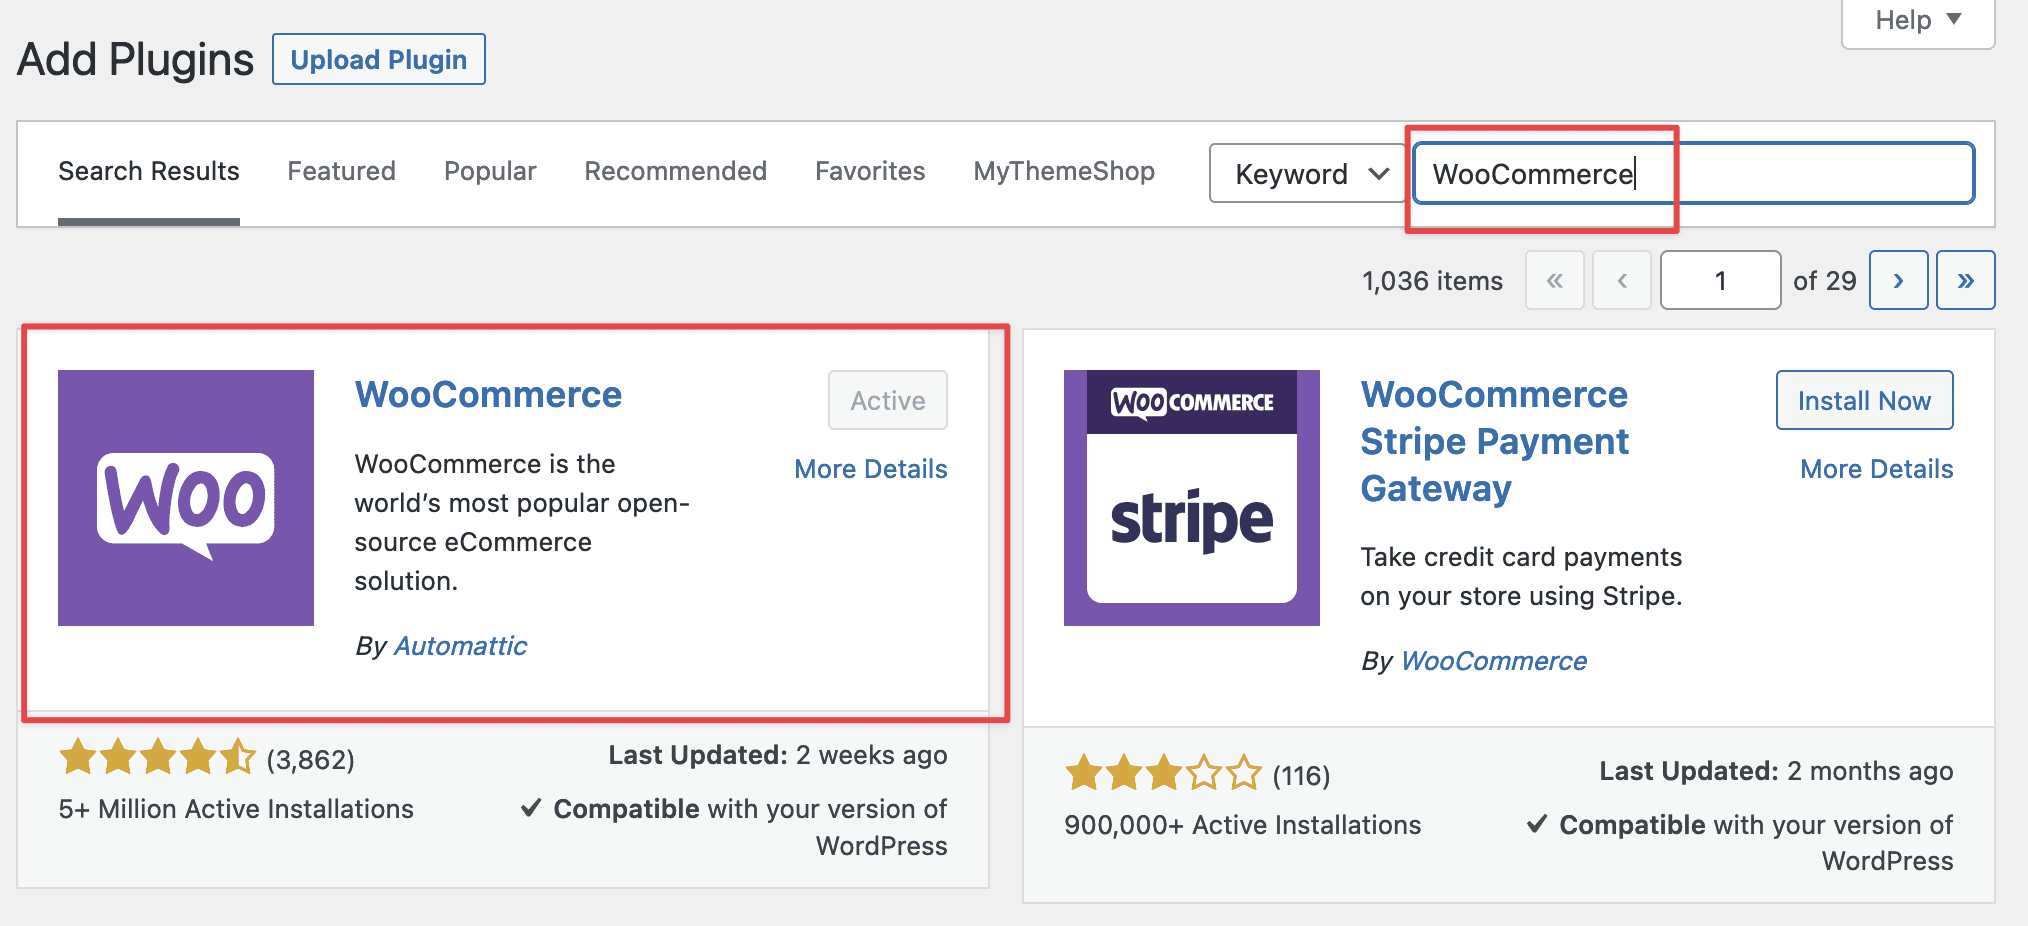
- Install WooCommerce Plugin
You need to install the WooCommerce Plugin because when you import the MyThemeShop e-commerce Theme demo without the WooCommerce Plugin, the products will not be imported. Therefore, you need to install the WooCommerce Plugin before importing the demo.
- Download WooCommerce directly here.
3. Activate MyThemeShop license
To use all the copyright features and the theme store, MyThemeShop Plugin, you need to activate the copyright license. You can send a support request to the Technical Team with the product’s license activated.
Note: The license only needs to be activated once with MyThemeShop Theme & Plugin Updater and you can use all MyThemeShop products later without activation.
4. Import demo Theme
Next, you need to enter the demo theme of the selected Theme to use by clicking Appearance => Theme Options
At the Theme Options interface, select Import/Export to start importing sample content.
Then, you will see the options that the Theme supports. Please choose the corresponding template that suits yours needs to import.
Demo content includes:
- Import Theme Options: Import only Theme options.
- Import Theme Options & Widgets: Import options and Template Widgets.
- Import Theme Options, Widgets & Content: Import theme options, Widgets and template content.
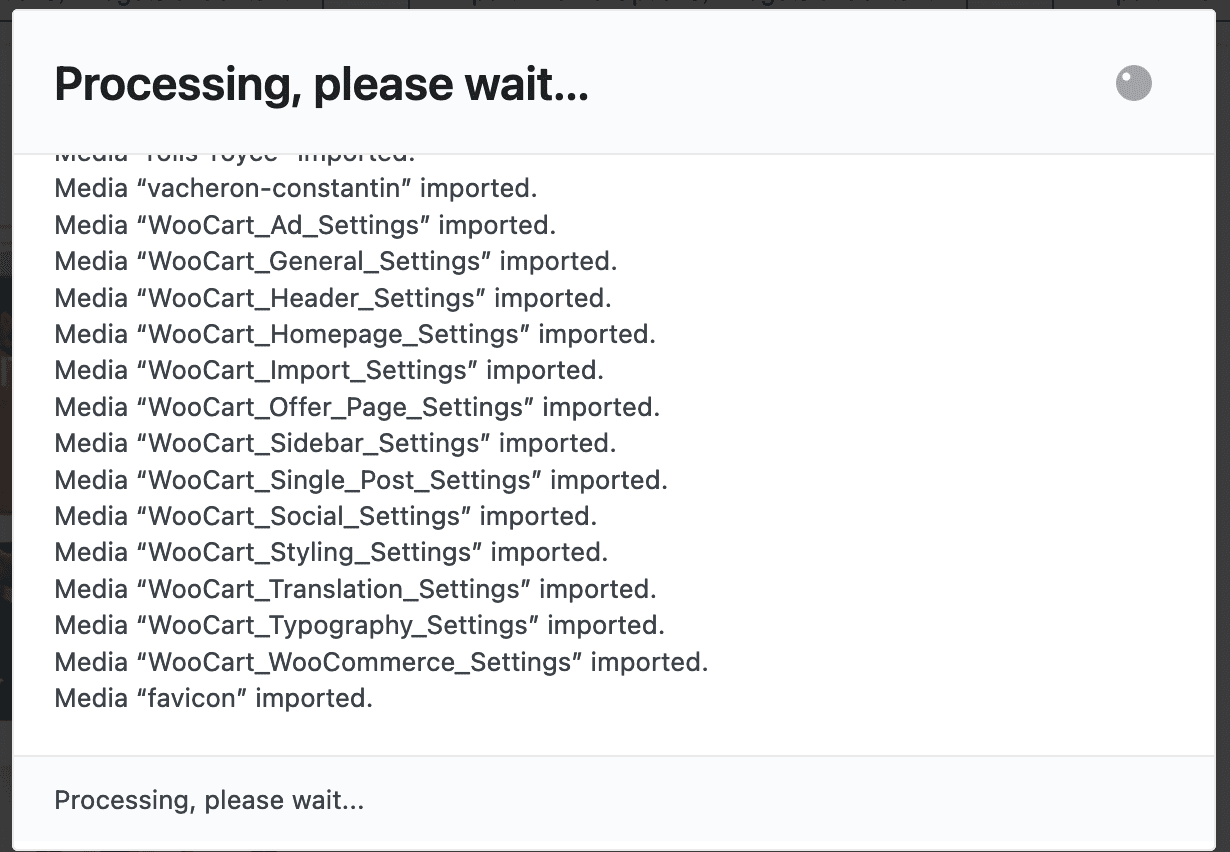
Sample content import is being started. Import may take 5-10 minutes or less. Please don’t close the browser until done.
Then you will get the message Importing process finished!, this means successfully imported. Finally, click OK to close the window.
Note: If you receive an import failure message, please see the returned log and contact our Technical Team to support.
If you receive the Importing proccess finished! message, the import process has been completed.

Below is the sample interface that I successfully imported. Now you can rely on this template interface to fully customize your website.

II. Customize Theme Options in MyThemeShop
1. Customize Customizer in WordPress
Customizer is the default WordPress customization, you can use the Customizer to customize some WordPress components, such as:
- Site Identity
The Site Identity section links to the Header Builder quite a bit. Because here, you can customize Site Title & Logo Settings and Site Icon aka Favicon.
- Menu
In addition to customizing the menu in Appearance => Menus, you can also customize the menu directly here. To add a new menu, click Create New Menu.

- Widgets
Widget WordPress (referred to as Widget) is a system of WordPress tools that allows you to add new content, shape the list of posts. Thereby displaying the latest posts on the bars for visitors to search and track the posts easily.
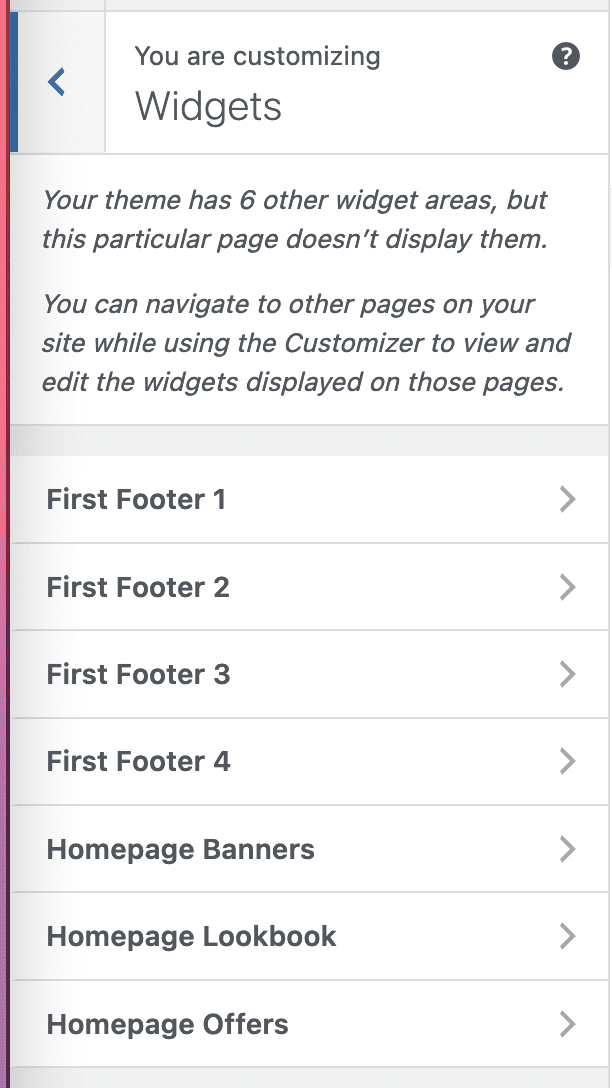
Each theme will have certain Widgets with different positions, and you can add multiple blocks in each Widget.
For each block, you can use it as a post editor.
- Homepage Settings
Homepage Settings You will choose a fixed page for the homepage in the Homepage Settings section (you leave it as default).

- Additional CSS
Additional CSS Most website builders often work with this part. Instead of having to edit the CSS code directly in the theme, which will affect the theme and cause unexpected errors, you can edit the CSS in this section.
2. Customize Theme Options in MyThemeShop
This is a separate customization function of MyThemeShop. This function will manage almost the entire Theme and you can use the Theme Options to remodel your website.
- General Settings
This tab contains general settings options that will be applied to the entire theme, such as changing Logo, Favicon.
- Performance
This tab contains performance-related options that can help speed up your sites, such as speeding up page loading, Lazy loading for scrolling, JavaScript syncing,…

- Styling Options
This tab contains functions related to your theme, such as adjusting layout, colors, fonts…
- Header
This tab customizes the elements of the website header section.

- Footer
This tab customizes the footer elements of the theme.

- Homepage
This tab controls the layout of the website homepage section.

- Single Posts
This tab controls the look and functionality of your post.
- Social Buttons
This tab controls the functionality of social network sharing buttons.
- Ad Management
This is the function that controls the ads on your website. With this function, managing ads becomes easier.
- Sidebars
With this function, you have complete control over the sidebars. Here you can manage the sidebars and choose one sidebar per site section or a custom sidebar on a per-post basis in the post editor.
- Navigation
This function will use on Appearance => Menus
- Typography
This function controls all the fonts on your website, from headers, pages and articles. To change the font and size, you just need to click and select the font you need to use. To see more options, click More.

- Import/Export
This function is used to import the demo theme for the website. In addition, this function is also used to save the theme’s configuration or import the theme configuration again.
III. Set up Woocommerce
1. Create categories for products
To create categories for products, click Products => Categories
- Name: Enter the category name
- Slug: Leave blank or enter in the format of the unsigned category name (eg: ca-phe)
- Parent category
- Description: Description of the category
Then select Add new category.


A new category will appear, and to edit the newly created category, hover your mouse over the category name:
- Edit
- Quick Edit
- Delete
- View
- Make default
2. Create products
To create a new product, select Products => All Products => enter the content and information of the product. After entering, click Public to post the product.


The product is successfully posted, you will see it appear in the shop interface of the website.
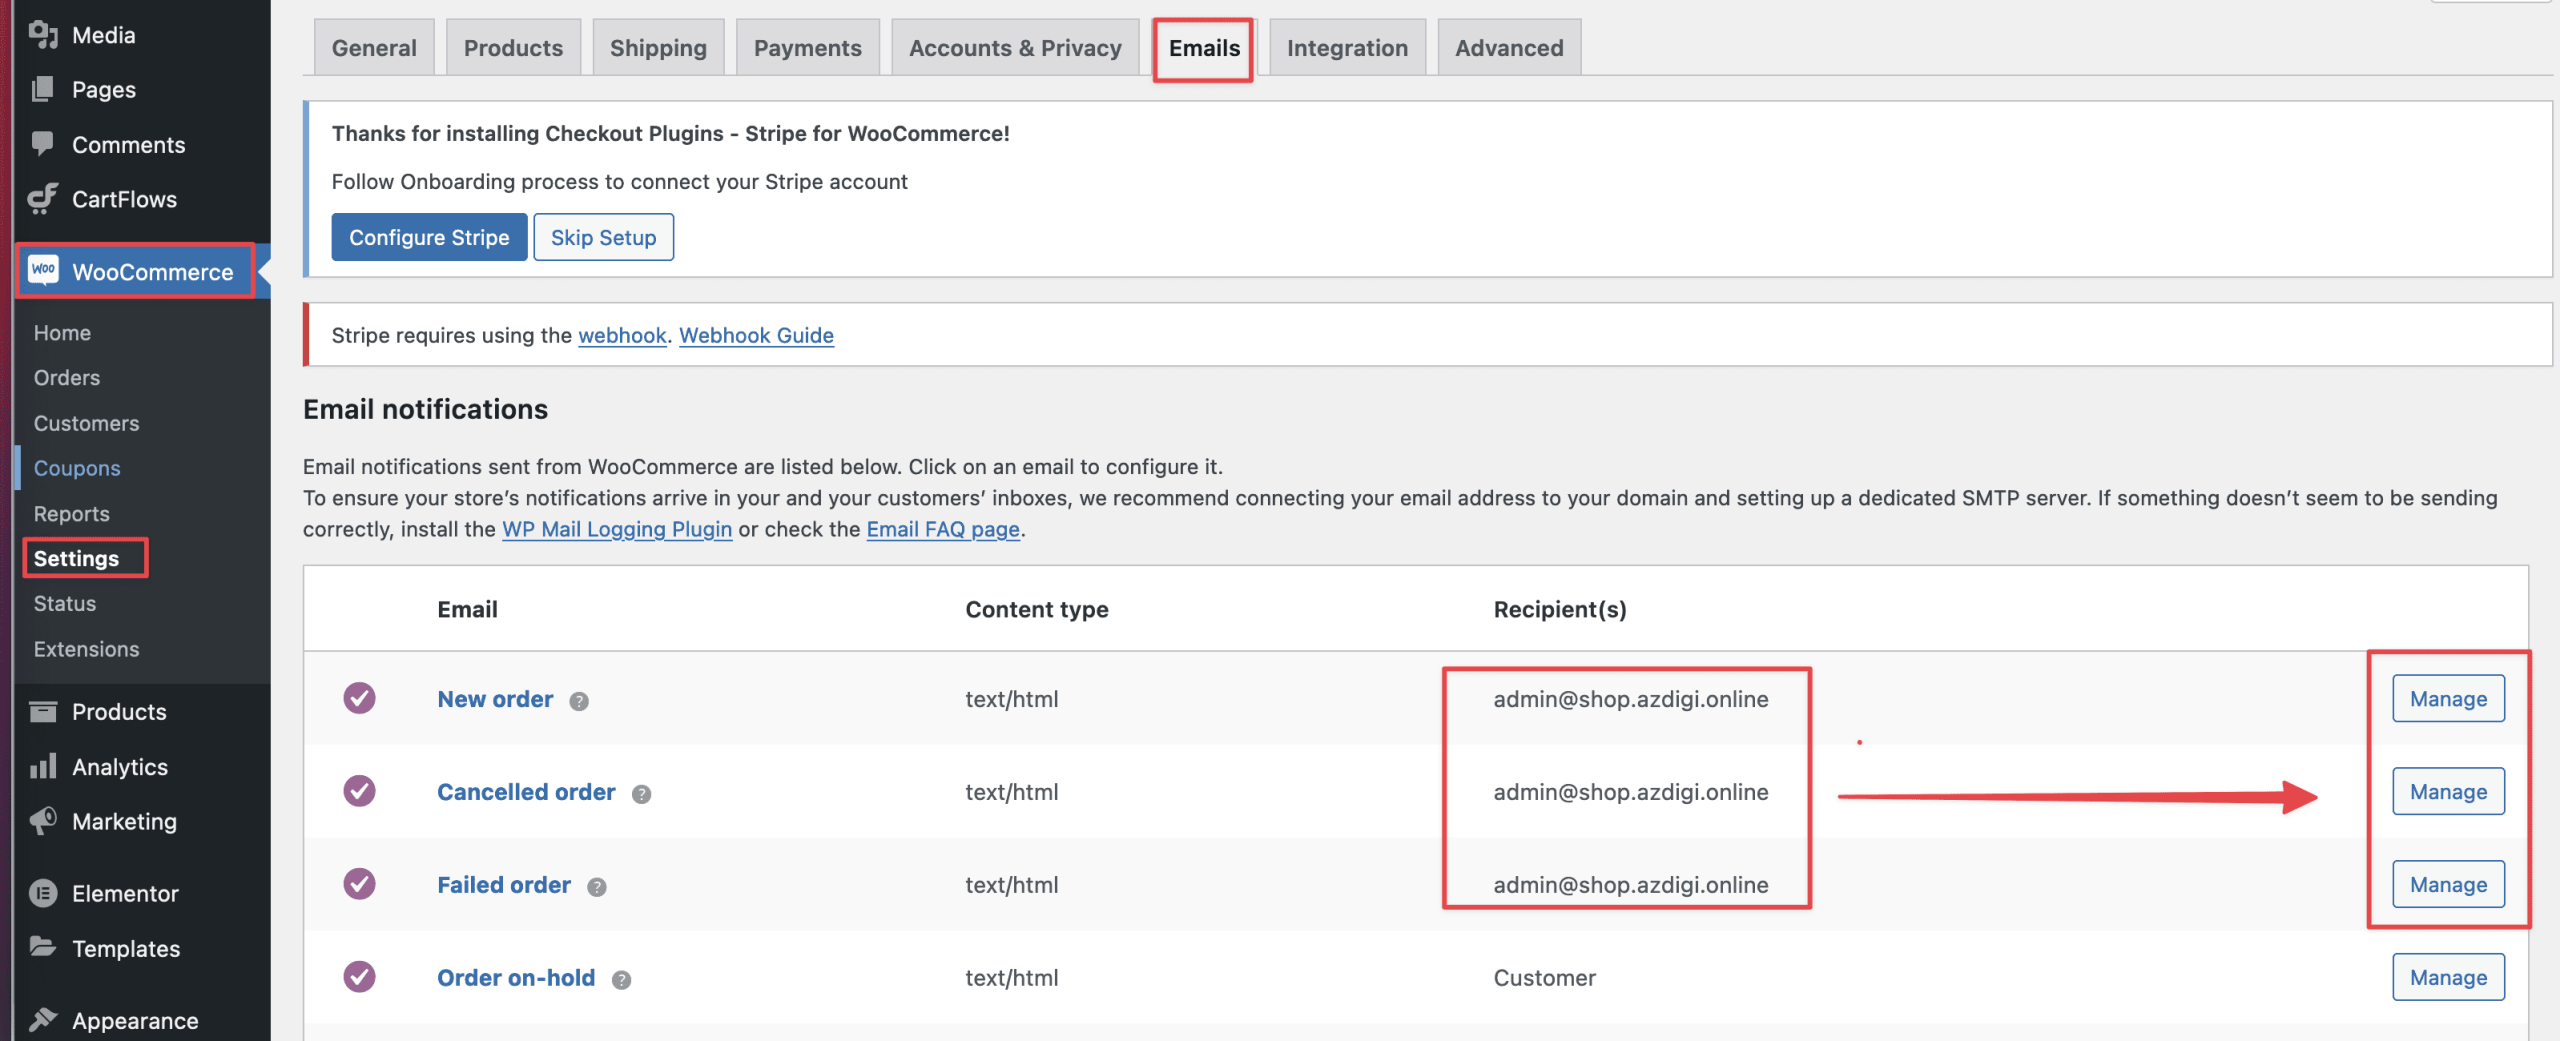
3. Configure order notification email
Note: Before setup, you need to configure SMTP for mail.
In this step, we will set up the Email Sending Order and Email receiving WooCommerce order information such as New Order, Order Cancellation, Failed Order Notification.
Go to WooCommerce => Setup, then select and enter the following information:
- New order: Enter your email to receive notifications when someone places a new order.
- Cancel an order: Enter your email to receive a notification when an order is canceled.
- Unsuccessful order: Enter your email to receive notifications when there is an unsuccessful order.
If you want to receive notifications via multiple emails, please enter the emails and separate them by comma (,), Example (email1, email2, email3, email4)
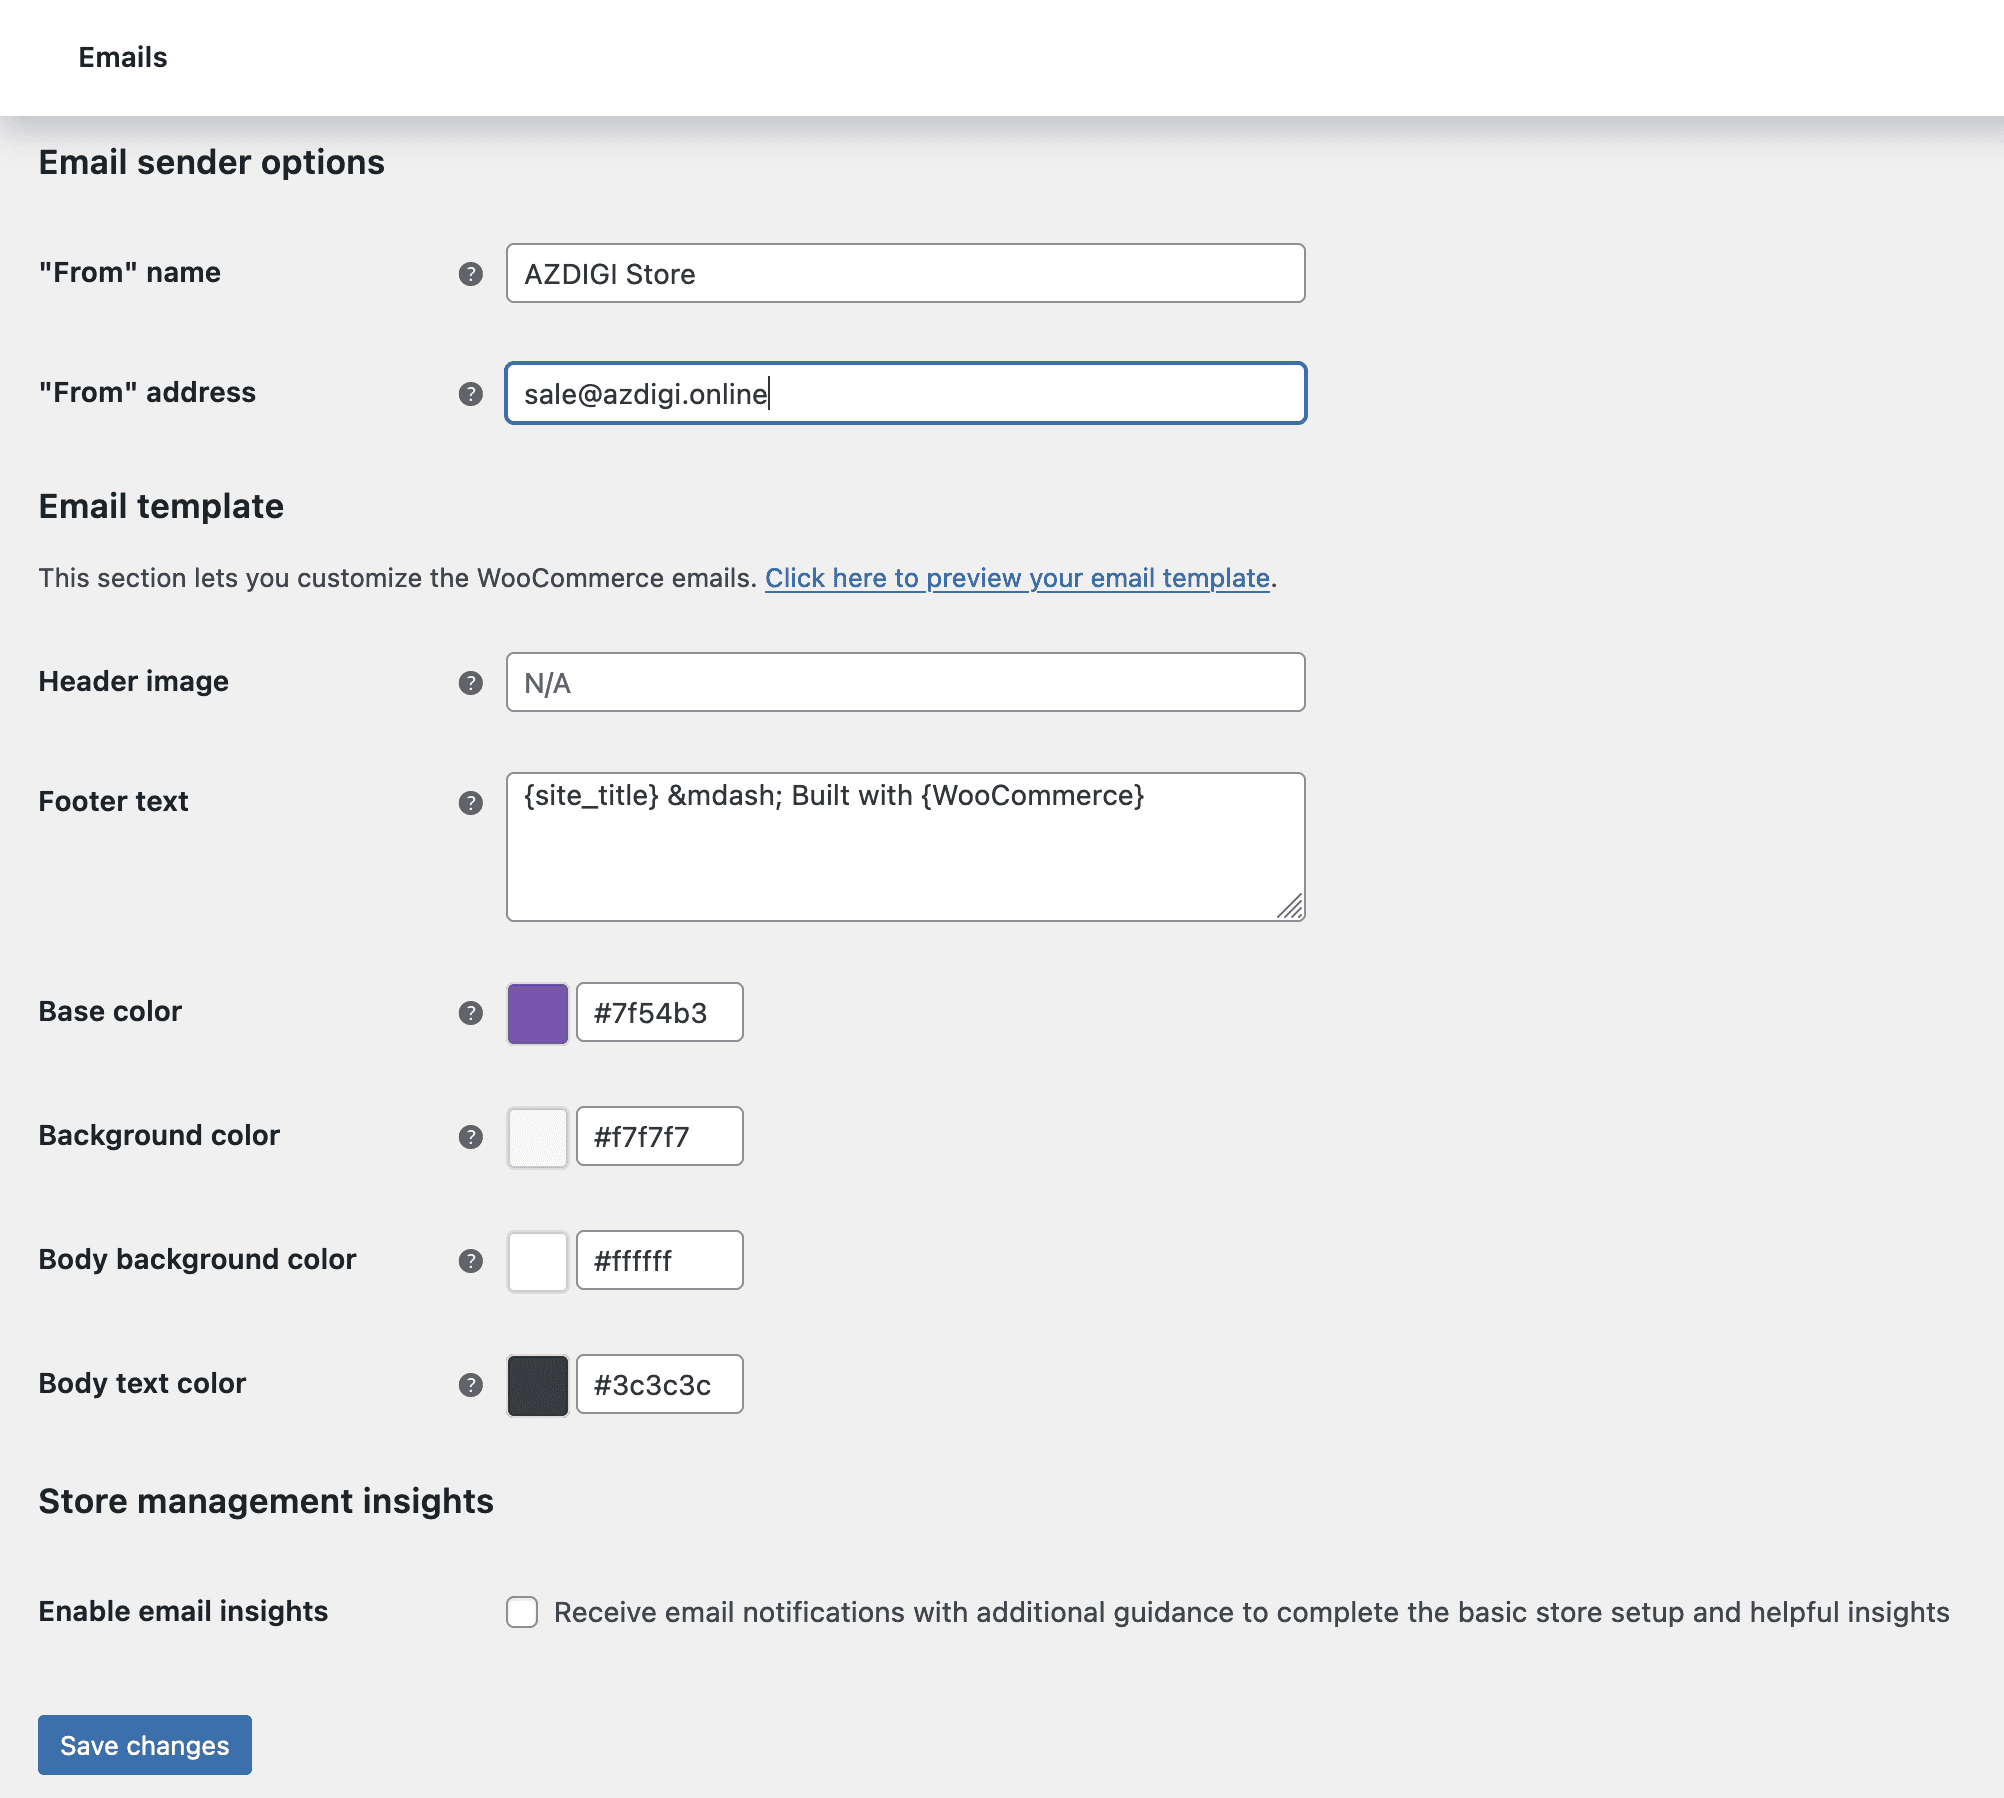
Next, please scroll down and set up at Sender email preferences:
- Name “sender”: enter the title name of the sender of the order.
- “From” address: enter the Gmail for which you have configured SMTP (This is the email that sends order notifications to your customers)
Hopefully, this article will help you build your own complete e-commerce website to prepare for your business.
Wishing you success!
If you need assistance, you can contact support in the ways below:
- Hotline 247: 028 888 24768 (Ext 0)
- Ticket/Email: You use the email to register for the service and send it directly to: support@azdigi.com .
- Click on the AZDIGI website to refer to the best Hosting/VPS service in Vietnam.
About the author

Thạch Phạm
Đồng sáng lập và Giám đốc điều hành của AZDIGI. Có hơn 15 năm kinh nghiệm trong phổ biến kiến thức liên quan đến WordPress tại thachpham.com, phát triển website và phát triển hệ thống.