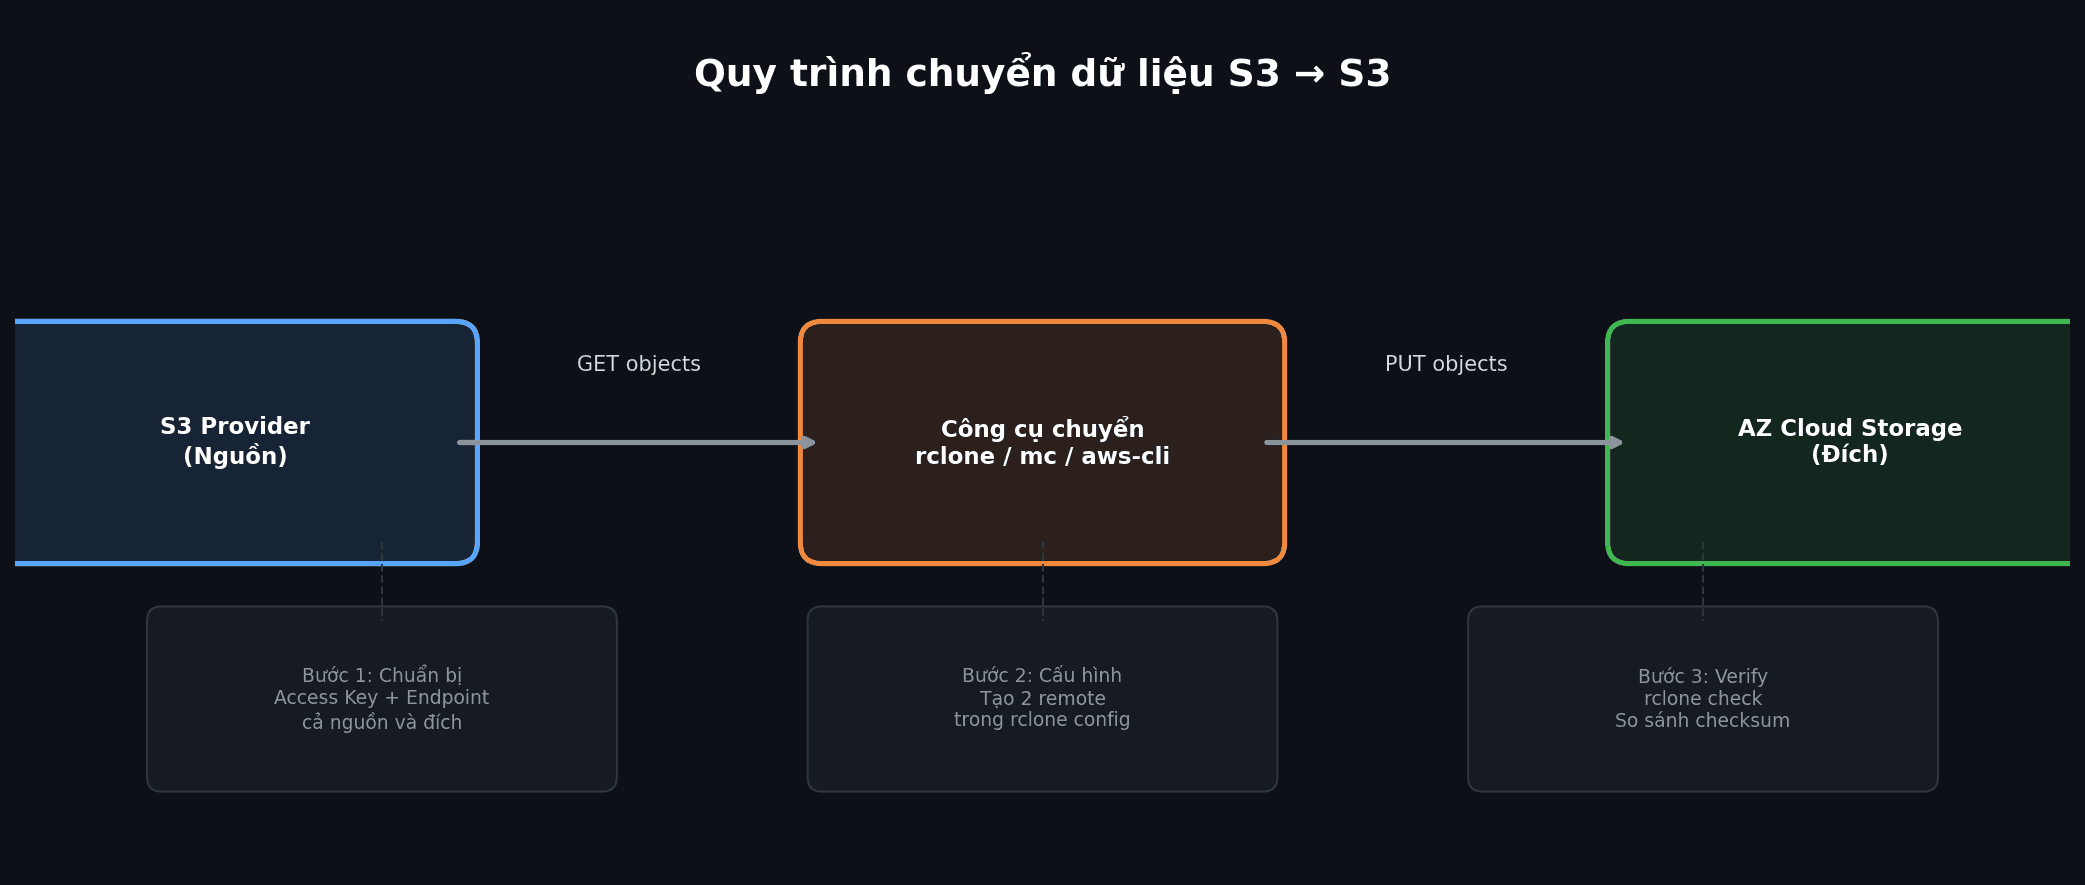
Moving data between Object Storage services is a common need: switching providers, setting up cross-cloud backups, or migrating from a legacy system to a new one. Since most providers support the S3-compatible API standard, transferring data between them is straightforward if you pick the right tool.
This guide walks you through how to move data from any S3 provider (AWS S3, DigitalOcean Spaces, Wasabi, MinIO, Backblaze B2…) to AZ Cloud Storage by AZDIGI, or vice versa. We cover 4 different tools that work on Linux, macOS, and Windows, from command-line to GUI.
Whether your data is a few GB or hundreds of GB, you will find a suitable method here. For each tool, we go through installation, configuration, data transfer commands, and post-transfer verification.
Preparation before transferring data
Before starting the transfer, gather the required information from both sides: source and destination.
Required information from both sides
- Access Key ID: S3 access key
- Secret Access Key: the secret key paired with the access key
- Endpoint URL: the provider’s API address (e.g.,
s3.amazonaws.com, or the AZ Cloud Storage endpoint) - Region: storage region (e.g.,
ap-southeast-1,sgp1) - Bucket name: source bucket and destination bucket names
💡 For AZ Cloud Storage, you can find your Access Key and Endpoint in the Cloud Storage management panel at my.azdigi.com.
Pre-transfer checks
- Data volume: know the total size in advance to estimate transfer time and ensure the destination bucket has enough capacity.
- Bandwidth: transfer speed depends on your network. Transfers between providers in the same datacenter are much faster than cross-region transfers.
- Transfer strategy: one-time full copy or continuous incremental sync? If the source data keeps changing, use sync instead of copy.
- Destination bucket created: some tools auto-create buckets, but it is best to create it beforehand to control the name and region.
Quick checklist
| Item | Source | Destination |
|---|---|---|
| Access Key | ✅ | ✅ |
| Secret Key | ✅ | ✅ |
| Endpoint URL | ✅ | ✅ |
| Region | ✅ | ✅ |
| Bucket name | ✅ | ✅ |
| Destination bucket created | – | ✅ |
Method 1: rclone (recommended)
rclone is an open-source command-line tool supporting over 70 cloud storage types. For S3 migration, rclone is the top choice because it copies directly from source S3 to destination S3 without staging data locally. It is fast, supports multipart upload, resume on interruption, and checksum verification.
Installing rclone
Linux:
curl https://rclone.org/install.sh | sudo bashOr via package manager:
sudo apt install rclone    # Debian/Ubuntu
sudo yum install rclone    # CentOS/RHEL
macOS:
brew install rcloneWindows: Download the installer from rclone.org/downloads, or use a package manager:
scoop install rclone
# or
winget install rclone
Configuring 2 remotes (source + destination)
Run rclone config to create remotes via the interactive wizard, or edit the config file directly.
Config file location: ~/.config/rclone/rclone.conf (Linux/macOS) or %APPDATA%\rclone\rclone.conf (Windows):
[source-s3]
type = s3
provider = AWS
access_key_id = AKIAXXXXXXXXXXXX
secret_access_key = your-source-secret-key
region = ap-southeast-1
[az-storage]
type = s3
provider = Other
access_key_id = AZ_ACCESS_KEY
secret_access_key = AZ_SECRET_KEY
endpoint = https://ENDPOINT_AZ_CLOUD_STORAGE
region = sgp1
ℹ️ Replace ENDPOINT_AZ_CLOUD_STORAGE with the actual endpoint of AZ Cloud Storage that you receive when signing up for the service. For other providers (DigitalOcean Spaces, Wasabi…), configure similarly, just change the endpoint and region.
If the source is not AWS, set provider = Other and fill in the corresponding endpoint.
Transferring data
Copy an entire bucket from source to destination:
rclone copy source-s3:my-bucket az-storage:new-bucket -P --transfers 16Sync (keep in sync, delete extra files at destination if source no longer has them):
rclone sync source-s3:my-bucket az-storage:new-bucket -P --transfers 16Copy only a specific folder:
rclone copy source-s3:my-bucket/images az-storage:new-bucket/images -PDry run (preview what will be transferred without actually copying):
rclone copy source-s3:my-bucket az-storage:new-bucket --dry-run⚠️ rclone sync will delete files at the destination if they don’t exist at the source. If you only want to add files without deleting, use rclone copy instead.
Performance optimization
For large datasets, tune these parameters:
rclone copy source-s3:my-bucket az-storage:new-bucket \
  -P \
  --transfers 32 \
  --checkers 16 \
  --s3-chunk-size 64M \
  --s3-upload-concurrency 4 \
  --fast-list
Flag explanations:
--transfers 32: transfer 32 files simultaneously (increase if bandwidth allows)--checkers 16: 16 parallel file checkers--s3-chunk-size 64M: chunk size for multipart upload (default 5MB, increasing helps with large files)--s3-upload-concurrency 4: upload 4 parts of each large file in parallel--fast-list: faster listing by loading the full file list into RAM (uses more RAM but fewer API calls)-P: display real-time progress
Post-transfer verification
After copying, run the check command to compare source and destination:
rclone check source-s3:my-bucket az-storage:new-bucket --one-wayThis compares file sizes and hashes (MD5) between both sides. The --one-way flag only checks from source to destination (ensuring every source file exists at the destination).
When both source and destination are S3, use --checksum during copy/sync so rclone compares by MD5 instead of modification time, which is both more accurate and saves API calls:
rclone sync source-s3:my-bucket az-storage:new-bucket --checksum -P --transfers 16Method 2: AWS CLI
AWS CLI is Amazon’s official tool, familiar to many users. However, it has a major limitation: AWS CLI does not support direct copying between two different S3 endpoints. You must download to local storage first, then upload to the destination.
Installation
Linux/macOS:
pip install awscli
# or
brew install awscli
Windows: Download the MSI installer from aws.amazon.com/cli.
Configuring 2 profiles
# Source profile
aws configure --profile source
# Enter Access Key, Secret Key, Region
# Destination profile
aws configure --profile destination
# Enter Access Key, Secret Key, Region
Or edit ~/.aws/credentials directly:
[source]
aws_access_key_id = SOURCE_ACCESS_KEY
aws_secret_access_key = SOURCE_SECRET_KEY
[destination]
aws_access_key_id = AZ_ACCESS_KEY
aws_secret_access_key = AZ_SECRET_KEY
Transferring data (via local directory)
Step 1: download from source to local:
aws s3 sync s3://source-bucket ./local-temp \
  --profile source \
  --endpoint-url https://source-endpoint
Step 2: upload from local to destination:
aws s3 sync ./local-temp s3://dest-bucket \
  --profile destination \
  --endpoint-url https://az-cloud-storage-endpoint
⚠️ This method requires enough local storage to hold all the data temporarily. For large datasets (hundreds of GB), use rclone instead of AWS CLI to avoid local staging.
Method 3: MinIO Client (mc)
MinIO Client (mc) is a CLI tool from MinIO, lightweight and easy to use. Its key advantage is supporting direct copying between two different S3 endpoints (like rclone) while also preserving custom metadata (x-amz-meta-*), something that rclone and AWS CLI cannot do.
Installation
Linux:
wget https://dl.min.io/client/mc/release/linux-amd64/mc
chmod +x mc
sudo mv mc /usr/local/bin/
macOS:
brew install minio/stable/mcWindows: Download mc.exe from min.io/download.
Configuring aliases
# Source (e.g., AWS S3)
mc alias set source https://s3.amazonaws.com SOURCE_ACCESS_KEY SOURCE_SECRET_KEY
# Destination (AZ Cloud Storage)
mc alias set azcloud https://ENDPOINT_AZ_CLOUD_STORAGE AZ_ACCESS_KEY AZ_SECRET_KEY
Transferring data
Mirror (sync the entire bucket, including folder structure):
mc mirror source/my-bucket azcloud/new-bucket --overwriteRecursive copy:
mc cp --recursive source/my-bucket/ azcloud/new-bucket/Check transferred size:
mc du azcloud/new-bucket💡 If your data has custom metadata headers (x-amz-meta-*) and you need to preserve them, use mc instead of rclone. This is MinIO Client’s key advantage.
Method 4: GUI Tools (for users unfamiliar with CLI)
If you are not comfortable with the command line, you can use the following graphical applications. Note: GUI tools typically transfer data through your local machine (download then upload), so speed will be slower than rclone or mc.
Cyberduck (macOS, Windows)
Download at cyberduck.io. Cyberduck supports S3-compatible connections via the Amazon S3 protocol.
- Create 2 bookmarks: one for the source, one for the destination
- Open 2 Cyberduck windows side by side
- Drag and drop files/folders between the 2 windows
This method is intuitive and easy to use, but very slow for large data since it downloads to your machine then re-uploads.
S3 Browser (Windows)
Download at s3browser.com. This is a dedicated S3 application, available only on Windows.
- Add 2 accounts (source + destination) with their respective endpoints
- Browse files in each bucket
- Copy files between accounts using the right-click menu
If you use Windows and manage S3 daily, S3 Browser is quite convenient. AZDIGI also has a detailed S3 Browser guide.
WinSCP (Windows)
WinSCP from version 5.19 onwards supports the S3 protocol. Configuration: New Site, select Amazon S3, enter endpoint, access key, secret key.
WinSCP has a Synchronize feature for syncing local with remote, but does not support remote-to-remote. Suitable if you already have WinSCP installed and only need to transfer small amounts of data.
Handling large data (over 100GB)
When data reaches hundreds of GB or TB, keep these points in mind:
Multipart upload
For files over 5GB, both rclone and AWS CLI automatically use multipart upload (splitting files into smaller parts and uploading in parallel). No extra configuration needed; it works behind the scenes.
Bandwidth throttling
If you are running the transfer on a production server and don’t want to impact other traffic:
rclone copy source-s3:bucket az-storage:bucket --bwlimit 50M -PThe --bwlimit 50M flag limits speed to 50MB/s.
Running inside screen or tmux
Large transfers can take hours to days. If running via SSH, use screen or tmux to keep the session alive when disconnected:
# Create a new session
tmux new -s migration
# Run rclone inside tmux
rclone sync source-s3:bucket az-storage:bucket -P --transfers 32
# Detach: Ctrl+B then D
# Reattach: tmux attach -t migration
Resuming interrupted transfers
rclone automatically skips files that were already transferred successfully when you re-run the command. So if a transfer gets interrupted, just run the same command again and rclone will only transfer the remaining files.
Checksum verification
After transferring, verify with checksums to ensure no files were corrupted:
rclone check source-s3:bucket az-storage:bucket --one-way --checksumTool comparison
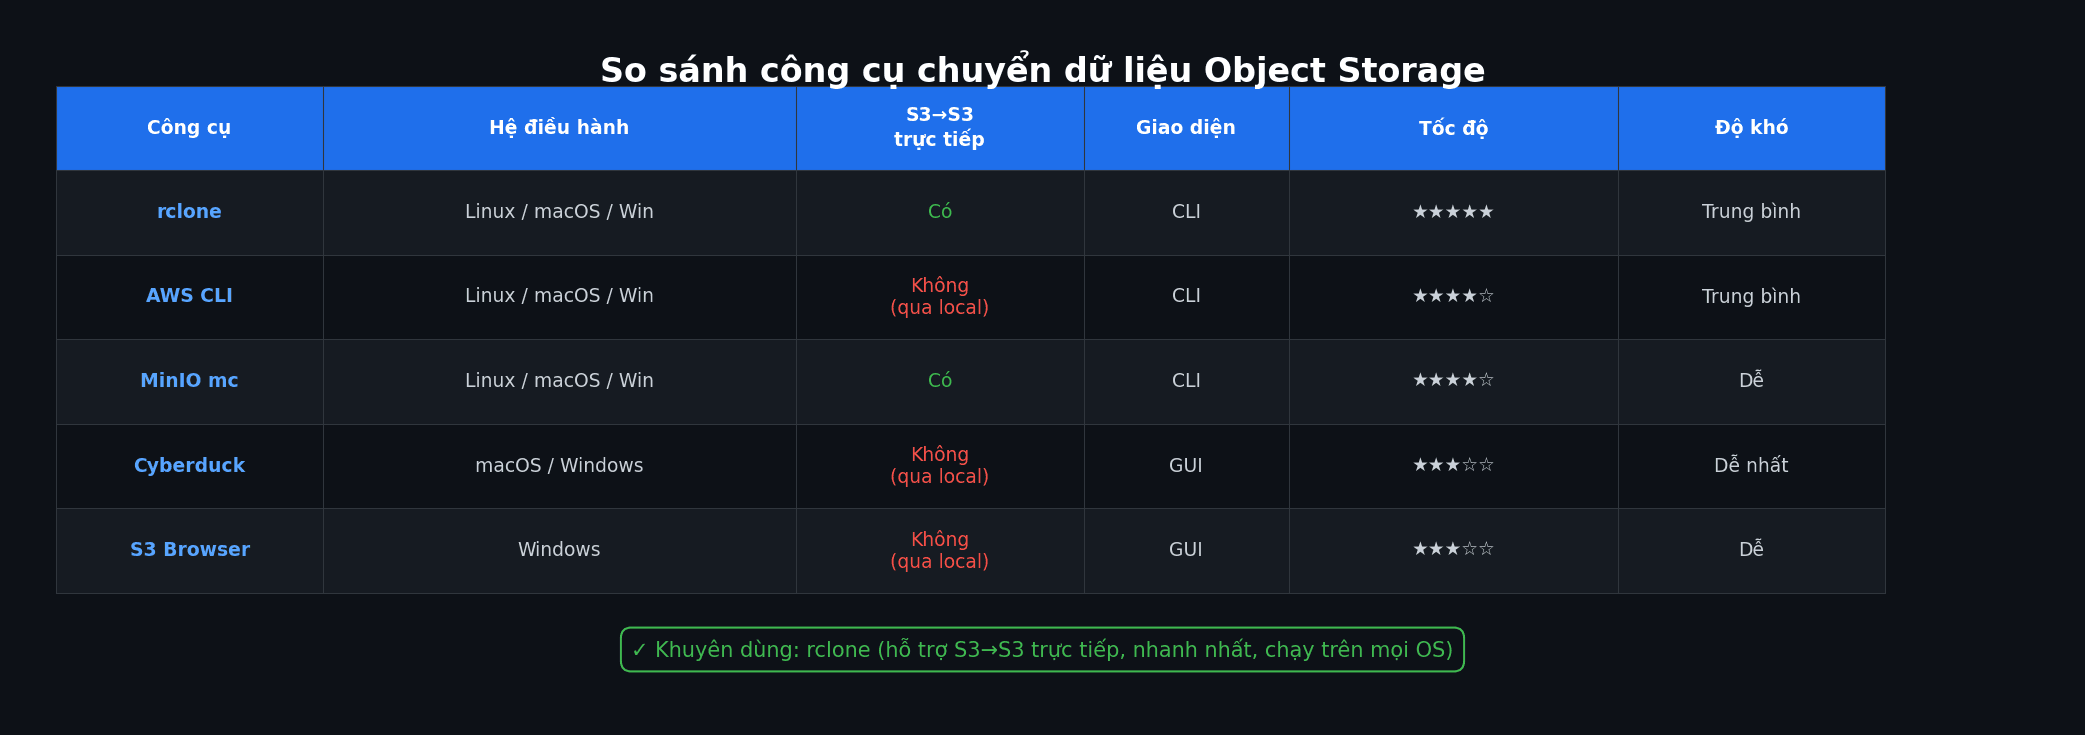
| Tool | OS | Direct S3-to-S3 | Interface | Speed | Difficulty |
|---|---|---|---|---|---|
| rclone | Linux, macOS, Windows | ✅ Yes | CLI | Fastest | Medium |
| AWS CLI | Linux, macOS, Windows | ❌ Via local | CLI | Fast | Medium |
| MinIO mc | Linux, macOS, Windows | ✅ Yes | CLI | Fast | Easy |
| Cyberduck | macOS, Windows | ❌ Via local | GUI | Slow | Easiest |
| S3 Browser | Windows | ❌ Via local | GUI | Medium | Easy |
| WinSCP | Windows | ❌ Via local | GUI | Medium | Easy |
If speed and direct S3-to-S3 transfer are priorities, choose rclone. If you need to preserve custom metadata, choose MinIO mc. If you prefer a graphical interface, Cyberduck or S3 Browser are the most accessible options.
Frequently asked questions
How long does data transfer take?
It depends on data volume, file count, and bandwidth between source and destination. On a 1Gbps connection, transferring 100GB takes roughly 15-20 minutes under ideal conditions. Many small files transfer slower than fewer large files (due to HTTP request overhead per file). With rclone, increasing --transfers to 32-64 helps maximize bandwidth utilization.
Are there bandwidth fees when transferring?
It depends on the source provider. Many providers charge egress fees (outbound bandwidth). With AZ Cloud Storage, there are no domestic egress fees. Some providers like AWS charge egress starting at $0.09/GB. Before transferring, check the source provider’s fee policy.
How to verify data completeness after transfer?
Use rclone check to compare file count, size, and checksum between source and destination. If no errors are reported, the data has been transferred completely and correctly.
Can I do incremental transfers (only new/changed files)?
Yes. Both rclone sync and mc mirror only transfer new or changed files. You can run the command multiple times, and they will automatically skip files that already exist at the destination.
How are files over 5GB handled?
rclone and AWS CLI automatically use multipart upload for files over 5GB. The file is split into multiple parts (default 5MB/chunk with AWS CLI, configurable with rclone via --s3-chunk-size), uploaded in parallel, then reassembled at the destination. This process is automatic and requires no user intervention.
Conclusion
Transferring data between S3-compatible Object Storage services is not complicated if you prepare the right information and choose the right tool. For most cases, rclone is the best choice because it supports direct S3-to-S3 transfer, is fast, and runs on every OS. If your data has custom metadata, use MinIO mc. If you prefer a graphical interface, Cyberduck or S3 Browser are the simplest options.
Looking for an S3-compatible Object Storage service in Vietnam? AZ Cloud Storage provides S3 storage with 3-way replication, 99.99% durability, 10Gbps network, and no domestic egress fees.
Further reading
You might also like
- Databases on Coolify — MySQL, PostgreSQL, Redis, MongoDB
- Guide to Installing Self-hosted Bitwarden on VPS for Password and Sensitive Data Management
- How to use SCP and RSYNC to migrate data on Linux
- Backup DirectAdmin data to Google Drive
- Integrating OpenViking into OpenClaw: Upgrading AI Agent Memory, Reducing Token Costs by 83%
- How to transfer website data to HestiaCP
About the author

Trần Thắng
Expert at AZDIGI with years of experience in web hosting and system administration.