Install LSMemcached on OpenLiteSpeed quickly with a few simple steps with AZDIGI to provide a good experience operating your WordPress website.
I. Overview
Continuing with the series about OpenLiteSpeed, today AZDIGI will guide you on installing LSMemcached on the OpenLiteSpeed server and optimizing it to bring outstanding performance to your website. So before going into the installation, let’s find out briefly what LSMemcached is.
What is LSMemcached?
LSMemcached is an improved version of Memcached. LSMemcached is a source code that supports the best Object Caching cache available today, you can briefly understand that LSMemcached is a perfect combination of Memcached and Redis, from which LSMemcached was created. With the combination of LSMemcached with OpenLiteSpeed, your server and your website will have extremely superior performance compared to the rest.
So how to install LSMemcached on the simplest OpenLiteSpeed server? Please continue to see the installation steps below.
II. Implementation Guide
To install LSMemcached on the OpenLiteSpeed server, you can follow these 2 steps.
Step 1: Install LSMemcached
To install the LSMemcached source code, you first need to SSH into your VPS with the highest privilege as root. If you do not know how to SSH, you can check out the instructions below:
After successfully SSH to the VPS, install the LSMemcached source code with the following command:
cd ~
yum groupinstall "Development Tools"
yum install autoconf automake zlib-devel openssl-devel expat-devel pcre-devel libmemcached-devel cyrus-sasl*
git clone https://github.com/litespeedtech/lsmcd.git
cd lsmcd
./fixtimestamp.sh
./configure CFLAGS=" -O3" CXXFLAGS=" -O3"
make
sudo make install
Command annotation:
- Command 1: Move to the root directory of the VPS
- Command 2,3,4,5,6,7,8: Install the source code and the LSMemcached repository.
After the installation is complete, use the following command to open and edit the content of the node.conf file:
vi /usr/local/lsmcd/conf/node.conf
After you have opened the file, you can delete all the content inside and replace it with the content below and save it.
Repl.HeartBeatReq=30 Repl.HeartBeatRetry=3000 Repl.MaxTidPacket=2048000 Repl.GzipStream=YES Repl.LbAddrs=127.0.0.1:12340 Repl.ListenSvrAddr=127.0.0.1:12340 REPL.DispatchAddr=127.0.0.1:5501 RepldSockPath=/tmp/repld.usock CACHED.PRIADDR=127.0.0.1:11000CACHED.ADDR=127.0.0.1:11211 CACHED.ADDR=UDS:///tmp/lsmcd.sock #default is 8, it can be bigger depending on cache data amount Cached.Slices=8 Cached.Slice.Priority.0=100 Cached.Slice.Priority.1=100 Cached.Slice.Priority.2=100 Cached.Slice.Priority.3=100 Cached.Slice.Priority.4=100 Cached.Slice.Priority.5=100 Cached.Slice.Priority.6=100 Cached.Slice.Priority.7=100
Cached.ShmDir=/dev/shm/lsmcd #If you change the UseSasl or DataByUser configuration options you need to remove the ShmDir folder and contents. #Cached.UseSasl=true #Cached.DataByUser=true #Cached.Anonymous=false #Cached.UserSize=1000 #Cached.HashSize=500000 #CACHED.MEMMAXSZ=0 #CACHED.NOMEMFAIL=false
##this is the global setting, no need to have per slice configuration. User=nobody Group=nobody #depends CPU core CachedProcCnt=4 CachedSockPath=/tmp/cached.usock. #TmpDir=/tmp/lsmcd LogLevel=notice #LogLevel=dbg_medium LogFile=/tmp/lsmcd.log
Thus, the installation of LSMemcached is completed. Now you use the following commands to enable and set up LSMemcached startup with the system.
systemctl start lsmcd
systemctl enable lsmcd
chkconfig lsmcd on
Then you restart Litespeed is completed.
systemctl restart lsws
Step 2: Configure LSMemcached with your website
To connect LSMemcached to the website, we have 2 methods to connect:
- Method 1: Connect via IP and Port LSMemcached.
- Method 2: Connect through the Unix socket port.
It is recommended to connect to Unix Socket when you are a basic user using Webserver with a small model or hosting, you should use connection via Unix Socket. Because with Unix Socket will bring about 30% faster speed than connecting via a network port and better security because the file can only be read as localhost.
It is recommended to connect through the network port when your Webserver scale is large or very large and requires a high load balance. For example, if your system runs a separate database and web server, you should use the network port to connect to LSMemcached.
You can see more details about the configuration of LSMemcached here.
And specifically, the information that you need to declare LSMemcached is as follows:
CACHED.ADDR=127.0.0.1:11211
CACHED.ADDR=UDS:///tmp/lsmcd.sock
Now we will go into connecting LSMemcached to the website. With WordPress, to connect to LSMemcached, you can install and use a plugin called LiteSpeed Cache.

After installing the plugin, you do the following configuration:
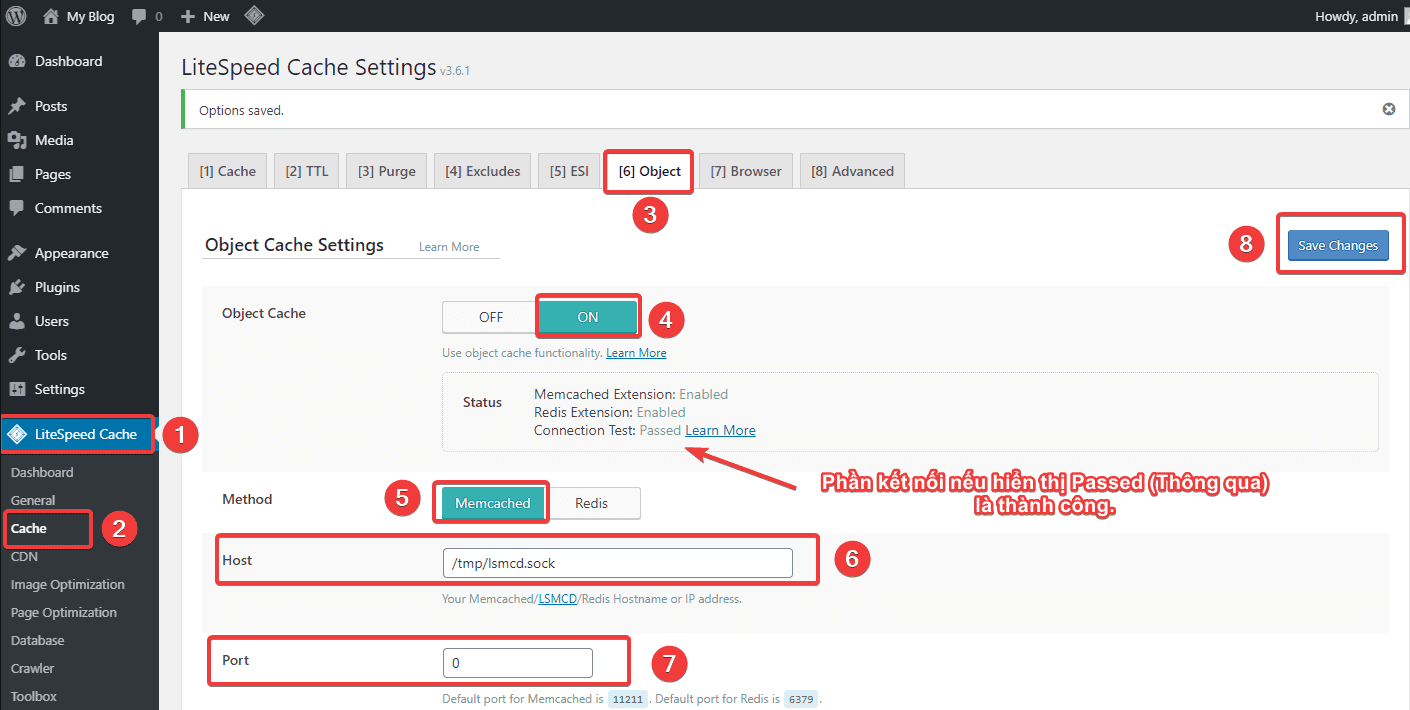
- Enable via Unix socket
Go to Litespeed cache (1) => Cache (2)=> Object (3)=> ON (4)=> Memcached (5) => /tmp/lsmcd.sock (6)=> 0 (7) => Save (8).
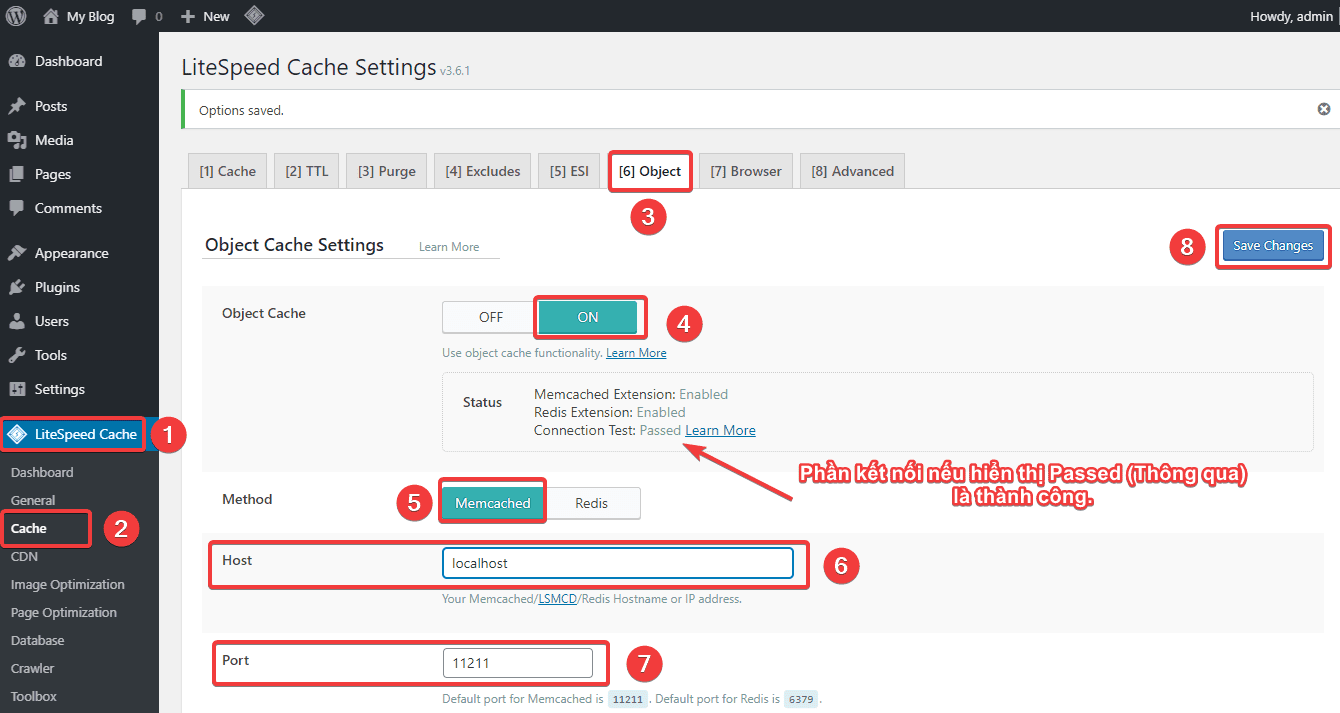
- Enable via the Port
Access Litespeed cache (1) => Cache (2)=> Object (3)=> ON (4)=> Memcached (5)=> localhost (6)=> 11211 (7) => Save (8).
If the connection fails, please check if Port 11211 is open. If not, you can open the port with the following command:
firewall-cmd --zone=public --add-port=11211/tcp --permanent
firewall-cmd --reload
III. Summary
So in this article, AZDIGI has shown you the complete installation of LSMemcached on the OpenLiteSpeed server in the most detail. If you want your website to work at full performance, you should not skip this installing and configuration section. Hopefully, this article will help you to install Let’s Encrypt SSL successfully!
If you find the article helpful, please share it widely. In addition, you can refer to some other articles about OpenLiteSpeed at the link below:
- How to add the website to OpenLiteSpeed WebAdmin GUI
- Install OpenLiteSpeed, MariaDB and PHP on Centos 7
- Install WordPress on Openlitespeed
If you need assistance, you can contact support in the ways below:
- Hotline 247: 028 888 24768 (Ext 0)
- Ticket/Email: You use the email to register for the service and send it directly to: support@azdigi.com .
You might also like
About the author

Thạch Phạm
Đồng sáng lập và Giám đốc điều hành của AZDIGI. Có hơn 15 năm kinh nghiệm trong phổ biến kiến thức liên quan đến WordPress tại thachpham.com, phát triển website và phát triển hệ thống.