
How to install and use Webinoly for newbies!
Hi guys, continuing today’s article, AZDIGI will introduce to you a script, a very good website management toolkit, with a lot of features that I want to share with you and that is Webinoly. Let’s find out with us.

In this article, AZDIGI will divide it into 2 main parts: introduction & installation and usage. So let’s get started with us.
Part 1: Introduction and installation of Webinoly
I. Introduction to Webinoly
Like other scripts installed LEMP (Linux, Nginx, MariaDB, PHP), but different from scripts like (hocvps, vpssim, larvps, centmin mod…) Discover it now.
Outstanding Features
- Free SSL with Let’s Encrypt, auto-renew SSL.
- HTTP/2 . Support
- Supports the latest PHP versions
- Use FastCGI Cache and Redis Cache
- Get an A at SSLlabs
- Automatically optimize the server to make the most of resources
Easy website management
- Easy and unique website management commands such as creating, deleting, disabling websites.
- Supports advanced features for WordPress sites. (One-third of the Internet runs on WP)
- Support many types of websites like HTML, PHP, Reverse-Proxy or any configuration you want in the LEMP environment.
- Support APP like Laravel, Node, Angular, React, Vue… in NGINX setup
- Fully Automatic SSL Certificate Installation
- NGINX Redirect Manager, Backup, SMTP and many more.
- Datadog integration for monitoring and analysis.
- Log viewer in real-time.
II. Install Webinoly
Server requirements:
- Operating System: Ubuntu 20.04 or 18.04
- CPU: 1 core
- RAM: 1GB
- Disk: 10GB
Step 1: SSH into the server
To install Webinoly, we first need to SSH into your VPS/server with root privileges. If you don’t know how to SSH into your VPS/Server, you can refer to the following tutorial:
Step 2: Install Webinoly on Ubuntu
It may take more than 10 minutes to install Webinoly, but in order not to suddenly shut down, you should use Screen to run it safest.
wget -qO weby qrok.es/wy && sudo bash weby 3
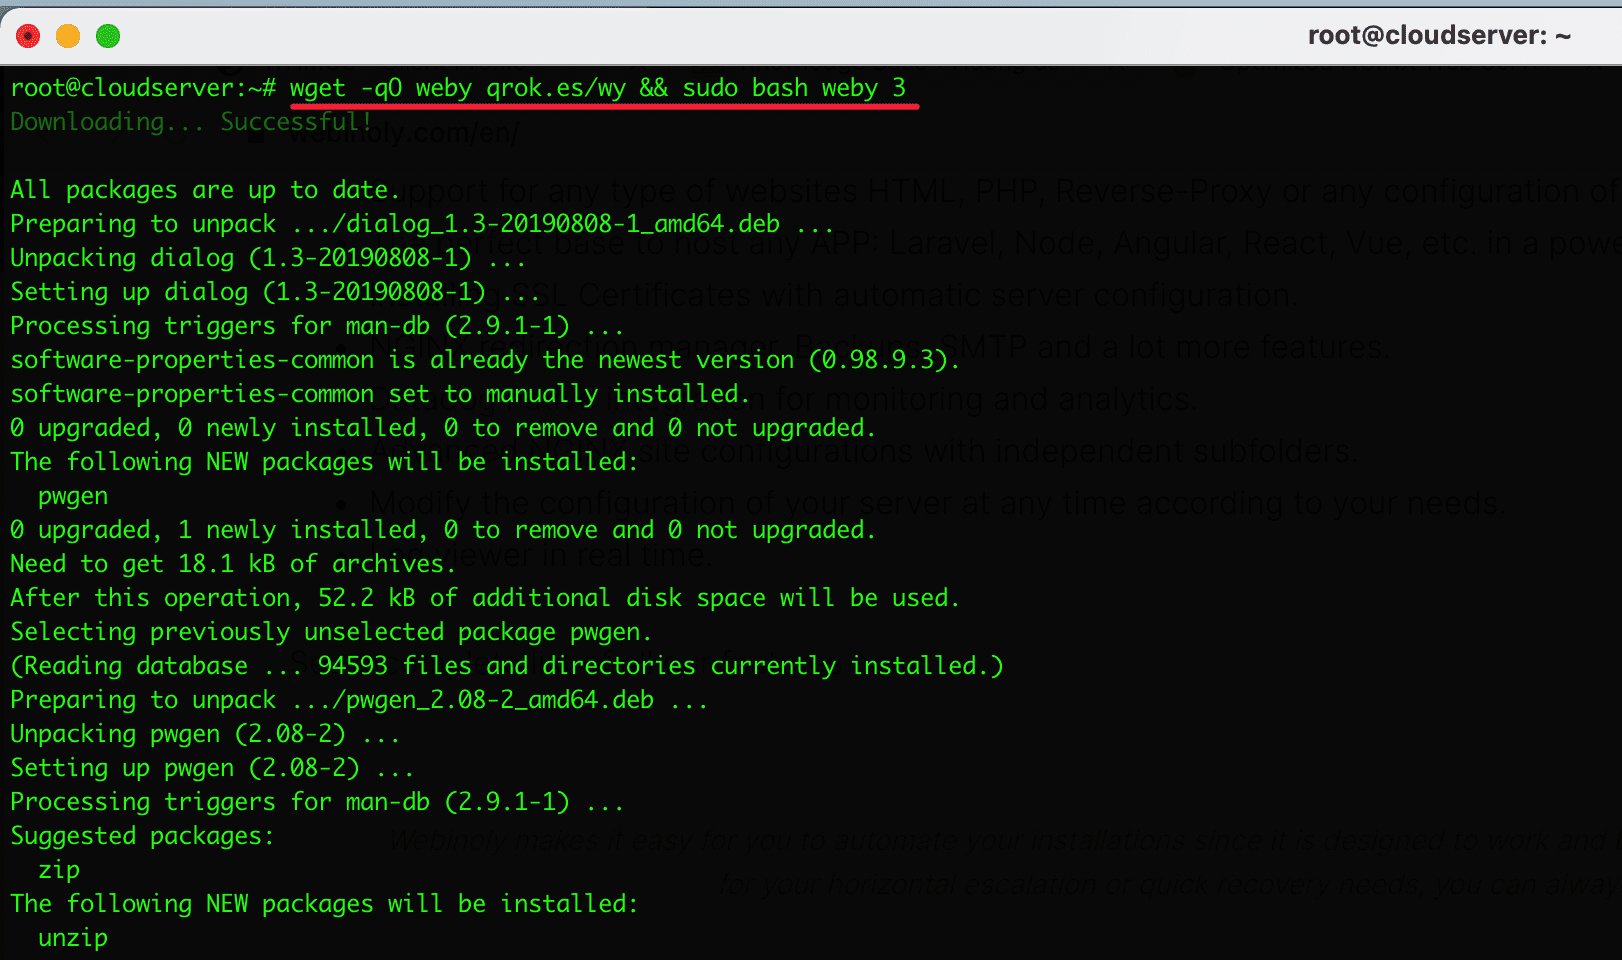
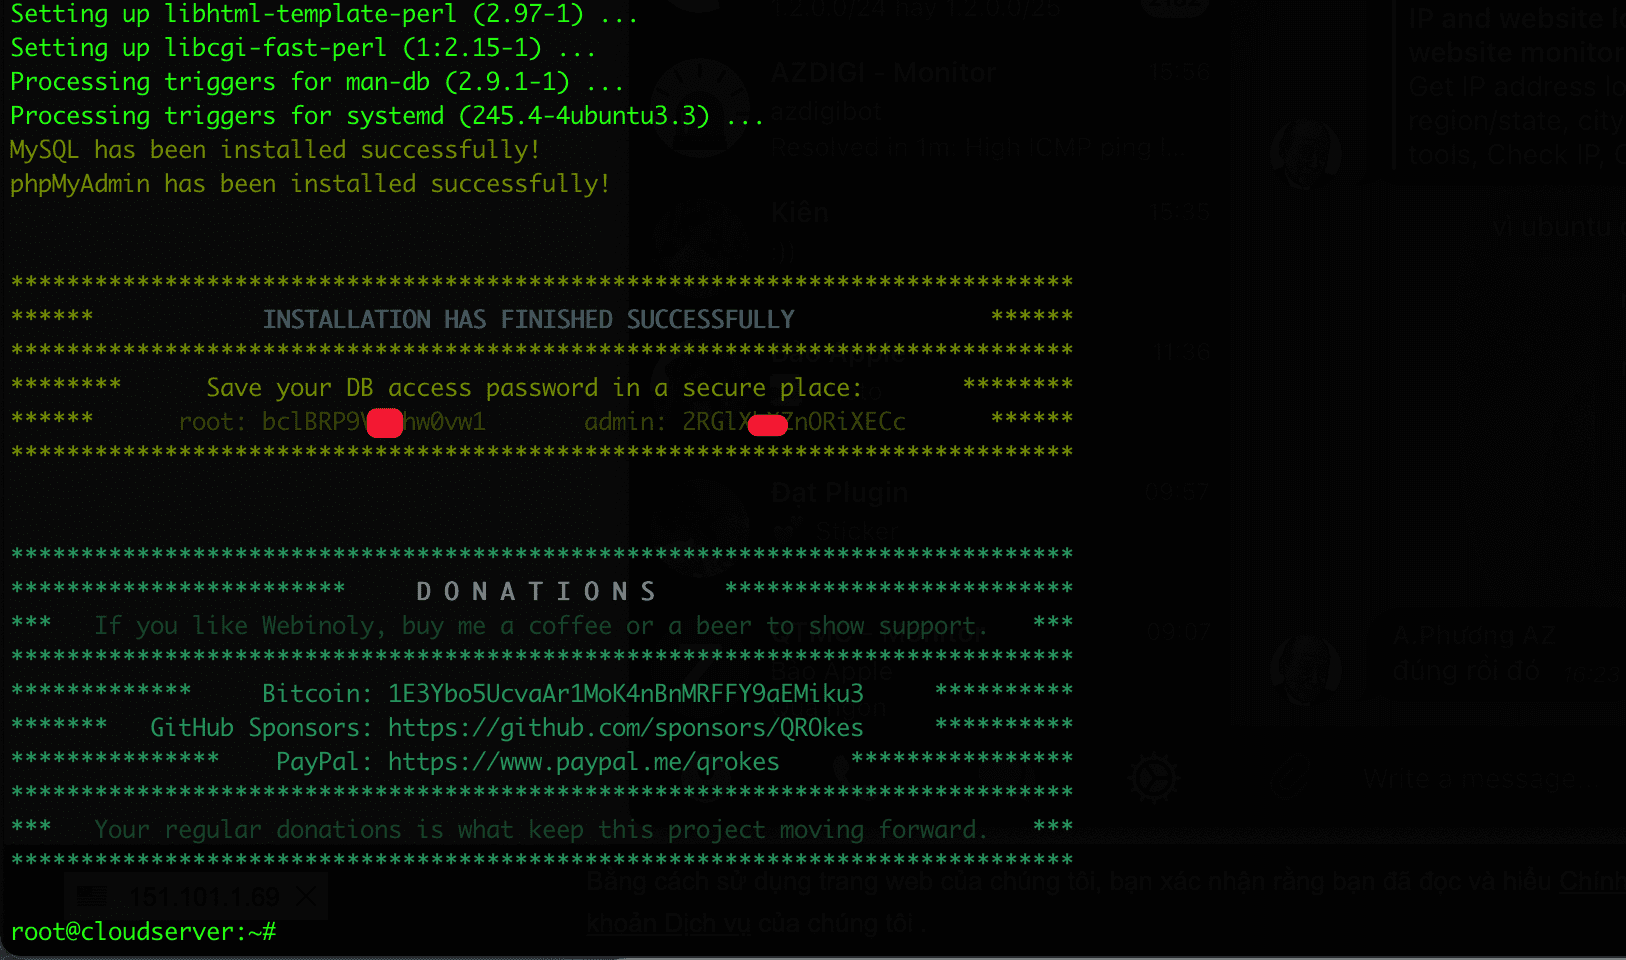
It took me more than 10 minutes to install because I chose the lowest server configuration to test with this script. When finished you will receive a message below, in this message please save the root and admin information.
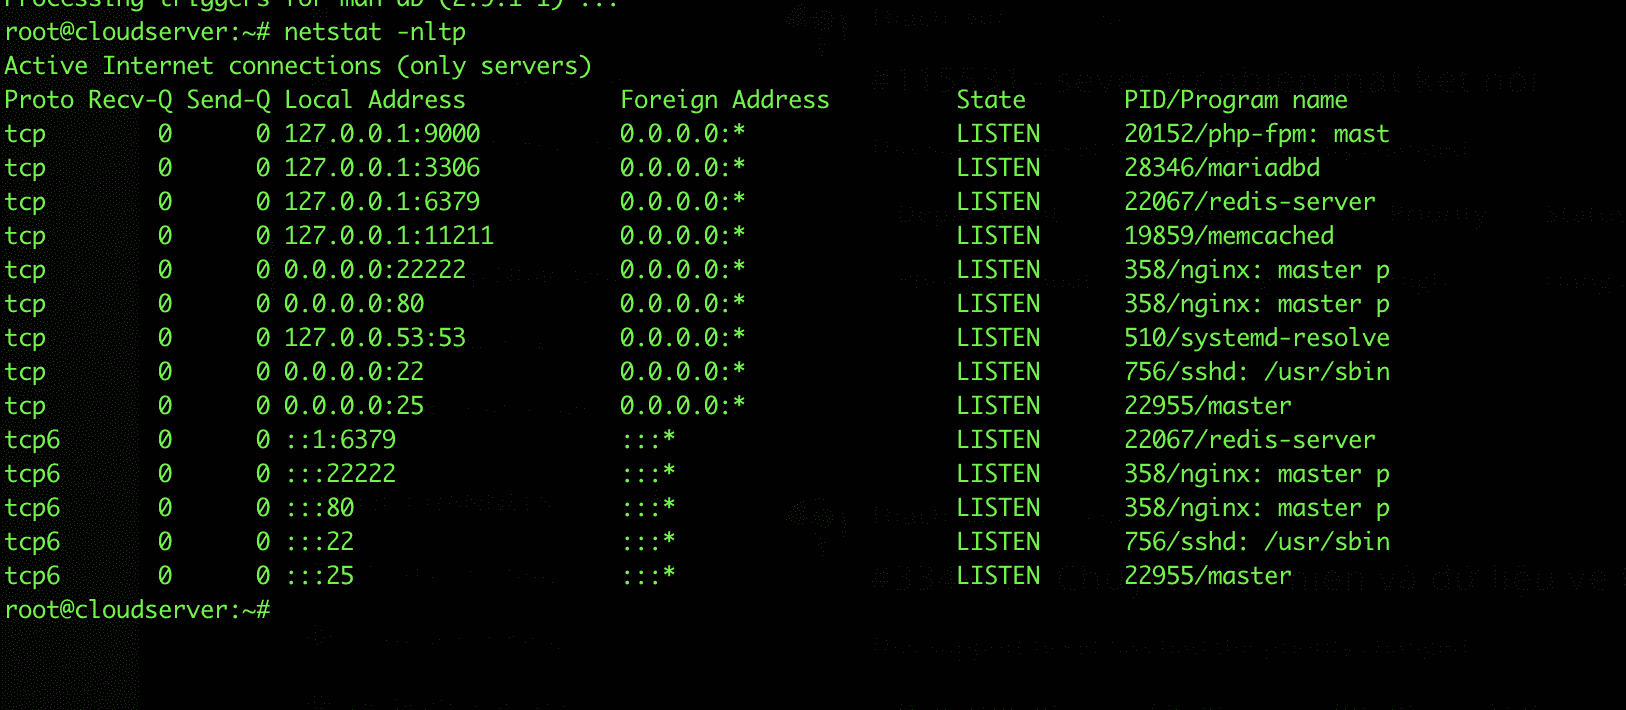
Now I will netstat to see installed and active services. If you can’t type the netstat command, please install net-tools.
apt install net-tools -y
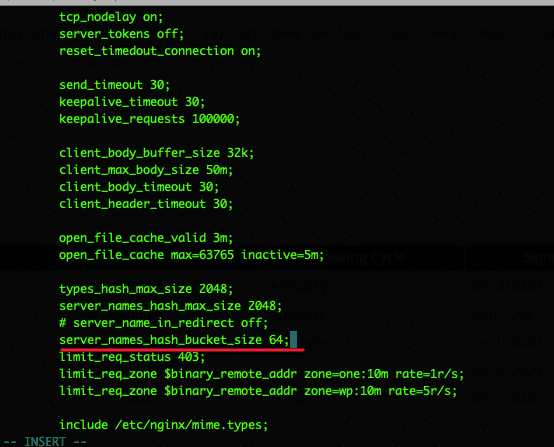
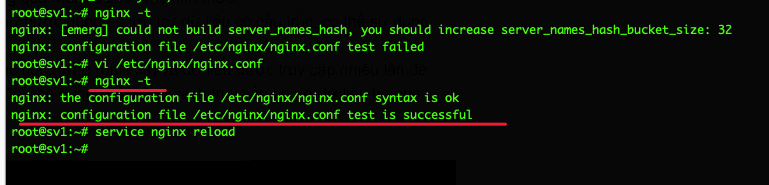
Note: If you get an error like the image below, please fix it as follows.

You open the /etc/nginx/nginx.conf file and add to the lineserver_names_hash_bucket_size 64; as shown below:
Below are some Webinoly important services included:
- NGINX: Webserver is NGINX
- PHP-FPM: PHP-FPM stands for FastCGI Process Manager is a program that interprets PHP when running web pages for web servers. PHP-FPM was formed based on the extension of CGI and is currently chosen by a large number of users
- MariaDB: MariaDB 10.x MySQL Performance Upgrade Edition is used by default as an alternative to the official Oracle MySQL Server and is installed through the official MariaDB RPM.
- Redis: Redis (Remote DIctionary Server) is an open-source structured data storage that can be used as a database, cache, or message broker.
- Memcached: Memcached is a system that stores copies of objects and data that are accessed multiple times to speed up access. Its main purpose is to speed up web applications by caching database queries, content, or other computational results.
Part 2: User Manual
Next part 2, let’s learn how to use Webinoly. Here I will guide some general commands for quick setup and accompanying descriptions on the command lines.
# Cài đặt nhanh Webinoly wget -qO weby qrok.es/wy && sudo bash weby 3# Tạo website WordPress với FastCGI Cache sudo site example.com -wp -cache=on
# Cài đặt SSL Certificate (HTTPS) cho website sudo site example.com -ssl=on
# Truy cập website https://example.com và hoàn tất thiết lập WordPress # Webinoly sẽ bảo vệ trang đăng nhập WordPress(wp-admin / wp-login), và bạn cần tạo một người dùng để xác thực HTTP sudo httpauth -add
# Kích hoạt cho phép user www-data upload và sửa file qua SFTP. sudo webinoly -login-www-data=on
1. HTTP Authentication
The “HttpAuth” directive allows you to manage users who have access to pages protected by HTTP authentication, in addition to controlling the activation of this extra layer of security in site access tools such as phpMyAdmin and wp-admin or wp-login.
Syntax of execution
sudo httpauth
Included options
- -add
- -delete
- -list
- -path
- -whitelist
- -wp-admin
For example:
# Create the user sudo httpauth -add
# Disable WP Auth sudo httpauth -wp-admin=off
# Protect folder/file sudo httpauth example.com -path=/folder
1.1 Create a User
To create a user and password to access protected sections with HTTP Authentication, use this command:
sudo httpauth -add
For example:
sudo httpauth -add=[user,password]
You can also create a user with limited permissions to access only a specific domain.
sudo httpauth example.com -add
After you have created one or more users for a specific domain, only these users are allowed to access this domain, users with global access will be disabled for this site.
1.2 Delete user
To delete a user, you use the following command:
sudo httpauth -delete
#Delete user
 sudo httpauth -delete=user
#Delete user from the specified domain
 sudo httpauth example.com -delete
1.3 Lists from anything (Show a list of all Users)
To display all the users created with HTTP authentication, use the following command.
sudo httpauth -list
Use option -raw
#Remove format from list sudo httpauth -list -raw#List users from a specific domain sudo httpauth example.com -list
#List all protected files and directory paths. sudo httpauth example.com -list=protected
#List all IPs in whitelist sudo httpauth -whitelist -list
1.4 HTTP Authentication in WordPress Login
By default when you initialize WordPress thewp-admin folder to login to WordPress will be locked. This can be quite annoying for you to set up. But if you look at it in a positive way, when a website operates publicly on the internet, it will face dangers. So Webinoly set up this verification, I find it very useful and I like and believe in the security of Webinoly.
And to disable verification, you do the following:
#Enable/Disable wp-admin verification for all sites
 sudo httpauth -wp-admin = off
#Enable/disable verification for a specified site
 sudo httpauth example.com -wp-admin = off
1.5 Protect a custom folder or file
To protect a folder/file, you use the following syntax:
sudo httpauth example.com -path=/folder
1.6 IP Whitelist
To add IPs to the white list, the safe list is not asked when you log in, do the following:
sudo httpauth -whitelist
Or you can add the IP directly as follows:
sudo httpauth -whitelist=123.123.123.123
To delete the previously added IP, you use the following command:
sudo httpauth -whitelist -purge
2. Real-Time Logs
With any system, Log is an indispensable tool. With Log View, you can test control and debug. Or you can monitor websites and services in real-time.
Execution syntax:
sudo log
Included options
- -error
- -le
- –mysql
- -only-error
- –php
- -purge
- -ssh
- -syslog
- -wp
For example:
#Enable WP Debug mode sudo log example.com -wp=on#Enable access log sudo log example.com -only-error=off
#View web log in real-time sudo log example.com
2.1 Nginx Access Logs
By default, Access Logs Nginx will be disabled. To view it, you need to enable it.
To enable the general access log and apply it to all newly created sites, you use the following command:
sudo log -only-error=off
Activate for a specific website
sudo log example.com -only-error=off
To deactivate, you change the option with -only-error=on.
2.2 Website access log
To view the access log of a specific website, use the following command:
sudo log example.com
To view the access log of all websites, you use the following command:
sudo log
2.3 How can I view the error log
If you want to see the “warning” or “error” of the WordPress site generated by PHP during execution, use the following command to display it:
sudo log example.com -error
If you want to see the error log of all generated websites, you need to use the command below:
sudo log -error
2.4 WordPress Debug
After you have configured Debug inwp-config.php, please create a file debug.log in /wp-content/
To view in real-time from the command line the events generated in this file, use the following command:
sudo log example.com -wp
To turn on/off WordPress debugging, you run the following command:
sudo log example.com -wp=on
2.5 View application log
Webinoly supports visualization of events generated by PHP, MySQL, mail, syslog, SSH and Let’s Encrypt and to see you use the following commands.
sudo log -php
sudo log -ssh
sudo log -mail
sudo log -syslog
sudo log -le
2.6 MySQL logs
In Webinoly, MySQL logs are always enabled, and to see them, use the following command:
sudo log -mysql=error
The general log
sudo log -mysql=general
sudo log -mysql=general -enable
sudo log -mysql=general -disable
The slow query log
sudo log -mysql=slow
sudo log -mysql=slow -enable
sudo log -mysql=slow -disable
Binary log
sudo log -mysql=binary
sudo log -mysql=binary -enable
sudo log -mysql=binary -disable
3. Sites Manager
The site command allows you to perform website management operations on the server such as creating new websites, activating FastCGI Cache, adding SSL and many other features for you to safely and reliably manage and control your website.
Syntax of execution
sudo site
Included options
- -cache
- -clone-from
- -delete
- -delete-all
- -force-redirect
- -forward
- –html
- -info
- -list
- -multisite-convert
- –mysql
- -on
- -off
- -parked
- –php
- -proxy
- -redirection
- –ssl
- -wp
For example:
#Create PHP site sudo site example.com -php#Create a WordPress site and enable the cache sudo site example.com -wp -cache=on
#Disable cache sudo site example.com -cache=off
#SSL Cert sudo site example.com -ssl=on
#List of websites sudo site -list
#Clone WordPress website sudo site example.com -clone-from=staging.example.com
#Page redirect sudo site example.com -redirection
3.1 Create a new site
To create an HTML website, you execute the following command:
sudo site example.com -html
To create a website that supports PHP, you run the following command:
sudo site example.com -php
To create a PHP website that connects to the Database, you use the following command:
sudo site example.com -mysql
The data to connect to the database will be displayed after you execute the command
#Use -mysql option without domain to create DB and User (MySQL) sudo site -mysql#Custom data sudo site example.com -mysql=custom
#Custom data sudo site -mysql=[host,dbname,dbuser,password] sudo site example.com -mysql=[host,dbname,dbuser,password,external_dbuser,external_dbpass]
3.2 WordPress
Installing WordPress on Webinoly is very easy, Webinoly will automatically install and configure it for you. You just need to set up the remaining steps for the website.
Syntax of execution
sudo site example.com -wp
To customize, you use the custom option. Then all operations will be suggested to you during data entry
#Install and configure WordPress with the custom option
sudo site example.com -wp=custom -cache=on
#Install WordPress with custom data
 sudo site example.com -wp=[,,,,,,,,]
#For example
sudo site example.com -wp=[true,true,localhost,example_com,example_user,password,wp_]
3.3 FastCGI Cache
Along with Nginx, FastCGI is the best optimization you can do to speed up your WordPress site. Webinoly uses FastCGI only, so you won’t be able to use plugins like W3 Total Cache, Super Cache or WP Rocket.
Turn on/off FastCGI
sudo site example.com -cache=on
You can also activate it when you install WordPress
sudo site example.com -wp -cache=on
With FastCGI cache, you should use the Nginx Helper plugin to configure the cache.
3.4 Cloning WordPress websites
This feature allows you to clone a fully built website to another website. To use it, use the following command:
sudo site example.com -clone-from=dev.example.com
3.5 Parked domain or alias
A parked domain or alias allows you to access 2 different domains but will display the same content. To use it, use the following command:
sudo site example.com -parked
For example:
sudo site example.com -parked=mainsite.com
3.6 Domain forwarding
This function is like Redirect on controls. When you access domain A, it will automatically forward to domain B. To use, you use the following syntax:
sudo site example.com -forward=example.org
3.7 Disable website
Webinoly allows you to toggle a website, in other words, suspend a certain website. Use the following syntax to do it.
#Enable website
sudo site example.com -on
#Disable website
 sudo site example.com -off
3.8 Delete a website
To delete a web page, you use the command with the following syntax. Note: this command cannot be recovered when deleted.
sudo site example.com -delete
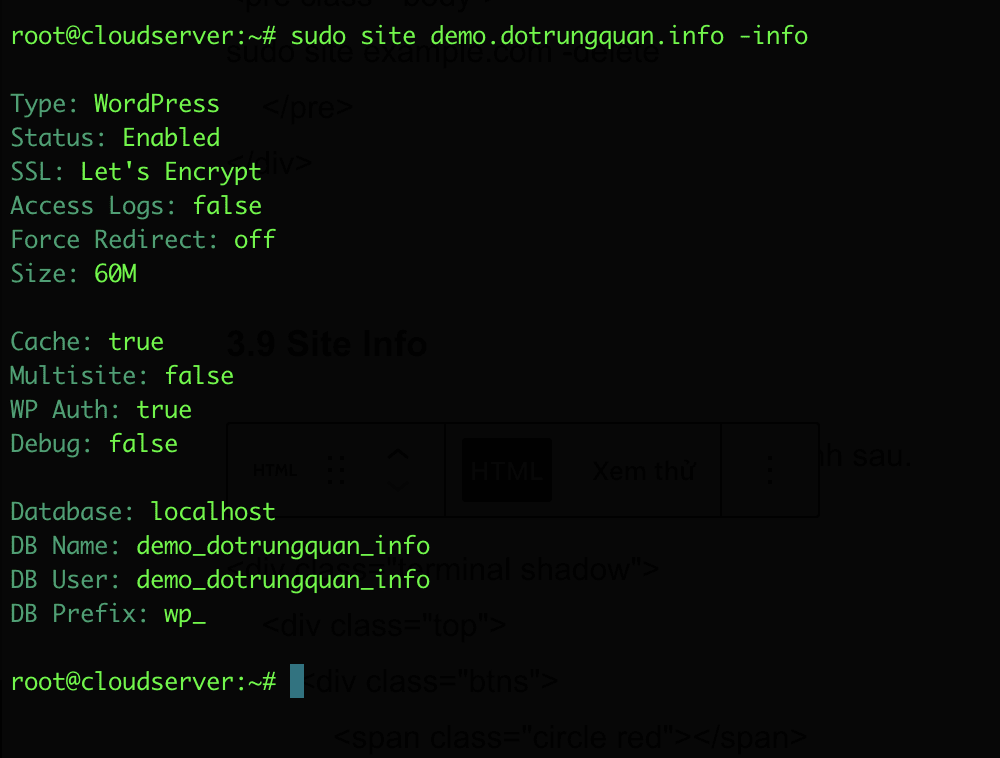
3.9 Site Info
To view website information, use the following command:
sudo site example.com -info
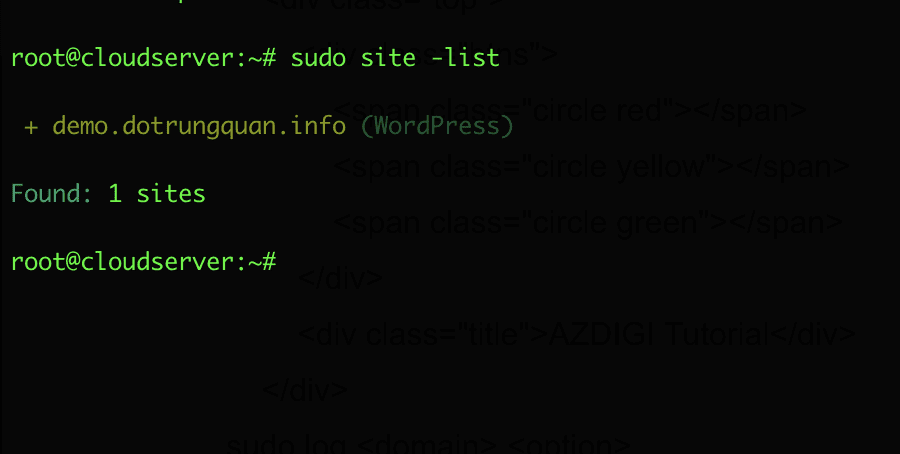
3.10 List of your sites
To list websites, you use the following command.
sudo site -list
3.11 Configuring WWW or non-WWW
By default, Webinoly will configure www and non-www support. That means you can both use www and no-www. (Note not sub.domain)
Syntax of execution
sudo site example.com -force-redirect=
Options.
- www
- root
- off
3.12 SSL Certificates with Let’s Encrypt
Let’s Encrypt is the world’s most powerful free SSL certificate authority. With controls in general and webinoly in particular, you can still install Let’s Encrypt. To install it, you use the following syntax:
During the certificate creation process, Webinoly will ask for your email account, which will be used to sign up for a new certificate, and also help you keep track of the recurring renewal process.
Note: To install SSL, you must point the domain/subdomain to the server IP.
sudo site example.com -ssl=on
3.13 Disable SSL on a site
If for some reason you need to deactivate the use of SSL certificates on your website, simply execute the following command:
sudo site example.com -ssl=off
3.14 Certificates in parked sites (SSL for parked sites)
This option is only available when you install SSL for the parked domain.
sudo site example.com -ssl=on -root=mainsite.com
3.15 Wildcard Certificates
When you need one certificate to cover all subdomains (*.example.com). This is the type of certificate commonly used in WordPress Multisite installations in your subdomain configuration, to install you use the following syntax:
sudo site example.com -ssl=on -wildcard
3.16 Renewing certificates
Although Webinoly has a fallback system for automatic renewal, you still have the option of manual renewal as follows:
sudo site -ssl=renew
To renew all SSL certificates on the server, you use the following syntax to renew them all.
sudo site -ssl=force-renewal-all
To renew a specified certificate, you use the following syntax:
sudo site example.com -ssl=force-renewal
3.17 Custom SSL Certificate
This case is only used when you have your own SSL and want to install this SSL on your website. To do this, you can do the following steps:
sudo site example.com -ssl=on -ssl-key=/path/cert.key -ssl-crt=/path/cert.crt -ssl-ocsp=/path/cert.pem
Summary
Hopefully, this article will help you successfully install and manage this script. With the next articles of Webinoly, AZDIGI will guide you to install WordPress source code and create SSL. And in this article, I would like to stop here.
Wishing you success!
If you need assistance, you can contact support in the ways below:
- Hotline 247: 028 888 24768 (Ext 0)
- Ticket/Email: You use the email to register for the service and send it directly to: support@azdigi.com .
About the author

Thạch Phạm
Đồng sáng lập và Giám đốc điều hành của AZDIGI. Có hơn 15 năm kinh nghiệm trong phổ biến kiến thức liên quan đến WordPress tại thachpham.com, phát triển website và phát triển hệ thống.