If you have installed Ollama and Open WebUI following previous tutorials, you might be accessing them via http://IP:11434 or http://IP:3000. This works, but has several issues: no HTTPS so data is transmitted in plain text, you need to remember port numbers, and if exposed to the internet, anyone can call your API.
The solution is to place Nginx as a reverse proxy in front. You will have a custom domain like ai.yourdomain.com, free HTTPS from Let’s Encrypt, and can add authentication to protect API endpoints.
This tutorial will guide you through setting up Nginx reverse proxy for both Ollama API and Open WebUI, including SSL, basic auth, and some performance optimizations.
Install Nginx
On Ubuntu/Debian, installing Nginx is simple:
sudo apt update
sudo apt install nginx -y
After installation, Nginx automatically starts and listens on port 80. Quick check:
sudo systemctl status nginxIf you see active (running), you’re good. Access http://server-IP in your browser to see the Welcome to Nginx page.
Configure Reverse Proxy for Ollama API
By default, Ollama runs on port 11434. I will create a server block to proxy requests from domain api.yourdomain.com to Ollama.
Create config file:
sudo nano /etc/nginx/sites-available/ollamaContent:
server {
    listen 80;
    server_name api.yourdomain.com;
location / {
        proxy_pass http://localhost:11434;
        proxy_set_header Host $host;
        proxy_set_header X-Real-IP $remote_addr;
        proxy_set_header X-Forwarded-For $proxy_add_x_forwarded_for;
        proxy_set_header X-Forwarded-Proto $scheme;
# WebSocket support - required for streaming response
        proxy_http_version 1.1;
        proxy_set_header Upgrade $http_upgrade;
        proxy_set_header Connection "upgrade";
# Disable buffering for smooth streaming
        proxy_buffering off;
        proxy_cache off;
# Longer timeout since LLM generation is slow
        proxy_read_timeout 600s;
        proxy_send_timeout 600s;
    }
}
Key points in the config above:
proxy_http_version 1.1andUpgrade/Connectionheaders: enable WebSocket support. Ollama uses streaming response, without this part responses will be buffered and returned all at once instead of streaming tokens.proxy_buffering off: disable Nginx buffering. Without this, Nginx waits for Ollama to complete the entire response before sending to client.proxy_read_timeout 600s: increase timeout to 10 minutes. Large models can take several minutes to generate long responses, default 60s timeout would cut off mid-generation.
Enable site and reload Nginx:
sudo ln -s /etc/nginx/sites-available/ollama /etc/nginx/sites-enabled/
sudo nginx -t
sudo systemctl reload nginx
The nginx -t command checks syntax. If it reports syntax is ok, reload safely.

Configure Reverse Proxy for Open WebUI
Similarly, create a server block for Open WebUI (running on port 3000):
sudo nano /etc/nginx/sites-available/openwebuiContent:
server {
    listen 80;
    server_name ai.yourdomain.com;
client_max_body_size 50M;
location / {
        proxy_pass http://localhost:3000;
        proxy_set_header Host $host;
        proxy_set_header X-Real-IP $remote_addr;
        proxy_set_header X-Forwarded-For $proxy_add_x_forwarded_for;
        proxy_set_header X-Forwarded-Proto $scheme;
# WebSocket - Open WebUI uses for real-time chat
        proxy_http_version 1.1;
        proxy_set_header Upgrade $http_upgrade;
        proxy_set_header Connection "upgrade";
proxy_buffering off;
        proxy_read_timeout 600s;
        proxy_send_timeout 600s;
    }
}
Config is similar to Ollama, only different in server_name and proxy_pass. I added client_max_body_size 50M because Open WebUI allows uploading files (PDF, images) to chat, default Nginx only allows 1MB uploads.
Enable and reload:
sudo ln -s /etc/nginx/sites-available/openwebui /etc/nginx/sites-enabled/
sudo nginx -t
sudo systemctl reload nginx
Point Domain to Server
Before proceeding, you need to create DNS records for the 2 subdomains. Go to your domain’s DNS management page and add 2 A records:
ai.yourdomain.com→ Your server IPapi.yourdomain.com→ Your server IP
Wait for DNS propagation (usually a few minutes, could be longer depending on provider). Check with command:
dig ai.yourdomain.com +short
dig api.yourdomain.com +short
When you see the correct server IP returned, proceed to SSL step.
Install SSL with Let’s Encrypt
HTTPS is not just for looks. When you send prompts over HTTP, content is transmitted as plain text, anyone intercepting packets can read them. With HTTPS, everything is encrypted.
Install Certbot:
sudo apt install certbot python3-certbot-nginx -yRun Certbot for both subdomains at once:
sudo certbot --nginx -d ai.yourdomain.com -d api.yourdomain.comCertbot will ask for email, agree to terms of service, then automatically configure SSL in Nginx config files. After completion, access https://ai.yourdomain.com to see Open WebUI with green lock.
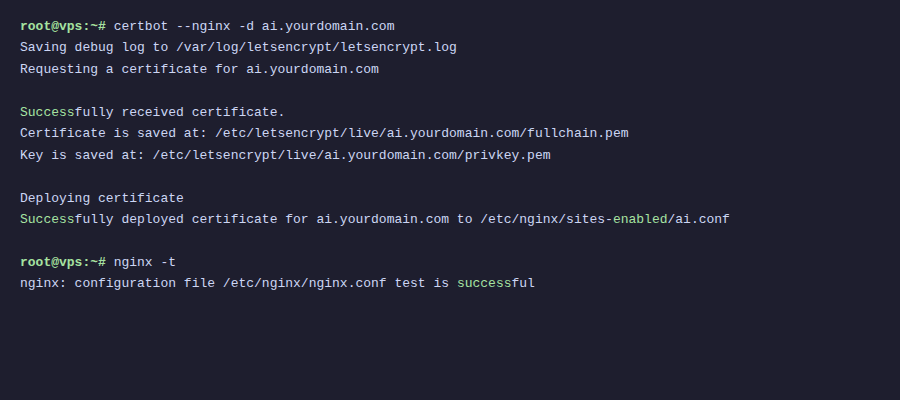
Certbot also automatically adds a cron job to renew certificates before expiration. Test with:
sudo certbot renew --dry-runIf no errors, auto-renewal works normally. Let’s Encrypt certificates last 90 days, Certbot will auto-renew when about 30 days remain.
Add Basic Auth for Ollama API
Open WebUI already has its own login system, so no need to add auth at Nginx layer. But Ollama API is different, by default it has no authentication. Anyone who knows the URL can call it. If you expose the API to internet, you need basic auth.
Create password file:
sudo apt install apache2-utils -y
sudo htpasswd -c /etc/nginx/.htpasswd ollama-user
The above command creates user ollama-user, you will be prompted to enter password. The .htpasswd file stores hashed password.
Edit file /etc/nginx/sites-available/ollama, add 2 lines inside location / block:
    location / {
        auth_basic "Ollama API";
        auth_basic_user_file /etc/nginx/.htpasswd;
proxy_pass http://localhost:11434;
        # ... keep other lines unchanged
    }
Reload Nginx:
sudo nginx -t
sudo systemctl reload nginx
Now when calling the API, you need to include credentials:
curl -u ollama-user:your-password https://api.yourdomain.com/api/generate \
  -d '{"model": "llama3.2", "prompt": "Hello"}'
If Open WebUI connects to Ollama through Nginx (instead of localhost), you need to configure the URL in Open WebUI with credentials. However, if both run on the same server, let Open WebUI connect directly via http://localhost:11434 to avoid going through Nginx.
Optimize Nginx Performance
A few small but useful optimizations. Add to /etc/nginx/nginx.conf file, inside http {} block:
http {
    # Enable gzip for API responses
    gzip on;
    gzip_types application/json text/plain text/css application/javascript;
    gzip_min_length 1000;
# Keepalive to upstream
    upstream ollama_backend {
        server localhost:11434;
        keepalive 32;
    }
upstream openwebui_backend {
        server localhost:3000;
        keepalive 16;
    }
# ... other configs
}
If using upstream blocks, edit proxy_pass in corresponding server blocks:
# In /etc/nginx/sites-available/ollama
proxy_pass http://ollama_backend;
proxy_set_header Connection "";
# In /etc/nginx/sites-available/openwebui
proxy_pass http://openwebui_backend;
proxy_set_header Connection "";
Note when using upstream with keepalive, you need to set Connection "" instead of "upgrade" for regular requests. For WebSocket, still keep the Upgrade header. The solution is to separate location blocks for WebSocket endpoints if needed.
In practice, if your server only serves a few users, the basic config from sections above is sufficient. Upstream keepalive is more useful when you have many concurrent users.
Docker Compose with Nginx
If you run everything with Docker, you can include Nginx in the same docker-compose.yml:
services:
  ollama:
    image: ollama/ollama
    volumes:
      - ollama_data:/root/.ollama
    deploy:
      resources:
        reservations:
          devices:
            - driver: nvidia
              count: all
              capabilities: [gpu]
    restart: unless-stopped
open-webui:
    image: ghcr.io/open-webui/open-webui:main
    environment:
      - OLLAMA_BASE_URL=http://ollama:11434
    volumes:
      - openwebui_data:/app/backend/data
    depends_on:
      - ollama
    restart: unless-stopped
nginx:
    image: nginx:alpine
    ports:
      - "80:80"
      - "443:443"
    volumes:
      - ./nginx/conf.d:/etc/nginx/conf.d
      - ./nginx/ssl:/etc/nginx/ssl
      - ./nginx/.htpasswd:/etc/nginx/.htpasswd
    depends_on:
      - ollama
      - open-webui
    restart: unless-stopped
volumes:
  ollama_data:
  openwebui_data:
When running in Docker, Nginx proxies to container names instead of localhost. Nginx config files also change, proxy_pass points to service names:
# File ./nginx/conf.d/ollama.conf
server {
    listen 80;
    server_name api.yourdomain.com;
location / {
        auth_basic "Ollama API";
        auth_basic_user_file /etc/nginx/.htpasswd;
proxy_pass http://ollama:11434;
        proxy_http_version 1.1;
        proxy_set_header Upgrade $http_upgrade;
        proxy_set_header Connection "upgrade";
        proxy_set_header Host $host;
        proxy_set_header X-Real-IP $remote_addr;
        proxy_buffering off;
        proxy_read_timeout 600s;
    }
}
# File ./nginx/conf.d/openwebui.conf
server {
    listen 80;
    server_name ai.yourdomain.com;
client_max_body_size 50M;
location / {
        proxy_pass http://open-webui:8080;
        proxy_http_version 1.1;
        proxy_set_header Upgrade $http_upgrade;
        proxy_set_header Connection "upgrade";
        proxy_set_header Host $host;
        proxy_set_header X-Real-IP $remote_addr;
        proxy_buffering off;
        proxy_read_timeout 600s;
    }
}
Open WebUI when running in Docker exposes port 8080 (internal), not 3000. So proxy_pass in Docker environment is http://open-webui:8080.
For SSL in Docker, you can mount certificates from host to container, or use additional Certbot container. A simpler approach is to run Certbot on host, then mount /etc/letsencrypt directory to Nginx container.
Summary
After this tutorial, you now have:
- Nginx reverse proxy for both Ollama API and Open WebUI
- Free HTTPS with Let’s Encrypt, auto-renewal
- Separate subdomains:
ai.yourdomain.comfor chat interface,api.yourdomain.comfor API - Basic authentication protecting API endpoints
- Proper streaming configuration (no buffering)
This setup works for both direct installation on server and Docker. For personal use or small teams, basic auth combined with HTTPS is secure enough. If you need higher security, you can add firewall rules to allow only specific IPs, or use VPN like WireGuard/Tailscale to restrict access.
You might also like
- Securing Self-Hosted AI - SSL, Authentication and Firewall for Ollama
- Installing Ollama on VPS Ubuntu - Run Private AI in 15 Minutes
- n8n + Ollama - Automate Workflows with AI Running on Your Own VPS
- Ollama API - Integrating Self-Hosted AI into Web Applications
- Installing Dify AI on VPS - Free No-code AI Platform
- Install Open WebUI + Ollama with Docker Compose - Create Your Own ChatGPT on VPS
About the author

Trần Thắng
Expert at AZDIGI with years of experience in web hosting and system administration.