
You’ve successfully installed Ollama, got models running, and connected Open WebUI smoothly. Now you want to access it from outside – from your laptop, phone, or share it with a few friends to try it out. But wait, have you thought about security yet?
By default, Ollama listens on port 11434 with no authentication layer whatsoever. Anyone who knows your IP can use it. In this article, I’ll walk you through each step to lock down your AI server tight, from firewall, reverse proxy with SSL, to authentication and network isolation.
Why Secure Ollama?
An open Ollama API means anyone can:
- Use your GPU/CPU for free to run models. Every request consumes real resources, and if someone spams it, your server dies.
- Pull or delete models through the API. Ollama allows model pull and delete via REST API without authentication.
- Read conversation content if traffic isn’t encrypted. On public networks, data travels as plaintext completely.
- Prompt injection to exploit the model into doing unwanted things, or extract system prompts.
Sounds scary, right? But fixing it isn’t hard. I’ll go through 5 steps, each adding a layer of protection.
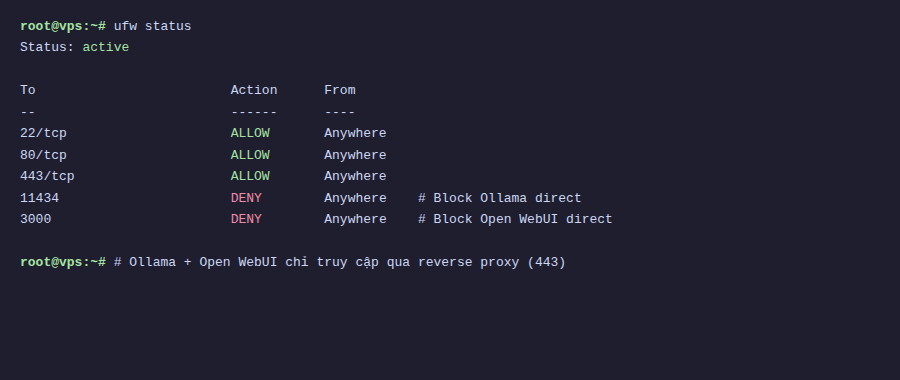
Step 1: Firewall with UFW
The first thing is always firewall. UFW (Uncomplicated Firewall) comes with Ubuntu, just a few commands and you’re done.
The idea is very simple: only open necessary ports, block everything else. Especially block Ollama’s port 11434, because I’ll use a reverse proxy to access it instead of direct connection.
# Allow SSH - important, don't lock yourself out
sudo ufw allow 22/tcp
# Allow HTTP and HTTPS for reverse proxy
sudo ufw allow 80/tcp
sudo ufw allow 443/tcp
# Block direct access to Ollama from outside
sudo ufw deny 11434
# Enable firewall
sudo ufw enable
# Check again
sudo ufw status
Note: If you’re SSH’d into the server, make sure to allow port 22 BEFORE enabling UFW. Otherwise you’ll lock yourself out and have to go into the VPS provider’s console to fix it.
After this step, Ollama still runs normally on localhost, but no one from outside can directly access port 11434 anymore.
Step 2: Reverse Proxy with Caddy
I choose Caddy over Nginx for one main reason: auto HTTPS. Caddy automatically gets certificates from Let’s Encrypt, auto-renews, no additional config needed. With Nginx you have to install certbot, set up cron renewal, then configure SSL ciphers. Caddy does it all.
Install Caddy:
sudo apt install -y debian-keyring debian-archive-keyring apt-transport-https curl
curl -1sLf 'https://dl.cloudsmith.io/public/caddy/stable/gpg.key' | sudo gpg --dearmor -o /usr/share/keyrings/caddy-stable-archive-keyring.gpg
curl -1sLf 'https://dl.cloudsmith.io/public/caddy/stable/debian.deb.txt' | sudo tee /etc/apt/sources.list.d/caddy-stable.list
sudo apt update
sudo apt install caddy
Create file /etc/caddy/Caddyfile with content:
ai.yourdomain.com {
    reverse_proxy localhost:11434
}
Yes, just 3 lines. Caddy will automatically:
- Get SSL certificate from Let’s Encrypt
- Redirect HTTP to HTTPS
- Proxy all requests to Ollama on localhost
Reload Caddy to apply:
sudo systemctl reload caddyRemember to point ai.yourdomain.com DNS to your server IP before reloading. Caddy needs to verify the domain to get certificates.
Now you access https://ai.yourdomain.com and reach Ollama with proper HTTPS. But there’s still no authentication, anyone with the link can still get in.
Step 3: Add Authentication
There are two approaches depending on your setup.
Method 1: Basic Auth on Caddy
If you expose Ollama API directly (not through Open WebUI), adding basic auth to Caddy is the fastest way.
Create password hash:
caddy hash-password --plaintext 'your-password'Update Caddyfile:
ai.yourdomain.com {
    basicauth {
        admin $2a$14$xxxxxxxxxxxxxxxxxxxxxxxxxxxxxxxxxxxxxxxxxxxxx
    }
    reverse_proxy localhost:11434
}
Replace admin with your desired username, and paste the hash you just created after the username.
Method 2: Open WebUI Built-in Auth
If you use Open WebUI (which most people will), the good news is it already has a built-in login system. The first user to register becomes admin, and you can toggle allowing new registrations in Settings.
In this case, Caddy just needs to proxy to Open WebUI (default port 3000 or 8080) instead of Ollama:
ai.yourdomain.com {
    reverse_proxy localhost:3000
}
Tip: Even when using Open WebUI, you should still block port 11434 with firewall. Don’t expose Ollama API when you already have Open WebUI as a middleware layer.
Step 4: Docker Network Isolation
If you run Ollama and Open WebUI with Docker (following the previous article in the series), there’s one more security layer: network isolation.
By default, Docker containers use bridge network and can access each other as well as the outside internet. I’ll create a separate internal network, so Ollama can only talk to Open WebUI.
Update docker-compose.yml:
services:
  ollama:
    image: ollama/ollama
    networks:
      - ai-internal
    # DON'T publish port 11434 outside
    # ports:
    #   - "11434:11434"
    volumes:
      - ollama-data:/root/.ollama
    deploy:
      resources:
        reservations:
          devices:
            - capabilities: [gpu]
open-webui:
    image: ghcr.io/open-webui/open-webui:main
    ports:
      - "3000:8080"
    networks:
      - ai-internal
    environment:
      - OLLAMA_BASE_URL=http://ollama:11434
    volumes:
      - open-webui-data:/app/backend/data
networks:
  ai-internal:
    internal: true
volumes:
  ollama-data:
  open-webui-data:
Key points here:
internal: truemeans this network has no route to internet. Containers in the network can only talk to each other.- Ollama doesn’t publish any port to host. Only Open WebUI can connect to Ollama via Docker DNS (
http://ollama:11434). - Open WebUI still publishes port 3000 to host for Caddy to proxy to.
Note: With internal: true, Ollama won’t be able to pull models from internet. You need to temporarily remove this flag when wanting to download new models, or add a second network with internet access specifically for pulling models.
Step 5: Rate Limiting
Even with auth, you should still limit the number of requests to avoid abuse or brute-force password attacks. Caddy has a rate_limit module for this.
Install the rate_limit module for Caddy:
sudo caddy add-package github.com/mholt/caddy-ratelimitUpdate Caddyfile:
ai.yourdomain.com {
    rate_limit {
        zone dynamic_zone {
            key {remote_host}
            events 30
            window 1m
        }
    }
reverse_proxy localhost:3000
}
The config above limits each IP to a maximum of 30 requests per minute. Adjust the number according to your actual usage. If you only have 2-3 users, 20-30 requests/minute is reasonable. If more usage, increase it.
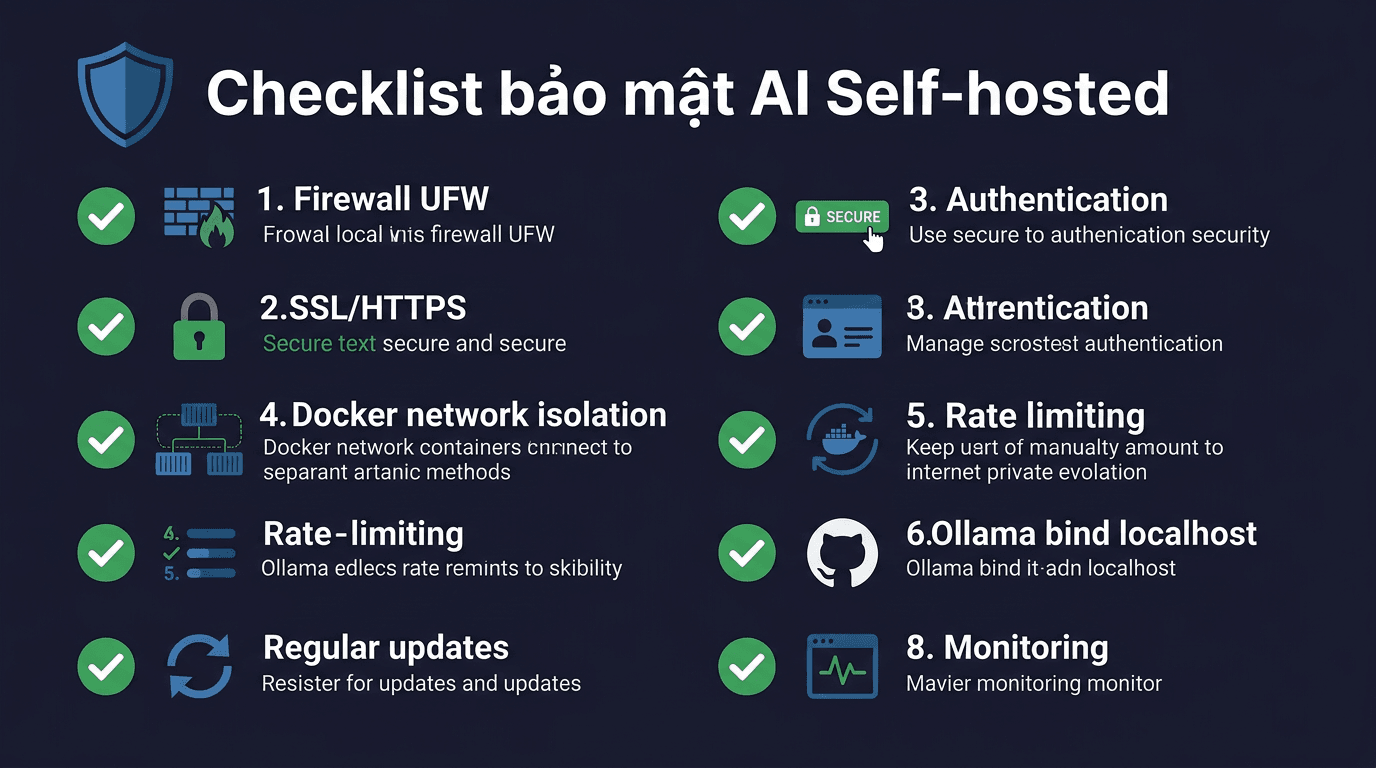
Comprehensive Security Checklist
Summary of what to check after setup:
| Category | Check |
|---|---|
| Firewall | UFW enabled, only opens ports 22, 80, 443. Port 11434 is denied. |
| SSL/HTTPS | Access via HTTPS, valid certificate, HTTP auto-redirects to HTTPS. |
| Authentication | Cannot access API/WebUI without login. |
| Network isolation | Ollama doesn’t expose ports to host. Only Open WebUI can connect. |
| Rate limiting | Spam requests blocked after allowed threshold. |
| SSH | Use key-based auth, disable password login if possible. |
| Updates | OS, Docker, Caddy, Ollama all on latest versions. |
Additionally, a few advanced points if you want to go further:
- Fail2ban to automatically ban IPs after multiple failed logins.
- Tailscale/WireGuard to create a private VPN, no need to expose to public internet.
- Log monitoring with Caddy access logs to track who’s accessing.
- Regular backups for model data and conversation history.
Conclusion
The 5 steps above don’t take more than 30 minutes to set up, but will make a huge difference compared to leaving Ollama wide open to the internet. In summary:
- UFW blocks all direct access to Ollama
- Caddy as reverse proxy with auto SSL
- Authentication via Caddy basic auth or Open WebUI
- Docker network isolates Ollama from the outside world
- Rate limiting prevents spam and brute-force
Security isn’t a one-time setup and forget. Remember to update software regularly, check logs, and review config when adding new services.
In the next article in the series, I’ll talk about optimizing Ollama performance, choosing models suitable for your hardware, and tips for running smoother on VPS.
You might also like
- Reverse Proxy Ollama with Nginx - Access AI via Custom Domain with HTTPS
- Installing Ollama on VPS Ubuntu - Run Private AI in 15 Minutes
- n8n + Ollama - Automate Workflows with AI Running on Your Own VPS
- What is Flowise? When Should You Self-Host It on a VPS?
- Ollama API - Integrating Self-Hosted AI into Web Applications
- Installing Dify AI on VPS - Free No-code AI Platform
About the author

Trần Thắng
Expert at AZDIGI with years of experience in web hosting and system administration.