Nội dung
I. Tổng quan.
1. Zimbra mail server là gì?
Zimbra mail(Zimbra Collaboration Suite) là phần mềm mã nguồn mở với hai phần là máy chủ mail và máy khách website và được phát triển với mục tiêu ngoài dùng làm mail ra thì còn là một giải pháp có thể giải quyết được nhiều vấn đề như bảo mật, kết nối các thành viên(chat) cũng như quản lý và chia sẽ công việc một cách nhanh chóng, hiệu quả cho các doanh nghiệp lớn – nhỏ.
2. Chức năng của Zimbra mail?
Các chức năng trên zimbra mail:
- Thư điện tử: Hệ thống thư điện tử hoàn hảo, Với hai phần là Mail Server (SMTP, POP3, IMAP, Backup, Antivirus… Bên cạnh đó có đủ các tính năng như: tự động trả lời, chuyển tiếp…) và Mail Client (Zimbra Desktop và Zimbra Web Client).
- Sổ địa chỉ (Contacts): Quản lý sổ cá nhân của từng thành viên(Địa chỉ, số điện thoại, thông tin cá nhân,…) và sổ chung của đội nhóm.
- Danh mục công việc (Tasks): Danh sách các công việc, giúp theo dõi tiến độ, và việc quản lý được tối ưu hơn, cũng như có phân chia độ ưu tiên công việc và khối lượng công việc đã hoàn thành của mỗi cá nhân hoặc đội nhóm.
- Tài liệu (Documents): Dễ dàng soạn thảo văn bản tài liệu dưới dạng Wiki của mỗi cá nhân hoặc đội nhóm. Cho phép người dùng in trực tiếp văn bản soạn thảo xong hoặc trao đổi(gửi – nhận) qua Email.
- Cặp tài liệu hồ sơ (Briefcase): Với công cụ này có thể lưu trữ tài liệu, tập tin cho việc dùng cá nhân hoặc chia sẻ với nhóm hoặc cá nhân khác dùng chung.
- Chat: Chat nội bộ với nhau trong mạng LAN hoặc trên Internet.
- Lịch công tác (Calendar): Thông tin về lịch cá nhân và lịch nhóm, hỗ trợ cho phép tạo cuộc hẹn, tự động gửi mail theo lịch trình(Như thời gian hợp được lên lịch trước)…
- Preferences: Chỉnh sửa nâng cao với Zimbra, Gồm thay đổi Theme, phông chữ, ngôn ngữ, phím tắt, chữ ký, bộ lọc mail….
3. Cấu hình tối thiểu để cài Zimbra?
- Disk: Trên 20GB
- Ram: 6GB
- IP(VPS hoặc máy chủ), domain, mail domain
II. Các bước cài đặt Zimbra mail server trên CentOS 7.
Bước 1: SSH vào máy chủ.
Để cài đặt Zimbra, việc đầu tiên bạn cần làm là SSH hoặc truy cập VPS hoặc máy chủ của bạn với quyền root trước. Nếu bạn chưa biết cách SSH vào VPS hoặc Server của bạn thì bạn có thể tham khảo bài viết hướng dẫn sau:
Bước 2: Kiểm tra và cập nhật hệ thống máy chủ.
Sau khi đã SSH vào VPS hoặc máy chủ với quyền root, bạn sẽ cần phải kiểm tra selinux và postfix. Vì thường trên CentOS 7 sẽ bật lên nên cần phải tắt đi.
- Tắt
selinux
[root@sv ~]# vi /etc/selinux/config
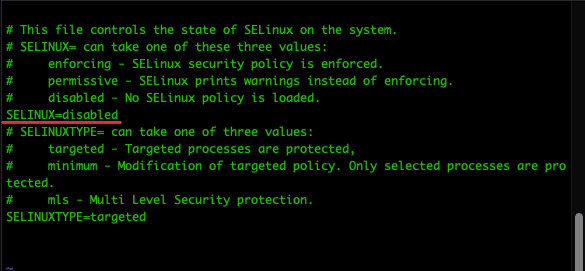
[root@sv ~]# sestatus
SELinux status: disabled
- Tắt
postfix
Với Postfix là một phầm mềm chuyển thư mã nguồn mở open-source mail transfer agent (MTA) có chức năng dùng để định tuyến và gửi mail. Được phát hành bởi IBM nhằm thay thế trình gửi mail phổ biến là sendmail. Nó được trang bị trên hệ điều hành do đó bạn hãy xoá bỏ để sử dụng dịch vụ riêng của Zimbra.
[root@sv ~]# systemctl stop postfix
[root@sv ~]# yum remove postfix -y
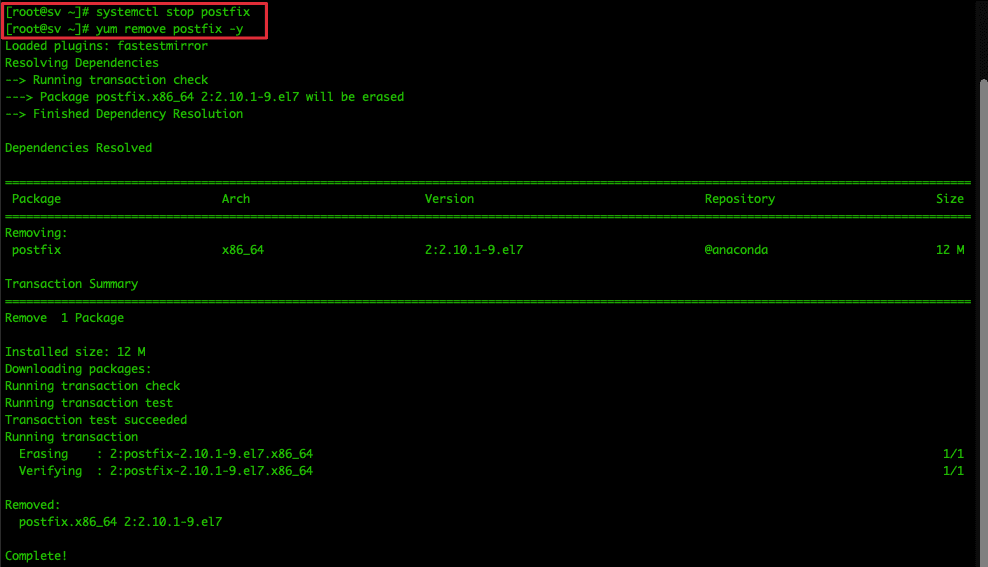
Tiếp theo bạn cập nhật lại hệ thống và reboot VPS hoặc máy chủ.
[root@sv ~]# yum update -y ; reboot
Trong quá trình đợi hệ thống cập nhật và reboot lại, bạn thực hiện bước tiếp theo luôn.
Bước 3: Cập nhật bản ghi mail.
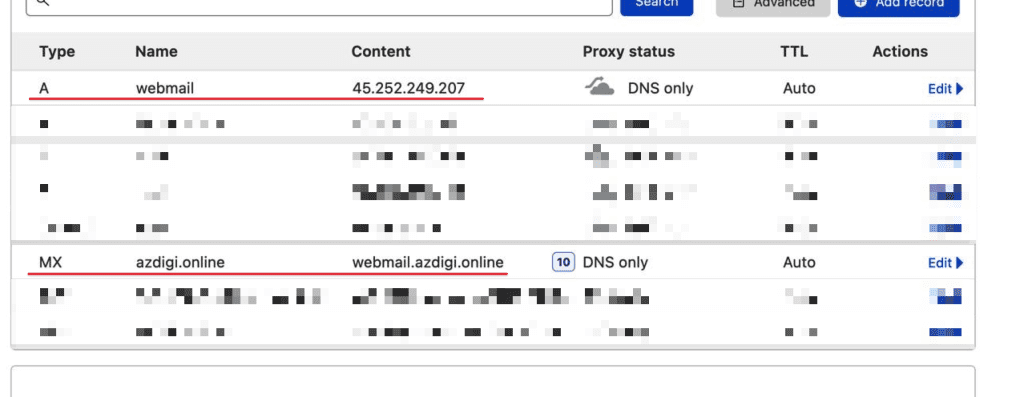
Để cài đặt được Zimbra, bạn cần phải trỏ hai bản ghi mail như mẫu bên dưới nhé.
| Type | Name | Value | TTL |
| A | webmail | ip-server | Auto |
| MX | @ or domain | webmail.domain | Auto |
Bước 4: Thiết lập hostname
Bạn SSH vào lại VPS hoặc máy chủ(như ở bước 1). Rồi kiểm tra hostname hiện tại của VPS hoặc máy chủ có đúng và trùng với bản ghi bạn đã trỏ ở bước 3 hay không, nếu không đúng thì bạn cần phải set lại hostname.
[root@sv ~]# hostnamectl set-hostname webmail.azdigi.online
[root@sv ~]# exec bash
[root@webmail ~]#
Sau khi set hostname xong, bạn vào file hosts và thêm dòng sau vào. Bạn nhớ thay đổi IP bằng IP VPS hoặc máy chủ của bạn.
[root@webmail ~]# vi /etc/hosts
127.0.0.1   localhost localhost.localdomain localhost4 localhost4.localdomain4
::1         localhost localhost.localdomain localhost6 localhost6.localdomain6
45.252.249.207 webmail.azdigi.online
Bước 5: Cài đặt một số ứng dụng cần thiết cho Zimbra.
Bạn thực hiện chạy lệnh sau để install các ứng dụng cần thiết cho việc cài đặt Zimbra.
[root@webmail ~]# yum install unzip net-tools sysstat openssh-clients perl-core libaio nmap-ncat libstdc++.so.6 wget -y
  perl-Net-Daemon.noarch 0:0.48-5.el7                                       perl-Object-Accessor.noarch 1:0.42-299.el7_9
  perl-Package-Constants.noarch 1:0.02-299.el7_9                            perl-Params-Check.noarch 1:0.38-2.el7
  perl-Parse-CPAN-Meta.noarch 1:1.4404-5.el7                                perl-Perl-OSType.noarch 0:1.003-3.el7
  perl-PlRPC.noarch 0:0.2020-14.el7                                         perl-Pod-Checker.noarch 0:1.60-2.el7
  perl-Pod-LaTeX.noarch 0:0.61-2.el7                                        perl-Pod-Parser.noarch 0:1.61-2.el7
  perl-Sys-Syslog.x86_64 0:0.33-3.el7                                       perl-Term-UI.noarch 0:0.36-2.el7
  perl-Test-Harness.noarch 0:3.28-3.el7                                     perl-Test-Simple.noarch 0:0.98-243.el7
  perl-Text-Soundex.x86_64 0:3.04-4.el7                                     perl-Text-Unidecode.noarch 0:0.04-20.el7
  perl-Thread-Queue.noarch 0:3.02-2.el7                                     perl-Time-Piece.x86_64 0:1.20.1-299.el7_9
  perl-Version-Requirements.noarch 0:0.101022-244.el7                       perl-autodie.noarch 0:2.16-2.el7
  perl-devel.x86_64 4:5.16.3-299.el7_9                                      perl-local-lib.noarch 0:1.008010-4.el7
  perl-version.x86_64 3:0.99.07-6.el7                                       pyparsing.noarch 0:1.5.6-9.el7
  systemtap-sdt-devel.x86_64 0:4.0-13.el7

Complete!
[root@webmail ~]#
Bước 6: Cài đặt Zimbra Mail.
Sau khi đã cài các ứng dụng cần thiết, bạn tạo một thư mục zimbra để tải Zimbra về và cài.
[root@webmail ~]# mkdir zimbra && cd zimbra
Tiếp theo bạn sử dụng lệnh bên dưới để tải zimbra về. Các bạn có thể truy cập vào trang chủ tải trực tiếp source Zimbra
[root@webmail zimbra]# wget https://files.zimbra.com/downloads/8.8.15_GA/zcs-8.8.15_GA_3869.RHEL7_64.20190918004220.tgz --no-check-certificate
--2022-04-11 01:28:24--  https://files.zimbra.com/downloads/9.0.0_GA/zcs-NETWORK-9.0.0_GA_3924.RHEL7_64.20200331010312.tgz
Resolving files.zimbra.com (files.zimbra.com)... 13.35.15.53
Connecting to files.zimbra.com (files.zimbra.com)|13.35.15.53|:443... connected.
HTTP request sent, awaiting response... 200 OK
Length: 493203719 (470M) [binary/octet-stream]
Saving to: ‘zcs-NETWORK-9.0.0_GA_3924.RHEL7_64.20200331010312.tgz’

57% [=======================================================>                                         ] 285,148,244 20.2MB/s  eta 13s
Quá trình tải về hoàn tất, bạn giải nén file .tgz ra và truy cập vào thư mục vừa giải nén để cài đặt zimbra với những lệnh sau:
[root@webmail zimbra]# tar zxpvf zcs*.tgz
...
  zcs-8.8.15_GA_3869.RHEL7_64.20190918004220/.BUILD_RELEASE_CANDIDATE
  zcs-8.8.15_GA_3869.RHEL7_64.20190918004220/.BUILD_TIME_STAMP
...
[root@webmail zimbra]# cd zcs* && ./install.sh
[root@webmail zimbra]# cd zcs* && ./install.sh

Operations logged to /tmp/install.log.bnyHvXPW
Checking for existing installation...
    zimbra-drive...NOT FOUND
    zimbra-imapd...NOT FOUND
    zimbra-modern-ui...NOT FOUND
    zimbra-modern-zimlets...NOT FOUND
    zimbra-patch...NOT FOUND
    zimbra-mta-patch...NOT FOUND
    zimbra-proxy-patch...NOT FOUND
    zimbra-license-tools...NOT FOUND
    zimbra-license-extension...NOT FOUND
    zimbra-network-store...NOT FOUND
    zimbra-network-modules-ng...NOT FOUND
    zimbra-chat...NOT FOUND
    zimbra-connect...NOT FOUND
    zimbra-talk...NOT FOUND
    zimbra-ldap...NOT FOUND
    zimbra-logger...NOT FOUND
    zimbra-mta...NOT FOUND
    zimbra-dnscache...NOT FOUND
    zimbra-snmp...NOT FOUND
    zimbra-store...NOT FOUND
    zimbra-apache...NOT FOUND
    zimbra-spell...NOT FOUND
    zimbra-convertd...NOT FOUND
    zimbra-memcached...NOT FOUND
    zimbra-proxy...NOT FOUND
    zimbra-archiving...NOT FOUND
    zimbra-core...NOT FOUND
...
zimbra-core...NOT FOUND
...
Do you agree with the terms of the software license agreement? [N] y
Use Zimbra's package repository [Y] y
Found zimbra-core (local)
Found zimbra-ldap (local)
Found zimbra-logger (local)
Found zimbra-mta (local)
Found zimbra-dnscache (local)
Found zimbra-snmp (local)
Found zimbra-store (local)
Found zimbra-apache (local)
Found zimbra-spell (local)
Found zimbra-memcached (repo)
Found zimbra-proxy (local)
Found zimbra-drive (repo)
Found zimbra-imapd (local)
Found zimbra-patch (repo)
Found zimbra-mta-patch (repo)
Found zimbra-proxy-patch (repo)
Select the packages to install
Install zimbra-ldap [Y] y
Install zimbra-logger [Y] y
Install zimbra-mta [Y] y
Install zimbra-dnscache [Y] y
Install zimbra-snmp [Y] y
Install zimbra-store [Y] y
Install zimbra-apache [Y] y
Install zimbra-spell [Y] y
Install zimbra-memcached [Y] y
Install zimbra-proxy [Y] y
Install zimbra-drive [Y] y
Install zimbra-imapd (BETA - for evaluation only) [N] y
Install zimbra-chat [Y] y
Checking required space for zimbra-core
Checking space for zimbra-store
Checking required packages for zimbra-store
zimbra-store package check complete.
Installing:
...
zimbra-core
...
zimbra-chat
...
The system will be modified.  Continue? [N] y
Beginning Installation - see /tmp/install.log.PtZTEKqZ for details...
zimbra-core-components will be downloaded and installed.
zimbra-timezone-data will be installed.
zimbra-common-core-jar will be installed.
zimbra-common-mbox-conf will be installed.
zimbra-common-mbox-conf-attrs will be installed.
zimbra-common-mbox-conf-msgs will be installed.
zimbra-common-mbox-conf-rights will be installed.
zimbra-common-mbox-db will be installed.
zimbra-common-mbox-docs will be installed.
zimbra-common-mbox-native-lib will be installed.
zimbra-common-core-libs will be installed.
zimbra-core will be installed.
zimbra-ldap-components will be downloaded and installed.
zimbra-ldap will be installed.
zimbra-logger will be installed.
zimbra-mta-components will be downloaded and installed.
zimbra-mta will be installed.
zimbra-dnscache-components will be downloaded and installed.
zimbra-dnscache will be installed.
zimbra-snmp-components will be downloaded and installed.
zimbra-snmp will be installed.
zimbra-store-components will be downloaded and installed.
zimbra-jetty-distribution will be downloaded and installed.
zimbra-mbox-conf will be installed.
zimbra-mbox-war will be installed.
zimbra-mbox-service will be installed.
zimbra-mbox-webclient-war will be installed.
zimbra-mbox-admin-console-war will be installed.
zimbra-mbox-store-libs will be installed.
zimbra-store will be installed.
zimbra-apache-components will be downloaded and installed.
zimbra-apache will be installed.
zimbra-spell-components will be downloaded and installed.
zimbra-spell will be installed.
zimbra-memcached will be downloaded and installed.
zimbra-proxy-components will be downloaded and installed.
zimbra-proxy will be installed.
zimbra-drive will be downloaded and installed (later).
zimbra-imapd will be installed.
zimbra-patch will be downloaded and installed (later).
zimbra-mta-patch will be downloaded and installed (later).
zimbra-proxy-patch will be downloaded and installed (later).
zimbra-chat will be downloaded and installed (later).
Downloading packages (11):
...
zimbra-core-components
...
zimbra-proxy-components
...done
...
Removing /opt/zimbra
Removing zimbra crontab entry...done.
Cleaning up zimbra init scripts...done.
Cleaning up /etc/security/limits.conf...done.
Finished removing Zimbra Collaboration Server.
Installing repo packages (11):
...
zimbra-core-components
...
zimbra-proxy-components
...done
...
Installing local packages (27):
...
zimbra-timezone-data
...
zimbra-imapd
...done
...
Installing extra packages (5):
...
zimbra-drive
...
zimbra-chat
...done
...
Running Post Installation Configuration:
Operations logged to /tmp/zmsetup.20220411-024200.log
Installing LDAP configuration database...done.
Setting defaults...
DNS ERROR resolving MX for webmail.azdigi.online
It is suggested that the domain name have an MX record configured in DNS
Change domain name? [Yes] yes
Create domain: [webmail.azdigi.online] azdigi.online  #Thay vào domain của bạn
MX: webmail.azdigi.online (45.252.249.207)
Interface: 127.0.0.1
Interface: ::1
Interface: 45.252.249.207
done.
Checking for port conflicts
Main menu
1) Common Configuration:
2) zimbra-ldap:                             Enabled
3) zimbra-logger:                           Enabled
4) zimbra-mta:                              Enabled
5) zimbra-dnscache:                         Enabled
6) zimbra-snmp:                             Enabled
7) zimbra-store:                            Enabled
+Create Admin User:                    yes
+Admin user to create:                 admin@azdigi.online
******* +Admin Password                        UNSET  #chưa set Password
+Anti-virus quarantine user:           virus-quarantine.oz1ioypute@azdigi.online
+Enable automated spam training:       yes
+Spam training user:                   spam.wnlas9fe1o@azdigi.online
+Non-spam(Ham) training user:          ham.97krutc9vl@azdigi.online
+SMTP host:                            webmail.azdigi.online
+Web server HTTP port:                 8080
+Web server HTTPS port:                8443
+Web server mode:                      https
+IMAP server port:                     7143
+IMAP server SSL port:                 7993
+POP server port:                      7110
+POP server SSL port:                  7995
+Use spell check server:               yes
+Spell server URL:                     http://webmail.azdigi.online:7780/aspell.php
+Enable version update checks:         TRUE
+Enable version update notifications:  TRUE
+Version update notification email:    admin@azdigi.online
+Version update source email:          admin@azdigi.online
+Install mailstore (service webapp):   yes
+Install UI (zimbra,zimbraAdmin webapps): yes
8) zimbra-spell:                            Enabled
9) zimbra-proxy:                            Enabled
10) zimbra-imapd:                            Enabled
11) Default Class of Service Configuration:
s) Save config to file
x) Expand menu
q) Quit
Address unconfigured (**) items  (? - help) 7
Store configuration
1) Status:                                  Enabled
2) Create Admin User:                       yes
3) Admin user to create:                    admin@azdigi.online
** 4) Admin Password                           UNSET
5) Anti-virus quarantine user:              virus-quarantine.oz1ioypute@azdigi.online
6) Enable automated spam training:          yes
7) Spam training user:                      spam.wnlas9fe1o@azdigi.online
8) Non-spam(Ham) training user:             ham.97krutc9vl@azdigi.online
9) SMTP host:                               webmail.azdigi.online
10) Web server HTTP port:                    8080
11) Web server HTTPS port:                   8443
12) Web server mode:                         https
13) IMAP server port:                        7143
14) IMAP server SSL port:                    7993
15) POP server port:                         7110
16) POP server SSL port:                     7995
17) Use spell check server:                  yes
18) Spell server URL:                        http://webmail.azdigi.online:7780/aspell.php
19) Enable version update checks:            TRUE
20) Enable version update notifications:     TRUE
21) Version update notification email:       admin@azdigi.online
22) Version update source email:             admin@azdigi.online
23) Install mailstore (service webapp):      yes
24) Install UI (zimbra,zimbraAdmin webapps): yes
Select, or 'r' for previous menu [r] 4
Password for admin@azdigi.online (min 6 characters): [JqA8eqasM] JqA8eqasM
Store configuration
1) Status:                                  Enabled
2) Create Admin User:                       yes
3) Admin user to create:                    admin@azdigi.online
4) Admin Password                           set #Đã set Password
5) Anti-virus quarantine user:              virus-quarantine.oz1ioypute@azdigi.online
6) Enable automated spam training:          yes
7) Spam training user:                      spam.wnlas9fe1o@azdigi.online
8) Non-spam(Ham) training user:             ham.97krutc9vl@azdigi.online
9) SMTP host:                               webmail.azdigi.online
10) Web server HTTP port:                    8080
11) Web server HTTPS port:                   8443
12) Web server mode:                         https
13) IMAP server port:                        7143
14) IMAP server SSL port:                    7993
15) POP server port:                         7110
16) POP server SSL port:                     7995
17) Use spell check server:                  yes
18) Spell server URL:                        http://webmail.azdigi.online:7780/aspell.php
19) Enable version update checks:            TRUE
20) Enable version update notifications:     TRUE
21) Version update notification email:       admin@azdigi.online
22) Version update source email:             admin@azdigi.online
23) Install mailstore (service webapp):      yes
24) Install UI (zimbra,zimbraAdmin webapps): yes
Select, or 'r' for previous menu [r] r
Main menu
1) Common Configuration:
2) zimbra-ldap:                             Enabled
3) zimbra-logger:                           Enabled
4) zimbra-mta:                              Enabled
5) zimbra-dnscache:                         Enabled
6) zimbra-snmp:                             Enabled
7) zimbra-store:                            Enabled
8) zimbra-spell:                            Enabled
9) zimbra-proxy:                            Enabled
10) zimbra-imapd:                            Enabled
11) Default Class of Service Configuration:
s) Save config to file
x) Expand menu
q) Quit
*** CONFIGURATION COMPLETE - press 'a' to apply
Select from menu, or press 'a' to apply config (? - help) a
Save configuration data to a file? [Yes] yes
Save config in file: [/opt/zimbra/config.15635] /opt/zimbra/config.15635
Saving config in /opt/zimbra/config.15635...done.
The system will be modified - continue? [No] yes
...
Operations logged to /tmp/zmsetup.20220411-024200.log
...
Finished installing common zimlets.
Restarting mailboxd...done.
...
Creating galsync account for default domain...done.
You have the option of notifying Zimbra of your installation.
This helps us to track the uptake of the Zimbra Collaboration Server.
The only information that will be transmitted is:
The VERSION of zcs installed (8.8.15_GA_3869_RHEL7_64)
The ADMIN EMAIL ADDRESS created (admin@azdigi.online)
Notify Zimbra of your installation? [Yes] yes/no
Notifying Zimbra of installation via http://www.zimbra.com/cgi-bin/notify.cgi?VER=8.8.15_GA_3869_RHEL7_64&MAIL=admin@azdigi.online
ERROR: Notification failed  #Nếu chọn yes, mà mail admin@domain chưa tồn tại thì sẽ báo failed, có thể bỏ qua
Checking if the NG started running...done.
Setting up zimbra crontab...done.
Moving /tmp/zmsetup.20220411-024200.log to /opt/zimbra/log
Configuration complete - press return to exit
Khi cài đặt xong bạn hãy khởi động lại dịch vụ Zimbra với lệnh sau:
[root@webmail ~]# su zimbra
[zimbra@webmail root]$ cd && zmcontrol restart
[zimbra@webmail root]$ cd && zmcontrol restart
Host webmail.azdigi.online
Stopping zmconfigd...Done.
Stopping imapd...Done.
Stopping zimlet webapp...Done.
Stopping zimbraAdmin webapp...Done.
Stopping zimbra webapp...Done.
Stopping service webapp...Done.
Stopping stats...Done.
Stopping mta...Done.
Stopping spell...Done.
Stopping snmp...Done.
Stopping cbpolicyd...Done.
Stopping archiving...Done.
Stopping opendkim...Done.
Stopping amavis...Done.
Stopping antivirus...Done.
Stopping antispam...Done.
Stopping proxy...Done.
Stopping memcached...Done.
Stopping mailbox...Done.
Stopping logger...Done.
Stopping dnscache...Done.
Stopping ldap...Done.
Host webmail.azdigi.online
Starting ldap...Done.
Starting zmconfigd...Done.
Starting dnscache...Done.
Starting logger...Done.
Starting mailbox...Done.
Starting memcached...Done.
Starting proxy...Done.
Starting amavis...Done.
Starting antispam...Done.
Starting antivirus...Done.
Starting opendkim...Done.
Starting snmp...Done.
Starting spell...Done.
Starting mta...Done.
Starting stats...Done.
Starting service webapp...Done.
Starting zimbra webapp...Done.
Starting zimbraAdmin webapp...Done.
Starting zimlet webapp...Done.
Starting imapd...Done.
Bước 7: Kiểm tra Firewall và mở Port.
Vậy là bạn đã hoàn tất việc cài đặt zimbra rồi và bạn cần phải kiểm tra trên VPS hoặc máy chủ có đang sử dụng Firewall hay không. Nếu có bạn cần mở các port sau ra để hoạt động
- Các Port bạn cần mở
25,80,110,143,443,465,587,993,995,5222,5223,9071,7071Sau khi đã kiểm tra bạn truy cập admin zimbra bằng IP:port qua giao thức https nhé!
- VD: https://45.252.249.207:7071/
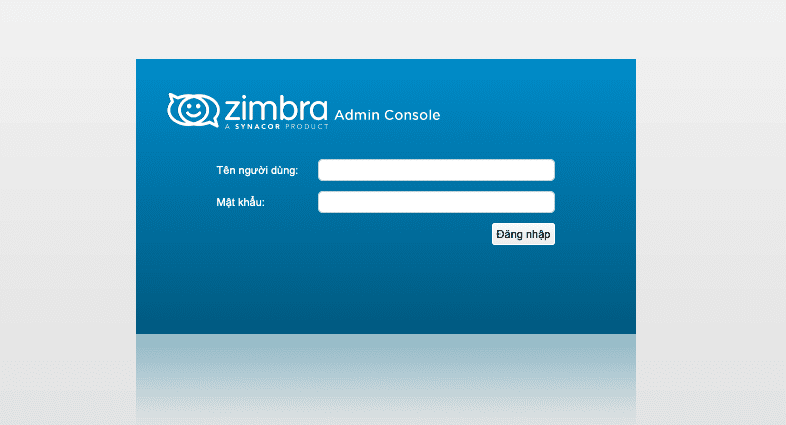
Phần thông tin đăng nhập sẽ là:
- Tên người dùng: admin@domain
- Mật khẩu: Mật khẩu đã set ở mục menu số 4
Lưu ý!
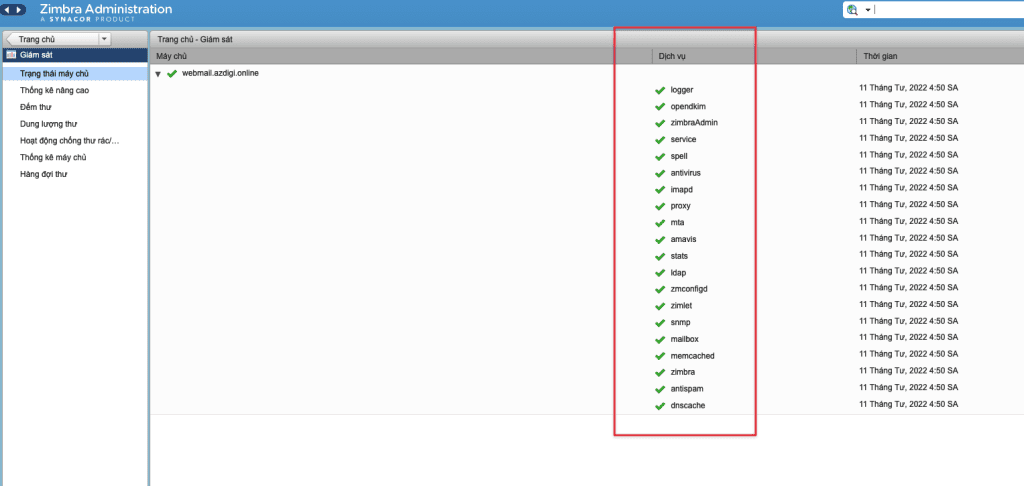
Sau khi bạn đăng nhập và thấy phần Trạng thái máy chủ các service không hoạt động, thì bạn hãy reboot lại VPS hoặc máy chủ nhé.
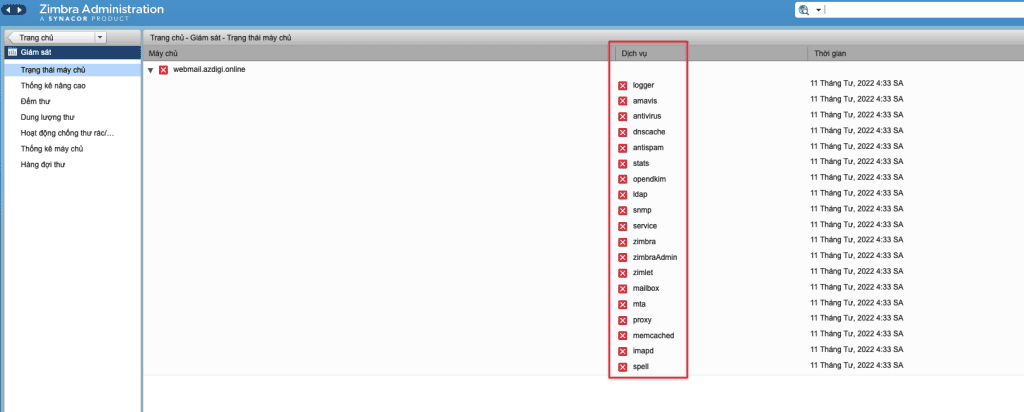
Và sau đây là kết quả các bước cài đặt của mình.
Chúc bạn thực hiện thành công.
Nếu các bạn cần hỗ trợ các bạn có thể liên hệ bộ phận hỗ trợ theo các cách bên dưới:
- Hotline 247: 028 888 24768 (Ext 0)
- Ticket/Email: Bạn dùng email đăng ký dịch vụ gửi trực tiếp về: support@azdigi.com.

