In the previous article, I showed you how to install Ollama to run AI models on VPS. Ollama works well through terminal, but what if you want a chat experience similar to ChatGPT? That’s when Open WebUI comes in.
Open WebUI is an open-source web interface designed for local AI models. This project currently has over 80,000 stars on GitHub, making it the most popular choice for creating a chat interface for Ollama. Beautiful interface, many features, multi-user support, and extremely quick installation via Docker.
In this article, I will guide you through installing Open WebUI combined with Ollama using Docker Compose, turning your VPS into a “private ChatGPT” for personal use or your entire team.
Prerequisites
Before installing Open WebUI, you need to ensure your VPS already has:
- Docker and Docker Compose installed.
- Ollama running on the VPS (or you will run Ollama via Docker Compose in the following section).
- VPS with at least 2GB free RAM for Open WebUI (just for the interface, not counting AI models).
If you haven’t installed Ollama yet, please review Part 1: Installing Ollama on Linux VPS to set it up first.
Method 1: Install Open WebUI with Docker Run (quick and simple)
If you have already installed Ollama directly on the VPS (not through Docker) and want to run Open WebUI as quickly as possible, you only need a single command:
docker run -d \\
  --name open-webui \\
  --restart always \\
  -p 3000:8080 \\
  --add-host=host.docker.internal:host-gateway \\
  -v open-webui:/app/backend/data \\
  ghcr.io/open-webui/open-webui:main
Quick explanation of the parameters:
-d: Run container in background mode.--restart always: Automatically restart when VPS reboots.-p 3000:8080: Map external port 3000 to internal port 8080.--add-host=host.docker.internal:host-gateway: Allow container to access Ollama running on the host.-v open-webui:/app/backend/data: Store data (chat history, settings, users) in Docker volume to avoid loss when recreating container.
This method is suitable when you want to test quickly or only use it personally. But if you want to manage both Ollama and Open WebUI more neatly, use Docker Compose in the next section.
Method 2: Install with Docker Compose (recommended)
Docker Compose helps you manage both Ollama and Open WebUI in a single configuration file. When you need to update, restart, or migrate to another server, everything is clear and easier to operate.
Create a directory for the project:
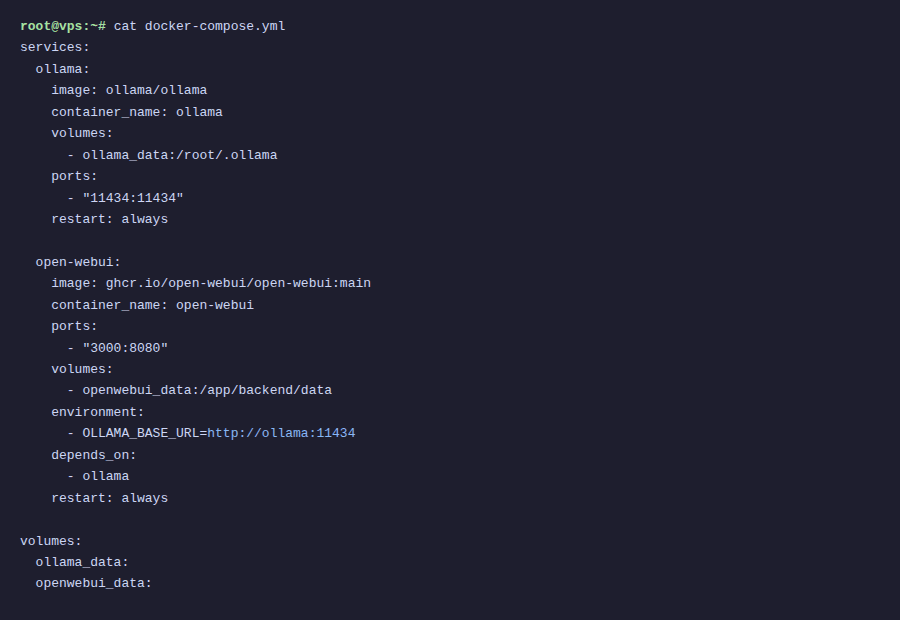
mkdir ~/open-webui && cd ~/open-webuiCreate a docker-compose.yml file with the following content:
services:
  ollama:
    image: ollama/ollama
    container_name: ollama
    restart: always
    ports:
      - "11434:11434"
    volumes:
      - ollama_data:/root/.ollama
    # If VPS has NVIDIA GPU, uncomment the 3 lines below:
    # deploy:
    #   resources:
    #     reservations:
    #       devices:
    #         - driver: nvidia
    #           count: all
    #           capabilities: [gpu]
open-webui:
    image: ghcr.io/open-webui/open-webui:main
    container_name: open-webui
    restart: always
    ports:
      - "3000:8080"
    environment:
      - OLLAMA_BASE_URL=http://ollama:11434
    volumes:
      - open_webui_data:/app/backend/data
    depends_on:
      - ollama
volumes:
  ollama_data:
  open_webui_data:
Start both services:
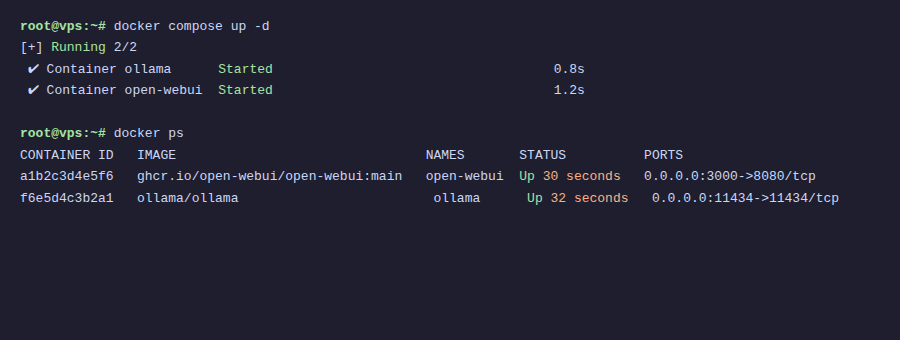
docker compose up -dDocker will pull the images and start both Ollama and Open WebUI. This process takes about 1-2 minutes depending on network speed.
With Docker Compose, the OLLAMA_BASE_URL variable points directly to the service name ollama in the same network. You don’t need to use --add-host like method 1.
First-time Open WebUI access
After the containers finish running, open your browser and access:
http://VPS-IP:3000On the first access, Open WebUI will ask you to create an account. The first account created will automatically become admin, with full system management permissions.
Create an admin account immediately after installation. If someone else accesses before you and creates an account, they will become admin.
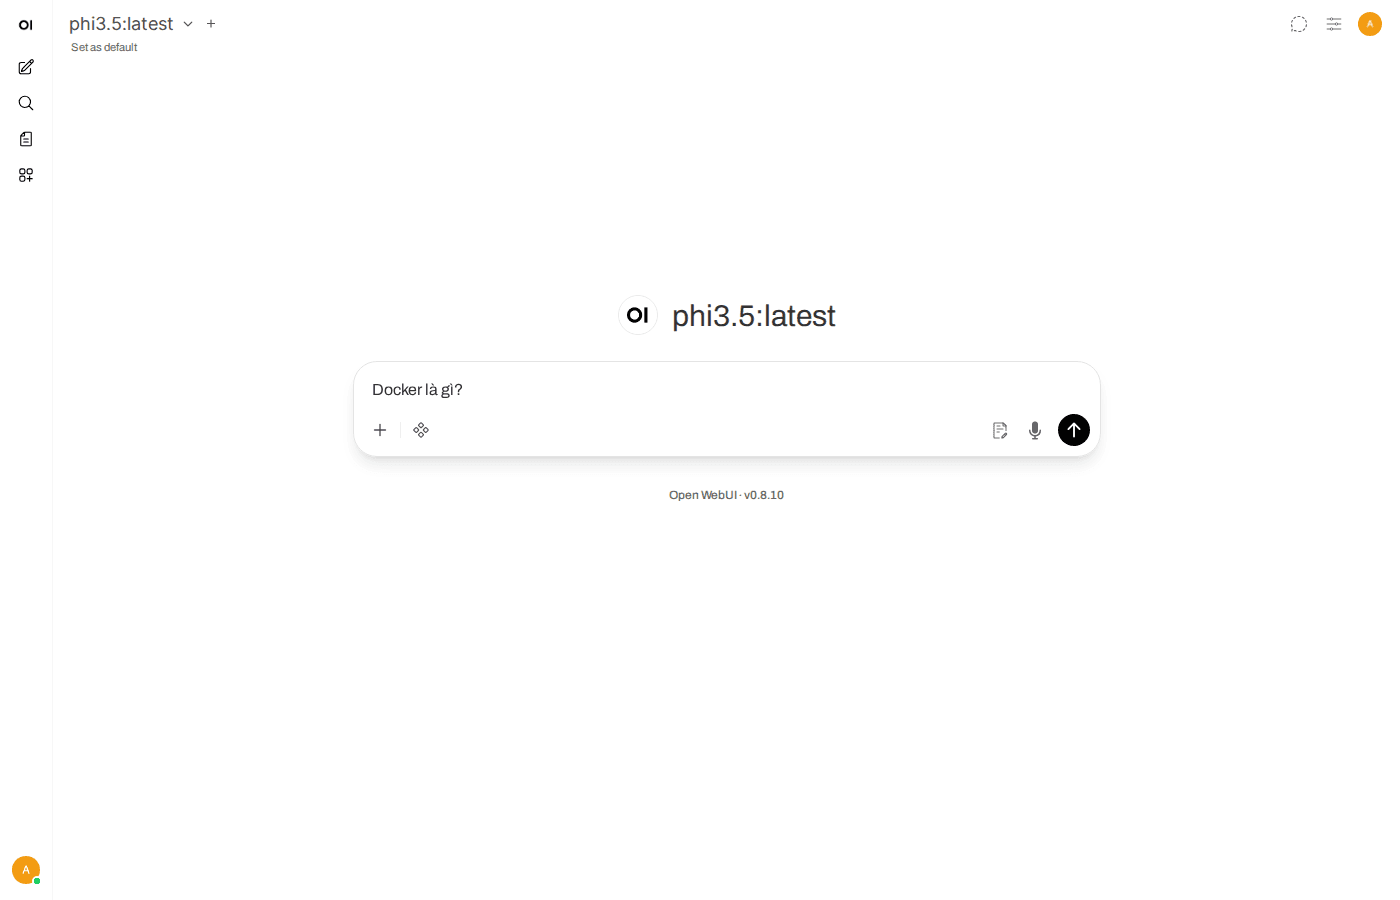
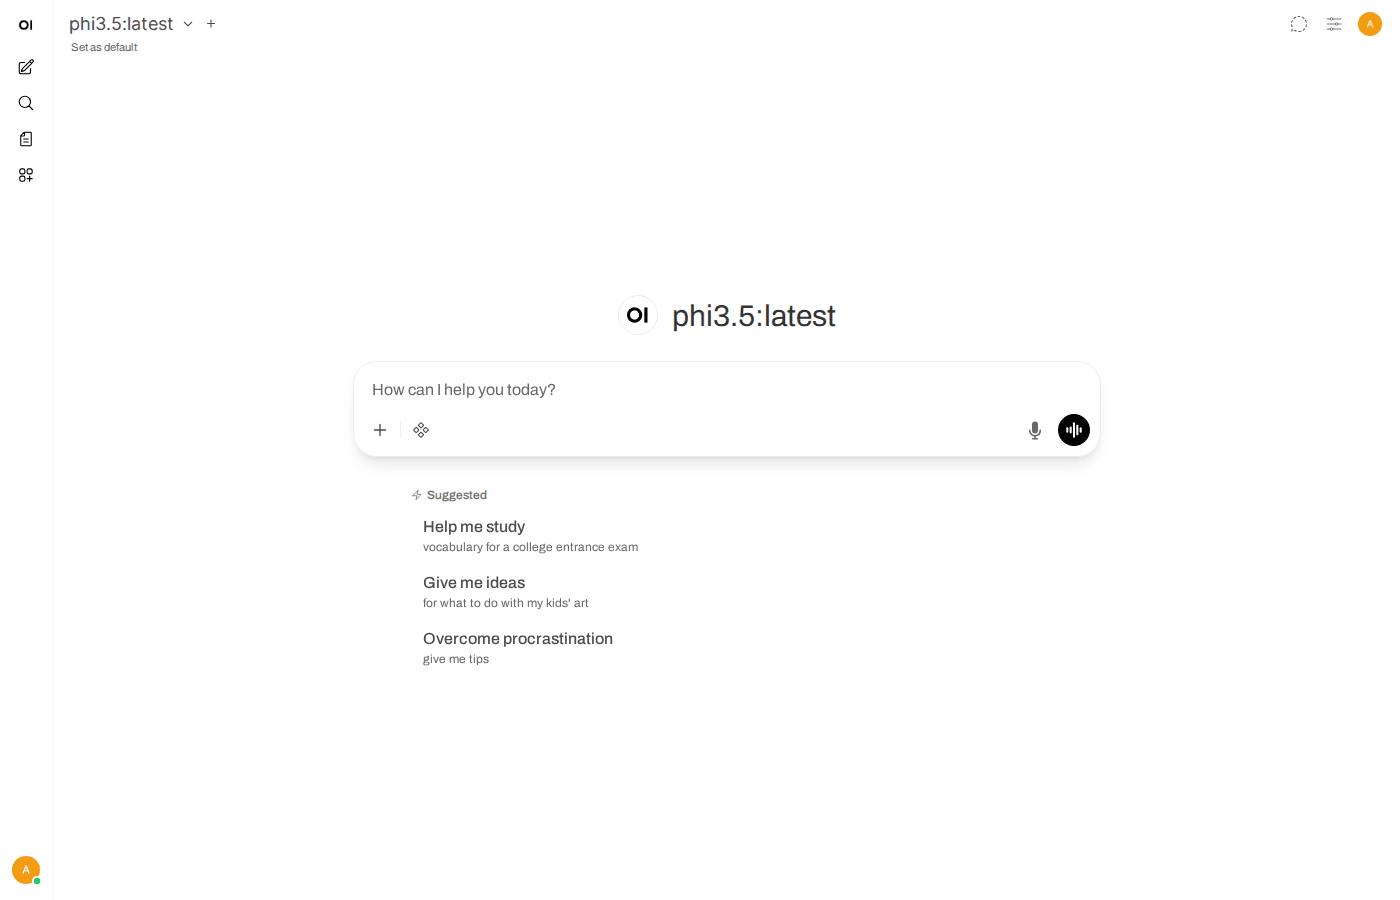
After registration, you will see a familiar chat interface similar to ChatGPT. If Ollama already has models (for example, you already ran ollama pull llama3.2 from the previous article), those models will automatically appear in the selection list.
Interface overview
The Open WebUI interface is divided into main sections:
- Left sidebar: Chat history, create new conversations, manage chat folders.
- Model selection bar at the top: Choose AI model for chat (Llama, Gemma, Phi, or any model you have pulled in Ollama).
- Chat area in the middle: Where you enter prompts and view responses.
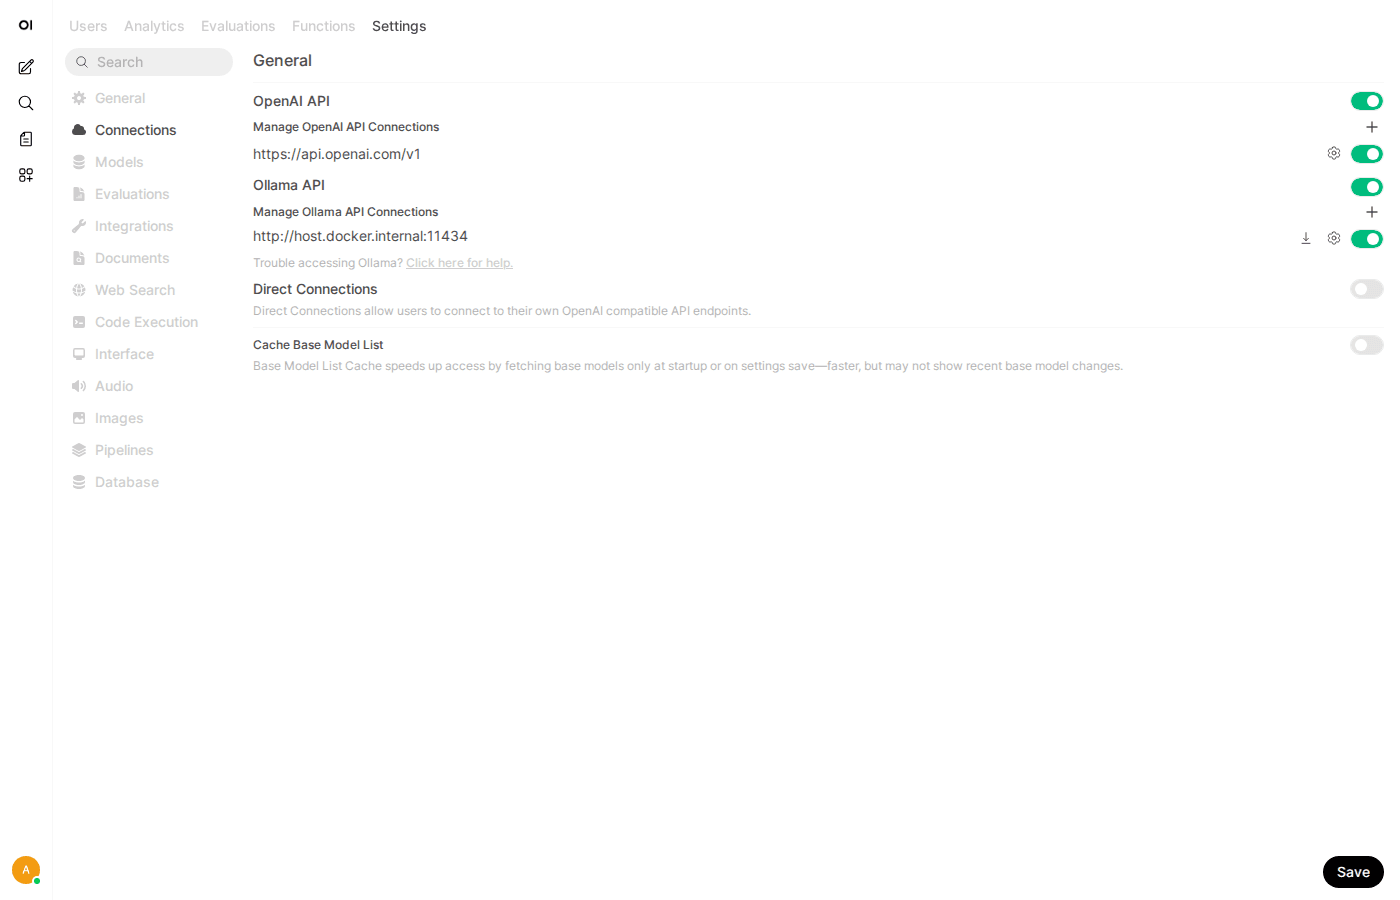
- Settings (bottom left corner): Configure interface, connections, user management.
You can start chatting right away by selecting a model and typing questions. Responses are rendered with Markdown, have syntax highlighting for code, and support LaTeX for mathematical formulas.
Notable features
Open WebUI is not just a chat framework. Below are noteworthy features:
Chat with multiple models simultaneously
You can select multiple models in the same conversation to compare responses. For example, ask the same question to both Llama 3.2 and Gemma 3 to see which model answers better.
File upload and built-in RAG
Open WebUI supports uploading documents (PDF, TXT, DOCX…) and then answering questions based on file content. RAG (Retrieval-Augmented Generation) feature is built-in, no additional installation needed.
Voice chat
Supports voice input and reading responses aloud. You can use it directly in the browser.
PWA
Open WebUI works as a Progressive Web App. You can “Add to Home Screen” on your phone to use it like a native app, opening quickly and receiving notifications.
Multi-user management
A strong point of Open WebUI is multi-user support from the beginning. You can create accounts for colleagues, friends, or team members to use together.
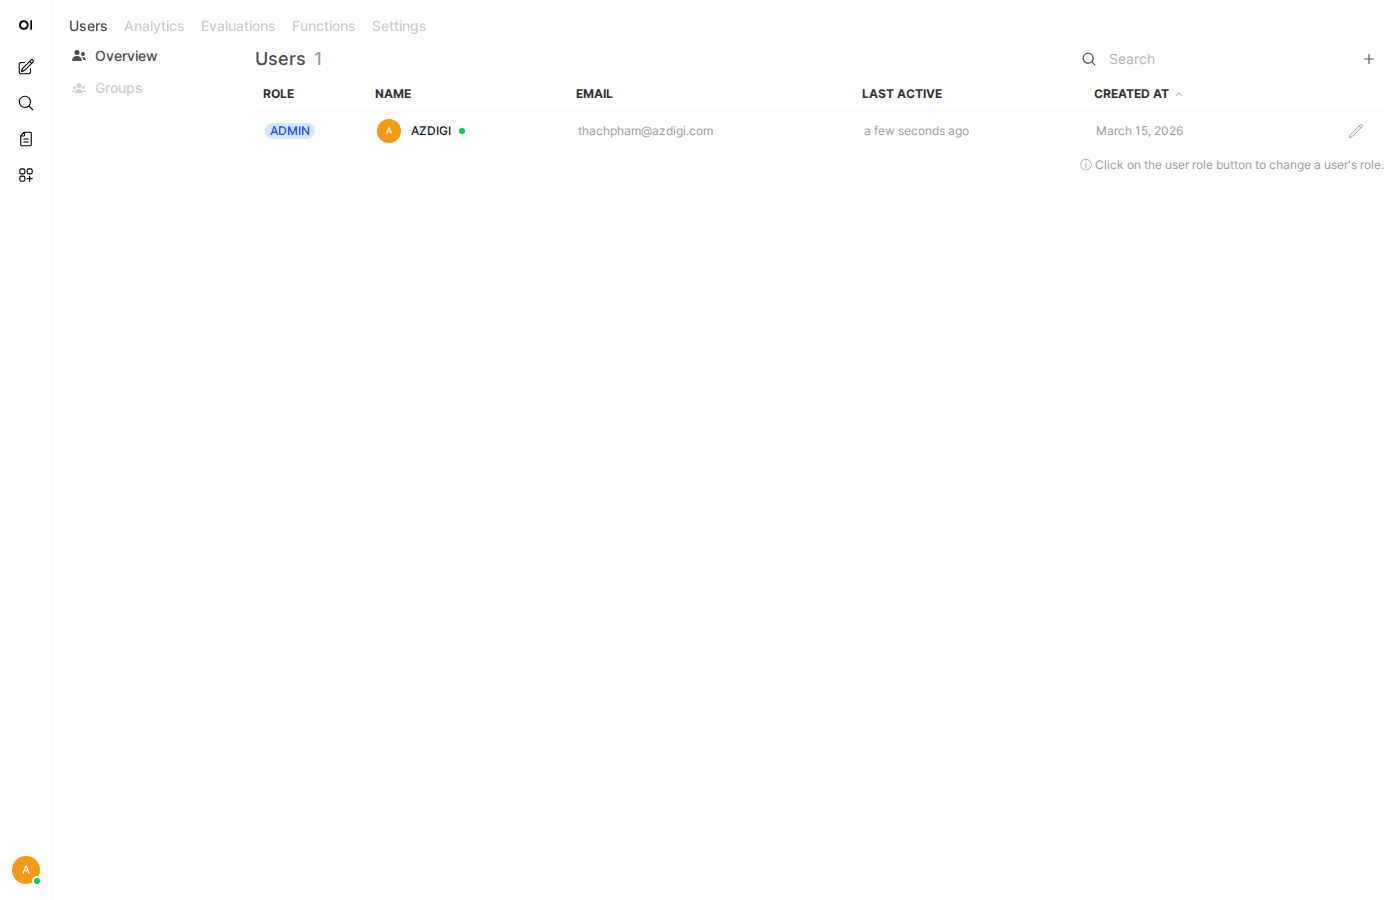
Go to Admin Panel (icon in sidebar), you will see:
- Dashboard: Overview statistics about number of users, number of chats.
- Users: Create, delete, manage user accounts.
- Permissions: There are 3 roles: Admin, User, and Pending. You can require admin approval for new accounts before allowing use.
Each user has their own chat history, no one can view others’ (except admin if enabled).
Creating Custom Model Profiles
Open WebUI allows you to create custom “model profiles” based on base models. For example, you can create a profile called “Python Code Assistant” based on Llama 3.2, with a system prompt preset to always respond in Python programming direction.
How to create:
- Go to Workspace → Models.
- Click Create a model.
- Choose base model (for example:
llama3.2). - Set name, description, and write system prompt as desired.
- Save. The new model profile will appear in the model selection list when chatting.
This feature is very useful when you want to create multiple “specialized assistants” from the same base model, each assistant serving a different purpose.
Updating Open WebUI
Open WebUI develops very quickly, almost every week there are updates. To update to the latest version:
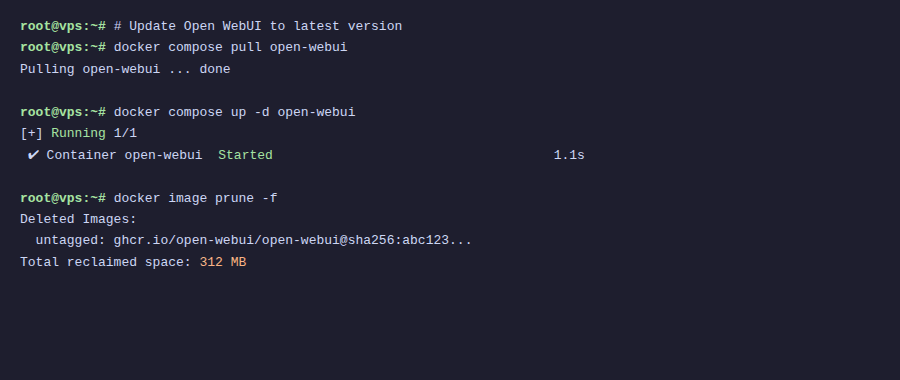
If using Docker Compose:
cd ~/open-webui
docker compose pull
docker compose up -d
If using Docker Run:
docker pull ghcr.io/open-webui/open-webui:main
docker stop open-webui
docker rm open-webui
docker run -d \\
  --name open-webui \\
  --restart always \\
  -p 3000:8080 \\
  --add-host=host.docker.internal:host-gateway \\
  -v open-webui:/app/backend/data \\
  ghcr.io/open-webui/open-webui:main
Chat data and configurations are stored in Docker volumes so they won’t be lost during updates. You can safely pull new images and recreate containers.
Conclusion
With Open WebUI, you now have a complete AI chat interface running on your VPS. Combined with Ollama from the previous article, you can:
- Chat with various AI models through a beautiful web interface.
- Upload documents for Q&A (RAG).
- Create accounts for team collaboration.
- Customize model profiles for specific purposes.
- All data resides on your server, no dependence on third parties.
In the next article, I will guide you through installing and running DeepSeek on Ollama to have another powerful AI model, especially good for reasoning and programming tasks.
You might also like
- n8n + Ollama - Automate Workflows with AI Running on Your Own VPS
- Securing Self-Hosted AI - SSL, Authentication and Firewall for Ollama
- Reverse Proxy Ollama with Nginx - Access AI via Custom Domain with HTTPS
- Installing Dify AI on VPS - Free No-code AI Platform
- Installing Ollama on VPS Ubuntu - Run Private AI in 15 Minutes
- Running DeepSeek on VPS without GPU - Detailed guide with Ollama
About the author

Trần Thắng
Expert at AZDIGI with years of experience in web hosting and system administration.