Nội dung
How to secure a WordPress website with the Wordfence plugin?
Currently, WordPress can be considered the most popular CMS in the world, used by many users abroad and the WordPress community in Vietnam. WordPress reaches non-specialist users, helping non-experts still be able to use it fluently. Instead, security holes and risks when using are inevitable. There are still a lot of attacks that exploit your website for destructive purposes.
To prevent attacks, there are many ways to improve the security of your WordPress website, many of which Plugins support, including Wordfence. This is a plugin with over 3 million active installs. In today’s article, let AZDIGI learn the features and how to use Wordfence.
Advantages and features of Wordfence
Scan and Secure WordPress
- Web Application Firewall filters and blocks malicious traffic
- Check and scan for Malware in Core WordPress, Themes, Plugins, bad URLs, backdoors, SEO spam, malicious redirects and code injections
- Compare your core, themes, and plugin files with the WordPress.org repository, check their integrity and report any changes to you.
- Repair changed files by overwriting them with an original version. Deleting files that don’t belong to the core is easy in the Wordfence interface.
- Check your website for known security holes and warn you.
- Check your content safety by scanning file content, posts and comments for dangerous URLs and suspicious content.
Secure WordPress Login
- Two-factor authentication (2FA), is one of the most secure forms of remote system authentication today through applications on TOTP, such as Google Auth, Authy, FreeOTP…
- CAPTCHA login page prevents BOT from logging in
- Disable or add 2FA to XML-RPC.
- Block logins for administrators using compromised passwords detected.
Above are all the features supported in the free version. With the paid version, you can actively schedule automatic source code scans.
Steps to install and use
Install Wordfence
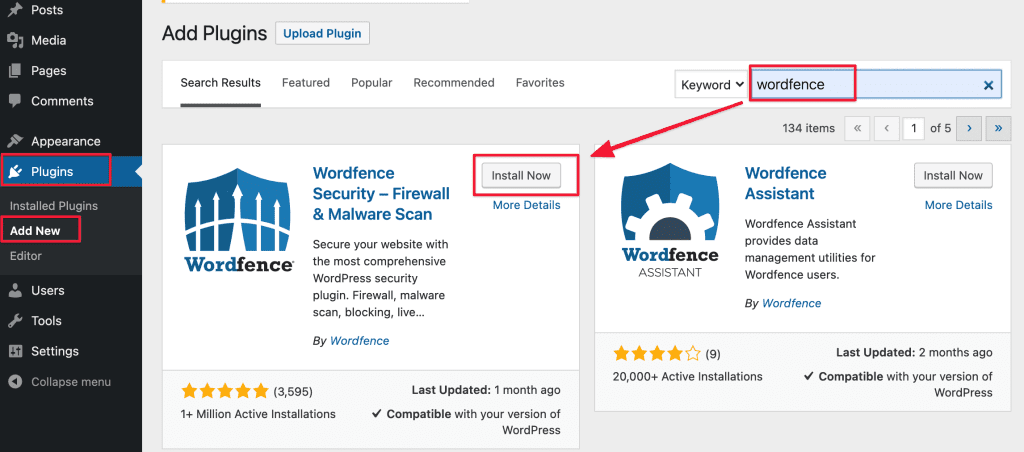
You can install Wordfence directly in WordPress or a zip file downloaded from the homepage. You can refer to the following guide to installing plugins on WordPress:
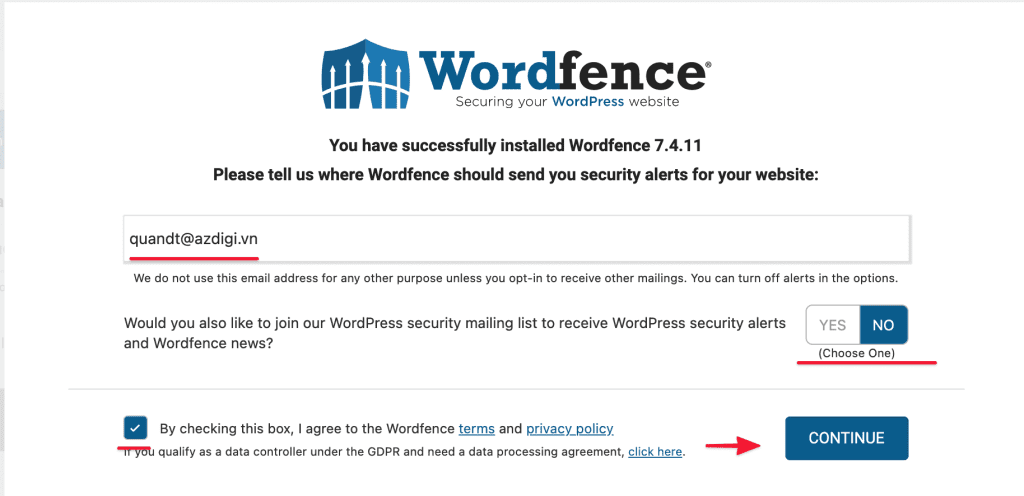
Enter your email and select YES/NO to receive or not receive notifications from the Wordfence plugin. Then, tick to agree to the policy => click CONTINUE.
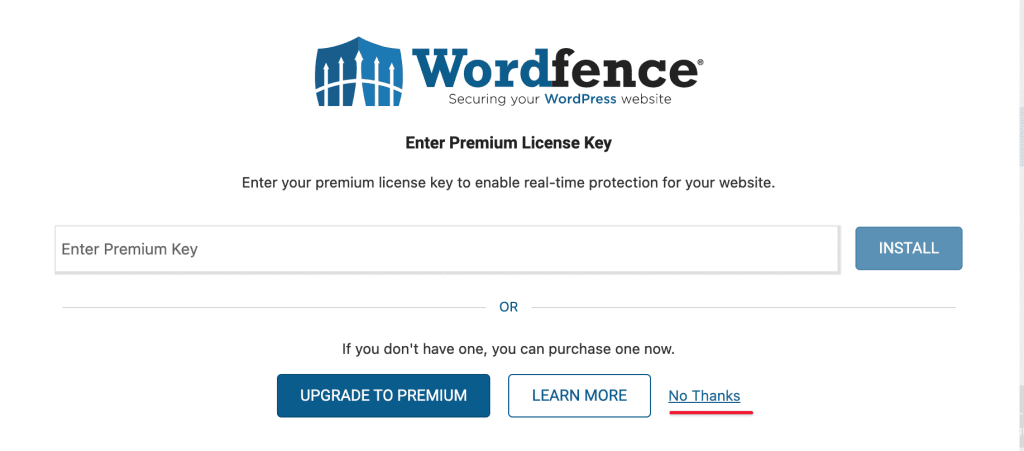
If you have a Premium activation code, enter it and click INSTALL. If you only use the free version, chooseNo Thanks.

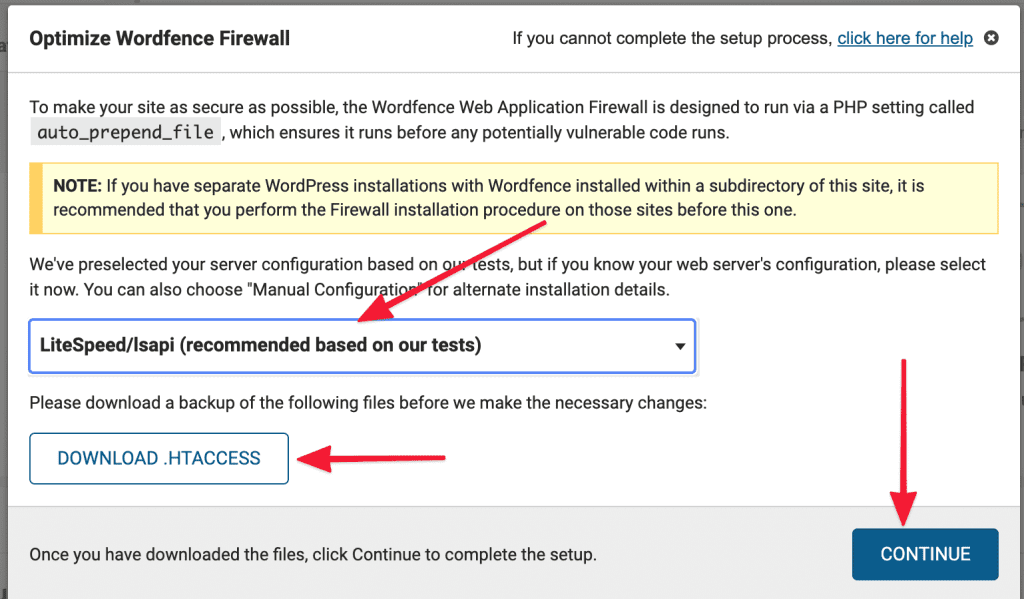
Go to Wordfence’s Dashboard, if you receive the above message, select Yes, enable auto-update to update the developer’s new version automatically. And click CLICK HERE TO CONFIGURE to optimize the firewall for the website, the plugin will rewrite the rules in .htaccess for you.
The plugin will scan and recommend the Webserver you use. Click Download the backup .htaccess file and select CONTINUE.
Set up login security
Go to Wordfence => Login Security => Two-Factor Authentication. You can use a QR code to set up for 2-factor verification or a Backup Code.
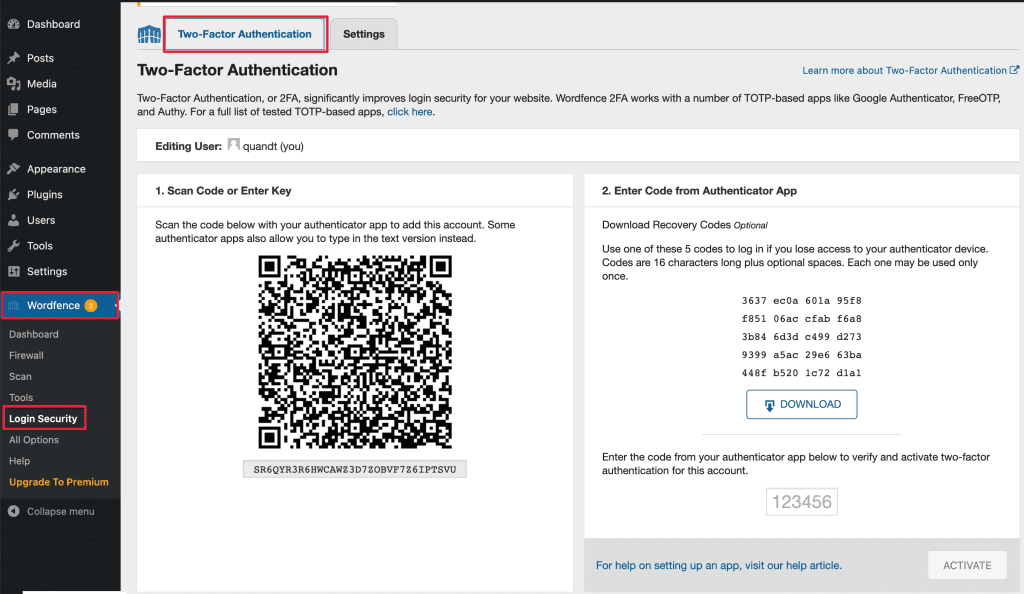
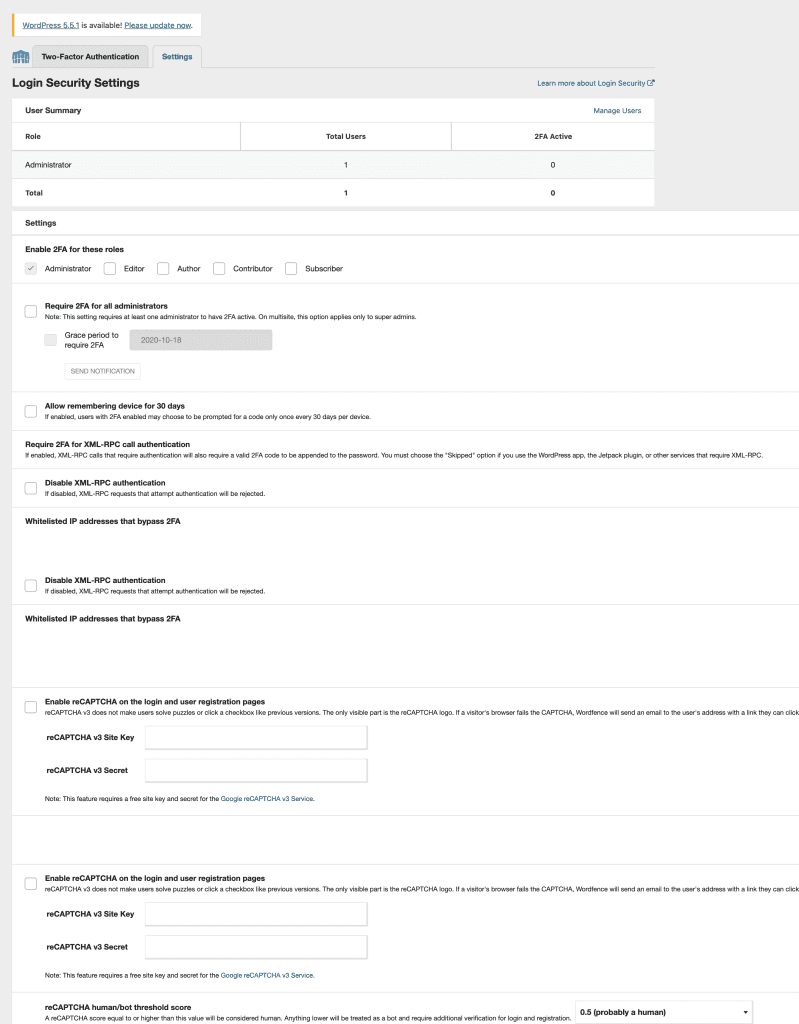
Next, you move through the Settings tab to adjust advanced options, you can choose the following functions:
- Enable 2FA for these roles: Enable 2FA for authorized users, admin, editor, Author…
- Require 2FA for all administrators
- Allow remembering device for 30 days
- Require 2FA for XML-RPC call authentication: If enabled, XML-RPC calls that require authentication will also require a valid 2FA code to be appended to the password. You must choose the “Skipped” option if you use a WordPress app, the Jetpack plugin, or other services that require XML-RPC.
- Disable XML-RPC authentication: If disabled, XML-RPC requests that attempt to authenticate will be rejected.
- Enable reCAPTCHA on the login and user registration pages
After you have set the options, save to apply the options.
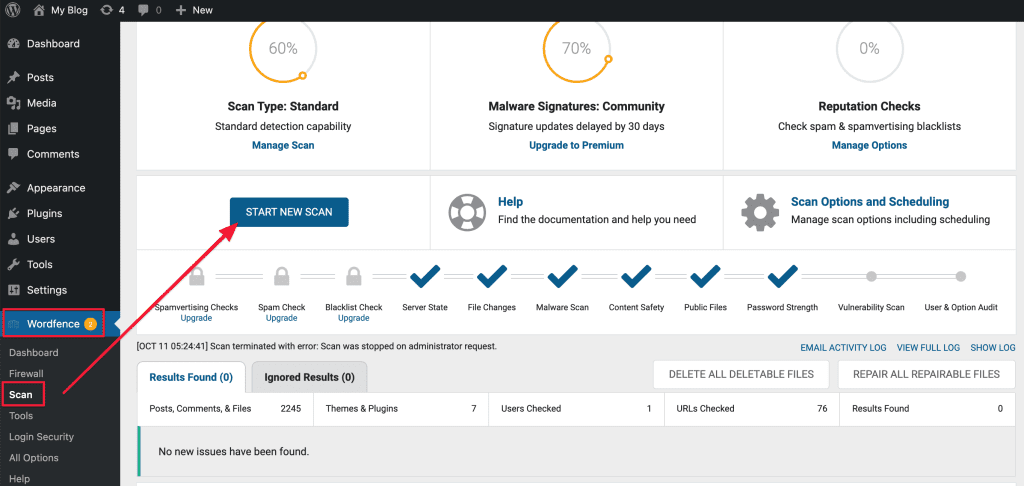
Scan websites to remove malware with Wordfence
With the Wordfence Scan function, the plugin will scan your entire website for malicious code in Core WordPress, Themes and Plugins. The time to scan depends on whether your website has a lot of data. When you scan, you will see that your server will use many RAM and CPU resources to work.
After the scan is completed, the plugin will show a report of the scan process, detect malicious code and list in detail which files are infected, the file is in the directory path, and the infected file contains dangerous code.
When detected malicious code you will see as shown below, the plugin specifies the infected files with the path. To see the details, click on DETAILS to see the details in the infected file.
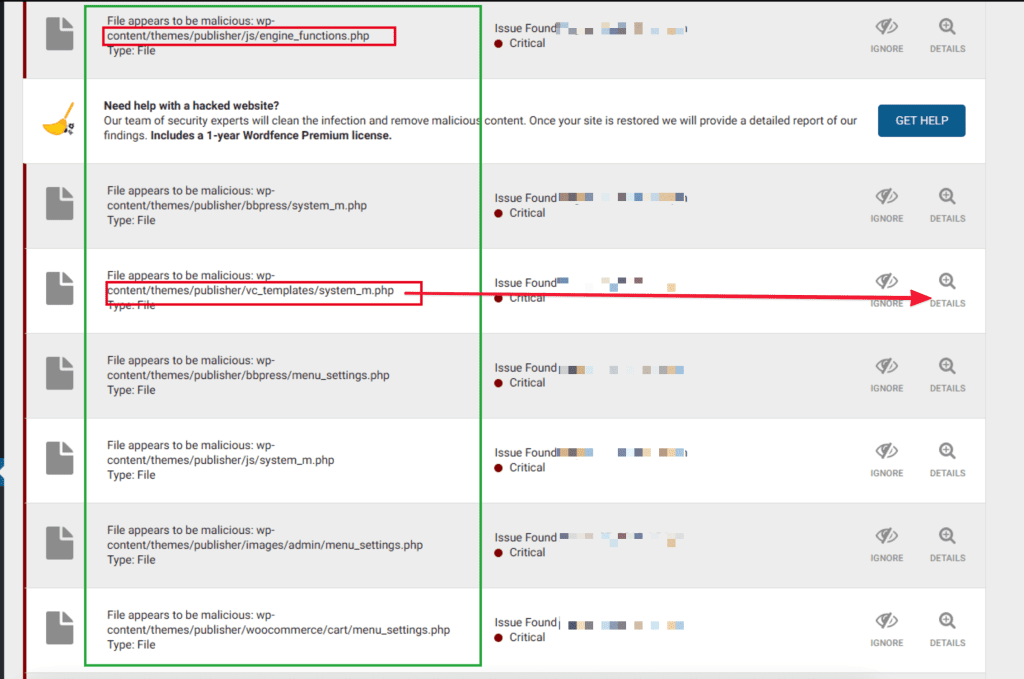
The DETAILS section will show the string of malicious code inserted by the virus. Select DELETE FILE if you want to remove this file from the website.


Set up the security alert function
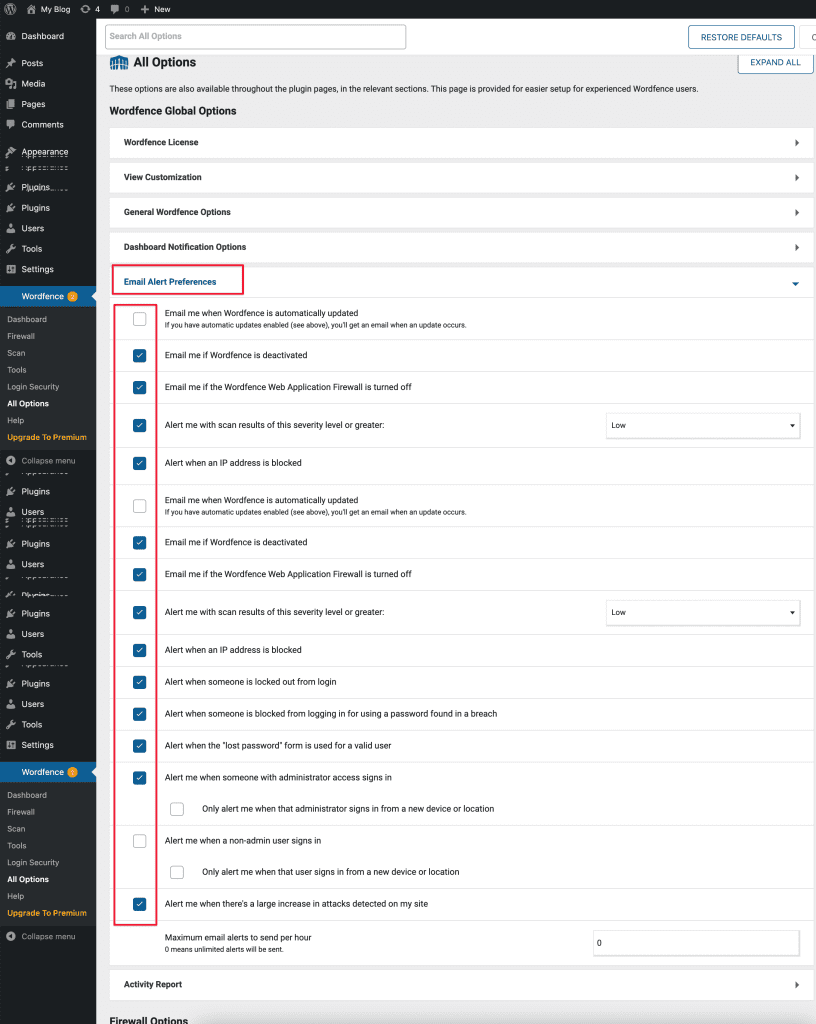
After installing the plugin, enter your email and select YES to receive security notifications from Wordfence. Then in this option when you set it up, you will receive warnings from the Plugin with optional functions as follows:
Click Wordfence => All option => Email Alert Preferences
Depending on the user’s needs, the setting corresponds to each administrator. I use the default and only turn off the login notification function on new devices.

Summary
WordPress website security cannot be ignored when you build a public website on the internet. Websites must “suffer” all risks daily, every hour by bad bots, hackers looking for security holes to destroy. With Wordfence, it is not 100% wholly prevented but still ensures that your website is always safe. In parallel, an administrator cannot depend on Plugins, but the administrator must be more proactive in security from the source code such as (Do not set a simple password, use plugins, null themes, paid themes but share for free…)
Hopefully, this article will help you set up a good security configuration for your server from outside attacks.
If you have questions or need support, please live chat with Technical Department. Or send the ticket to the Technical Department according to the information below.
- Hotline 247: 028 888 24768 (Ext 0)
- Ticket/Email: You can use your email to register for the service and send it directly to: support@azdigi.com
- Click on the AZDIGI website to refer to the best Hosting/VPS service in Vietnam.

