
Monitoring MySQL/MariaDB with Zabbix Agent with 2 simple steps.
Introduction
Continuing with the Zabbix series, then in this article, AZDIGI will show you how to monitor MySQL/MariaDB with Zabbix Agent on your server. You can check out the previous articles of the Zabbix series here.
Before going into MySQL/MariaDB monitoring setup, you need to ensure that on the server to be monitored, MySQL/MariaDB has successfully installed Zabbix Agent . If you have not installed it, you can refer to the instructions below:
Configuration Guide
Step 1: Configure MySQL
- Create User
mysql -uroot -p
Enter password:
GRANT USAGE ON *.* TO 'user'@'%' IDENTIFIED BY 'pass';
FLUSH PRIVILEGES;
QUIT;
- Declare the newly created User/Password
You proceed to create a “zabbix“ folder and create an additional .my.cnf file inside the zabbix folder by following the two commands below:
mkdir /var/lib/zabbix
vi /var/lib/zabbix/.my.cnf
Then copy the content below into the .my.cnf file you just created (replace it with your User/Password)
[client]
user = zbx_monitor
password = zabbix- Check configuration
Check the file
/etc/zabbix/zabbix_agentd.confhas the line below (if not, please add it).
Include=/etc/zabbix/zabbix_agentd.d/*.conf
Next, you check in the directory /etc/zabbix/zabbix_agentd.d/ there will be a file userparameter_mysql.conf. If you haven’t already, you need to manually create this file and add the following content:
# For all the following commands HOME should be set to the directory that has .my.cnf file with password information.
# Flexible parameter to grab global variables. On the frontend side, use keys like mysql.status[Com_insert].
# Key syntax is mysql.status[variable].
UserParameter=mysql.status[*],echo "show global status where Variable_name='$1';" | HOME=/var/lib/zabbix mysql -N | awk '{print $$2}'
# Flexible parameter to determine database or table size. On the frontend side, use keys like mysql.size[zabbix,history,data].
# Key syntax is mysql.size[<database>,<table>,<type>].
# Database may be a database name or "all". Default is "all".
# Table may be a table name or "all". Default is "all".
# Type may be "data", "index", "free" or "both". Both is a sum of data and index. Default is "both".
# Database is mandatory if a table is specified. Type may be specified always.
# Returns value in bytes.
# 'sum' on data_length or index_length alone needed when we are getting this information for whole database instead of a single table
UserParameter=mysql.size[*],bash -c 'echo "select sum($(case "$3" in both|"") echo "data_length+index_length";; data|index) echo "$3_length";; free) echo "data_free";; esac)) from information_schema.tables$([[ "$1" = "all" || ! "$1" ]] || echo " where table_schema="$1"")$([[ "$2" = "all" || ! "$2" ]] || echo "and table_name="$2"");" | HOME=/var/lib/zabbix mysql -N'
UserParameter=mysql.ping,HOME=/var/lib/zabbix mysqladmin ping | grep -c alive
UserParameter=mysql.version,mysql -V- Restart Zabbix Agent
sudo systemctl restart zabbix-agent
Step 2: Add Host and Templates MySQL/MariaDB
Now you proceed to add Host and Templates MySQL/MariaDB to the Zabbix server. At the Zabbix Server interface, go to
Configuration >> Host >> Create Host
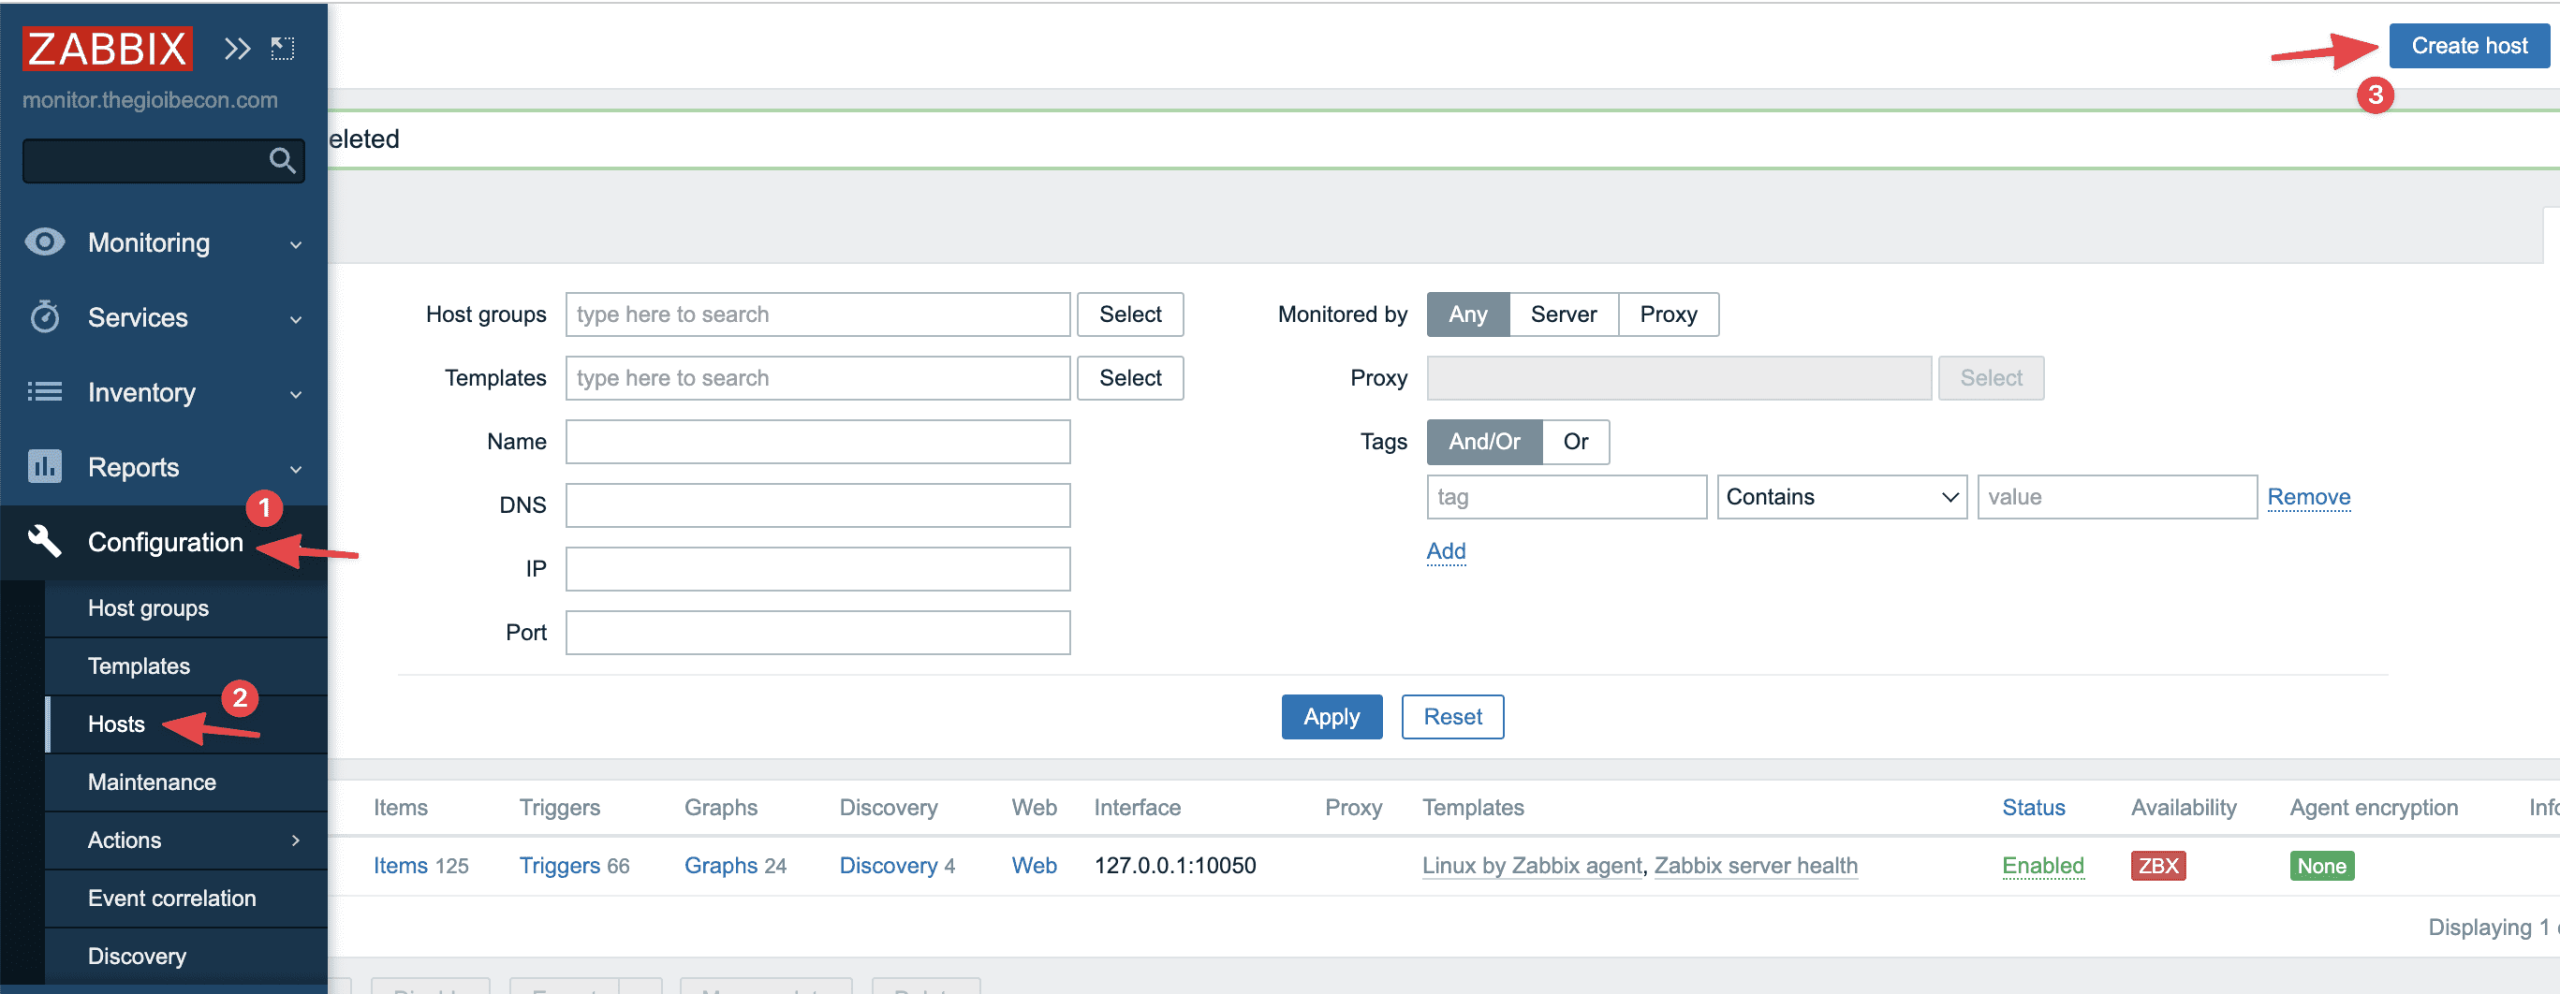
Now you need fill in the necessary information as shown below:
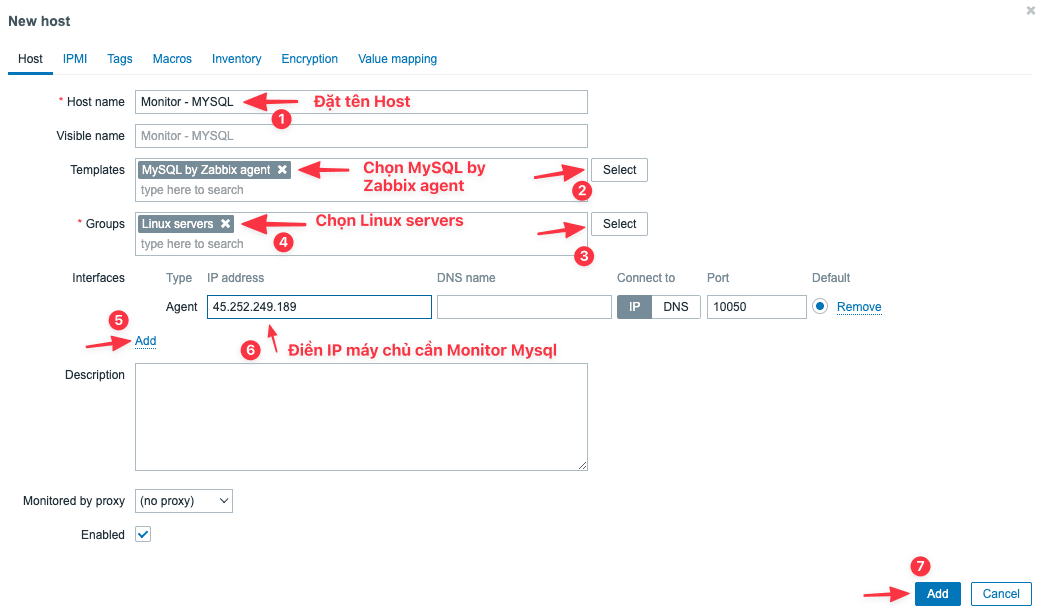
As shown below, you have completed the configuration.

Thus, AZDIGI has shown you how to configure MySQL/MariaDB monitoring on Zabbix in the most detail so that you can easily monitor your server and handle it quickly if there is a problem. Hope this article will help you, wish you success.
You can refer to other instructions at the link below:
If you need assistance, you can contact support in the ways below:
- Hotline 247: 028 888 24768 (Ext 0)
- Ticket/Email: You use the email to register for the service and send it directly to: support@azdigi.com .
You might also like
- How to install Zabbix 6.0 on Ubuntu 20.04
- How to install Zabbix Agent on Ubuntu 20.04
- Set up server monitoring with Zabbix Server
- Releem - Monitoring Performance and Optimizing MySQL
- Upgrade the MariaDB version on CentOS Web Panel
- Integrating OpenViking into OpenClaw: Upgrading AI Agent Memory, Reducing Token Costs by 83%
About the author

Thạch Phạm
Đồng sáng lập và Giám đốc điều hành của AZDIGI. Có hơn 15 năm kinh nghiệm trong phổ biến kiến thức liên quan đến WordPress tại thachpham.com, phát triển website và phát triển hệ thống.