Quickly activate QUIC (HTTP/3) on OpenLiteSpeed with a few simple steps with AZDIGI.
I. Introduction
After HTTP/2, next comes QUIC – Google has been working for quite some time to speed up its network protocols to minimize website response time. After HTTP/2 has accomplished the mission of speeding up HTTP(S) and become the foundation for fast TLS connections, QUIC takes it a step further – it aims to replace the TCP transport protocol on the Internet.
So what is QUIC?
QUIC stands for Quick UDP Internet Connections, and it is a transport protocol developed by Google to replace the Transmission Control Protocol (TCP). QUIC supports a set of connections between two endpoints over User Datagram Protocol (UDP) with security standards such as TLS/SSL.
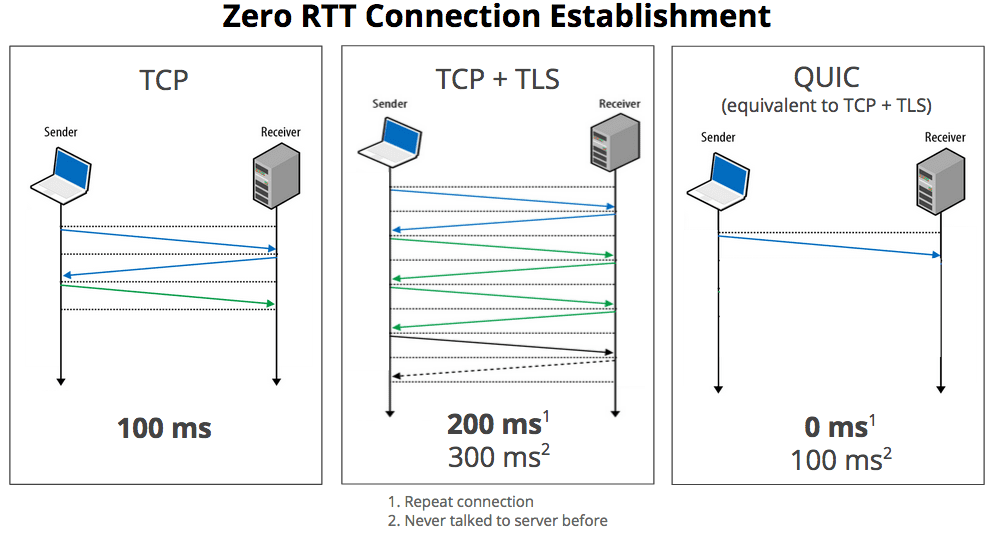
Google developed the QUIC protocol with the aim of speeding up its network protocols to reduce web page response time by minimizing Round Trip Times (RTT) (1) between senders and receivers. What the TCP protocol is currently facing.
And QUIC was created to address the shortcomings of its predecessor, HTTP/2.
- Data is packetized to limit data loss.
- Congestion control mechanism.
- UDP offloading to avoid TCP head-of-line blocking.
- High security level, similar to Transport Layer Security (TLS).
- Packet loss recovery to reduce retransmission latency.
- Connection ID to reduce reconnection for mobile users
- Fast 0-RTT connection similar to TLS Snapstart combined with TCP Fast Open.
The main advantages of QUIC (source chromium) over TCP+TLS+HTTP2 include:
- Dramatically reduced connection establishment time.
- Improved congestion control.
- Multiplexing without head of line blocking.
- Forward error correction.
- Connection migration.

To learn more about QUIC (http/3), this article will show how to enable QUIC on a server using OpenLitespeed. Please follow along.
II. Implementation Guide
Before proceeding to enable QUIC on OpenLitespeed, you need to ensure the following two factors:
- The version of OpenLitespeed you are using must be 1.6.1 or newer.
- The website you are using must be installed and running with SSL (https).
Step 1: Open UDP port 443.
You need to SSH into your VPS with the highest root privileges, if you don’t know how to SSH, you can refer to the instructions below:
After successfully SSH, you can open the UDP port as follows:
If you are using iptables, run the following commands:
iptables -I INPUT -p udp --dport 443 -j ACCEPT
service iptables save
service iptables restart
If you are using firewalld, run the following commands:
firewall-cmd --zone=public --add-port=443/udp --permanent
firewall-cmd --reload
Step 2: Access the OpenLitespeed Webadmin
After successfully opening UDP port in step 1, you need to access the Webadmin via the following link https://45.252.249.104:7080/, then log in with your admin credentials. If you forget this information, you can reset your information by following the instructions below:
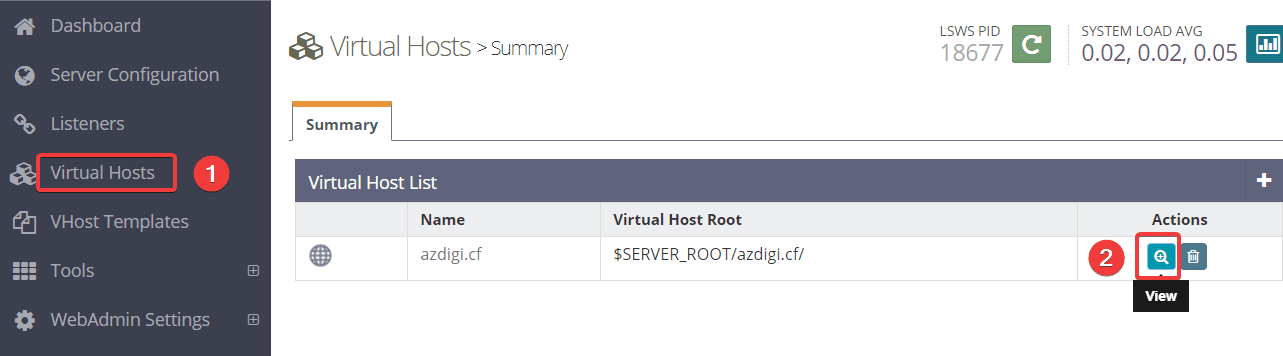
To QUIC, go to Virtual Hosts => Select vhost to configure (azdigi.cf) => View (2).
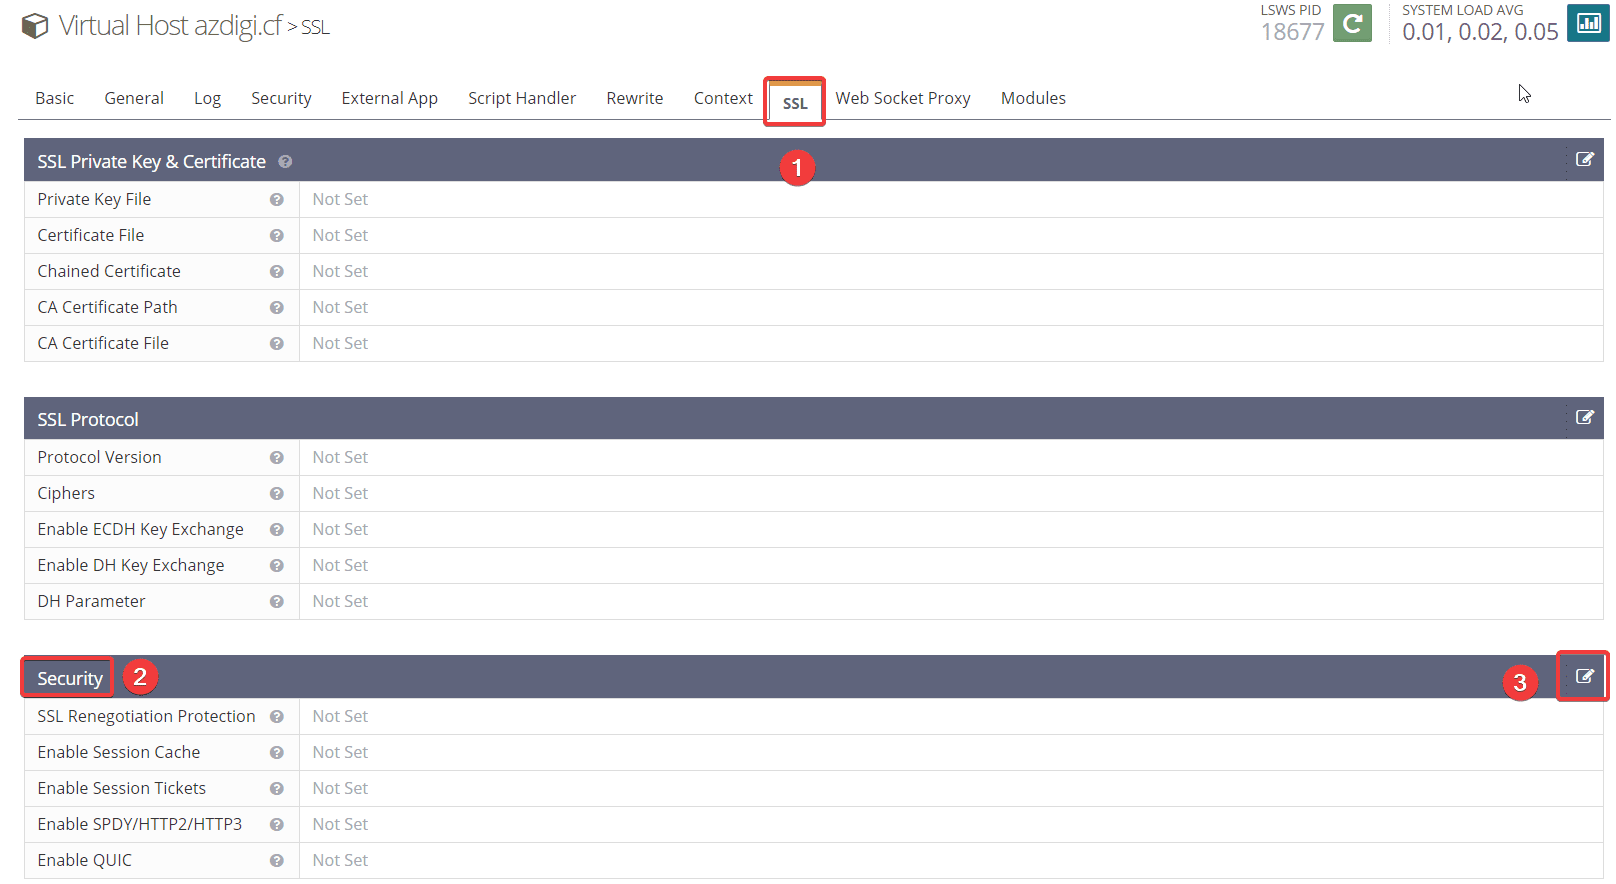
Next, click SSL tab (1) => Security (2) => Edit (3)
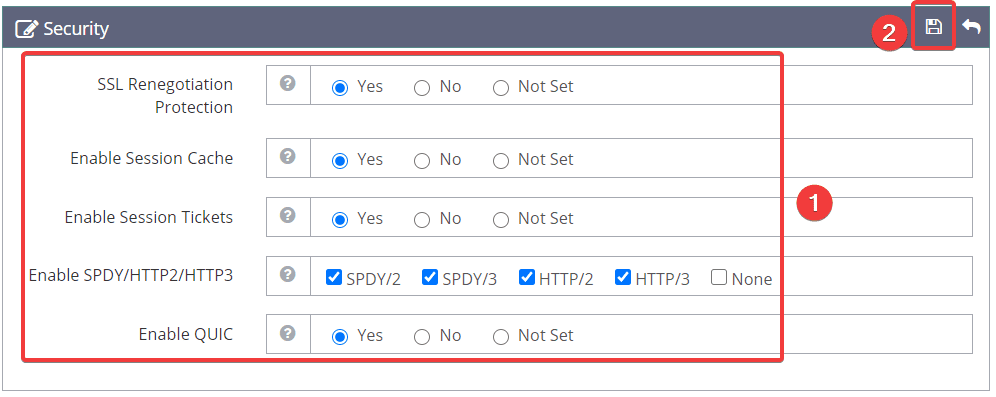
Here you fill in the information as below (1) => click Save (2)
SSL Renegotiation Protection: Yes
Enable Session Cache: Yes
Enable Session Tickets: Yes
Enable SPDY/HTTP2/HTTP3: SPDY/2 (enable) SPDY/3 (enable) HTTP/2 (enable) HTTP/3 (enable) None (disable)
Enable QUIC: Yes
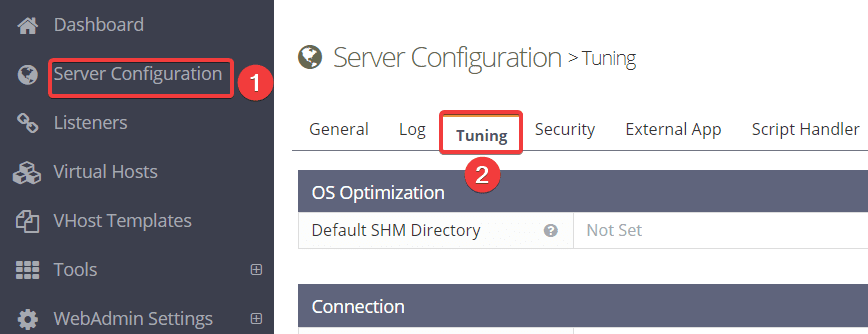
Now go back to the Dashboard and Server Configuration (1) => select tab Tuning tab (2).
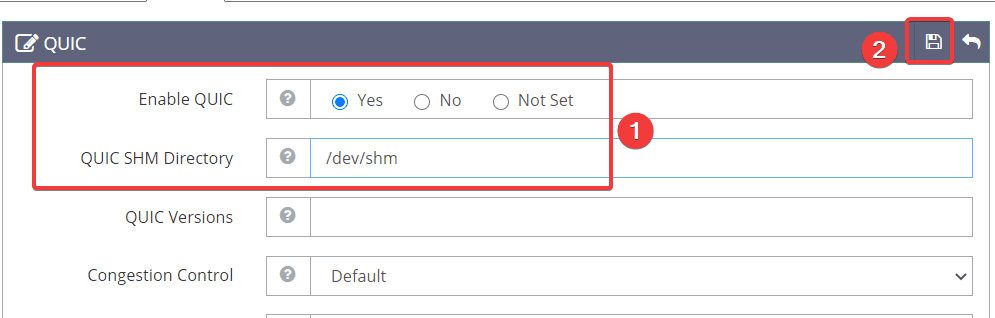
You scroll down to the bottom to find the QUIC section and edit the information as below (1) => and click Save (2).
Enable QUIC: Yes
QUIC SHM Directory: /dev/shm
After finishing the editing, you need to restart Litespeed by clicking on the Graceful Restart button.

Step 3: Check if QUIC is working
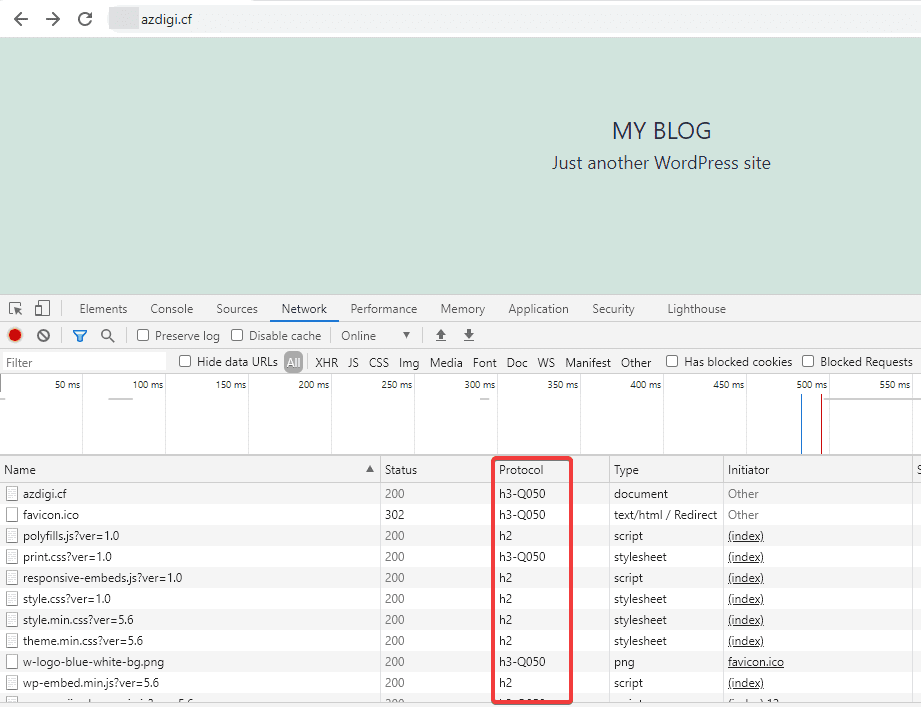
Now you can go to the browser and access Websist => press F12 => Select the Network tab => and check the Protocol section.
If the Protocol section shows h3-Q050 as shown in the image, then you have successfully activated QUIC.
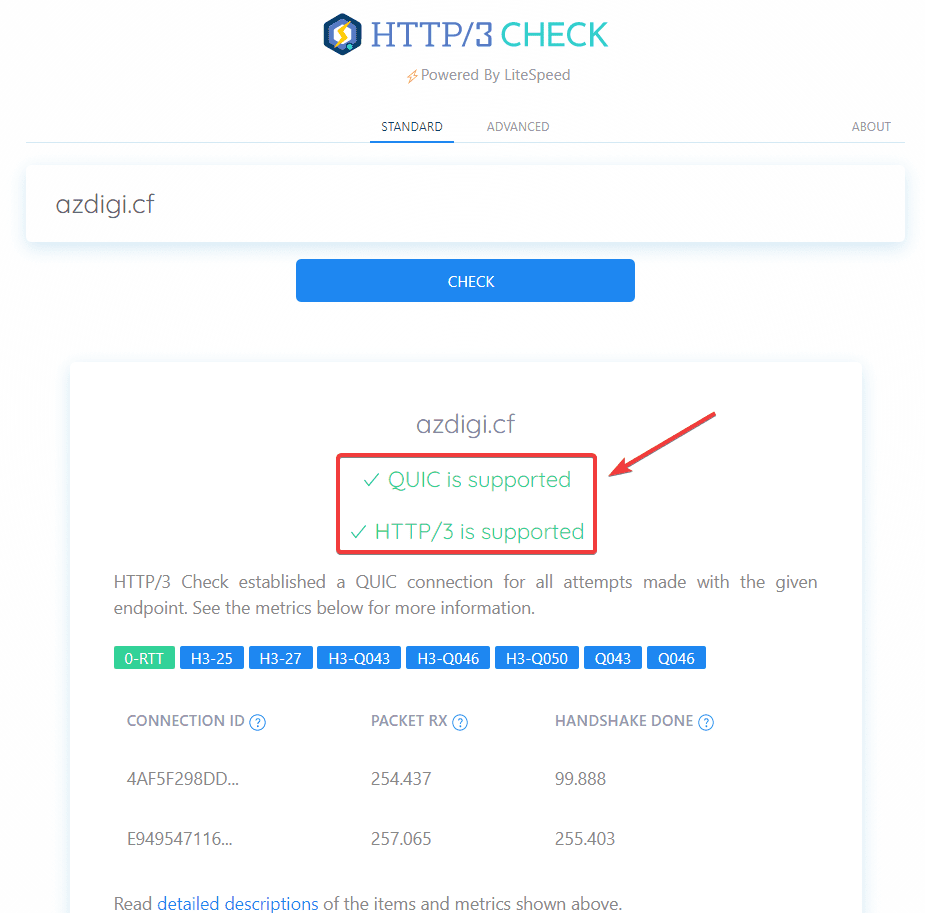
Or you can quickly check through the HTTP/3 CHECK page, just enter your website’s name and click Check. If your site has been activated for QUIC (HTTP/3), the check result will be as shown below:
III. Summary
In this article, AZDIGI has shown you the quickest and simplest way to enable QUIC (HTTP/3) on OpenLitespeed. Enabling QUIC on your server will bring a faster loading experience and faster server response, as well as enhance the security of your websites. So you can see that QUIC brings quite significant benefits while still being free to use. So there’s no reason why we shouldn’t use it, right?
Hopefully, this article will help you understand more about QUIC, and you can successfully activate QUIC on your OpenLitespeed server. If you find the article helpful, please share it widely.
In addition, you can refer to some other articles about OpenLiteSpeed at the link below:
- How to add the website to OpenLiteSpeed WebAdmin GUI
- Install OpenLiteSpeed, MariaDB and PHP on Centos 7
- Install WordPress on Openlitespeed
If you need assistance, you can contact support in the ways below:
- Hotline 247: 028 888 24768 (Ext 0)
- Ticket/Email: You use the email to register for the service and send it directly to: support@azdigi.com .
You might also like
About the author

Thạch Phạm
Đồng sáng lập và Giám đốc điều hành của AZDIGI. Có hơn 15 năm kinh nghiệm trong phổ biến kiến thức liên quan đến WordPress tại thachpham.com, phát triển website và phát triển hệ thống.