Nội dung
Adding a New Website to LAMP Stack on Ubuntu 22.04 with 5 steps.
Introduction
Continuing with the series about LAMP Stack, in this article, AZDIGI will guide you on how to add a new website to the LAMP Stack on Ubuntu 22.04.
Conditions to be met:
- Ubuntu Server 22.04.
- Use Root privileges and install LAMP Stack
- The domain to be configured has been pointed to the server IP.
Implementation guide
Step 1: SSH into the server
To upgrade the ProFTPD version on DirectAdmin, we first need to SSH or access your VPS/server with root privileges. If you don’t know how to SSH into your VPS/Server, you can refer to the following tutorial:
Step 2: Create a folder to save the website
For example, in this article, I will do a demo with the website lamp.azdigi.space, the structure will be as follows:
Note: Remember to change lamp.azdigi.space to your website.
- Create a folder to save website data
sudo mkdir -p /var/www/lamp.azdigi.space/public_html

- Assign User permissions and read and write permissions to the website folder, here I set it as www-data
sudo chown www-data:www-data /var/www/lamp.azdigi.space/public_html
sudo chmod -R 755 /var/www
- Create content for the website
I will quickly create an index.html file for the website.
sudo nano /var/www/lamp.azdigi.space/public_html/index.html
Enter the content below and save.
<html>
  <head>
    <title>Welcome to LAMP Stack</title>
  </head>
  <body>
    <h1>Success! lamp.azdigi.space virtual host is working!</h1>
  </body>
</html>
Step 3: Create a Virtual Host for the new website
By default on the Apache server, the Virtual Host file will be 000-default.conf and located at /etc/apache2/sites-available/. So when you add a new website to Apache, you need to create a Virtual Host file for that website with the same configuration as the default file.
- Copy the contents of the default Virtual Host file to the new Virtual Host file.
sudo cp /etc/apache2/sites-available/000-default.conf /etc/apache2/sites-available/lamp.azdigi.space.conf
- Edit the content of the new Virtual Host file.
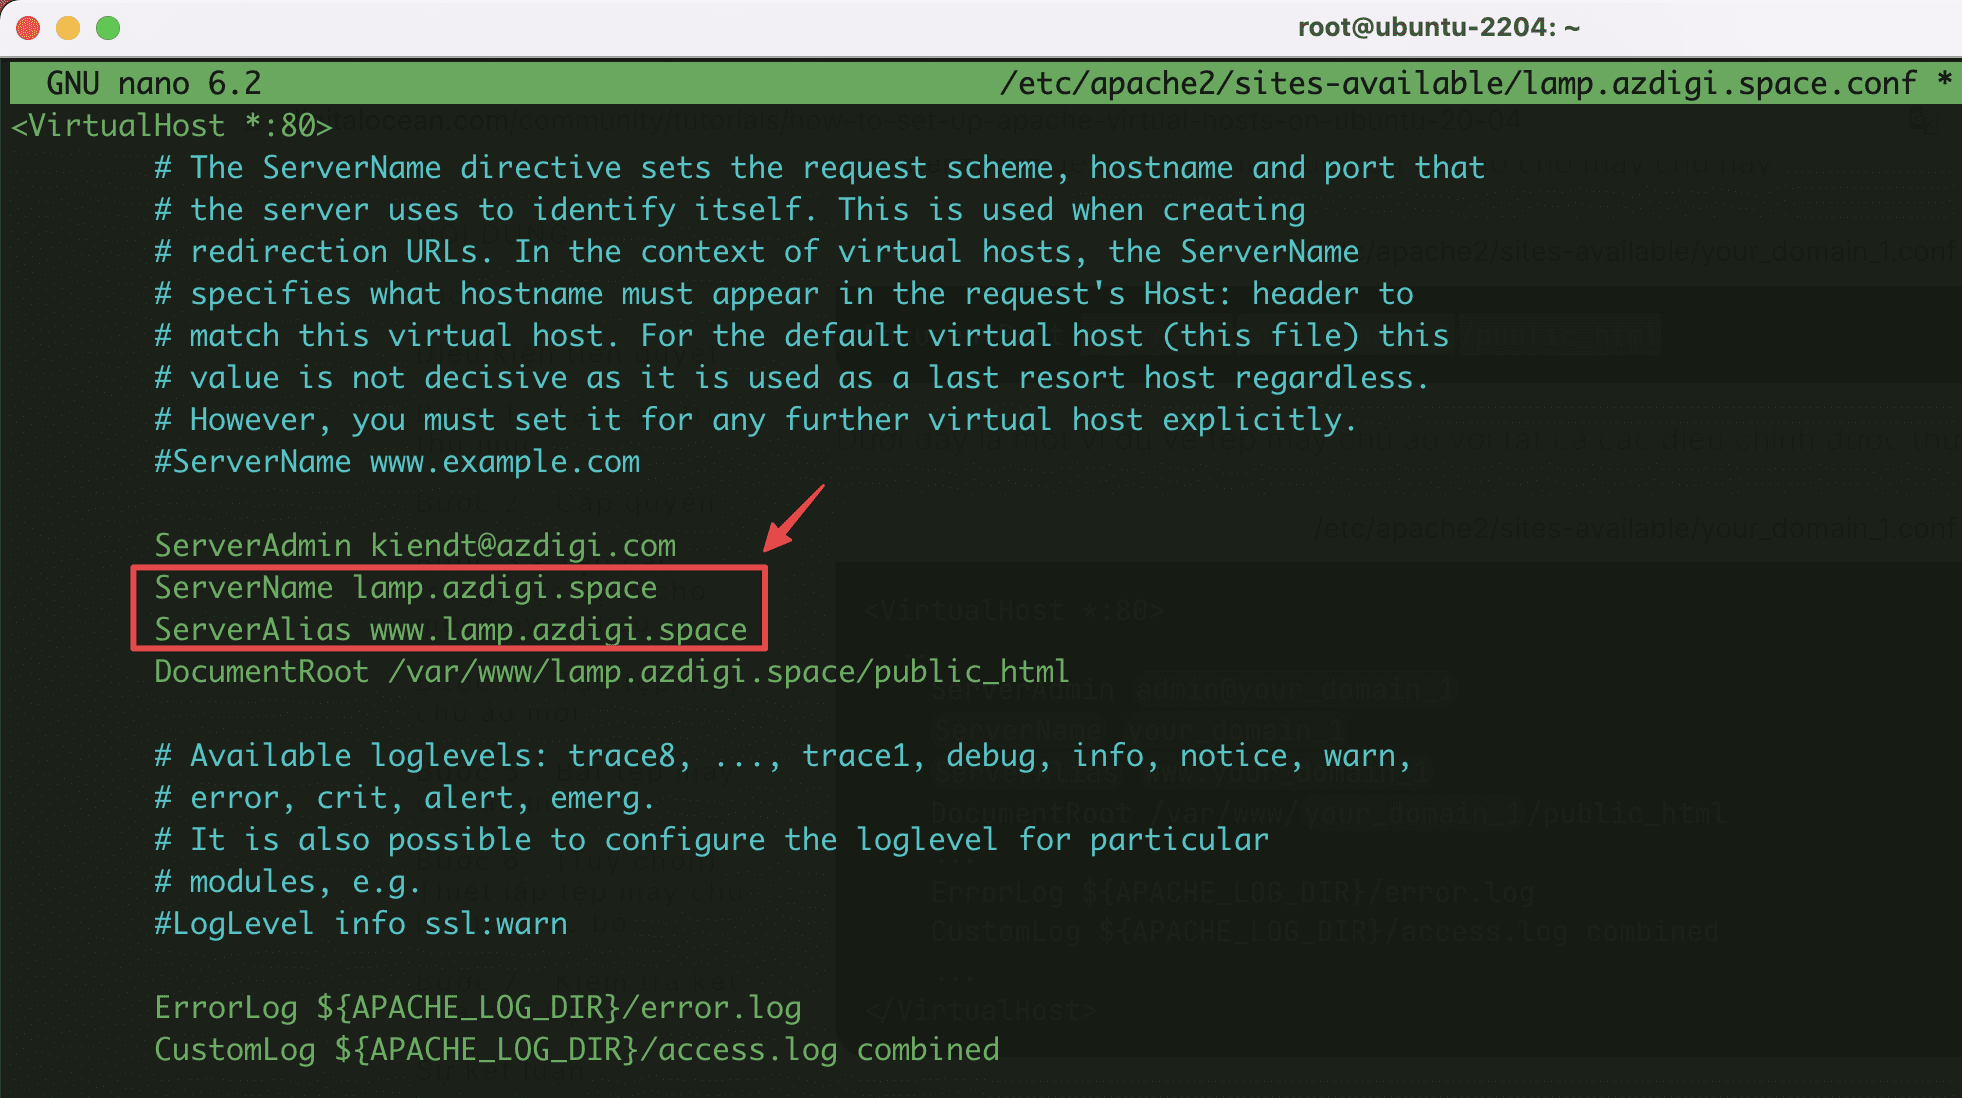
sudo nano /etc/apache2/sites-available/lamp.azdigi.space.conf
Next, you add the content below:
    ServerName lamp.azdigi.space
    ServerAlias www.lamp.azdigi.space
Then you edit the 2 lines below into the email information and website path created earlier (Step 2: Create a folder to save the website)
ServerAdmin kiendt@azdigi.com
DocumentRoot /var/www/lamp.azdigi.space/public_html- Activate the new Virtual Host configuration
sudo a2ensite lamp.azdigi.space.conf

- Disable default Virtual Host configuration and restart Apache
sudo a2dissite 000-default.conf
sudo apache2ctl configtest
sudo systemctl restart apache2

Step 4: Install SSL for the website
To make your website secure and look more professional, you should install SSL. And I will install SSL through the Cerbot automated tool with the following commands:
- Install Cerbot Apache
sudo apt install -y certbot python3-certbot-apache
- Allow ‘Apache Full’ through the firewall to use both HTTP & HTTPS
sudo ufw allow 'Apache Full'
- Install SSL for website
sudo certbot --apache -d lamp.azdigi.space
root@ubuntu-2204:~# sudo certbot --apache -d lamp.azdigi.space
Saving debug log to /var/log/letsencrypt/letsencrypt.log
Enter email address (used for urgent renewal and security notices)
 (Enter 'c' to cancel): kiendt@azdigi.com          (Nhập email của bạn)

- - - - - - - - - - - - - - - - - - - - - - - - - - - - - - - - - - - - - - - -
Please read the Terms of Service at
https://letsencrypt.org/documents/LE-SA-v1.2-November-15-2017.pdf. You must
agree in order to register with the ACME server. Do you agree?
- - - - - - - - - - - - - - - - - - - - - - - - - - - - - - - - - - - - - - - -
(Y)es/(N)o: Y                   (Nhấn y để đồng ý các điều khoản)

- - - - - - - - - - - - - - - - - - - - - - - - - - - - - - - - - - - - - - - -
Would you be willing, once your first certificate is successfully issued, to
share your email address with the Electronic Frontier Foundation, a founding
partner of the Let's Encrypt project and the non-profit organization that
develops Certbot? We'd like to send you email about our work encrypting the web,
EFF news, campaigns, and ways to support digital freedom.
- - - - - - - - - - - - - - - - - - - - - - - - - - - - - - - - - - - - - - - -
(Y)es/(N)o: N                   (Nhận các thông tin khác từ Let's Encrypt)
Account registered.
Requesting a certificate for lamp.azdigi.space

Successfully received certificate.
Certificate is saved at: /etc/letsencrypt/live/lamp.azdigi.space/fullchain.pem
Key is saved at:         /etc/letsencrypt/live/lamp.azdigi.space/privkey.pem
This certificate expires on 2022-08-19.
These files will be updated when the certificate renews.
Certbot has set up a scheduled task to automatically renew this certificate in the background.

Deploying certificate
Deploying certificate
Successfully deployed certificate for lamp.azdigi.space to /etc/apache2/sites-available/lamp.azdigi.space-le-ssl.conf
Congratulations! You have successfully enabled HTTPS on https://lamp.azdigi.space
Step 5: Check website activity
After the configuration is complete, you can go to the browser and access the previously configured domain name to check. If the screen displays the content below, it is already successful.

If you want to install WordPress, you can refer to the tutorial: Creating a WordPress website with LEMP on Ubuntu 22.04. You can follow the steps to manually create a WordPress website.
Above are all the steps to add a website to the LAMP Stack on Ubuntu 22.04 server. Hope this article is helpful to you and wish you success.
You can refer to other user manuals at the link below
If you need support, you can contact support in the ways below:
- Hotline 247: 028 888 24768 (Ext 0)
- Ticket/Email: You use the email to register for the service and send it directly to: support@azdigi.com

