Nội dung
Hướng dẫn cài đặt Nginx Proxy Apache 2.4.6
I. Giới Thiệu
Để tìm hiểu về cài đặt Nginx và Apache bạn tham khảo về cài LEMP và LAMP thực hiện nhé.
Trong bài viết cài đặt NGINX proxy cho Apache này sẽ kết hợp cả hai lại để tạo ra webserver NGINX proxy apache
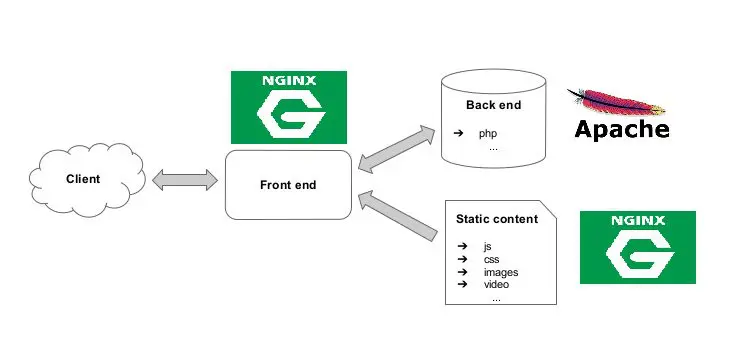
Nginx webserver hoạt động đa nhiệm nên có thể sử dụng kết hợp cùng với apache hoạt động song song cùng với nhau.
Tuy nhiên mỗi webserver đều có ưu nhược điểm riêng để hỗ trợ cho nhau. Tùy thuộc vào nhu cầu của người sử dụng để chọn ra giải pháp để có một Webserver phù nhất với source code của mình để có kết quả hoạt động tốt nhất.
Với vai trò làm front end xử lý các file tĩnh thì Nginx đứng trước nhận requset, còn Apache xử lý phía back end.
Vì thế mình có thể tận dụng ưu điểm của cả Apache và Nginx bằng cách kết hợp chúng với nhau thành webserver nginx proxy apache
II. Hướng dẫn cài đặt Nginx proxy apache
Bước 1: Kiểm tra tắt firewalld và selinux và package
Đầu tiên bạn hãy vô hiệu firewalld như sau.
systemctl disable firewalld
systemctl stop firewalld
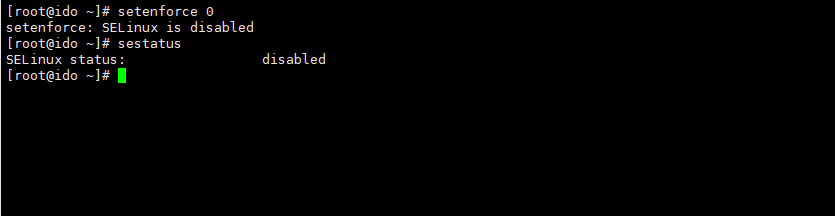
Bạn có thể hướng dẫn tắt selinux
sed -i 's/SELINUX=enforcing/SELINUX=disabled/g' /etc/sysconfig/selinux
sed -i 's/SELINUX=enforcing/SELINUX=disabled/g'  /etc/selinux/config

# Kiểm tra status selinux đã disabled hoàn tắt nếu chưa cần reboot lại VPS
setenforce 0
sestatus
Cài đặt các package hỗ trợ nginx
yum groupinstall " Development Tools"  -y
yum install zlib-devel pcre-devel openssl-devel wget -y
yum install epel-release -y
Bước 2 Cài Đặt Nginx
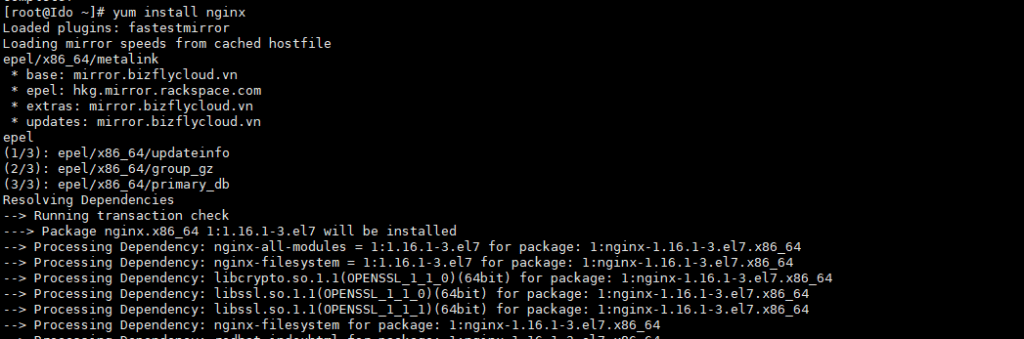
Tiến hành cài đặt NGINX, ở bài viết này mình sử dụng lệnh yum để cài đặt NGINX tự động
yum install nginx -y
Sau khi cài đặt hoàn tất NGINX bạn hãy mở file cấu hình nginx.conf tại /etc/nginx/nginx.conf. Bạn hãy copy các đoạn bên dưới sau đó dán vào file.
worker_processes auto;
pid /var/run/nginx.pid;

events {
        worker_connections  8096;
		multi_accept        on;
		use                 epoll;
}

http {

log_format  main  '$remote_addr - $remote_user [$time_local] "$request" '
                      '$status $body_bytes_sent "$http_referer" '
                      '"$http_user_agent" "$http_x_forwarded_for"';

        access_log /var/log/nginx/access.log main;

server {
         listen       80 default_server;
         listen       [::]:80 default_server;
         server_name  _;
         root         /var/www/html;

         location / {
         }

         error_page 404 /404.html;
         location = /404.html {
         }

         error_page 500 502 503 504 /50x.html;
         location = /50x.html {
         }
        }


        sendfile on;
        tcp_nopush on;
        tcp_nodelay on;
        keepalive_timeout 65;
        types_hash_max_size 2048;

        include /etc/nginx/mime.types;
        default_type application/octet-stream;

        access_log /var/log/nginx/access.log;
        error_log /var/log/nginx/error.log;

        gzip on;
        gzip_disable "msie6";
        gzip_min_length  1100;
        gzip_buffers  4 32k;
        gzip_types    text/plain application/x-javascript text/xml text/css;

 # File Cache Settings
        open_file_cache          max=10000 inactive=10m;
        open_file_cache_valid    2m;
        open_file_cache_min_uses 2;
        open_file_cache_errors   on;

	server_names_hash_bucket_size 64;
        ignore_invalid_headers on;
        client_max_body_size    8m;
        client_header_timeout  3m;
        client_body_timeout 3m;
        send_timeout     3m;
        connection_pool_size  256;
        client_header_buffer_size 4k;
        large_client_header_buffers 4 32k;
        request_pool_size  4k;
        output_buffers   4 32k;
        postpone_output  1460;

## Enable caching of SSL sessions
        ssl_session_cache shared:SSL:10m;
	ssl_session_timeout 10m;
	ssl_ciphers HIGH:!aNULL:!MD5;
	ssl_protocols TLSv1 TLSv1.1 TLSv1.2;
	ssl_prefer_server_ciphers on;

        include /etc/nginx/conf.d/*.conf;
        include /etc/nginx/sites-enabled/*.conf;
}
Để chắn chắc file cấu hình không bị lỗi trước khi khởi động dịch vụ, bạn sử dụng lệnh nginx -t để test file cấu hình. Nếu hiện dòng successful có nghĩa file cấu hình đã đúng và bạn hãy thực hiện đếnc ác bước tiếp theo.

Kích hoạt và khởi động NGINX cùng hệ thống
systemctl start nginx
systemctl enable nginx
systemctl status nginx
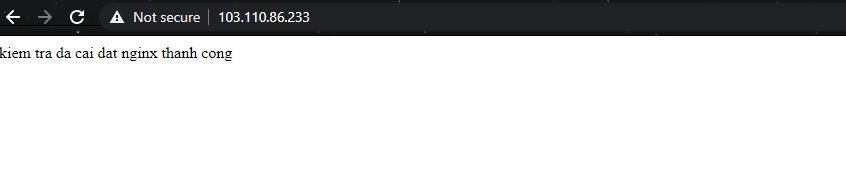
Sau khi cài đặt để kiểm tra nhanh vào /var/www/html tạo một file index.html để kiểm tra xem cơ bản nginx đã hoạt động hay chưa.
Bạn copy và dán vào cửa sổ Terminal với lệnh sau
echo "kiem tra da cai dat nginx thanh cong" > /var/www/html/index.html

Bước 3 Cài Đặt Apache
Bước tiếp theo bạn hãy cài đặt Apache với lệnh sau. Mình cũng sẽ sử dụng lệnh YUM để cài đặt tự động apache.
yum install httpd
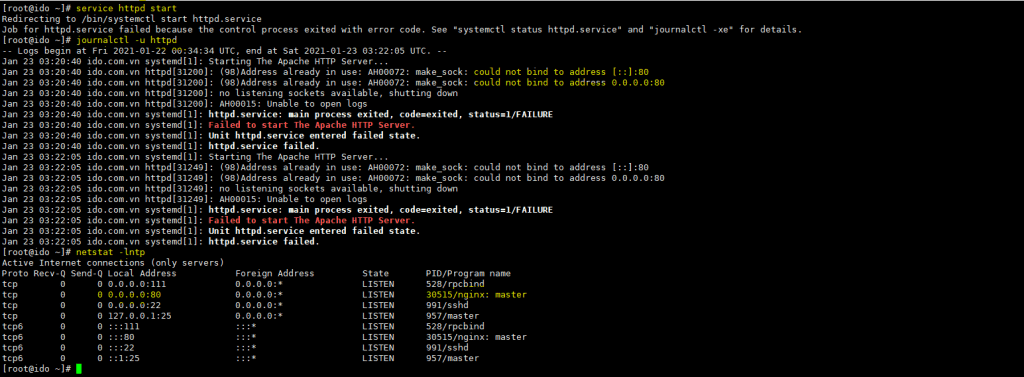
Sau khi cài đặt httpd thành công thì httpd không thể hoạt động khi start lên vì trùng port 80 với nginx bạn có xem lỗi ảnh minh hoạ thực tế bên dưới
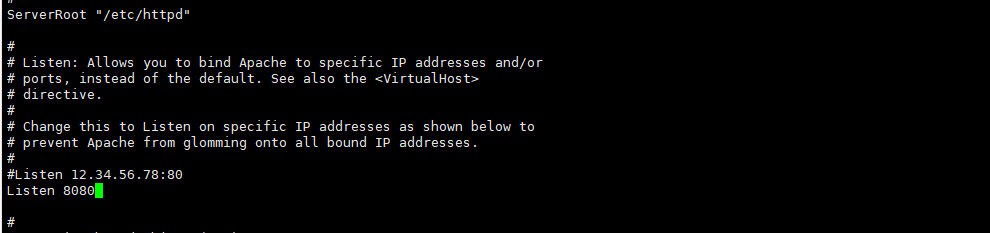
Vì thế mình đi tiến hành đổi port httpd để có thể start httpd lên được. Ở đây mình sẽ đổi port httpd từ 80 thành 8080 như sau.
vi /etc/httpd/conf/httpd.conf
sed -i 's/Listen 80/Listen 8080/g' /etc/httpd/conf/httpd.conf
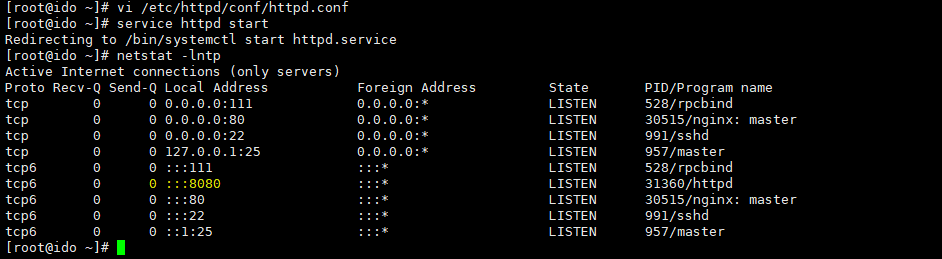
Sau khi chỉnh sửa thành công port 8080 bạn save lại tiến hành start httpd các câu lệnh bên dưới.
systemctl start httpd
systemctl enable httpd
systemctl status httpd
Sau khi cài đặt nginx và http hoạt động thành công rồi tiến hành tạo vhost cho nginx và httpd. Nếu bạn sử dụng domain và test online thì trước tiên doamin cần trỏ về IP của VPS hoặc nếu bạn test local thì bạn cần trỏ file hosts để kiểm tra thực tế.
Đầu tiên mình tạo vhost cho nginx đúng đường dẫn đã khai báo ở nginx.conf là include /etc/nginx/sites-enabled/*.conf;
cd  /etc/nginx/sites-enabled/
vi kienthuclinux.info.conf
Sau đó bạn hãy copy toàn bộ cấu hình bên dưới vào file my-doamin.conf
server {
        listen    80;
        server_name  kienthuclinux.info www.kienthuclinux.info;
        access_log off;
        error_log  /var/log/httpd/kienthuclinux.info-error_log crit;

location ~* .(gif|jpg|jpeg|png|ico|wmv|3gp|avi|mpg|mpeg|mp4|flv|mp3|mid|js|css|html|htm|wml)$ {
        root /var/www/html/kienthuclinux.info;
        expires 30d;
        }

location / {
        client_max_body_size    10m;
        client_body_buffer_size 128k;

        proxy_send_timeout   90;
        proxy_read_timeout   90;
        proxy_buffer_size    128k;
        proxy_buffers     4 256k;
        proxy_busy_buffers_size 256k;
        proxy_temp_file_write_size 256k;
        proxy_connect_timeout 30s;

        proxy_redirect  http://www.kienthuclinux.info:8080   http://www.kienthuclinux.info;
        proxy_redirect  http://kienthuclinux.info:8080   http://kienthuclinux.info;

        proxy_pass   http://127.0.0.1:8080/;

        proxy_set_header   Host   $host;
        proxy_set_header   X-Real-IP  $remote_addr;
        proxy_set_header   X-Forwarded-For $proxy_add_x_forwarded_for;
        }
}
Sau khi đã tạo lập vhost thành công đi kiểm tra các đường dẫn đã khai báo đã có chưa, chưa có đi tạo mới như sau.
mkdir -p /var/www/html/kienthuclinux.info
touch  /var/log/httpd/kienthuclinux.info-error_log
Để chắn chắn không lỗi cú pháp bạn sử dụng lệnh test nginx - để kiểm tra lại lần cuối xem có bị lỗi systax khi tạo vhost hay không.
nginx -t
systemctl reload nginx
Tiến hành đi tạo vhost cho httpd với lệnh sau
cd /etc/httpd/conf.d/
vi kienthuclinux.info.conf
<VirtualHost *:8080>
ServerAdmin adminr@kienthuclinux.info
    DocumentRoot /var/www/html/kienthuclinux.info
    ServerName kienthuclinux.info
    ServerAlias www.kienthuclinux.info
    <Directory "/var/www/html/kienthuclinux.info">
               AllowOverride All
               Order allow,deny
               Allow from all
    </Directory>
       RewriteEngine on
    ErrorLog logs/kienthuclinux.info-error_log
    CustomLog logs/kienthuclinux.info-access_log common
# config log /etc/httpd/logs/*
</VirtualHost>
Sau khi đã tạo vhost httpd thành công, cũng phải đi kiểm tra lại xem có lỗi gì không với lệnh httpd -t
httpd -t
systemctl reload httpd
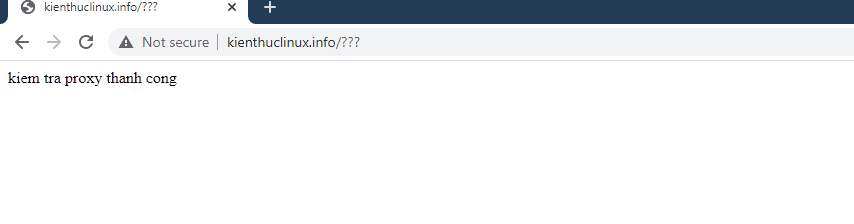
cd /var/www/html/kienthuclinux.info
echo "kiem tra proxy thanh cong"> index.html
Tiến hành truy cập bằng domain kiểm tra lại kết quả
Bước 4 Cài đặt PHP-FPM và các Module
Để chạy được php-fpm thì bạn cần thực hiện cài đặt với các bước như sau.
yum -y install yum-utils -y
rpm -Uvh http://rpms.remirepo.net/enterprise/remi-release-7.rpm
yum -y update

yum-config-manager --enable remi-php73
yum -y install php php-fpm php-ldap php-zip php-embedded php-cli php-mysql php-common php-gd php-xml php-mbstring php-mcrypt php-pdo php-soap php-json php-simplexml php-process php-curl php-bcmath php-snmp php-pspell php-gmp php-intl php-imap perl-LWP-Protocol-https php-pear-Net-SMTP php-enchant php-pear php-devel php-zlib php-xmlrpc php-tidy php-mysqlnd php-opcache php-cli php-pecl-zip unzip gcc
Tiếp đến bạn hãy cấu hình php-fpm cho httpd để hoạt động.
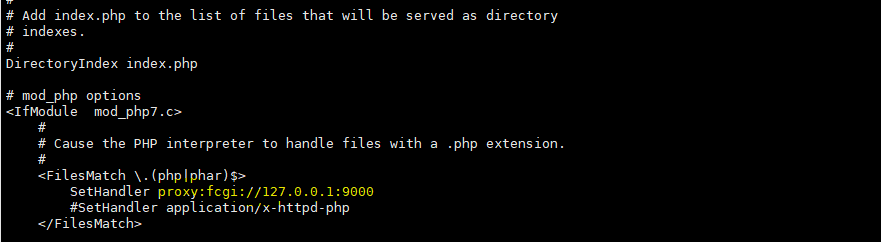
vi /etc/httpd/conf.d/php.conf
SetHandler application/x-httpd-php
sửa thành
SetHandler proxy:fcgi://127.0.0.1:9000
Điều chỉnh một số config php cơ bản file php.ini như sau:
Nếu bạn chưa biết vị trí file php.ini bạn có thể sử dụng lệnh sau để tìm kiếm. Khi nhập xong bạn xem dòng Loader để xác định vị trí của file.
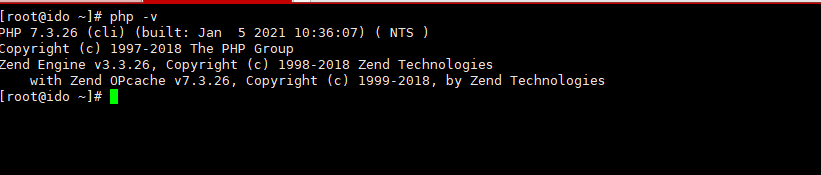
php -i | grep php.ini

Sau đó bạn mở file /etc/php.ini và điều chỉnh lại như sau.
;date.timezone =
expose_php = On
short_open_tag = Off
;max_input_vars = 1000
disable_functions =
upload_max_filesize = 2M
max_execution_time = 30
max_input_time = 60

##Sửa thành

max_input_time = 600
max_execution_time = 300
date.timezone = Asia/Ho_Chi_Minh
upload_max_filesize = 1024M
expose_php = Off
short_open_tag = On
max_input_vars = 3000
disable_functions = exec,system,passthru,shell_exec,proc_close,proc_open,dl,popen,show_source,posix_kill,posix_mkfifo,posix_getpwuid,posix_setpgid,posix_setsid,posix_setuid,posix_setgid,posix_seteuid,posix_setegid,posix_uname
;==> một số functions không sử dụng mình tắt đi để tăng độ bảo mật cho webserver.
Sau khi đã thiết lập thành công php-fpm bạn thực thực hiện restart lại các service nhận config mới.
systemctl start php-fpm
systemctl enable php-fpm
systemctl reload httpd
Để kiểm tra php-fpm đã hoạt động chưa tạo file php.info để kiểm tra
cd /var/www/html/kienthuclinux.info
echo "<?php phpinfo(); phpinfo(INFO_MODULES); ?>" > info.php
Đã tạo thành công file php.info truy cập kiểm tra lại như hình

III. Tổng kết
Qua bài hướng dẫn cài đặt Nginx Proxy Apache 2.4.6 hy vọng bài viết này sẽ giúp bạn xây dựng một máy chủ mạnh mẽ và hoạt động tốt cho các website của bạn.
Nếu các bạn cần hỗ trợ các bạn có thể liên hệ bộ phận hỗ trợ theo các cách bên dưới:
- Hotline 247: 028 888 24768 (Ext 0)
- Ticket/Email: Bạn dùng email đăng ký dịch vụ gửi trực tiếp về: support@azdigi.com.