In part 3, we went through the anatomy of a Helm chart: Chart.yaml, values.yaml, templates/ and the charts/ directory. This part moves into the more interesting area: the template rendering engine. This is where Helm becomes powerful, and also where many people get stuck when they first meet Go templating.
If you have opened a Helm Deployment file and seen a wall of {{ }}, if, range, and include, that is normal. Helm is not difficult because of YAML alone. It gets tricky because YAML is mixed with rendering logic, value merging, and template scope. Once these pieces make sense, reading other people’s charts is much easier, and writing your own chart stops feeling like debugging whitespace for half an afternoon.
- Built-in objects in Helm
- Common template functions
- Values precedence
- Lab: render a small chart
- A practical debugging workflow
- include, template, and named templates
- Best practices for organizing templates
- FAQ
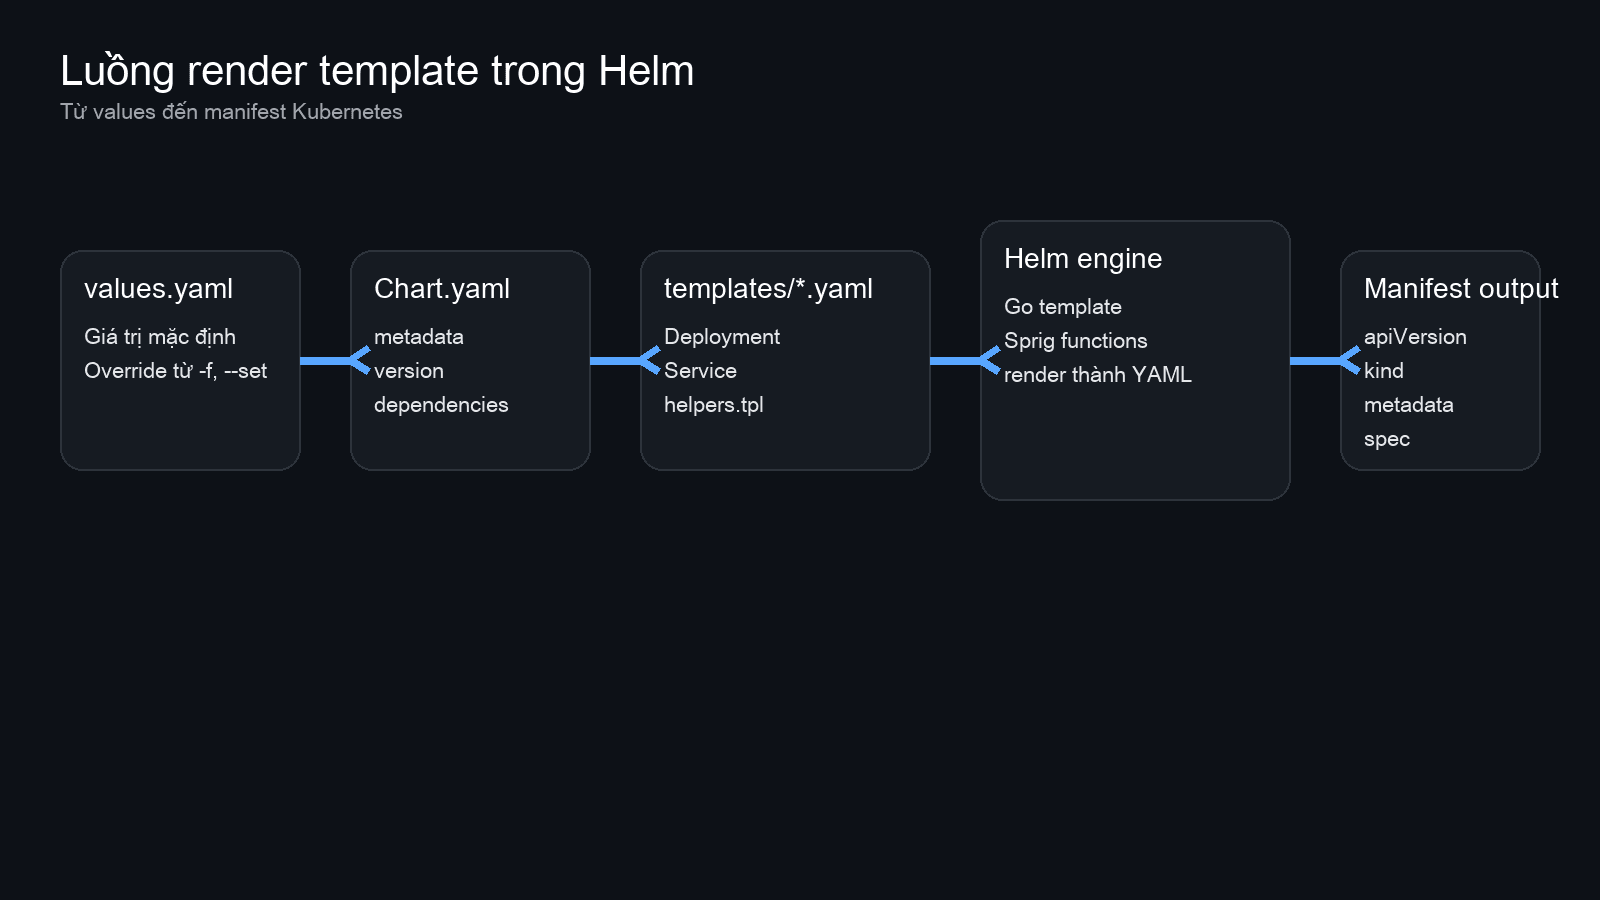
Built-in objects in Helm: where template data comes from
When Helm renders files inside templates/, it injects a context that contains several built-in objects. The most important one is .Values, but there are also .Chart, .Release, .Template, and .Capabilities. These explain why the same chart can render different output on a different cluster or under a different release name.
.Values
This is the object you will use most. It contains all values after Helm merges the chart’s values.yaml, parent chart values, files passed with -f, and flags such as --set. In practice, this is the configuration data available during rendering.
# values.yaml
image:
  repository: nginx
  tag: "1.27.0"
service:
  type: ClusterIP
  port: 80
# templates/deployment.yaml
image: "{{ .Values.image.repository }}:{{ .Values.image.tag }}".Chart
This object reads data from Chart.yaml. It is useful when you want to place the chart name, version, or appVersion into labels and annotations, so rendered manifests can still be traced back to the chart package.
labels:
  helm.sh/chart: "{{ .Chart.Name }}-{{ .Chart.Version }}"
  app.kubernetes.io/version: {{ .Chart.AppVersion | quote }}
.Release
.Release contains information about the current installation, such as .Release.Name, .Release.Namespace, and .Release.Service. This is often used to generate resource names, labels, and namespace-specific settings.
metadata:
  name: "{{ .Release.Name }}-web"
  namespace: {{ .Release.Namespace }}
.Template
This object tells you which template file is currently being rendered. Not every chart uses it, but it can be handy for annotations or debugging output.
annotations:
  rendered-from: {{ .Template.Name | quote }}
.Capabilities
Many beginners ignore this object at first. It lets the chart inspect supported Kubernetes API versions and cluster capabilities, so templates can render different output depending on the target environment.
{{- if .Capabilities.APIVersions.Has "networking.k8s.io/v1/Ingress" }}
apiVersion: networking.k8s.io/v1
{{- else }}
apiVersion: networking.k8s.io/v1beta1
{{- end }}
ℹ️ The easiest thing to miss here is template scope. Inside with and range, the dot . can point to a new context. If you need the root context again, use $.
Common template functions: shorter templates, fewer mistakes

Helm uses Go templates and adds many functions from Sprig. You do not need all of them. A small set covers most real-world chart work.
default
This function returns a fallback value when the value on the left is empty or missing. It is useful for optional fields.
spec:
  type: {{ .Values.service.type | default "ClusterIP" }}
quote
Use quote to force output into a quoted string. This helps avoid YAML surprises with versions, booleans, or values containing special characters.
env:
  - name: APP_VERSION
    value: {{ .Chart.AppVersion | quote }}
nindent and toYaml
These two usually go together. toYaml converts a map or list into YAML. nindent adds a newline and the correct indentation. Without them, resources, tolerations, and similar blocks often break on whitespace.
resources:
{{- toYaml .Values.resources | nindent 2 }}
if/else
Use this to conditionally render a block. For example, only create an Ingress when ingress.enabled is true.
{{- if .Values.ingress.enabled }}
apiVersion: networking.k8s.io/v1
kind: Ingress
{{- else }}
# ingress is disabled
{{- end }}
with
with shortens access to a nested object and skips the block if the value is empty. The main thing to remember is that . changes inside the block.
{{- with .Values.resources }}
resources:
{{- toYaml . | nindent 2 }}
{{- end }}
range
Use range to loop through a list or map. You will see it for env vars, ports, hosts, volumes, and many repeated blocks.
env:
{{- range .Values.env }}
  - name: {{ .name | quote }}
    value: {{ .value | quote }}
{{- end }}
Values precedence: which value wins?
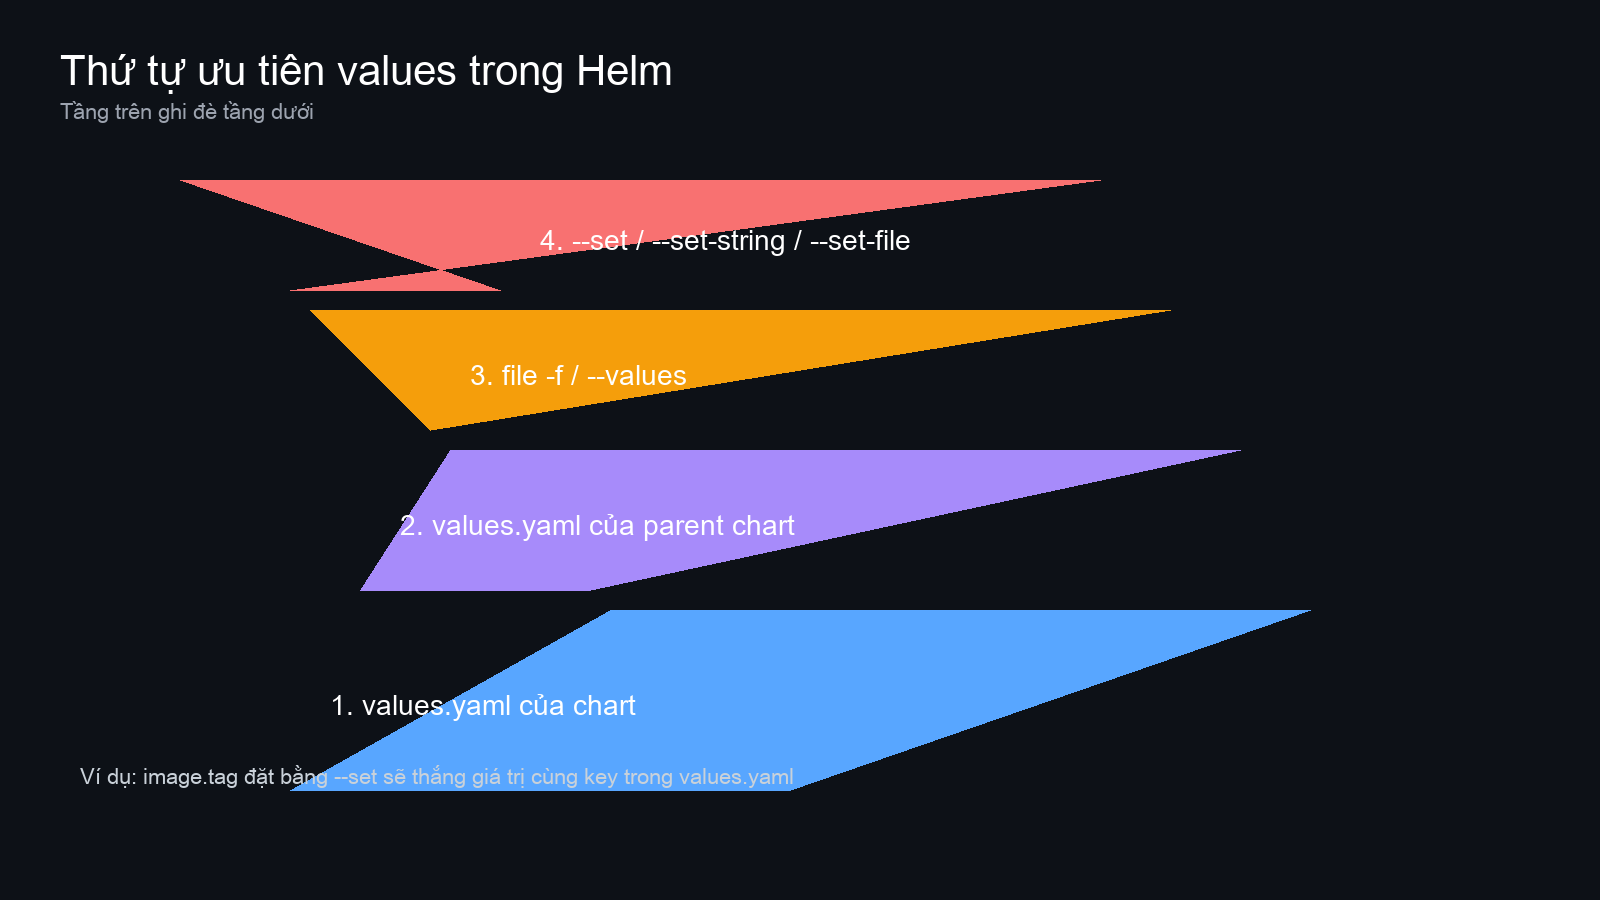
When the rendered value is different from what you expected, precedence is often the reason. Helm merges values from low priority to high priority in this order:
values.yamlfrom the chartvalues.yamlfrom the parent chart if this is a subchart- files passed with
-for--values - flags passed with
--set,--set-string, or--set-file
Later layers override earlier ones. If the chart defaults to ClusterIP and you run the command below, service.type ends up as LoadBalancer.
helm install demo ./mychart \
  -f values-prod.yaml \
  --set service.type=LoadBalancer
The file still matters for other keys, but the key touched by --set is overridden by the CLI flag.
💡 In CI/CD, it is usually cleaner to keep larger configuration in -f files and reserve --set for short values such as an image tag or a feature switch.
Lab: render a small chart and watch the data flow
This lab uses Helm 3.15 on macOS and a very small demo chart. The goal is not a real deployment. The goal is to see rendering clearly.
helm create demo-web
cd demo-web
rm -f templates/tests/test-connection.yaml
Replace values.yaml with a shorter version:
replicaCount: 2
image:
  repository: nginx
  tag: "1.27.0"
  pullPolicy: IfNotPresent
service:
  type: ClusterIP
  port: 80
env:
  - name: LOG_LEVEL
    value: info
  - name: APP_MODE
    value: demo
resources:
  limits:
    cpu: 250m
    memory: 256Mi
  requests:
    cpu: 100m
    memory: 128Mi
Then update templates/deployment.yaml so it uses the functions from this article:
containers:
  - name: {{ .Chart.Name }}
    image: "{{ .Values.image.repository }}:{{ .Values.image.tag | default .Chart.AppVersion }}"
    imagePullPolicy: {{ .Values.image.pullPolicy }}
    env:
{{- range .Values.env }}
      - name: {{ .name | quote }}
        value: {{ .value | quote }}
{{- end }}
    resources:
{{- toYaml .Values.resources | nindent 6 }}
Render it:
helm template demo ./In the output, the {{ }} expressions are gone and replaced by plain YAML. Kubernetes never sees Helm templates directly. It only sees the final rendered manifests. That matters when you debug: either the template rendered badly, or the rendered manifest is valid YAML but invalid for Kubernetes.
A debugging workflow that works in practice
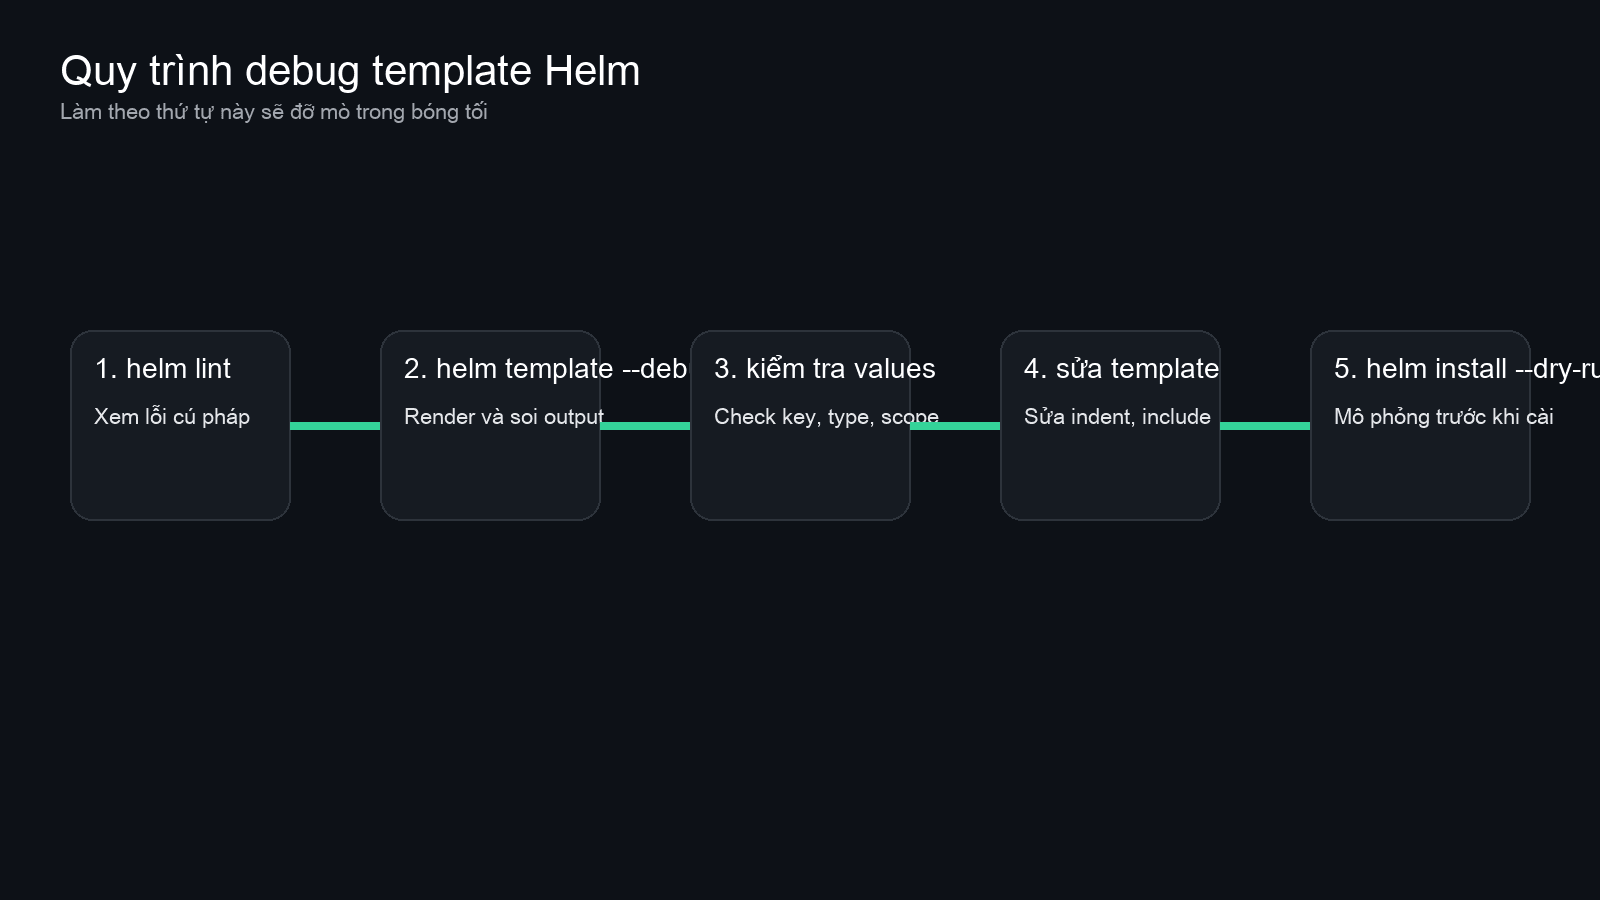
When a chart breaks, the fastest path is to debug layer by layer.
1) Run helm lint first
helm lint ./demo-webThis catches a lot of chart-level problems quickly.
2) Render with helm template –debug
helm template demo ./demo-web --debugThis shows the final YAML output and extra debug details, which is usually enough to spot indentation issues and missing fields.
3) Verify the actual values in use
Sometimes the template is fine. The input data is not. A value may be a string when the chart expects a map, or the key path may be different from what the template references.
4) Check scope in with and range
This is a classic source of trouble. Inside range .Values.env, the dot points to each env item. If you want the root release name there, use $.Release.Name.
{{- range .Values.env }}
- name: {{ .name | quote }}
  value: {{ .value | quote }}
  # use $ to access the root context
  # release: {{ $.Release.Name | quote }}
{{- end }}
5) Use dry-run before a real install
helm install demo ./demo-web --dry-run --debugThis gets closer to a real install and is helpful when chart behavior depends on release metadata or install flow.
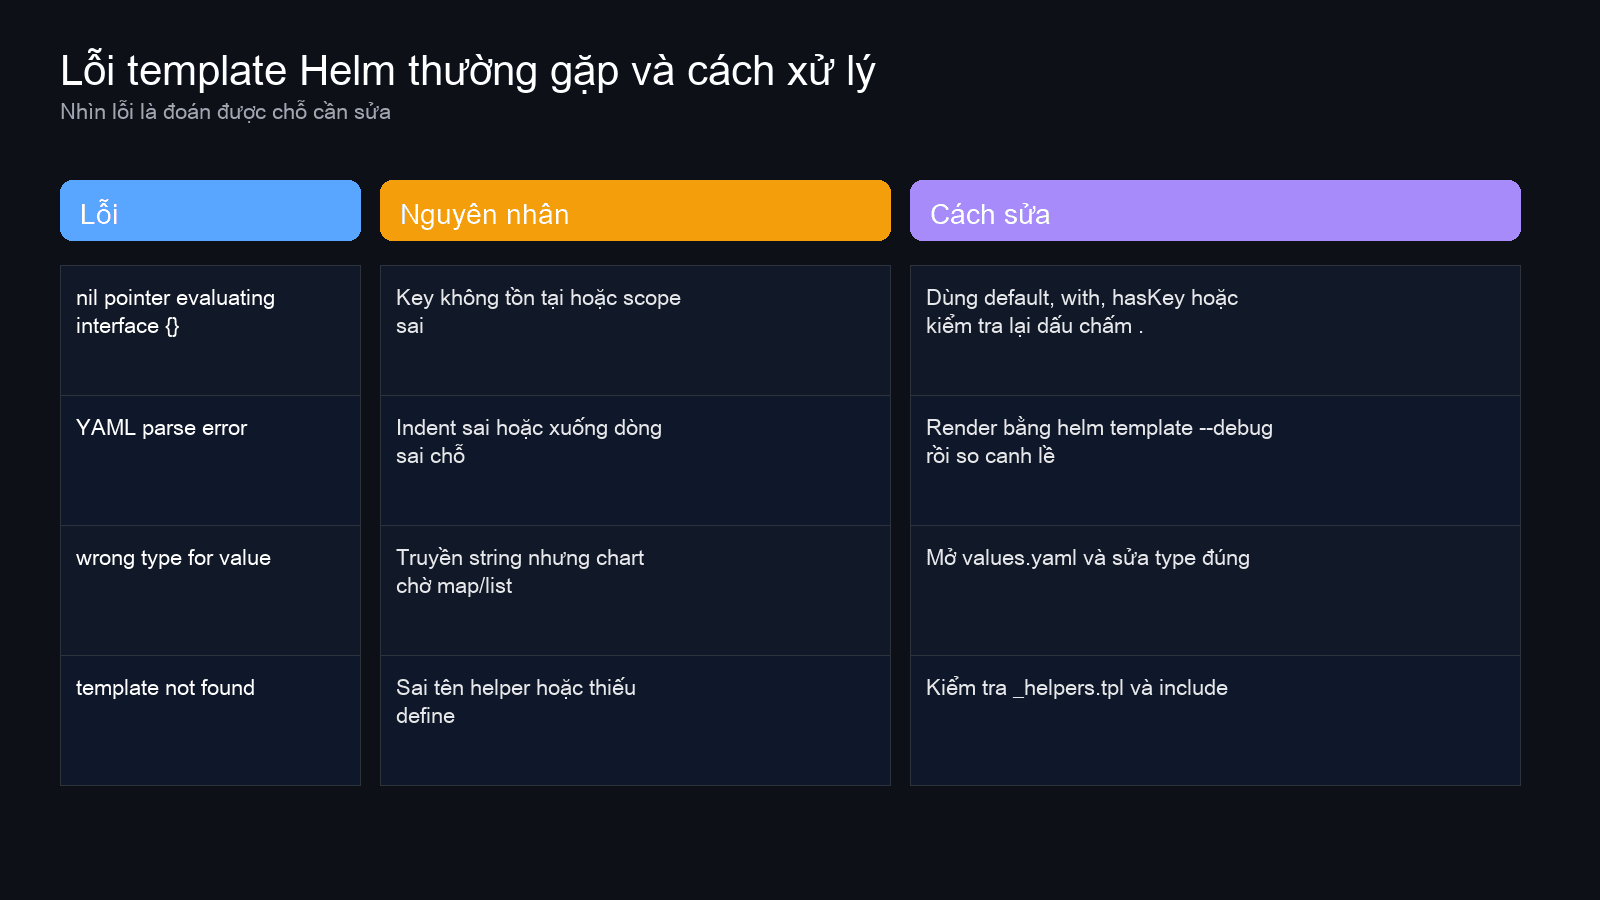
Common errors you will see
- nil pointer evaluating interface {}: usually a missing key or the wrong scope.
- YAML parse error: often caused by bad indentation after
toYaml,nindent, or conditional blocks. - wrong type for value: the chart expects a map or list, but the value is passed as a string.
- template not found: wrong helper name in
includeor missingdefine.
A little further: include, template, and named templates
As a chart grows, repeating the same labels, fullname logic, or selector blocks everywhere becomes painful. That is why named templates exist, usually in templates/_helpers.tpl.
{{- define "demo-web.labels" -}}
app.kubernetes.io/name: {{ .Chart.Name }}
app.kubernetes.io/instance: {{ .Release.Name }}
helm.sh/chart: {{ .Chart.Name }}-{{ .Chart.Version }}
{{- end -}}
Then reuse it elsewhere with include:
metadata:
  labels:
{{ include "demo-web.labels" . | nindent 4 }}
include is often more flexible than template because it returns a string, so you can pipe it into nindent, trim, and other functions.
⚠️ Prefix named template names with the chart namespace, such as demo-web.labels, instead of using generic names like labels.
Best practices for cleaner and more debuggable templates
- Move shared helpers into
_helpers.tplinstead of copying blocks everywhere. - Keep
values.yamlreadable and structured. Deep nesting is easy to mistype. - Use
defaultfor optional fields, but do not hide important configuration mistakes. - Prefer
include ... | nindentfor multiline YAML blocks. - If a section is optional, wrap it once with a clean condition instead of scattering many tiny conditions.
- Name helpers consistently, for example
mychart.fullnameandmychart.labels. - Run
helm templatewhenever you make meaningful template changes. - Use
.Capabilitiesfor Kubernetes version compatibility instead of hardcoding an API version.
If part 3 helped you read chart structure, this part helps you read chart behavior during rendering. In part 5, the series moves to a more practical area: public charts, repositories, and how to override values safely when you deploy an existing chart. You can preview it here: part 5 of the series.
FAQ about Helm template debugging
When should I use helm lint and when should I use helm template –debug?
Use helm lint for a quick chart-level check. Use helm template --debug when you need to inspect the rendered YAML in detail. In practice, running both is a good habit.
Why does a chart render successfully but still fail when applied to the cluster?
Because Helm only renders templates. Kubernetes validates and applies the manifest afterward. A rendered manifest can be valid YAML but still invalid for the resource schema or API version supported by the cluster.
How should I approach nil pointer errors?
Check whether the key exists, whether the value type is correct, and whether the current dot context is what you think it is. Many nil pointer errors happen inside range or with because the scope changed.
What is the difference between include and template?
include returns a string, which makes it easier to pipe into nindent or other functions. template renders directly. For multiline YAML, include is often the cleaner choice.
Should I put a lot of logic into Helm templates?
Usually no. Templates should stay flexible, but if logic becomes too dense, the chart gets harder to read, debug, and maintain. Clean values and small helpers are often better than turning the template into a mini programming language.
Helm is powerful because it standardizes and reuses Kubernetes manifests. To use that power well, you need to understand what the templating engine is actually doing. Once .Values, default, toYaml, range, include, and the debugging workflow become familiar, other people’s charts are much easier to work with.
You might also like
- Deploying applications from public repositories: Bitnami, Artifact Hub, and best practices (Part 5/12)
- Umbrella chart vs microservices strategy: When should you use each one? (Part 11/12)
- What is Claude Code Agent Teams? How to coordinate multiple AI agents in parallel
- What is Gemma 4? Google most powerful open AI model running from phones to servers
- Crawled Currently Not Indexed and How to Fix It in Search Console
- How to Deploy Laravel to Coolify from Local to Server with Basic CI/CD
About the author

Trần Thắng
Expert at AZDIGI with years of experience in web hosting and system administration.