The final article in the series, summarizing best practices for production, how to troubleshoot common errors, and comparing Coolify costs vs cloud platforms.
📖 Previous article: Part 11, Multi-Server & Scaling
I. Backup Coolify
Coolify stores all config and data in /data/coolify/. Backup regularly!
Backup .env (most important)
# .env file contains all secrets
cat /data/coolify/source/.env
# Backup to a safe place (password manager, another machine)
scp /data/coolify/source/.env user@backup-server:/backups/coolify/.env
🚨 Losing the .env file = losing Coolify access. Backup right after installation and store in a safe place outside the server!
Backup entire /data/coolify
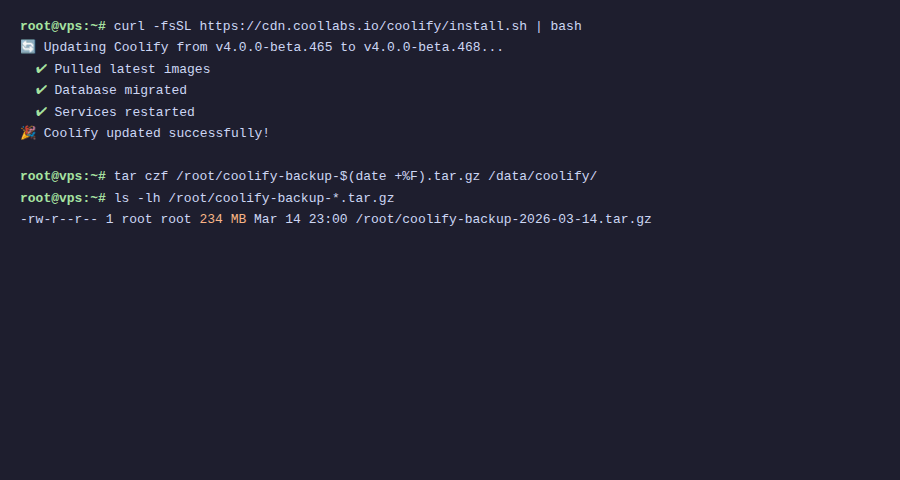
# Full backup (config, databases, volumes)
tar czf /tmp/coolify-backup-$(date +%Y%m%d).tar.gz /data/coolify/
# Or rsync to backup server
rsync -avz /data/coolify/ backup-server:/backups/coolify/
II. Update Coolify
Auto update
Go to Settings → enable “Auto Update”. Coolify automatically checks and updates when a new version is available.
Manual
# Update Coolify
curl -fsSL https://cdn.coollabs.io/coolify/install.sh | bash
# Or from dashboard: Settings → Update Available → click "Update"
⚠️ Backup before updating! Although Coolify has a rollback mechanism, backing up .env and database is a mandatory best practice.
III. Security Best Practices
1. Firewall
# Only open necessary ports
sudo ufw allow 22/tcp    # SSH
sudo ufw allow 80/tcp    # HTTP
sudo ufw allow 443/tcp   # HTTPS
sudo ufw allow 8000/tcp  # Coolify dashboard (or use domain + SSL)
sudo ufw enable
2. SSH Hardening
- Turn off password authentication → only use SSH key
- Turn off root login → use regular user + sudo
- Change SSH port (e.g. 2222) → reduce brute force
- Install fail2ban → block IP after multiple failed logins
3. Coolify Dashboard
- Set domain for dashboard + SSL (instead of using IP:8000)
- Enable 2FA for admin account (if Coolify supports)
- Don’t share API tokens: create separate tokens for each CI/CD pipeline
IV. Monitoring
Sentinel (built-in)
Coolify has Sentinel: agent running on each server, collecting metrics:
- CPU, RAM, disk usage
- Network traffic
- Container status
- Go to server → “Metrics” tab to view
Disk Management
Docker images and build cache take up a lot of disk space. Clean up regularly:
# From SSH
docker system prune -a --volumes
# Or from Coolify dashboard
# Server → Docker Cleanup → set schedule (e.g. weekly)
💡 Enable Docker Cleanup schedule in Coolify (Server → Docker Cleanup), automatically clean old images/containers weekly, avoid disk full.
V. Troubleshooting
502 Bad Gateway
- Cause: Container hasn’t started, crashed, or wrong port
- Fix: Check Logs tab → see error → fix code/config → Redeploy
- Check port: app must listen on port declared in Ports Exposes
Build Failed
- Nixpacks doesn’t detect correctly: Add
nixpacks.tomlor switch to Dockerfile - npm install error: Check Node.js version, add
.node-versionfile - Out of memory: Server out of RAM → increase RAM or use separate build server
SSL Issues
- Certificate not issued: DNS not pointing correctly or port 80 blocked
- Mixed content: App loading HTTP resources on HTTPS page → fix in app code
- Redirect loop: Cloudflare SSL mode = Flexible → change to Full (Strict)
Disk Full
# Check disk
df -h
# Clean Docker
docker system prune -a
# Delete old build caches
docker builder prune -a
# Check large logs
du -sh /var/lib/docker/containers/*/
VI. Cost Comparison
Real-world example, running: 3 web apps + 2 databases + Redis + Uptime Kuma + n8n + Plausible:
| Platform | Cost/month | Notes |
|---|---|---|
| Vercel + PlanetScale + Upstash + SaaS tools | $80-150+ | Pro plan + database + Redis + SaaS subscriptions |
| Railway | $50-100+ | Usage-based, increases with traffic |
| Heroku | $75-150+ | Dynos + add-ons + databases |
| Coolify + VPS | $10-20 | 1 VPS 4GB RAM, unlimited apps |
ℹ️ Coolify cost is just VPS cost. With a $10/month VPS (4GB RAM, 2 CPU), you can run 5-10 apps + databases + monitoring tools. Save $50-130+/month compared to cloud platforms.
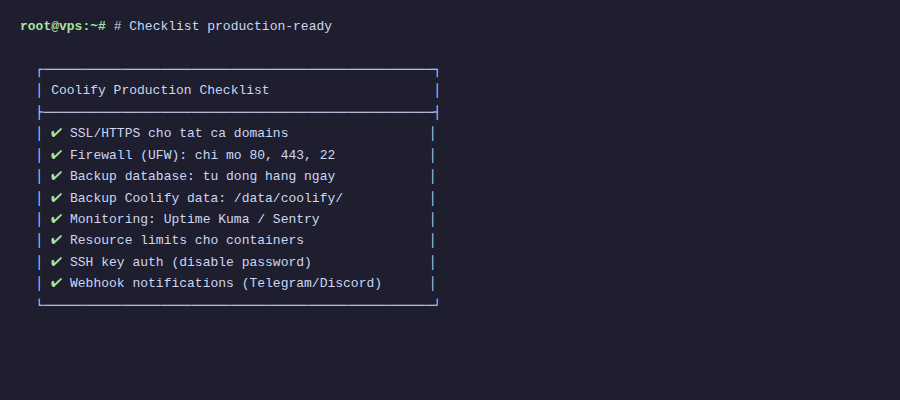
VII. Production-Ready Checklist
- ☐ Backup .env file to a safe place
- ☐ Set domain + SSL for Coolify dashboard
- ☐ Enable notifications (at least 1 channel)
- ☐ Configure firewall (ufw)
- ☐ SSH hardening (key-only, no root login)
- ☐ Set memory limits for containers
- ☐ Configure database backup (S3)
- ☐ Enable Docker Cleanup schedule
- ☐ Health checks for all apps
- ☐ Test rollback flow
VIII. Series Summary
Through 12 articles, you’ve learned how to:
- Install Coolify on VPS (articles 1-2)
- Use dashboard and configure domain/SSL (articles 3-4)
- Deploy all types of applications: static, SPA, backend, Docker Compose (articles 5-7)
- Setup automated CI/CD (article 8)
- Manage databases and services (articles 9-10)
- Scale to multi-server (article 11)
- Production-ready with monitoring and backup (article 12)
Coolify transforms a $10/month VPS into a powerful PaaS platform, deploying unlimited apps, databases, services. Instead of paying $100+/month for cloud platforms, you have complete control over your data and infrastructure.
Happy self-hosting! 🚀
You might also like
- Coolify Interface - Detailed Dashboard Usage Guide
- One-Click Services on Coolify — Deploy 294+ services with just 1 click
- Multi-Server & Scaling on Coolify — Expanding Your System
- Installing Coolify on VPS - Detailed Step-by-Step Guide
- What is Coolify? - Self-hosted alternative to Vercel, Heroku for free
- Databases on Coolify — MySQL, PostgreSQL, Redis, MongoDB
About the author

Trần Thắng
Expert at AZDIGI with years of experience in web hosting and system administration.