Nội dung
How to install Roundcube Webmail on Ubuntu 22.04 with 7 extremely simple steps.
Introduction
Roundcube is a free, open-source and full-featured webmail client written in PHP. Webmail is an in-browser Email management application, which means that instead of you reading and sending Emails from a desktop mail client (Laptop/PC) like Mozilla Thunderbird, you can access your email from the web browser. In this article, AZDIGI will show you how to install Webmail Roundcube on Ubuntu 22.04 with Apache or Nginx web server.
Conditions to be met:
- Ubuntu Server 22.04.
- Use Root privileges and install LAMP Stack
- The domain to be configured has been pointed to the server IP.
Implementation Guide
Step 1: SSH into the server and update the system
To upgrade the ProFTPD version on DirectAdmin, we first need to SSH or access your VPS/server with root privileges. If you don’t know how to SSH into your VPS/Server, you can refer to the following tutorial:
Step 2: Create a database for RoundCube
Now we will create the database and user for Roundcube. To do that, you need to log in to MariaDB as the root user.
- Access MariaDB with the root user
sudo mysql -u root
Next, you use the following commands to create the database for Roundcube:
Note: You can replace the information below with your own.
- Command 1: Create the database with the name roundcubedb.
- Command 2: Create a user with the name roundcubeuser and set the password as passwd.
- Command 3: Grant all permissions to the new user.
- Command 4: Apply for the changed permissions.
- Command 5: Exit MariaDB.
CREATE DATABASE roundcubedb DEFAULT CHARACTER SET utf8 COLLATE utf8_general_ci;
CREATE USER roundcubeuser@localhost IDENTIFIED BY 'passwd'
GRANT ALL PRIVILEGES ON roundcubedb.* TO roundcubeuser@localhost;
FLUSH PRIVILEGES;
exit;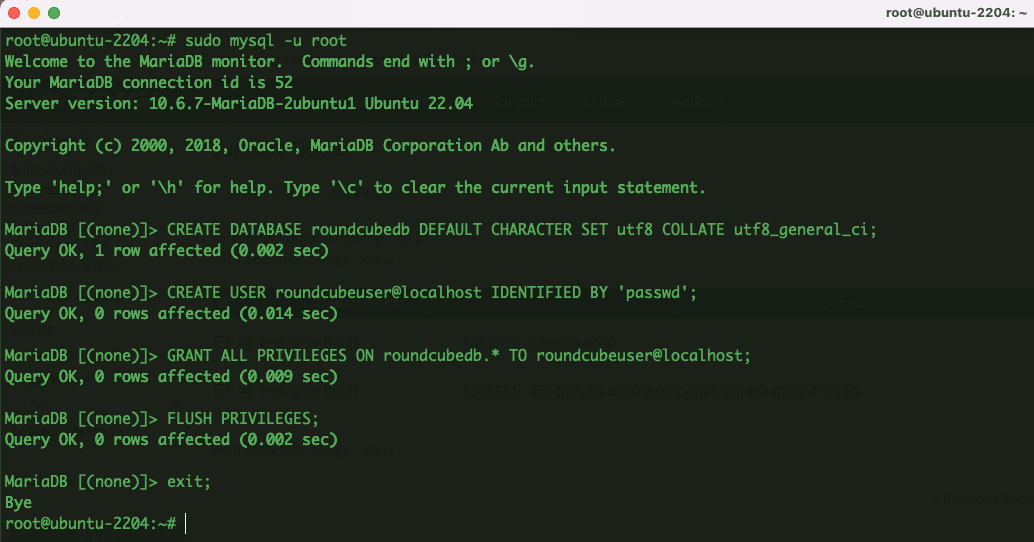
Step 3: Create virtual host Roucube
Now let’s create a virtual host file for Rounecube, for example, I will name the file as rounecube. conf. You can give it another name with the extension *.conf.
- Create a virtual host Rouncube
sudo nano /etc/apache2/sites-available/rounecube.conf
Add the following content to the file and save it.
<VirtualHost *:80>
  ServerName webmail.azdigi.space
  DocumentRoot /var/www/roundcube/
  ErrorLog ${APACHE_LOG_DIR}/roundcube_error.log
  CustomLog ${APACHE_LOG_DIR}/roundcube_access.log combined

  <Directory />
    Options FollowSymLinks
    AllowOverride All
  </Directory>

  <Directory /var/www/roundcube/>
    Options FollowSymLinks MultiViews
    AllowOverride All
    Order allow,deny
    allow from all
  </Directory>
</VirtualHost>Note: In the ServerName section, you can replace it with your domain name and make sure that the domain name has been pointed to the server IP.
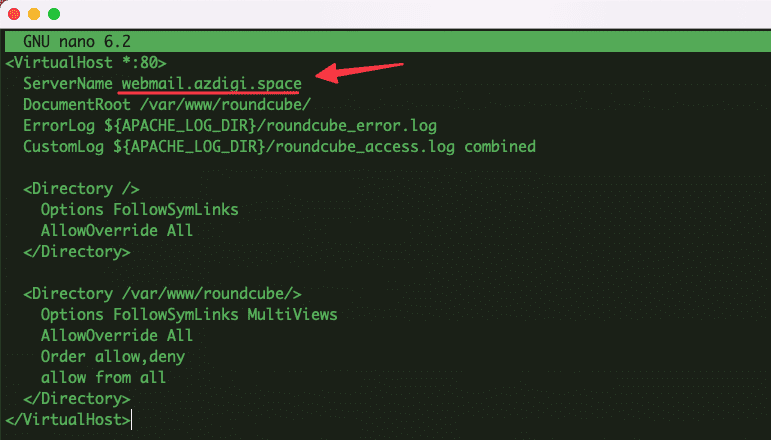
- Activate virtual host Rouncube and reload Apache
sudo a2ensite rounecube.conf
sudo systemctl reload apache2

Step 4: Install SSL webmail
Earlier I named webmail webmail.azdigi.space and now I will install SSL for this domain so that we can access it with HTTPS. I will install SSL through the Cerbot automated tool.
- Install SSL for webmail.azdigi.space
sudo certbot --apache -d webmail.azdigi.space
root@ubuntu-2204:/var/www/roundcube# sudo certbot --apache -d webmail.azdigi.space
Saving debug log to /var/log/letsencrypt/letsencrypt.log
Requesting a certificate for webmail.azdigi.space

Successfully received certificate.
Certificate is saved at: /etc/letsencrypt/live/webmail.azdigi.space/fullchain.pem
Key is saved at:         /etc/letsencrypt/live/webmail.azdigi.space/privkey.pem
This certificate expires on 2022-08-21.
These files will be updated when the certificate renews.
Certbot has set up a scheduled task to automatically renew this certificate in the background.

Deploying certificate
Successfully deployed certificate for webmail.azdigi.space to /etc/apache2/sites-available/rounecube-le-ssl.conf
Congratulations! You have successfully enabled HTTPS on https://webmail.azdigi.space

- - - - - - - - - - - - - - - - - - - - - - - - - - - - - - - - - - - - - - - -
If you like Certbot, please consider supporting our work by:
 * Donating to ISRG / Let's Encrypt:   https://letsencrypt.org/donate
 * Donating to EFF:                    https://eff.org/donate-le
- - - - - - - - - - - - - - - - - - - - - - - - - - - - - - - - - - - - - - - -
Step 5: Install Roundcube
So we have completed the necessary conditions for Roundcube, now we will continue to install the latest Roundcube version.
At the time of this writing, the latest version of Roundcube is 1.5.2. And I will install the following:
- Download Roundcube from the homepage and extract it
wget https://github.com/roundcube/roundcubemail/releases/download/1.5.2/roundcubemail-1.5.2-complete.tar.gz
tar xvf roundcubemail-1.5.2-complete.tar.gz
- Rename the folder to roundcube
sudo mv roundcubemail-1.5.2 /var/www/roundcube
- Set owner to www-data for 2 directories: logs and temp
sudo chown www-data:www-data -R /var/www/roundcube
- Import database with previously created information
mysql -u roundcubeuser -p roundcubedb /www/roundcube/SQL/mysql.initial.sql

Step 6: Finish Installing Roundcube
Now go to the browser and proceed to access the previously set address with the link https://webmail.azdigi.space/installer. If the access is successful, the Roundcube interface will display as below:
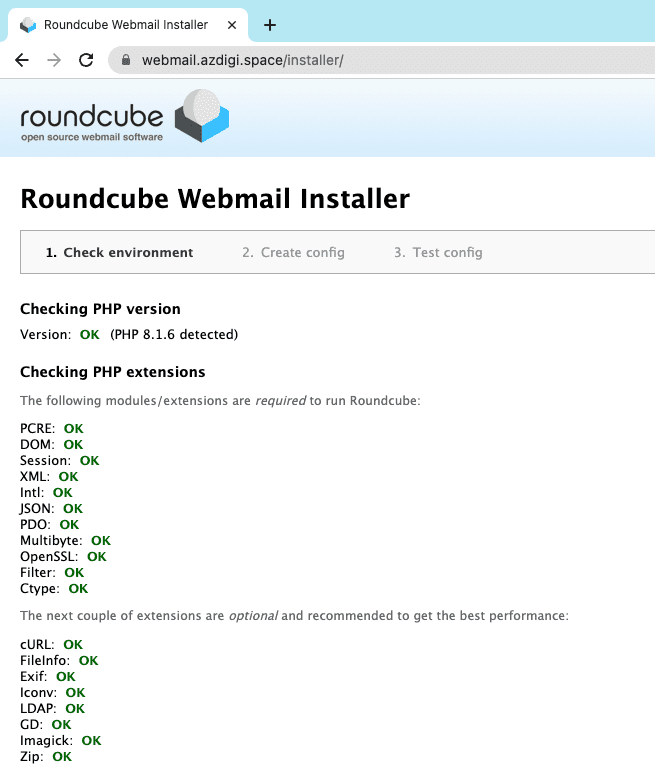
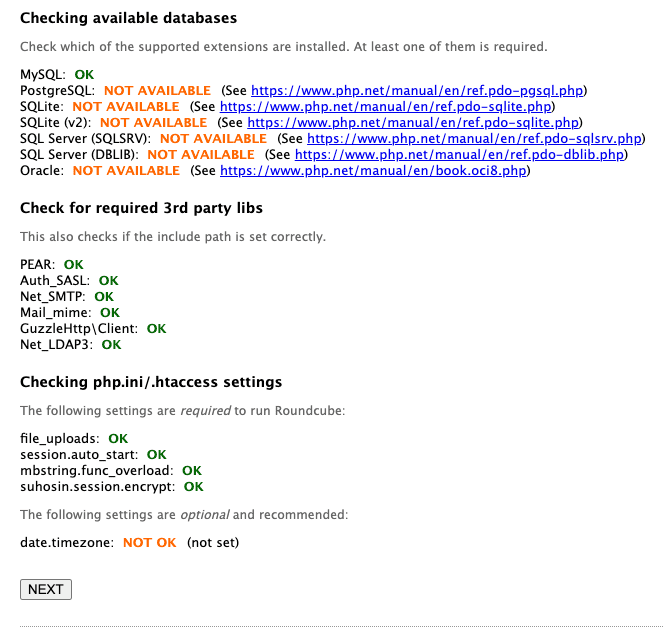
Next, on page 2, please note and fill in the following information:
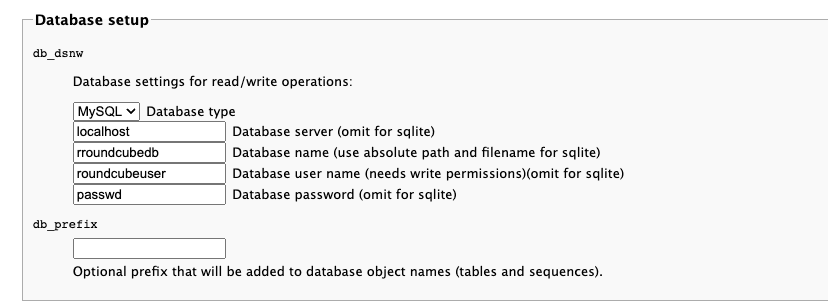
- Database setup
You need to fill in the details of the MariaDB database you created in step 2.
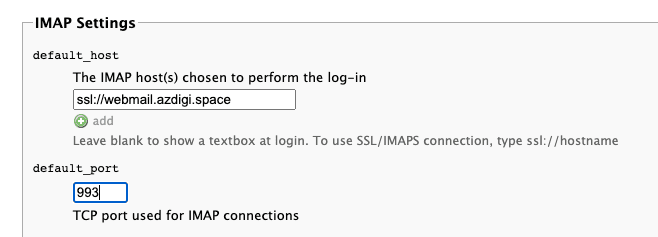
The IMAP and SMTP sections allow you to configure how email is received and sent. Please enter the following values for IMAP:
- IMAP Settings
- SMTP Settings

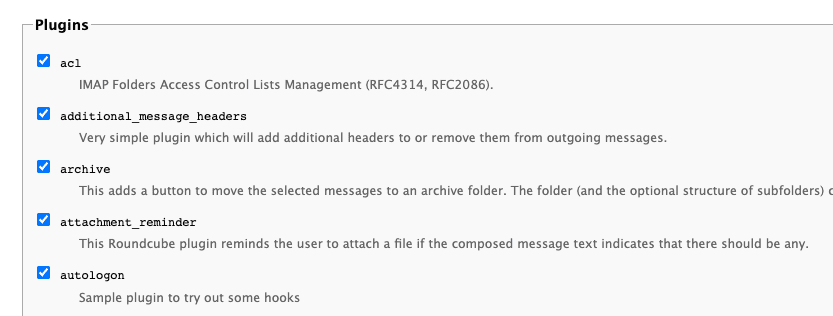
- Plugins
In this section, we will have the option to enable some plugins. For example, password plugin, mark as junk plugin, etc. Here I will enable all plugins, and if you need to disable any plugin, you can disable it at /var/www/roundcube/config/config.inc.php
Next, you will receive a warning with the content below:
After completing the installation and the final tests please remove the whole installer folder from the document root of the webserver or make sure that enable_installer option in config.inc.php is disabled.

These files may expose sensitive configuration data like server passwords and encryption keys to the public. Make sure you cannot access this installer from your browser.
Don’t worry, Roundcube just warns you to delete the installer installation directory, and you use the command below to delete it.
sudo rm /var/www/roundcube/installer/ -r
After the configuration is complete, you visit https://webmail.azdigi.space to check. At this point, the Roundcube webmail interface will display as shown below:
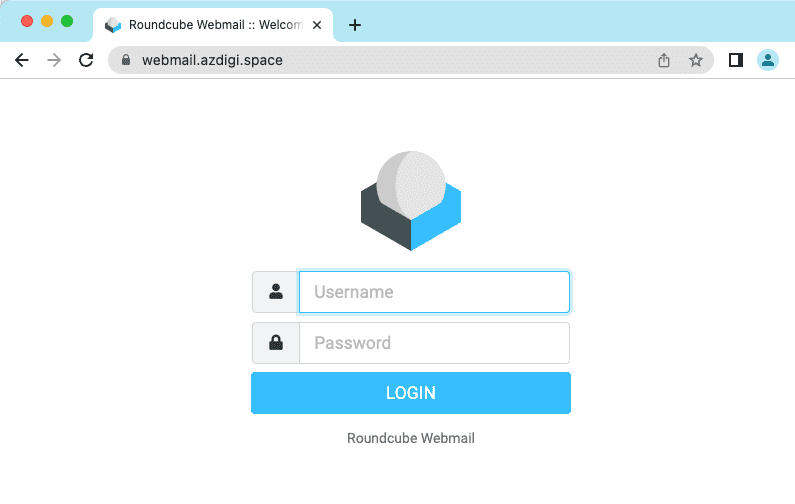
Roundcube is a simple webmail client that makes it easier for users to manage their email. It provides advanced email management features such as Plug-in API, a template system for custom interfaces, import/export functionality, canned response templates and support for IDNA and SMTPUTF8.
So in this article, AZDIGI has shown you how to set up Roundcube on Ubuntu 22.04. And in the next articles, AZDIGI will guide you on how to use it as well as the necessary configuration to use Roundcube better.
You can refer to other user manuals at the link below
If you need support, you can contact support in the ways below:
- Hotline 247: 028 888 24768 (Ext 0)
- Ticket/Email: You use the email to register for the service and send it directly to: support@azdigi.com

