Surely in some cases, you need to back up the current data on your email account for easy storage. Or maybe you are looking for a way to move email accounts to another device to continue using but still want the data to be fully synchronized. If you use the POP3 protocol on Outlook, syncing when you move devices is impossible, so how can you keep your data and still be able to use email on the new device?
If you are having trouble finding a way to solve the above problem, in this article, AZDIGI will guide you on how to bring all old data to a new device completely simply through the Backup/Restore feature on Outlook. We will proceed to back up all data and the backup file will be in the form of backup.pst, then you just need to access the new device and restore the other backup file to complete. Please follow the article below.
Implementation Guide
Backup Email
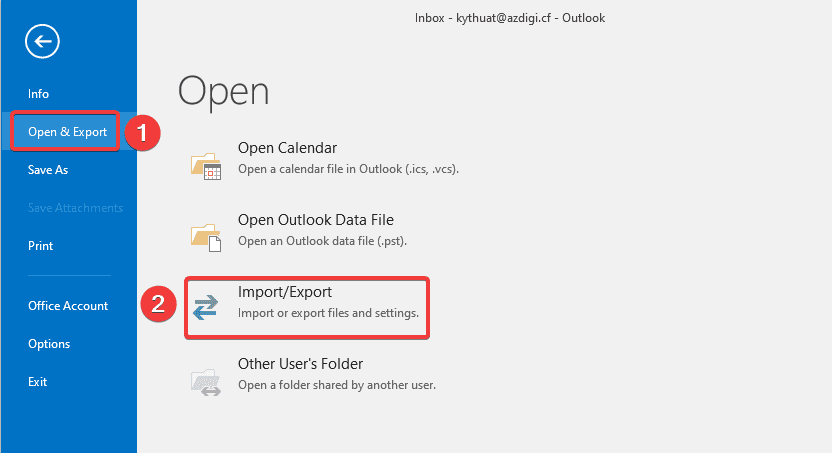
Step 1: Access your Outlook, select File (1)=> Open & Export (2) => Import/Export (3).

Step 2: In the Import and Export Wizard window=> select Export to a file (1) => Next (2).

Step 3: In the Export to a File window => select Outlook Data File (.pst) (1) => Next (2)

Step 4: At the interface below, select the email to be backed up (1) => Tick the Include subfolders box (2), this action helps you display all the included folders (Inbox, Outbox), Drafts, Calendar…). If you want to backup all email-related information, click on the email (1) or if you want to backup each folder separately, click on folder => Next (3)

Step 5: Choose the path to save the backup file (1) and select Replace duplicates with items exported (2) => Finish (3)

Step 6: When you set up a .pst file, the system will ask if you want to create a password to protect this file, you should create a password.

So you have set up and created an email backup, the time when the backup process runs fast or long depends on the data in the email account you backup. When the backup is complete, you will receive a backup.pst file saved in the directory you set up in Step 5.

Restore Email
If you deleted your email account and now need to restore it, you do it on the same device.
If you need to move email data to another device, then you need to download and move the backup.pst file to the new device and then follow these steps:
Step 1: Access your Outlook, select File (1)=> Open & Export (2) => Import/Export (3).

Step 2: Select Import from another program or file (1) => Next (2)

Step 3: Select Outlook Data File (.pst) (1) => Next (2).

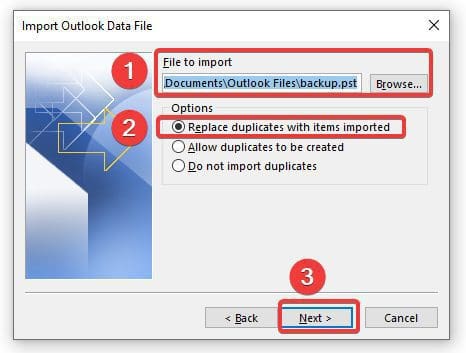
Step 4: In the File to Import section, click Browse to go to the place where your backup.pst file is stored Click on the line Replace duplicates with items imported (2) => Next (3).
Step 5: At Import items into the same folder in (1), select your Email account => Finish (2).

After selecting Finish, the content of the backup.pst file will be imported immediately, the restore process is fast or slow depending on the data from your backup file, you need to wait for the progress window to run until the end.
Summary
So AZDIGI has shown you how to backup and restore email accounts quickly and in detail when you use Outlook. This is a convenient feature for moving email accounts between devices, as well as a backup plan for all cases related to data loss.
Wishing you success!
If you need assistance, you can contact support in the ways below:
You might also like
About the author

Thạch Phạm
Đồng sáng lập và Giám đốc điều hành của AZDIGI. Có hơn 15 năm kinh nghiệm trong phổ biến kiến thức liên quan đến WordPress tại thachpham.com, phát triển website và phát triển hệ thống.