In today’s article, AZDIGI will guide you on how to install and configure email using the Pro Mail Hosting service at AZDIGI to Outlook 2016 (Other Outlook versions differ slightly in the interface, but parameters and steps settings will make no difference).
Implementation Guide
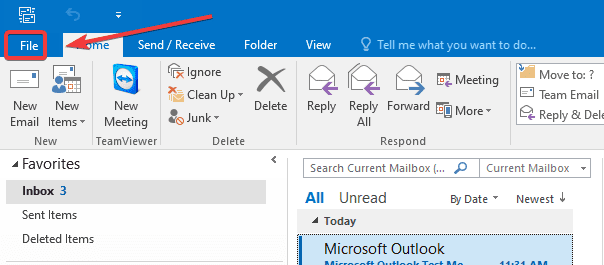
Step 1: Access Account Information
Step 2: Click Add Account

Step 3: Select Manual setup or additional server types.

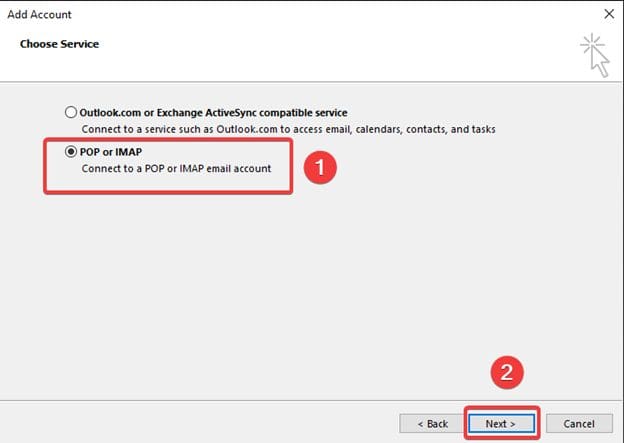
Step 4: Choose POP or IMAP
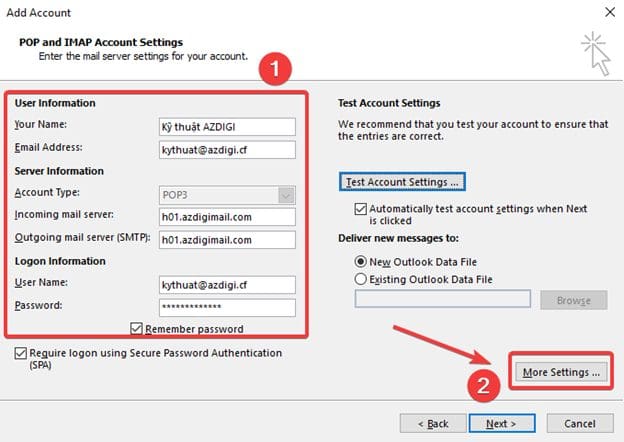
Step 5: Enter email information

Please fill in the following information:
- Your Name: First and last name displayed when sending/receiving email.
- Email Address: Enter your email address (kythuat@azdigi.cf)
- Account Type: Leave the default as POP3
(If you choose POP3, email data will be downloaded directly to your device and stored here. And IMAP data will be synchronized back and forth between devices with Server Mail, that is when using IMAP, if you delete/edit an email on any device, the data in Server Mail will also be deleted/edited similarly. You should use the default POP3 is the best)
- Incoming mail server – Outgoing mail server (MTP):You enter exactly h01.azdigimail.com
- User Name: Your email name (kythuat@azdigi.cf)
- Password: The password of the email
Step 6: Configure Outgoing Server.
After filling in the complete and correct information in (1), click More Settings (2) to configure the Outgoing Server.
Select the Outgoing Server tab and tick the box for My outgoing server (SMTP) requires authentication.
Step 7: Configure Port
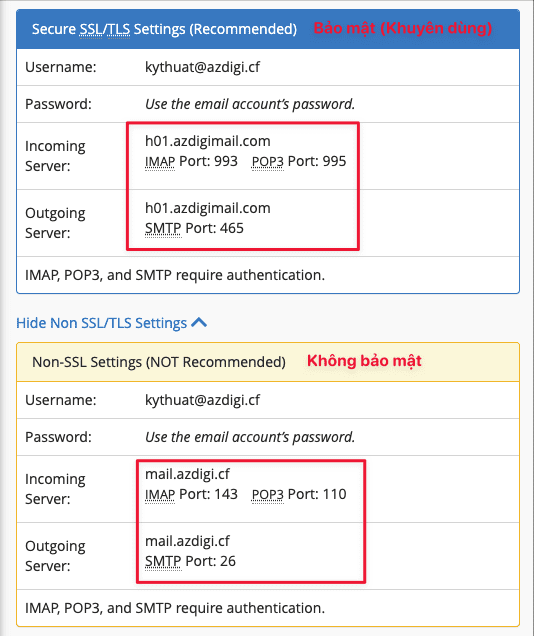
- How to view and select the Port of the mail service
This Port configuration depends on whether your mail server supports Security certificates (SSL/TLS) so that you can follow and configure the Port correctly. Usually, paid Mail service providers in general, or at AZDIGI in particular, most of them support Security certificates (SSL/TLS ) on the mail server. Therefore, when configuring, you should choose this method to increase security.
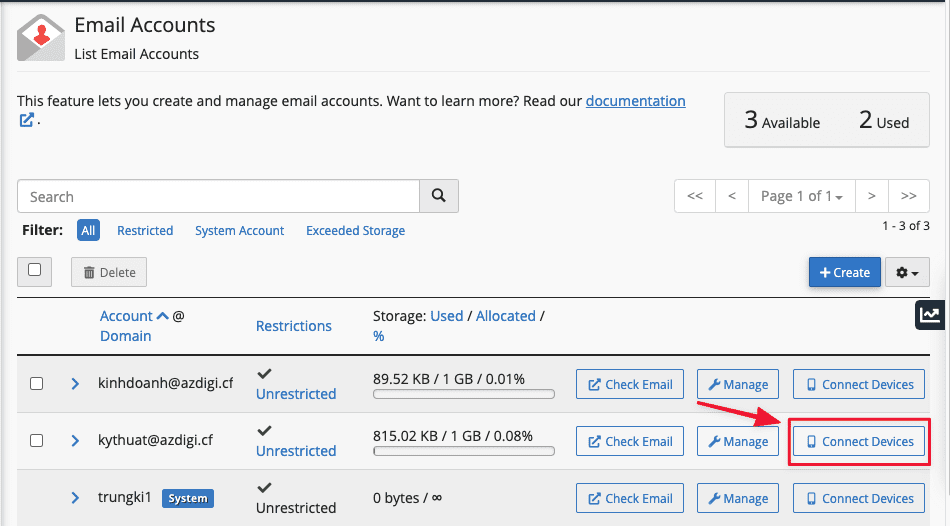
At AZDIGI, to see specific Port parameters, you log in to the AZDIGI-MAIL => Email Accounts => Connect Devices.
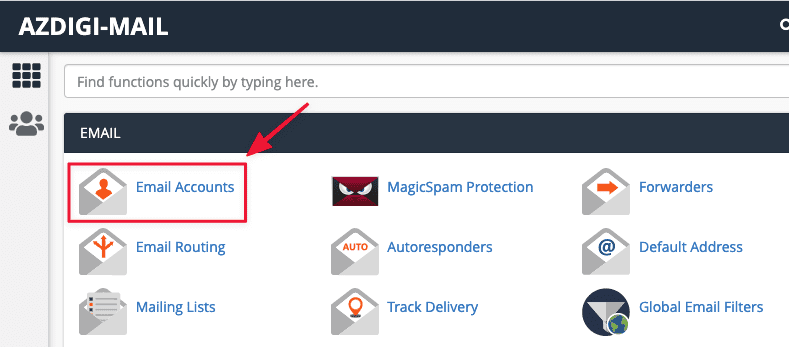
This section will show the Port parameter for POP3/IMAP configuration of both Secure and Unsecured certificates.
- How to configure with Outlook
As mentioned above, when configuring, you should choose to have a Security certificate (SSL/TLS) to increase the security of the mail service. So now you return to the Outlook interface to configure, I will make an example with both POP3/IMAP protocol with a Security certificate (SSL/TLS).
If using POP3, you configure the following:
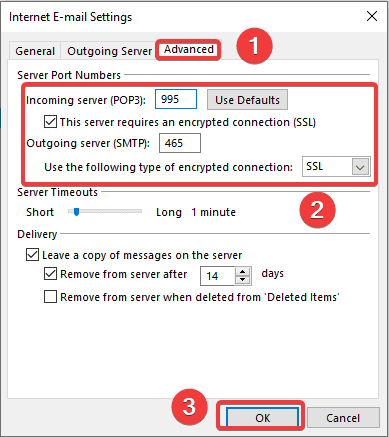
In part (2), you fill in the following information completely and accurately:
- Incoming server (POP3): 995 . Tick the line “This server requires an encrypted connection (SSL)”
- Outgoing server (SMTP): 465
- User the following type of encrypted connection: You choose SSL
- Remove from server after: This part means to set the date that the email will be deleted from the server, because you are using the POP protocol, the email will be downloaded directly to your device, so this part you can skip.
If using IMAP, you configure the following:
In part (2), you fill in the following information completely and accurately:
- Incoming server (IMAP): 993
- Use the following type of encrypted connection: You choose SSL
- Outgoing server (SMTP): 465
- User the following type of encrypted connection: You choose SSL
When finished, click OK (3) to complete the configuration process.
Step 8: Check the connection and complete the configuration
Click Test Account Settings (1) to check if the connection is successful and if the message shown in Figure (2) is successful (click Close to close the message box)

Next, click the Next button.

Click Finish to complete.

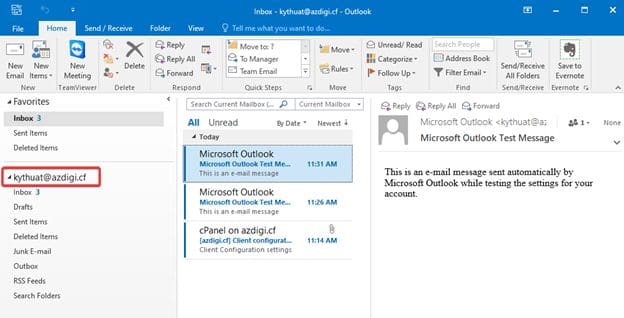
That’s done, after successful configuration, you will be able to enter the Outlook interface as shown below:
So in this article, AZDIGI showed you how to add email using the Pro Mail Hosting service to Outlook quickly and simply. If you find the article helpful, please share it widely.
Wishing you success!
If you need assistance, you can contact support in the ways below:
- Hotline 247: 028 888 24768 (Ext 0)
- Ticket/Email: You use the email to register for the service and send it directly to: support@azdigi.com
You might also like
- How to login to email on Outlook
- Pro Mail Hosting: How to login mail on Outlook IOS
- Pro Mail Hosting: How to add a domain email account to Gmail
- Add an Email Account to the Gmail Application
- What is Email Server and the difference with Email Hosting
- Configure SMTP with G Suite for the WordPress website
About the author

Thạch Phạm
Đồng sáng lập và Giám đốc điều hành của AZDIGI. Có hơn 15 năm kinh nghiệm trong phổ biến kiến thức liên quan đến WordPress tại thachpham.com, phát triển website và phát triển hệ thống.