
Nagios is a popular open source monitoring system used to monitor IT infrastructure and services in server, network, application and device environments. Developed by Ethan Galstad in 1999, Nagios has become one of the leading monitoring tools in the world and is widely used in the enterprise and user community.
I. Main features of Nagios
- Flexible architecture: Nagios uses a modular architecture that allows integration with many plugins and addons, helping to expand monitoring capabilities according to the specific needs of the environment.
- Diverse monitoring: Nagios can monitor everything from servers , networks, applications to services running on the system. It is capable of checking parameters such as the health of hard drives, memory, CPU, network, services like HTTP, SMTP, SSH, and more.
- Notifications and warnings: Nagios has the ability to warn administrators through many means such as email, SMS, and other notification channels when detecting problems or exceeding set thresholds.
- Web interface: Provides a beautiful and easy-to-use web interface for status viewing, reporting, and monitoring system management.
- Extensive integration: Nagios supports integration with many other technologies through the use of plugins and APIs, helping to integrate with other solutions such as ticketing systems, dashboards, or automated configuration management systems.
- Strong community development: The Nagios user community is large and active, which means there is plenty of documentation, plugins and support available online.
Nagios has developed and added many versions and expansion modules over time to meet the increasingly diverse requirements of the information technology environment.
II. How to install Nagios on Ubuntu 22.04
Step 1: Update system g
Before proceeding with the installation, it is necessary to update the system packages to ensure you have the latest software version. Open a terminal and run the following lines of code:
apt update && apt upgrade -y
Step 2: Install necessary packages
Now install the necessary packages using apt :
sudo apt install wget unzip apache2 php libapache2-mod-php php-gd libgd-dev libapache2-mod-php php-mbstring php-xml libssl-dev build-essential libssl-dev libgd-dev
Step 3: Download Nagios Core
We will download Nagios and extract it.
cd /tmp
wget https://assets.nagios.com/downloads/nagioscore/releases/nagios-4.4.6.tar.gz
tar -xzf nagios-4.4.6.tar.gz
cd nagios-4.4.6

Step 4: Compile and install Nagios Core
Create users and groupsnagios . This command will create the usernagios , groupnagcmd , and addnagios into both groupsnagcmd andwww-data .:
sudo useradd nagios
sudo groupadd nagcmd
sudo usermod -aG nagcmd nagios
sudo usermod -aG nagcmd www-data
Run the following command to compile Nagios source code and install.
./configure --with-httpd-conf=/etc/apache2/sites-enabled
make all
sudo make install
sudo make install-init
sudo make install-daemoninit
sudo make install-config
sudo make install-commandmode
sudo make install-exfoliation
sudo make install-webconf

Below is a brief explanation for each command during the Nagios installation process:
./configure --with-httpd-conf=/etc/apache2/sites-enabled: Prepare configuration for the compilation process, configure it so that Apache can understand and integrate Nagios. Option--with-httpd-confSpecifies where Apache’s configuration files are stored.make all: Compile Nagios source code and accompanying components.sudo make install: Install Nagios on the system.sudo make install-init: Install the init file to manage the Nagios service when the system starts.sudo make install-daemoninit: Install init script to manage Nagios Daemon (main platform of Nagios).sudo make install-config: Installs default configuration files for Nagios.sudo make install-commandmode: Set the execution mode for Nagios command files.sudo make install-exfoliation: Install necessary files for Nagios web interface.sudo make install-webconf: Install Apache configuration to be able to access the Nagios web interface.
Step 5: Create a user and password for Nagios
You use the following command to create an administrative user and password.
sudo htpasswd -c /usr/local/nagios/etc/htpasswd.users nagiosadmin

Step 6: Install Nagios Plugins and NRPE Plugins
To extend the monitoring capabilities of Nagios, we need to install Nagios Plugins and NRPE Plugin
apt install monitoring-plugins nagios-nrpe-plugin -y
Step 7: Configure Nagios Plugins and NRPE Plugins
After installing Nagios Plugins and NRPE Plugins, navigate to the /usr/local/nagios/etc directory. Create a folder named “servers” .
cd /usr/local/nagios/etc/
mkdir servers
Next use the vim or nano editor to edit the file:nagios.cfg .
Remove # from line cfg_dir=/usr/local/nagios/etc/servers

Next, adjust the file configuration resource.cfg
Add the following parameter: $USER1$=/usr/lib/nagios/plugins , to specify the Nagios Monitoring Plugin path

Next findobjects/contacts.cfg Edit email contact.

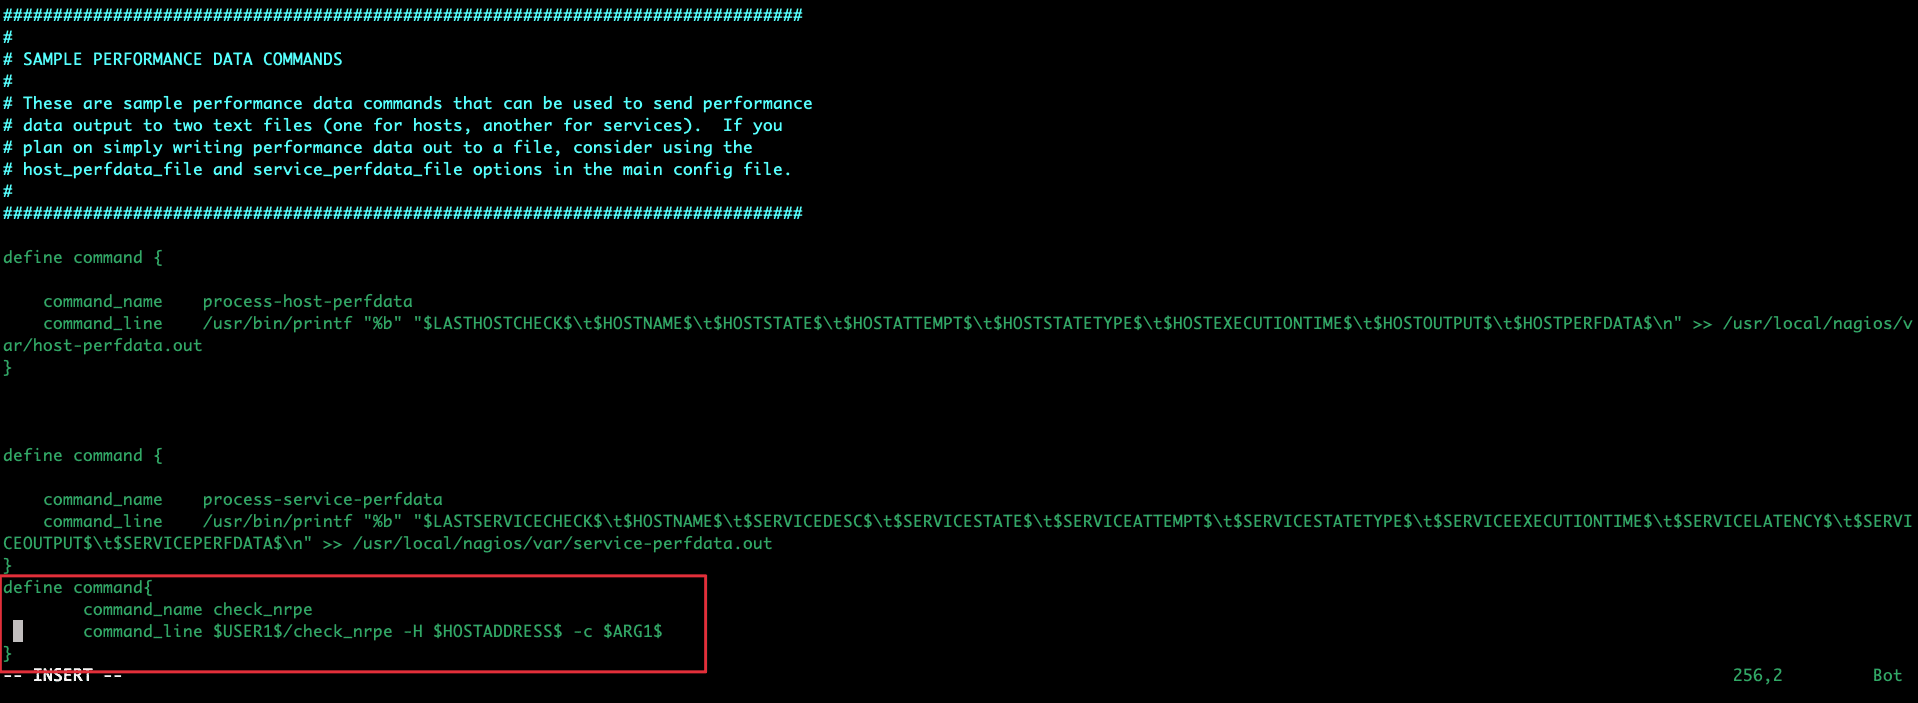
Finally openobjects/commands.cfg Add the following content at the end of the configuration file.
define command{
        command_name check_nrpe
        command_line $USER1$/check_nrpe -H $HOSTADDRESS$ -c $ARG1$
}
Step 8: Open port on Firewall
sudo ufw enable
sudo ufw allow 80
sudo ufw allow 443
sudo ufw allow 22
sudo ufw reload
sudo ufw status
Step 8: Start Apache and Nagios
sudo a2enmod cgi
sudo systemctl restart apache2
sudo systemctl start nagios
Next, everyone accesses the link http://your_ip_server/nagios or http://your_domain/nagios
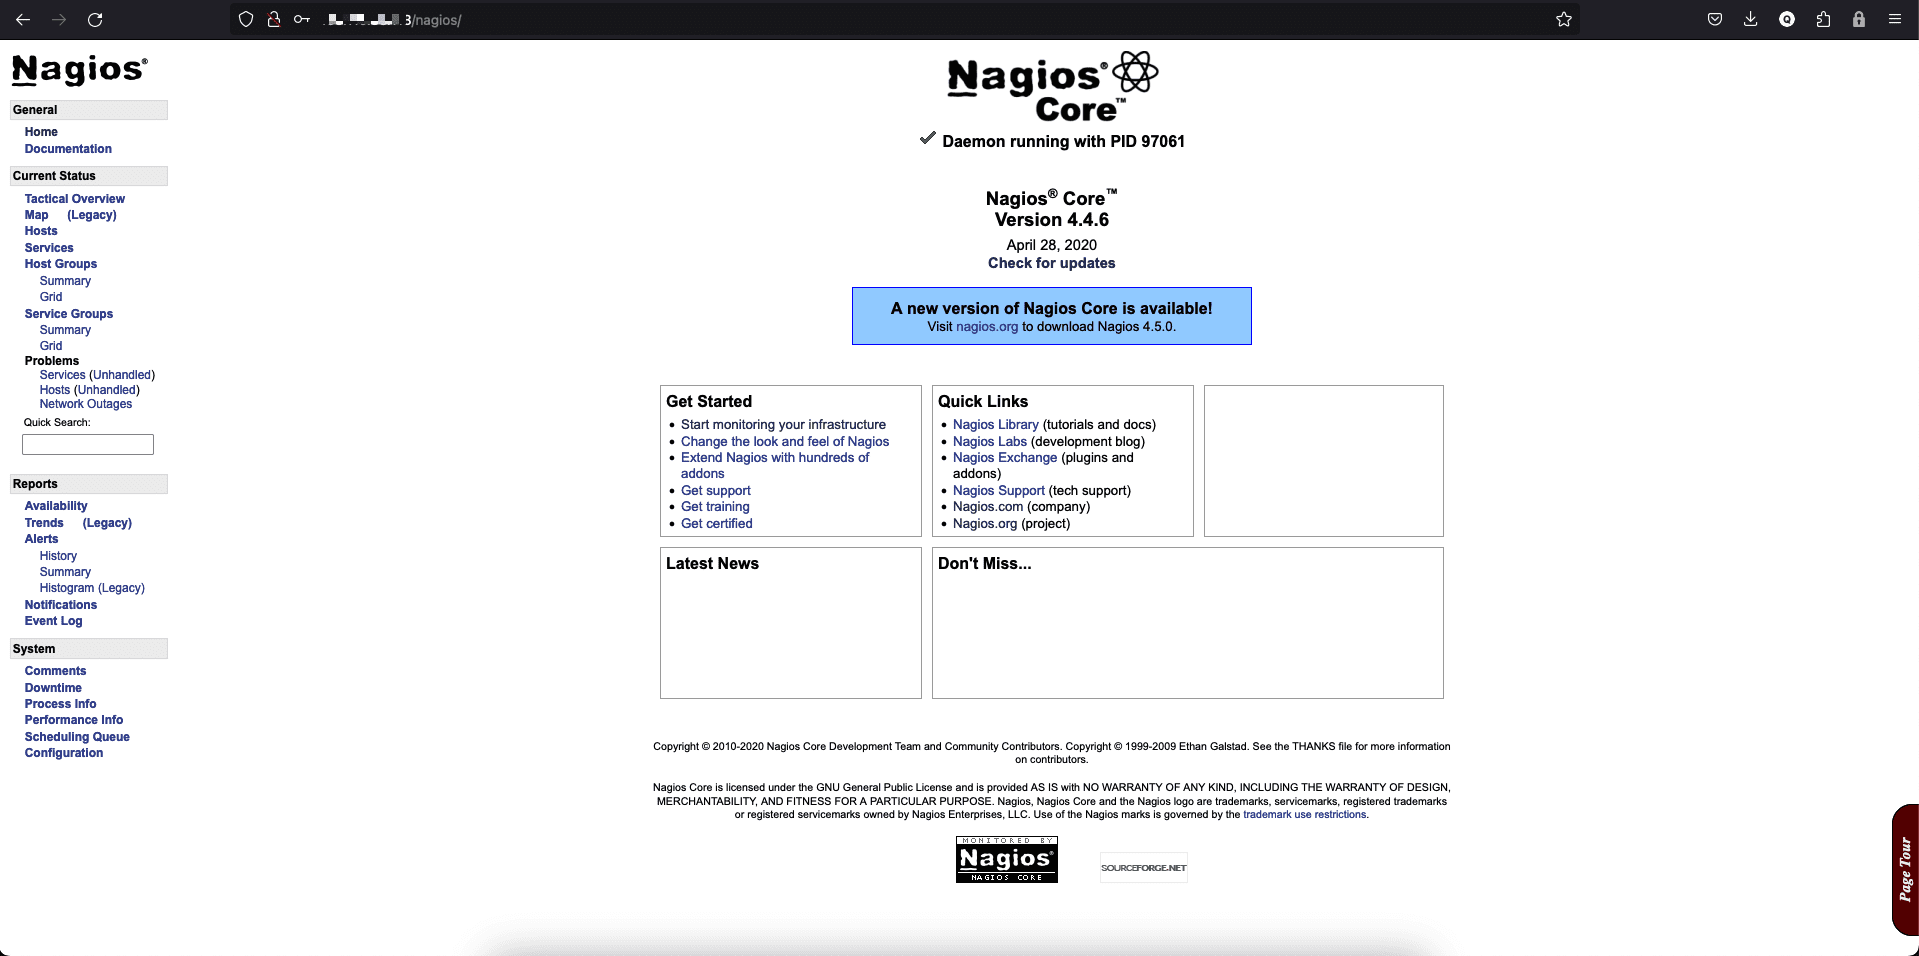

With these steps, you will have successfully deployed Nagios on Ubuntu 22.04, ready to monitor and manage the health of systems and services in your IT environment.
If you need assistance, you can contact support in the ways below:
- Hotline 247: 028 888 24768
- Ticket/Email: You use the email to register for the service and send it directly to: support@azdigi.com.
About the author

Thạch Phạm
Đồng sáng lập và Giám đốc điều hành của AZDIGI. Có hơn 15 năm kinh nghiệm trong phổ biến kiến thức liên quan đến WordPress tại thachpham.com, phát triển website và phát triển hệ thống.