
In the 4.0 technology era, everything can work, communicate, and meet online remotely. Especially in the present time, the severe impact of the global Covid 19 pandemic has become even more necessary. Therefore, companies, organizations, and businesses operating in service provision, including AZDIGI, started working from Work From Home (WFH).
Therefore, as the demand for working online increases, everyone needs a tool to directly exchange online with each other so that the work is convenient and smooth right when working from home. There are many solutions and tools to help you do that, such as Zoom, Google Meet and especially the application AZDIGI’s technical team deploys, Jitsi Meet. Moreover, many units in the world apply open-source code. And what is Jitsi Meet? The advantages features and how to install, please continue reading this article.
I. What is Jitsi Meet?
Jitsi Meet is a free online meeting solution developed based on open source code, allowing businesses, especially in the current situation, for companies and businesses to work from home (WFH). With Jitsi Meet, you can proactively deploy online meeting rooms on your infrastructure through video with high resolution to 720p and clear sound quality. SSL-encrypted data according to the highest security standards to help ensure privacy and information security, easy to set up and join meetings anytime, anywhere through the website link or install the application on the phone without requiring the user to register an account.
II. Features of Jitsi Meet
- Share screens and slides with participants.
- Simple meeting invitation with a URL.
- Intuitive interface and easy to manipulate with users.
- It has enough features to run an online meeting proactively.
- Allows editing documents and chatting directly in the room.
- Stable sound quality and clear picture.
- Vietnamese interface.
- Unlimited time and the number of users to access.
- Support Livestream to Facebook, YouTube and record the meeting.
- Support the online chat feature and raise your hand to speak.
- Safe and secure, allowing to set a password for each room separately.
- Completely free.
III. Install Jitsi Meet Guide
System Requirements
- Linux Server Ubuntu 18+
- CPU (core): At least 1 Core or more, depending on the number of online users that you need the server more powerful.
- RAM: 2GB
- DISK: 25GB
- Use root or su root
- A domain or subdomain pointed to a Public IP
Steps to install Jitsi Meet
Step 1: Log in SSH into the server/VPS
To install Jisti Meet, you need to SSH into the server. If you don’t know how to SSH into your VPS/Server, you can refer to the following tutorial:
Step 2: Set up the system
Before starting, update the server system to the latest version with the following command:
sudo apt-get update -y
sudo apt-get upgrade -y
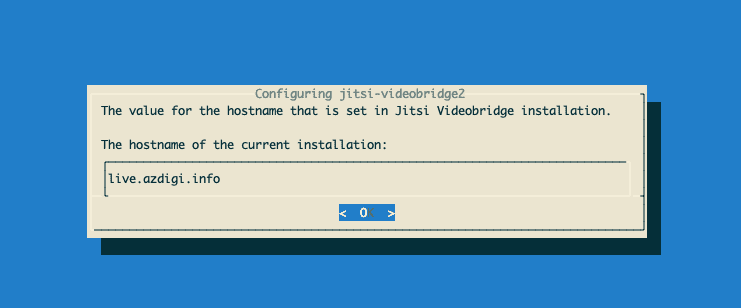
After your system is updated, please reboot your system to apply the changes. Next, you’ll set up the relevant server hostname (example: live.azdigi.info). You can do this by running the following commands:
sudo hostnamectl set-hostname live.azdigi.info
exec bash
Set up swap
With limited resources, you should set up swap for better performance. Some VPS services in Vietnam are mostly pre-configured. If your server hasn’t been set up, set it up as follows:
dd if=/dev/zero of=/mnt/swapfile bs=1024 count=2048k
mkswap /mnt/swapfile
swapon /mnt/swapfile
echo /mnt/swapfile none swap defaults 0 0 >> /etc/fstab
chown root:root /mnt/swapfile
chmod 0600 /mnt/swapfile
sysctl vm.swappiness=10
Set up Firewall
sudo ufw allow OpenSSH
sudo ufw allow http
sudo ufw allow https
sudo ufw allow in 10000:20000/udp
sudo ufw enable
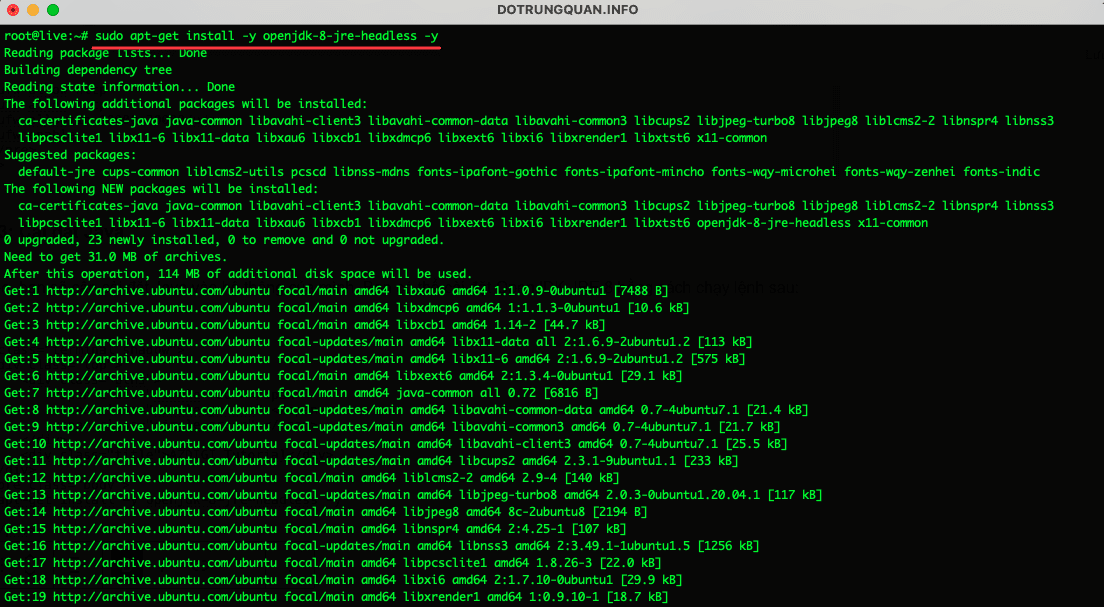
Step 3: Install Java
Next, you will need to install Java on your system. You can install OpenJDK JRE 8 by running the command:
sudo apt-get install -y openjdk-8-jre-headless -y
Configure java_home
echo "JAVA_HOME=$(readlink -f /usr/bin/java | sed "s:bin/java::")" | sudo tee -a /etc/profile
source /etc/profile
root@live:~# java -version
openjdk version "1.8.0_292"
OpenJDK Runtime Environment (build 1.8.0_292-8u292-b10-0ubuntu1~20.04-b10)
OpenJDK 64-Bit Server VM (build 25.292-b10, mixed mode)
Step 4: Install NGINX as a webserver
Jitsi Meet uses Nginx as a reverse proxy. So you will need to install NGINX on your system with the following command:
sudo apt install -y nginx
Enable system startup and check status
sudo systemctl start nginx.service
sudo systemctl enable nginx.service
sudo systemctl status nginx.service
Output
root@live:~# sudo systemctl status nginx.service
 ● nginx.service - A high performance web server and a reverse proxy server
 Loaded: loaded (/lib/systemd/system/nginx.service; enabled; vendor preset: enabled)
 Active: active (running) since Sun 2021-07-18 04:50:35 UTC; 15s ago
 Docs: man:nginx(8)
 Main PID: 16393 (nginx)
 Tasks: 2 (limit: 19660)
 Memory: 2.5M
 CGroup: /system.slice/nginx.service
 ├─16393 nginx: master process /usr/sbin/nginx -g daemon on; master_process on;
 └─16395 nginx: worker process
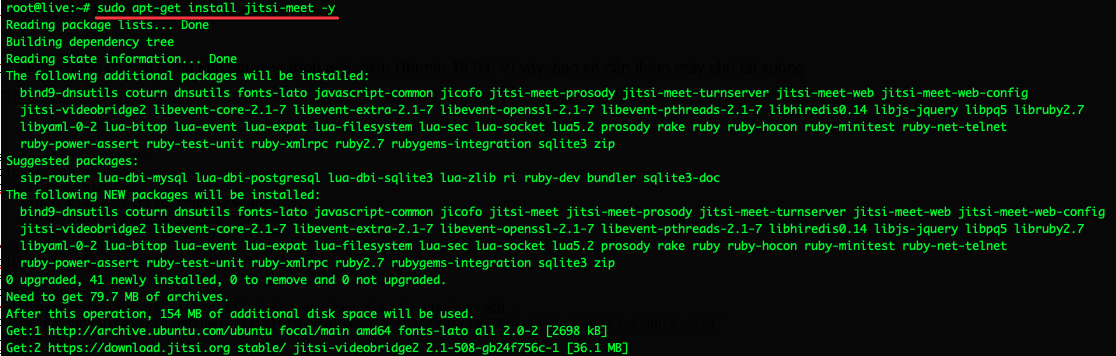
Step 5: Install Jitsi Meet
Jitsi Meet is not available in the Ubuntu 18.04 default program repositories. So you will need to add the Jitsi Meet download server to Ubuntu’s program repositories. You can do this by running the following command:
wget -qO - https://download.jitsi.org/jitsi-key.gpg.key | sudo apt-key add -
sudo sh -c "echo 'deb https://download.jitsi.org stable/' > /etc/apt/sources.list.d/jitsi-stable.list"
sudo apt update -y
Next, update the repository and install Jitsi Meet with the command:
sudo apt-get update -y
sudo apt-get install jitsi-meet -y
Install free Let’s Encrypt SSL
sudo /usr/share/jitsi-meet/scripts/install-letsencrypt-cert.sh

Output from deploy-hook command 0000-coturn-certbot-deploy.sh:
 Configuring turnserver
 IMPORTANT NOTES:
 Congratulations! Your certificate and chain have been saved at:
 /etc/letsencrypt/live/live.azdigi.info/fullchain.pem
 Your key file has been saved at:
 /etc/letsencrypt/live/live.azdigi.info/privkey.pem
 Your cert will expire on 2021-10-16. To obtain a new or tweaked
 version of this certificate in the future, simply run certbot
 again. To non-interactively renew all of your certificates, run
 "certbot renew"
 Your account credentials have been saved in your Certbot
 configuration directory at /etc/letsencrypt. You should make a
 secure backup of this folder now. This configuration directory will
 also contain certificates and private keys obtained by Certbot so
 making regular backups of this folder is ideal.
 If you like Certbot, please consider supporting our work by:
 Donating to ISRG / Let's Encrypt: https://letsencrypt.org/donate
 Donating to EFF: https://eff.org/donate-le
 Configuring nginx
Step 6: Access to Jitsi Meet
So you have installed Jitsi Meet complete and can now access and start the first meeting. And if you are following this article by AZDIGI, you have access to port 443. And below is the access path, open your browser and enter the URL as follows:
- Access by domain: https://my-domain
- Access by IP: http://your-server-ip
Step 7: Access the meeting room safely
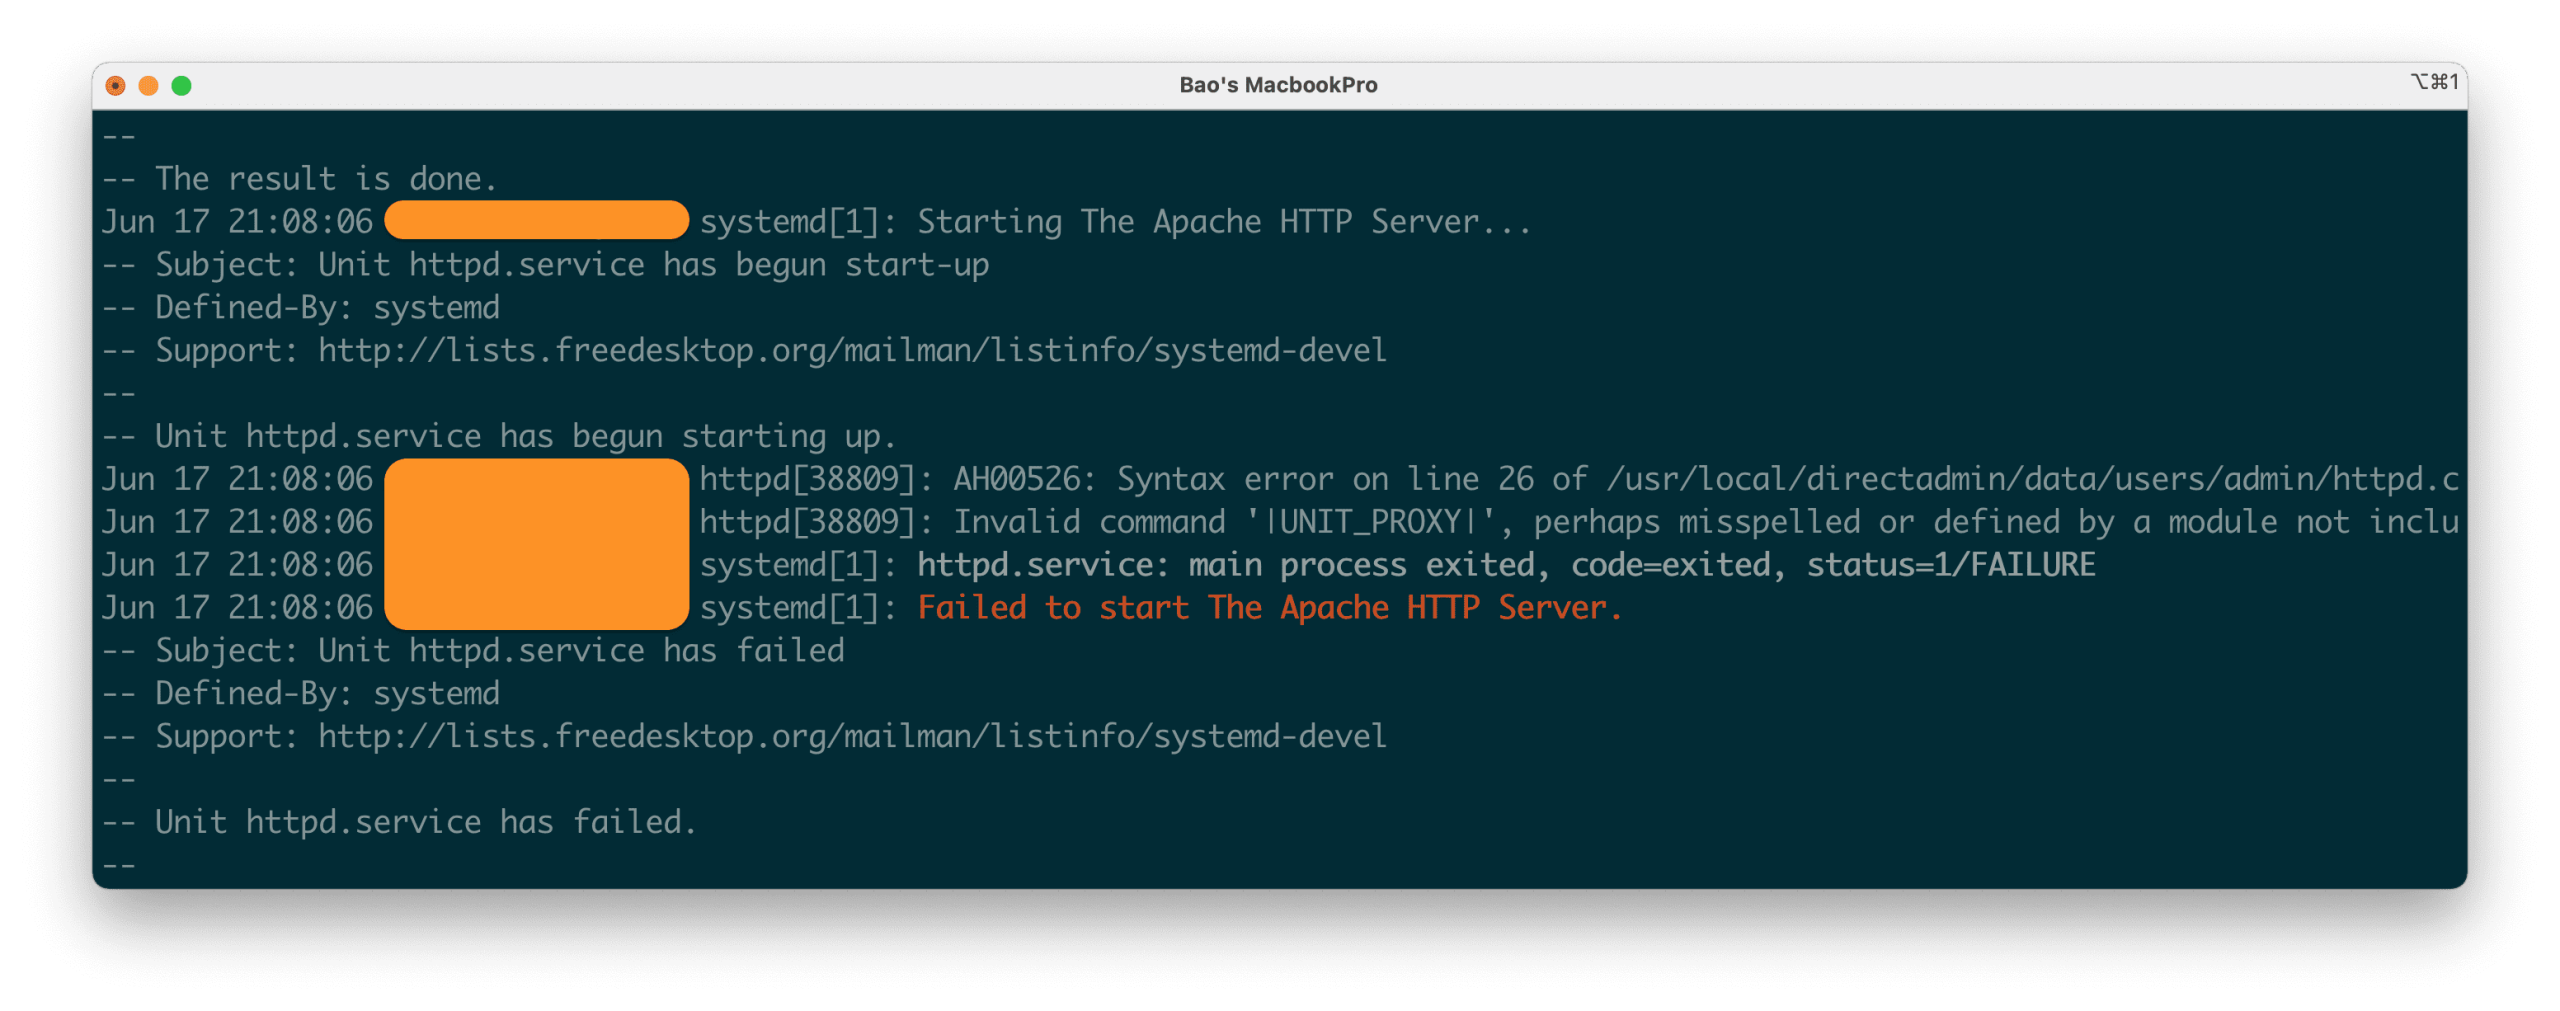
By default, anyone who knows the domain name or IP address of your Jitsi Meet server will usually have access to your Jitsi Meet and will create the conference. And this will cause significant problems for your server in many ways. AZDIGI will guide you through secure meeting room access with a password.
Note: I will add cp command to backup files to avoid correcting mistakes in the commands. In case of error, you can restore. And change live.azdigi.info with your domain in the commands.
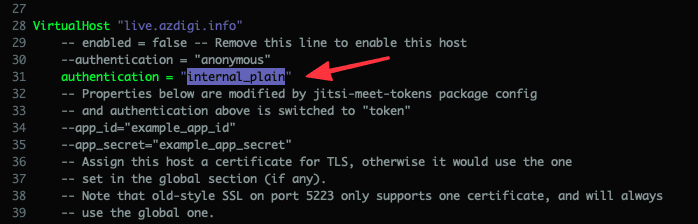
- Edit file your_domain.cfg.lua
This configuration will force username and password validation before allowing the conference room to be created by a new user.
cp /etc/prosody/conf.avail/live.azdigi.info.cfg.lua /etc/prosody/conf.avail/live.azdigi.info.cfg.lua.bak
vi /etc/prosody/conf.avail/live.azdigi.info.cfg.lua
Find and edit as below:
……..
     authentication = "anonymous"
 …….
 Thành
 …….
 authentication = "internal_plain"
 …….
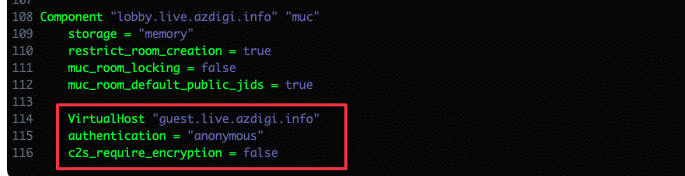
Next, in the file /etc/prosody/conf.avail/live.azdigi.info.cfg.lua, you add the following lines at the end of the file.
This configuration will allow any user to join an existing conference room. However, these users must have a URL and password to enter the room.
Here, you can add guest before the domain. For example, with live.azdigi.info, you would put guest.live.azdigi.info. Then you need to create these records on DNS to be able to use them.
VirtualHost "guest.live.azdigi.info"
authentication = "anonymous"
c2s_require_encryption = false
- Edit file my-domain-config.js
Open the file /etc/jitsi/meet/live.azdigi.info-config.js and edit the following:
hosts: {
 // XMPP domain.
 domain: 'live.azdigi.info',
 anonymousdomain: 'guest.example.com',
To
anonymousdomain: 'guest.live.azdigi.info',
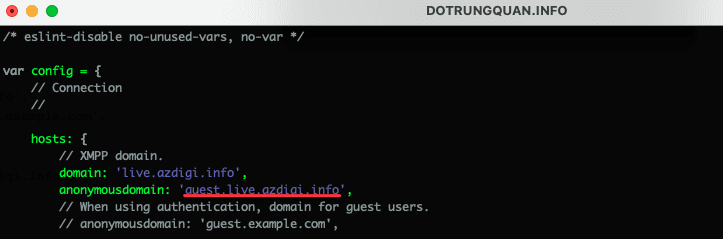
By using guest.your_domain, you will notify Jitsi Meet that you want to use this domain for user Guests when they log in. Please open the file and edit it as follows:
vi /etc/jitsi/jicofo/sip-communicator.properties
org.jitsi.jicofo.auth.URL=XMPP:live.azdigi.info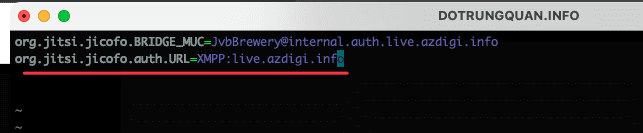
This is the configuration for processing Jitsi Meet to the local server to serve the user when requested. Your Jitsi Meet is now fully configured, now only need to register a user to be able to create a conference room. Once the room is created, anyone can join without signing up to create an account. All those users only need the room URL and password to log in.
Please use Prosodyctl to register.
prosodyctl registerjitsi-meet.example.com
For example:
prosodyctl register azdigi live.azdigi.info azdigi@2021
In there:
- Login user: azdigi
- Domain name: live.azdigi.info
- Room password: azdigi@2021
And the last step, please restart the services.
sudo systemctl restart prosody.service
sudo systemctl restart jicofo.service
sudo systemctl restart jitsi-videobridge2.service
When you create the room, the screen will show:
IV. How to use Jitsi Meet basically
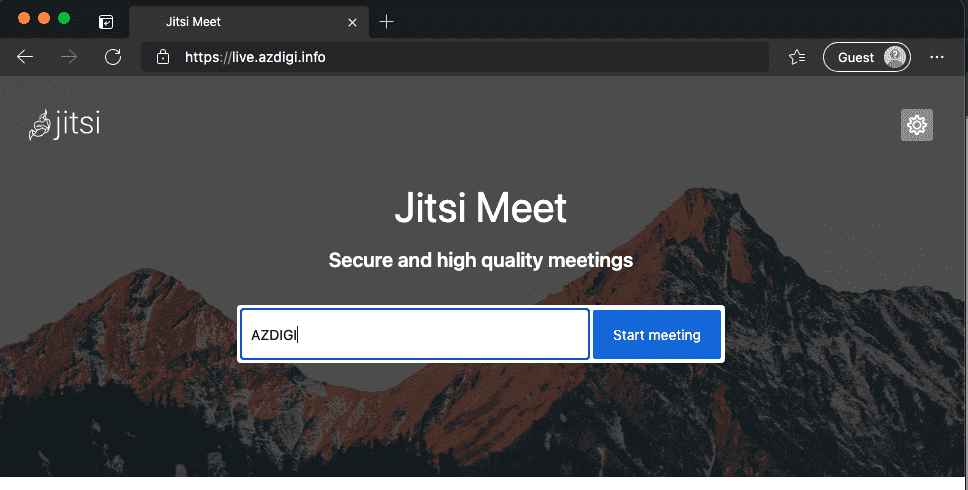
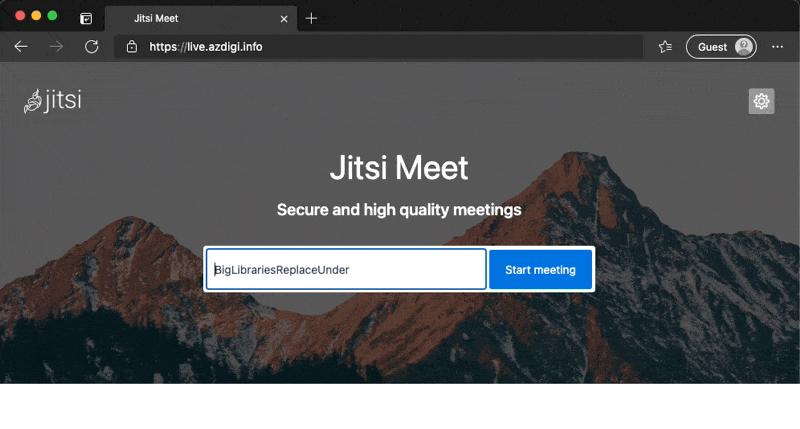
Step 1: Access to Jitsi Meet
On your browser, access Jitsi Meet by:
- Access by domain: https://my-domain
- Access by IP: http://your-server-ip
If you use mobile devices, you can Download Jitsi Meet from the app store:
Step 2: Create the first meeting room
After having access to Jitsi Meet, please set a name for the room and press Start Meeting to start.

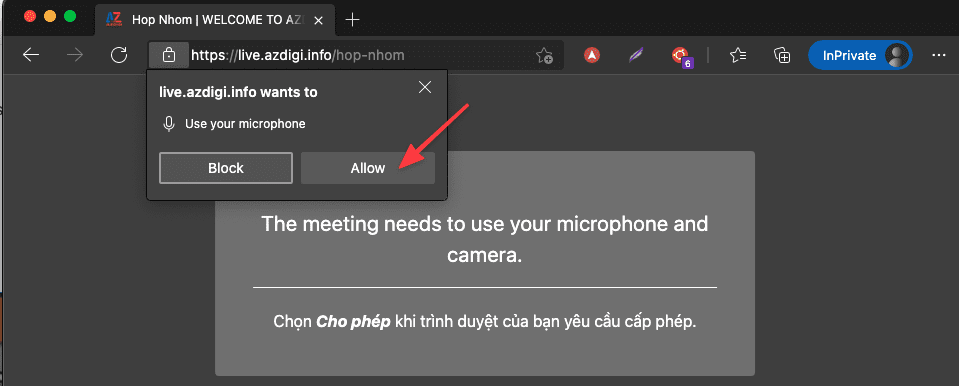
When asked if you want to allow connection to your camera & microphone, click Allow to accept.
Step 3: Features in the meeting
These are the main features of the meeting room of Jisti Meet:
- Turn on/off micro in the meeting
- Turn on/off the camera in the meeting
- Share your device screen in the meeting
- Live chat frame in the meeting
- Raise your hand to speak
- See the list of members in the meeting
- Adjust sound quality and photo frame
- Zoom in/out of the screen
- Set up meeting room security, set a password for the room
- Share online meeting on YouTube
- Share meeting call audio
- Customize the background image behind your camera
- Meeting statistics
- Personal information settings (device, profile, name, language)
- Suggestions for quick shortcuts in the meeting
- Show iframe information for you to embed the link
- End call

V. Advanced Configuration Jitsi Meet
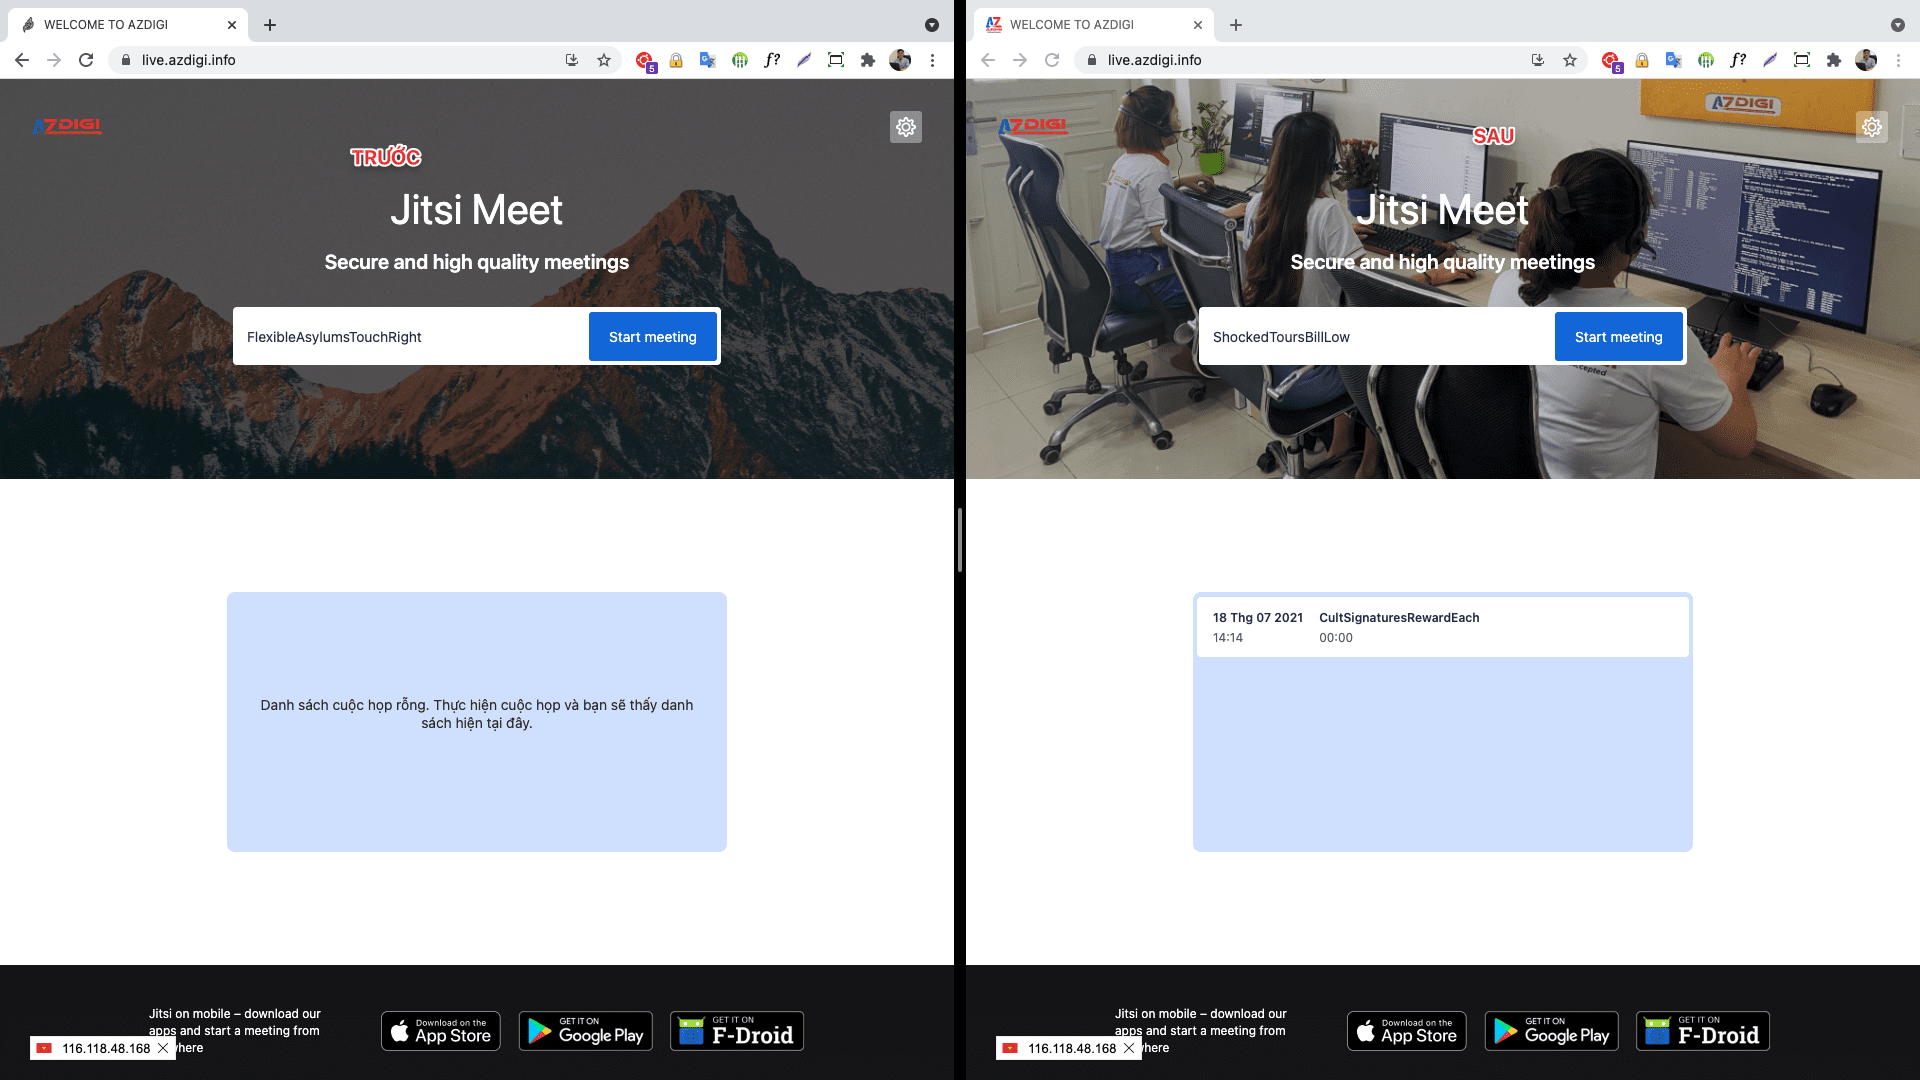
You can already use Jitsi Meet for meetings with just the above steps. However, if you want to change some advanced configurations, such as changing language, logo, favicon, background, and resolution, you can do it as follows:
1. Change language
Open the config.js file and add the command:
vi /etc/jitsi/meet/live.azdigi.info-config.js
defaultLanguage: 'vi',

Note: Because the translation language is not good. Therefore, you can open the file to configure the language at /usr/share/jitsi-meet/lang/main-vi.json to change the content of Vietnamese.
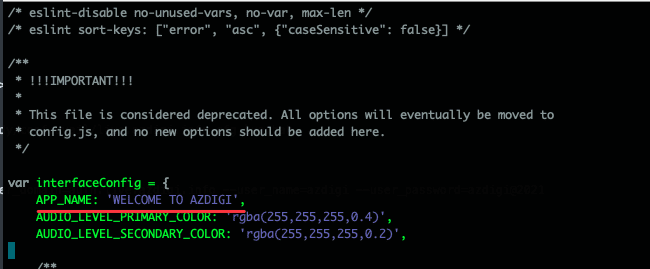
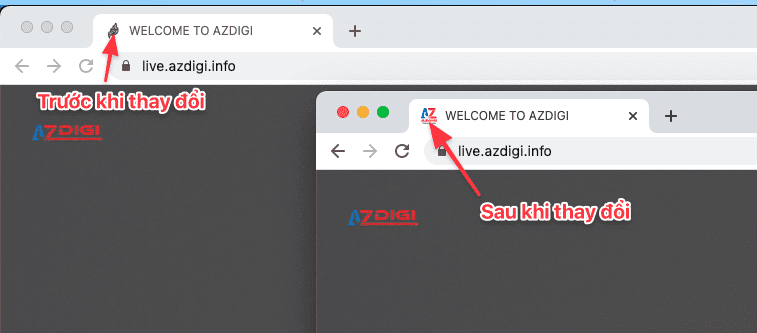
2. Change the title
The default title name is Jitsi Meet, but you can change it by opening the configuration file and editing it as follows:
vi /usr/share/jitsi-meet/interface_config.js
3. Change logo
vi /usr/share/jitsi-meet/interface_config.js
Here, paste in the URL of your logo and favicon:
- DEFAULT_LOGO_URL: URL of the logo
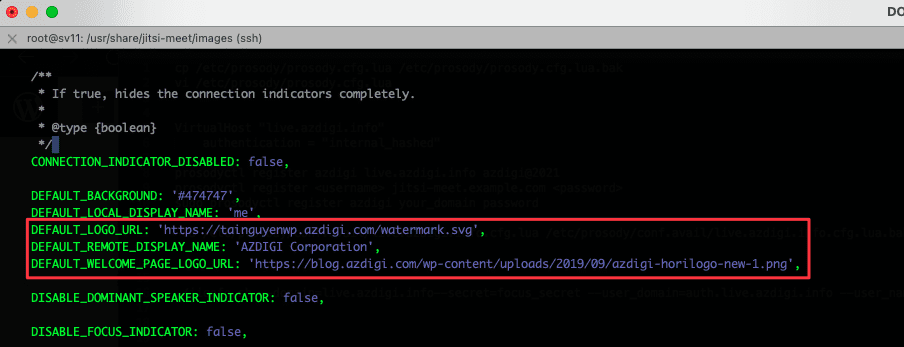
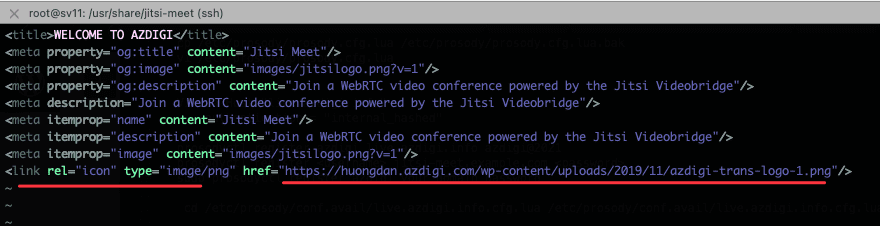
4. Change Favicon
Open the title.html file and paste into the URL of your Favicon file.
vi /usr/share/jitsi-meet/title.html
5. Change the background
To change your background, use the command: And change the link to your background.
cp /usr/share/jitsi-meet/images/welcome-background.png /usr/share/jitsi-meet/images/welcome-background.png.bak
cd /usr/share/jitsi-meet/images/
wget https://tainguyenwp.azdigi.com/welcome-background.png
Reboot to apply the changes:
/etc/init.d/jicofo restart && /etc/init.d/jitsi-videobridge2 restart && /etc/init.d/prosody restart && systemctl restart nginx
Wishing you success!
You might also like
About the author

Thạch Phạm
Đồng sáng lập và Giám đốc điều hành của AZDIGI. Có hơn 15 năm kinh nghiệm trong phổ biến kiến thức liên quan đến WordPress tại thachpham.com, phát triển website và phát triển hệ thống.