Nội dung
DKIM configuration guide on simple DirectAdmin with AZDIGI.
I. Overview
By default, when installing, DirectAdmin does not support DKIM initialization for email. DKIM will generate a signature in the outgoing email and the receiving mail server will check the signature against the domain’s DKIM DNS records to verify the signature and reduce the spam score if the verification is correct.
In this article, AZDIGI will show you how to enable DKIM on DirectAdmin and enable DKIM records for domains to help increase reliability when sending/receiving mail. For detailed steps, please go to part II.
II. Implementation Guide
To configure DKIM on DirectAdmin, you can perform the following steps.
Step 1: Check if Exim supports DKIM or not
- To check if Exim on your server supports DKIM or not, you can quickly check with the command:
/usr/sbin/exim -bV | grep 'Support for'
If the result is similar to the one below, it means that Exim supports DKIM.
[root@serverlab3 /]# /usr/sbin/exim -bV | grep 'Support for'
2021-01-26 02:54:42 cwd=/ 2 args: /usr/sbin/exim -bV
Support for: crypteq IPv6 Perl OpenSSL move_frozen_messages Content_Scanning DKIM DNSSEC Event OCSP PIPE_CONNECT PRDR TCP_Fast_Open Experimental_SRS
Otherwise, if the above result is not displayed, then you need to recompile Exim according to Step 2.
Step 2: Add DKIM to Exim
- Download the DKIM configuration file for Exim
cd /etc && wget -O exim.dkim.conf http://files.directadmin.com/services/exim.dkim.conf
- Edit the Exim configuration file
vi /etc/exim.conf
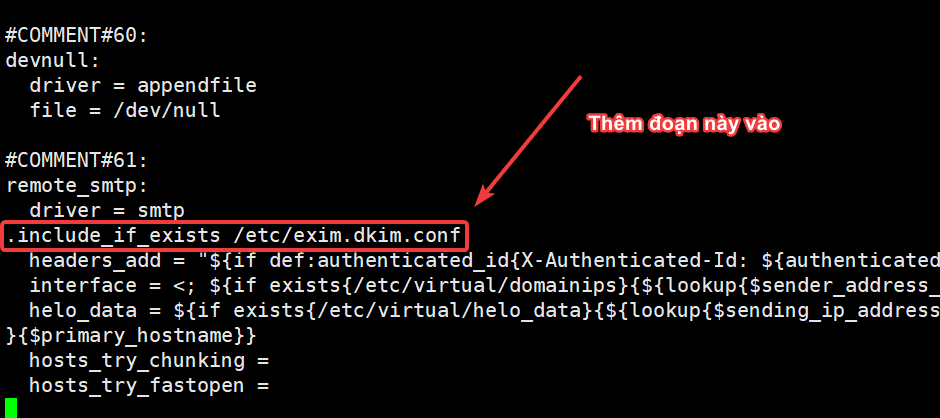
Next, find the section:
remote_smtp:
driver = smtp
And fill in the following content:
.include_if_exists /etc/exim.dkim.conf

- Restart the Exim service
systemctl status exim
Step 3: Enable DKIM on DirectAdmin
First, we should back up the DA configuration file, then add the “dkim=1” parameter to this configuration file:
cd /usr/local/directadmin                                  (Di chuyển đến thư mục directadmin)
cp -f conf/directadmin.conf conf/directadmin.conf.backup   (Backup file directadmin.conf)
echo 'dkim=1' >> conf/directadmin.conf                     (Thêm tham số dkim=1' vào file directadmin.conf)
- Restart DirectAdmin
systemctl restart directadmin
Step 4: Enable DKIM record for the domain
- To create a DKIM record for a certain domain, use the following command:
cd /usr/local/directadmin/scripts
./dkim_create.sh azdigi.cf         (Thay azidig.cf bằng tên miền của bạn)

- If you want to enable DKIM for all existing domains on the system, run the following command:
echo "action=rewrite&value=dkim" >> /usr/local/directadmin/data/task.queue
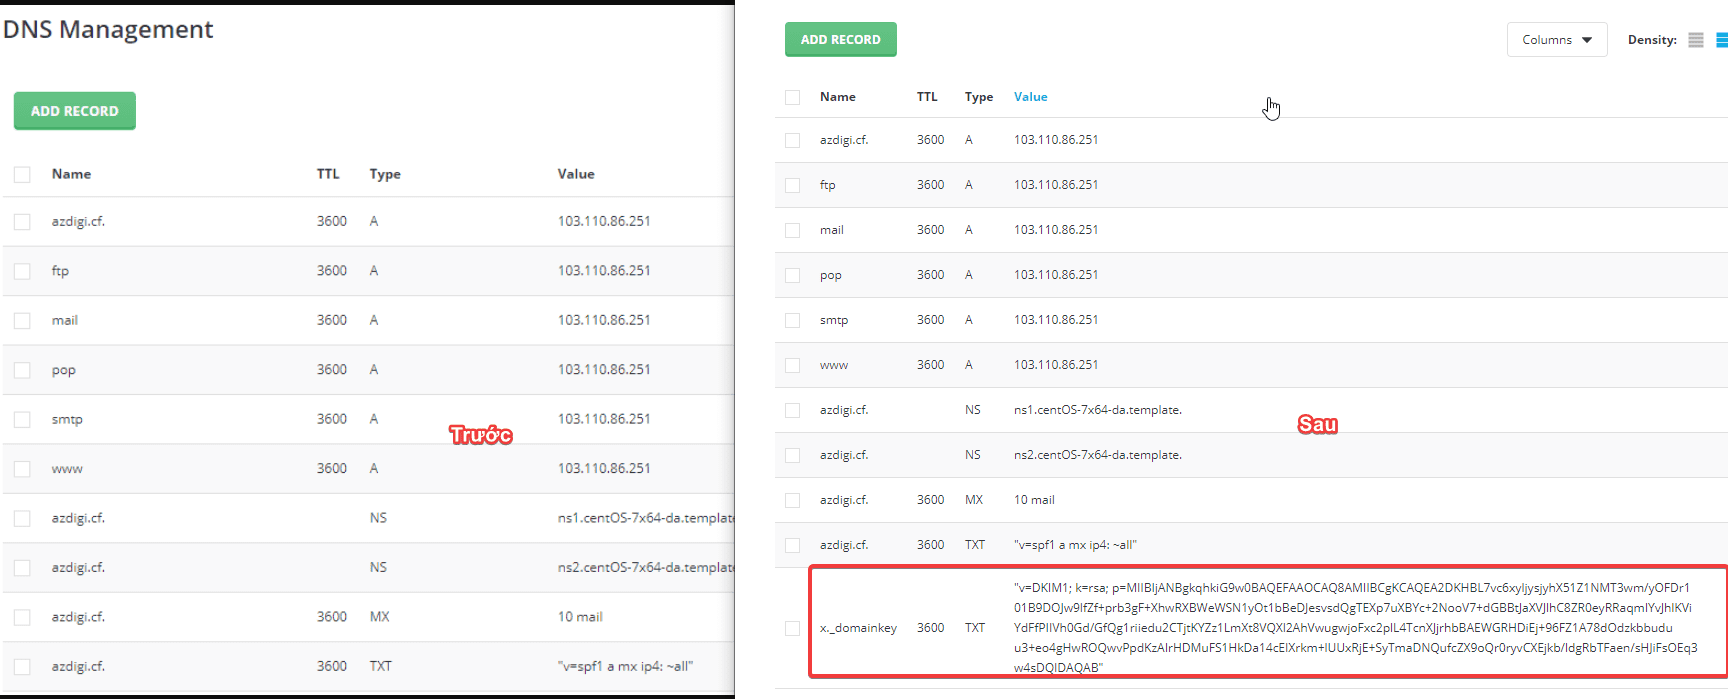
So you have configured DKIM for the domain completely, you can go to DirectAdmin => Domain => DNS Management to see if the DKIM record has been created or not. As shown below is the created DKIM record.

If you are not using DirectAdmin’s direct DNS on the server, then you need to update the above DKIM record in your domain’s DNS.
Note: When updating, in addition to updating the DKIM record, remember to update the SPF record as well.
       Name                  Type               Value
     azdigi.cf               TXT         "v=spf1 a mx ip4: ~all"
  x._domainkey               TXT         "v=DKIM1; k=rsa; p=MIIBIjANBgkqhkiG9w0BAQEFAAOCAQ8AMIIBCgKCAQEA2DKHBL7vc6xyIjysjyhX51Z1NMT3wm/yOFDr101B9DOJw9lfZf+prb3gF+XhwRXBWeWSN1yOt1bBeDJesvsdQgTEXp7uXBYc+2NooV7+dGBBtJaXVJlhC8ZR0eyRRaqmIYvJhlKViYdFfPIIVh0Gd/GfQg1riiedu2CTjtKYZz1LmXt8VQXl2AhVwugwjoFxc2plL4TcnXJjrhbBAEWGRHDiEj+96FZ1A78dOdzkbbuduu3+eo4gHwROQwvPpdKzAIrHDMuFS1HkDa14cEIXrkm+lUUxRjE+SyTmaDNQufcZX9oQr0ryvCXEjkb/ldgRbTFaen/sHJiFsOEq3w4sDQIDAQAB"
III. Summary
Thus, in this article, AZDIGI has shown you how to enable DKIM on DirectAdmin and create a DKIM record for the domain for authentication and greater reliability in using the mail domain. If you find this article useful, don’t forget to share it widely!
Hope this article will be of help to you. Wishing you success!
See more useful articles about DirectAdmin at the following link:
If you need assistance, you can contact support in the ways below:

