Configuring DKIM SPF DMARC on Centos Web Panel makes your emails more reliable when sent out and the ability to go into the inbox of other servers is higher with emails without DKIM, SPF and DMARC configured.
I. Overview
What is DKIM?
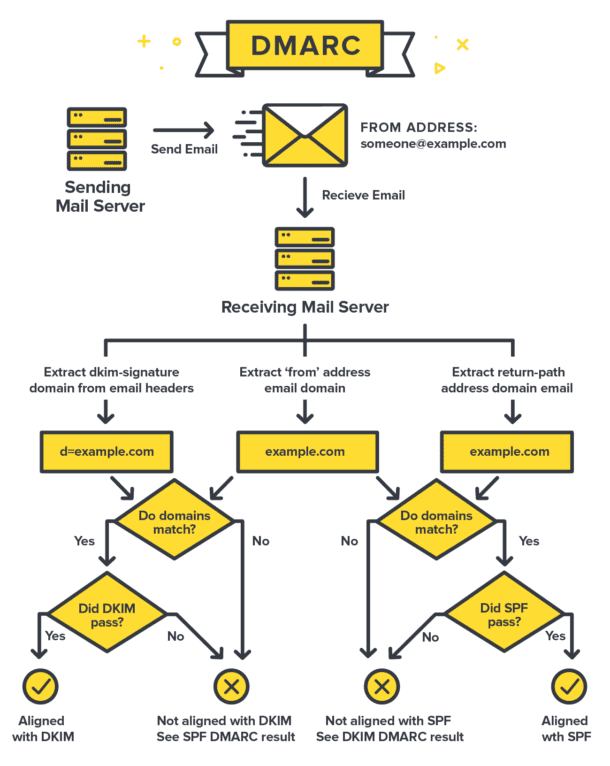
DKIM (Domain Keys Identified Mail) is a method to help authenticate emails through the digital signature of the mailing domain, this helps to avoid email spoofing, the original purpose of DKIM was designed to The recipient can determine which email is coming from a specific domain, whether the domain is real, authorized or not.
What is SPF?
SPF (SPF Record – Sender Policy Framework) is a way to confirm an email server is allowed to send email under a certain domain name. For example, I only want emails of the form @azdigi.cf sent to have an IP address of 45.252.249.106, and emails of the form @azdigi.cf sent from a non-IP server 45.252.249.106 are all fake and not allowed to send, then SPF will do this. The receiving mail server will automatically discard all emails sent as @azdigi.cf from non-IP addresses 45.252.249.106 and of course, the receiving mail server must have this SPF check function.
What is DMARC?
DMARC is a standard to block spammers from using the domain owner’s domain without their permission, which we call spoofing. When using mail, anyone can easily spoof the address in the “From” field in outgoing mail. DMARC will ensure these fake mail will be intercepted before they reach the recipient’s mailbox and only valid mail will be accepted into the system.
DMARC goes further than DKIM and SPF when it gives us the power to set a policy to reject or quarantine (usually putting this mail in the SPAM folder) an email from an unknown source obvious or unreliable based on the results of DKIM and SPF.
DMARC allows you to tell the mail servers on the receiving side what to do when SPF or DKIM fails or isn’t available. Below is a description of how SPF and DKIM work together with DMARC.

In addition, to be able to quickly own a reputable and quality Email Hosting service, you can refer to AZDIGI’s Email Hosting service at a very favorable price, which also supports fully configuring the records to make your Email highly reliable and easy to INBOX of some major Mail servers such as Yahoo, Gmail, Outlook…
II. Implementation Guide
To configure DKIM, SFP on Centos Web Panel, follow these 4 steps.
Step 1: Check to send mail
First, you need to prepare a mail account to check to send mail. You can refer to the article below if you do not know how to create it.
After creating a successful email, I will now try to use that email to send mail to another mail server to see what the result is. Here I will send mail to the Gmail server, this is one of the best security and filter servers available today. As shown below, the email I sent immediately fell into Gmail’s SPAM mailbox, which means that the mail sent from my server is not reliable enough to be able to enter the inbox of Gmail.
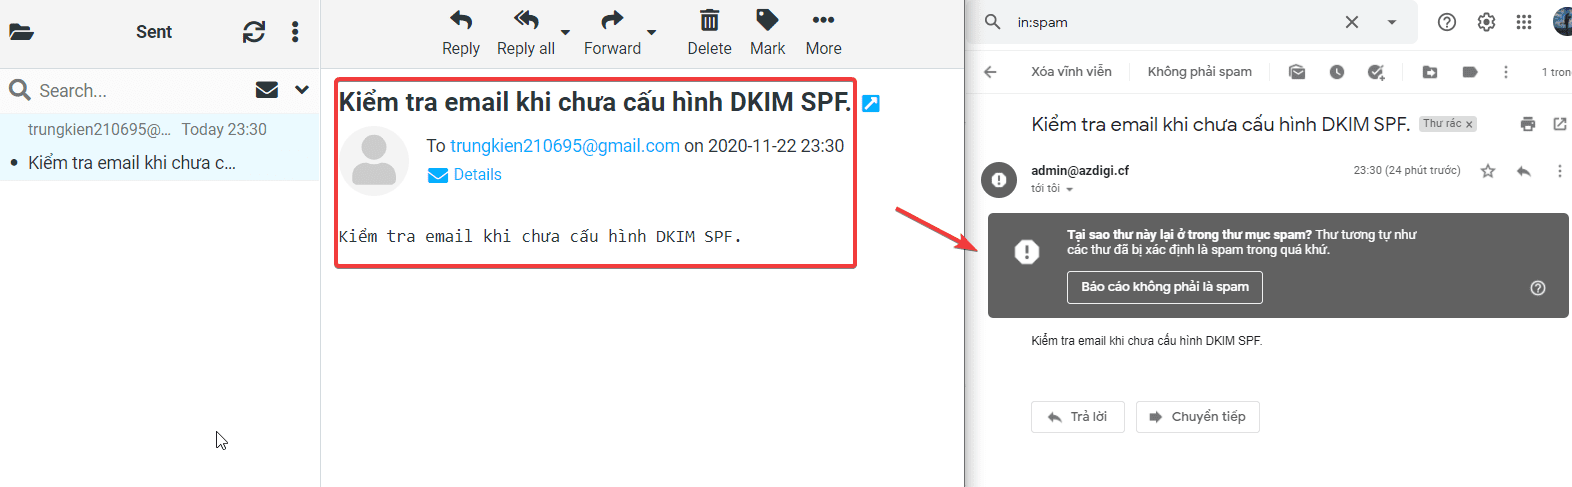
If your email has this problem, you can check the factors that determine the reliability of an email. Email reliability is determined by the DKIM, SPF, DMARC records configured on that mail server. If your outgoing email falls into SPAM, immediately check whether your email address has been fully configured with the above records.
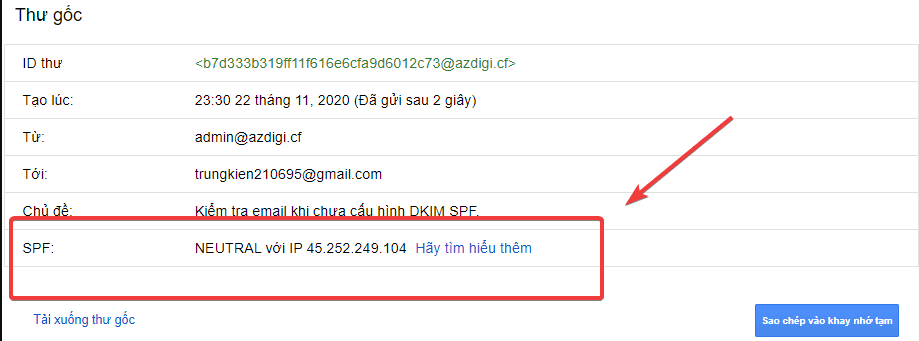
And when I checked the display of the original email in Gmail, it was true that my email address isn’t configured with DKIM, SPF, DMARC records.
So now I will need to fully configure the DKIM, SPF, DMARC records and then try sending the mail again. Please continue to see the configuration of these records in Centos Web Panel with step 2.
Step 2: Configure DKIM, SPF, DMARC records
Install DKIM, SPF, DMARC
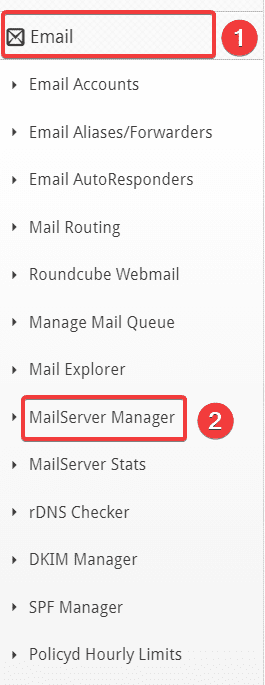
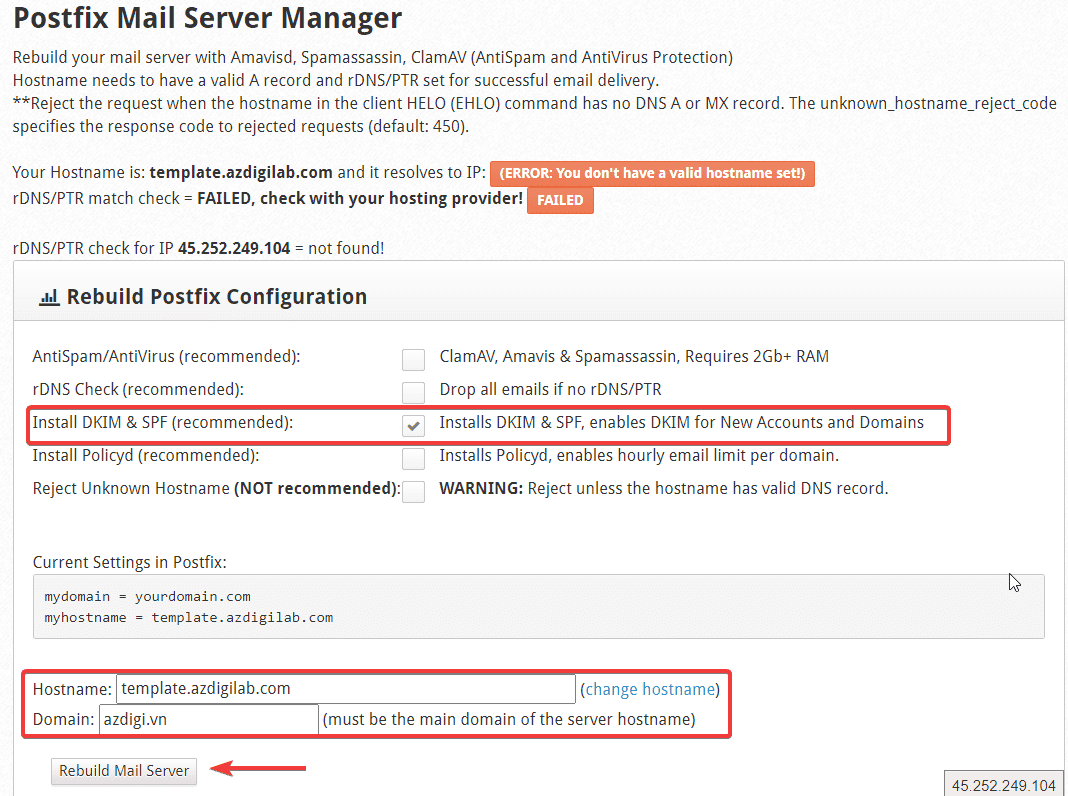
To install the above records, you need to access Centos Web Panel as root and after successful login, go to Email => MailServer Manager
At the next interface, click Install DKIM & SPF. => enter the hostname of the VPS and the corresponding domain name to configure DKIM, SPF => click Rebuild Mail Server to start the installation.
Enable DKIM, SPF, DMARC
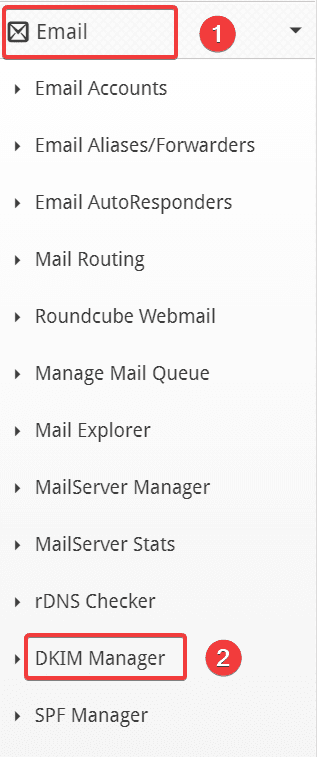
To enable DKIM & SPF, go to Email => DKIM Manager
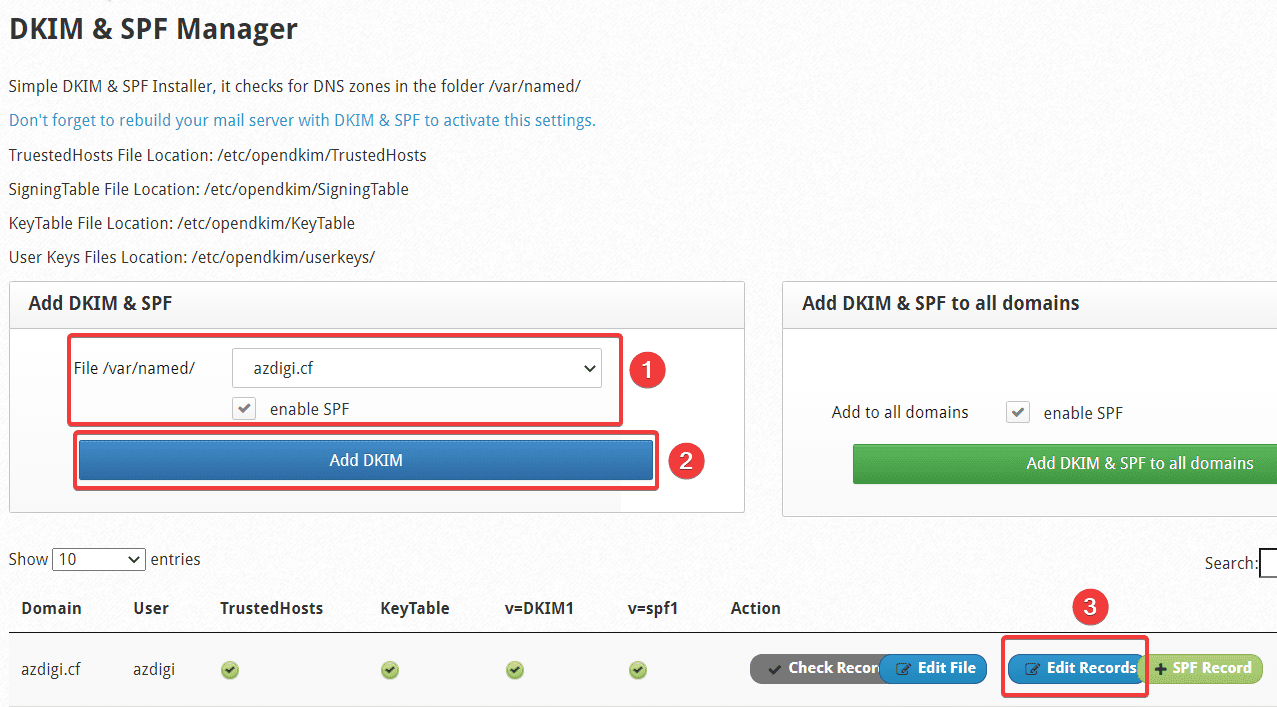
At the interface below, you do the following in turn:
- 1 – Select the domain to activate DKIM , and tick enable SPF
- 2 – Click Add DKIM
- 3 – Click Edit Records to get the records after activation
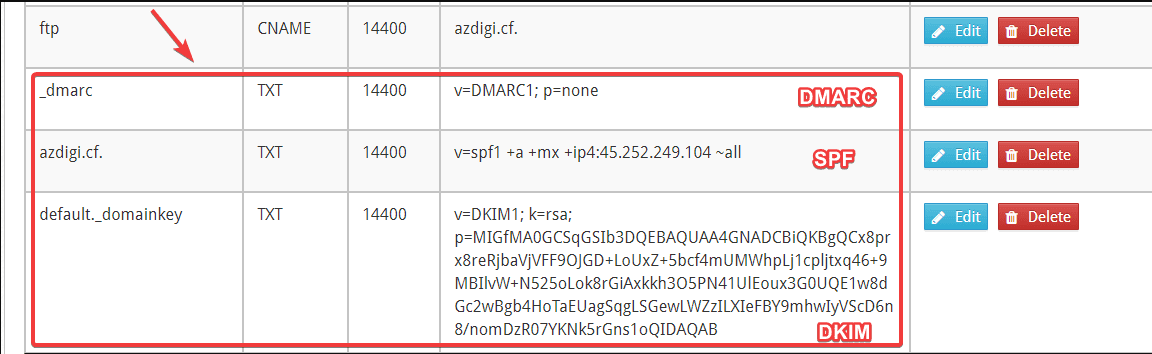
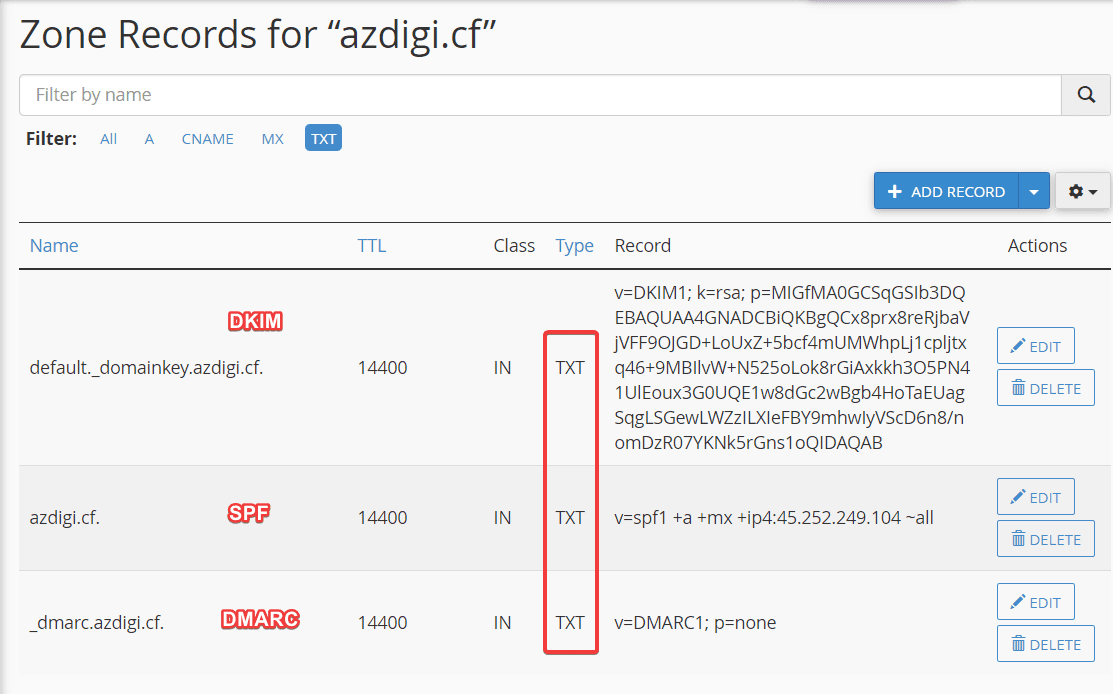
At the next Zone Editor interface, you scroll down to the bottom and get the content of the records.
Step 3: Point the record for the domain name
After you have the content of the DKIM, SPF, DMARC records in step 2, you need to access your domain admin page to point to these records.
Step 4: Recheck sending mail after configuration
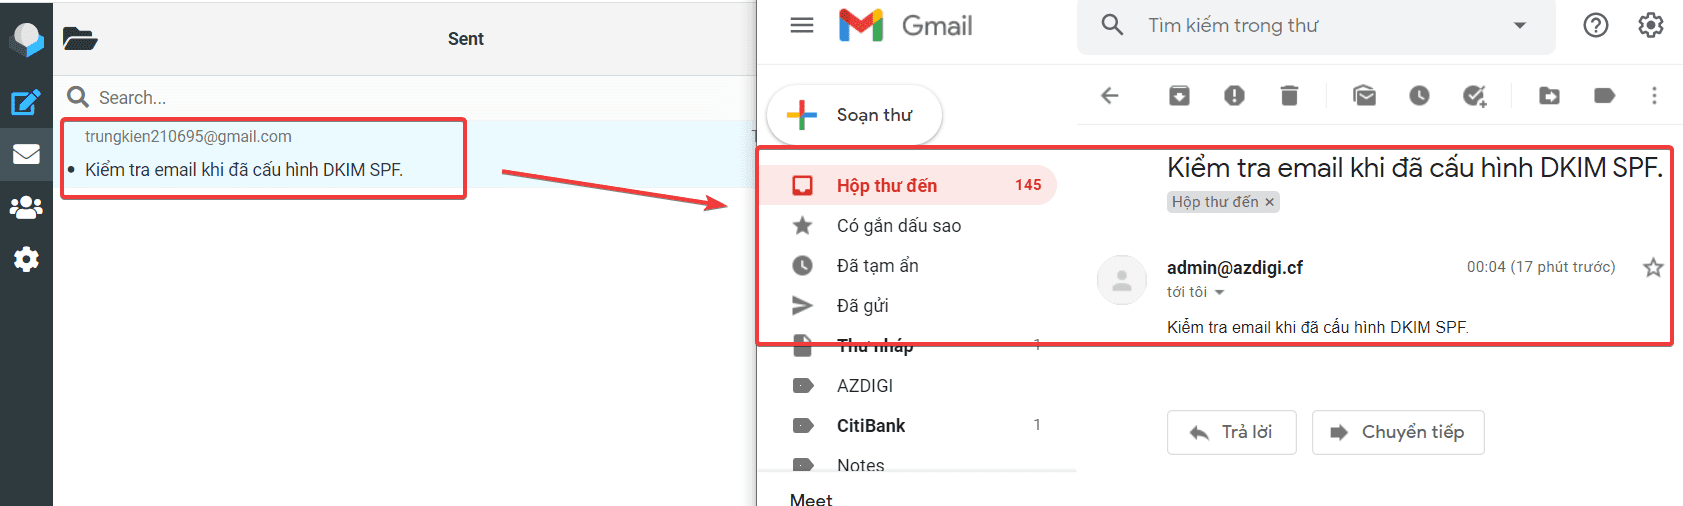
As shown below, after the configuration is complete, I resend the email, the email has been in Gmail’s inbox.
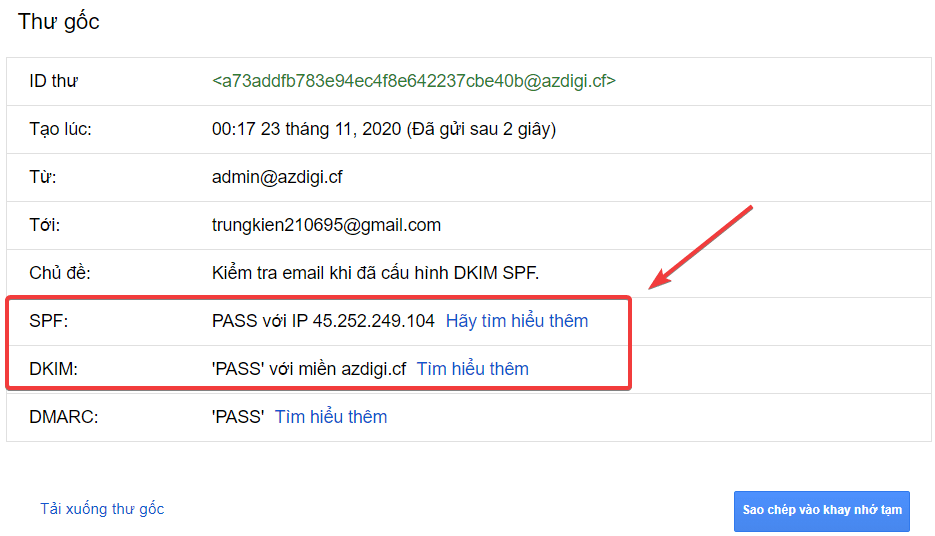
And I checked the display of the original message in Gmail, the DKIM, SPF, DMARC records were fully authenticated (Pass means passed the authentication step).
III. Summary
So AZDIGI has shown you how to fully configure DKIM, SPF, DMARC records to increase reliability and improve the ability to access the inbox of notable Mail servers with high accuracy. This helps you or your brand become more reputable and appreciated. However, you need to note that not emails when fully updating the records will default to the inbox because, in addition to the above records, there are some other factors such as the trust of the domain name, the domain name has Was it a phishing attack, was the email spammed by the user?
Hopefully, this article will help you configure DKIM, SPF, DMARC successfully and help you in finding the best solution for your Email usage. If you find the article helpful, please share it widely.
You can refer to other articles about CWP at the link below:
If you need assistance, you can contact support in the ways below:
- Hotline 247: 028 888 24768 (Ext 0)
- Ticket/Email: You use the email to register for the service and send it directly to: support@azdigi.com
About the author

Thạch Phạm
Đồng sáng lập và Giám đốc điều hành của AZDIGI. Có hơn 15 năm kinh nghiệm trong phổ biến kiến thức liên quan đến WordPress tại thachpham.com, phát triển website và phát triển hệ thống.