
How to install Let’s Encrypt SSL on LarVPS
In this article, AZDIGI will guide you on installing the Let’s Encrypt SSL certificate on websites using the LarVPS script in the simplest and fastest way, please follow along.
I. Overview
What is an SSL certificate?
SSL is a type of certificate that helps encrypt information on devices or applications that support encryption using SSL certificates. SSL certificate will have Private Key and Public Key, in which Public Key will be installed in terminal applications that browsers or other applications can access. Private Key will be installed in applications that handle receiving data.
Its purpose of operation is like the key to helping decrypt the data sent from the terminal, which is also encrypted through the Public Key.
What is Let’s Encrypt?
Let’s Encrypt is an SSL authentication organization like Comodo, GeoTrust and Symantec, but the difference is that they are a non-profit organization established with the auspices of influential organizations in the world Cisco, Akamai, Mozilla, Facebook… Therefore, Let’s Encrypt SSL certificates will be no different from other types of SSL certificates. However, you must renew them every 90 days to continue using them.
In addition, you can find out more about LarVPS at the homepage below:
So how to install Let’s Encrypt SSL on a website using LarVPS, please see the steps below.
II. Implementation Guide
To install Let’s Encrypt SSL on LarVPS, you can follow the 3 steps below.
Step 1: SSH into your LarVPS server
First, you need to SSH into your VPS as root, if you don’t know how to SSH, you can see the instructions below:
Step 2: Install SSL
Note: Before installing SSL, you need to make sure that the domain has been pointed to the server IP. If not pointed, you will not be able to install it successfully.
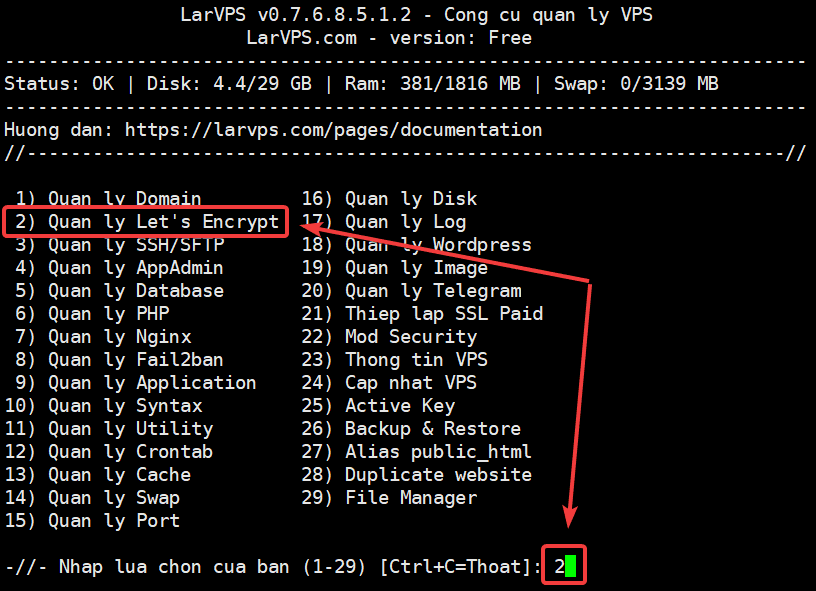
After SSHing into your VPS, type larvps to access the LarVPS menu. At the menu, you notice and type the number corresponding to the function to use.
Now I need to install SSL Let’s Encrypt for the website, I press the 2 key corresponding to the Let’s Encrypt Management section.
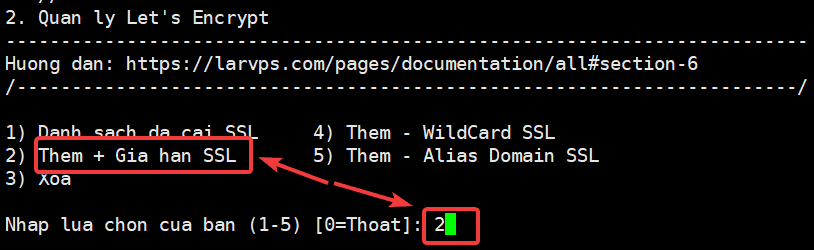
After entering the Let’s Encrypt Management section, you need to select the number corresponding to the operation.
Here because I will install the new Let’s Encrypt on the website, I will type the number 2 corresponding to Add + Renew SSL (If you need to renew the SSL for the previously installed website, also type 2)
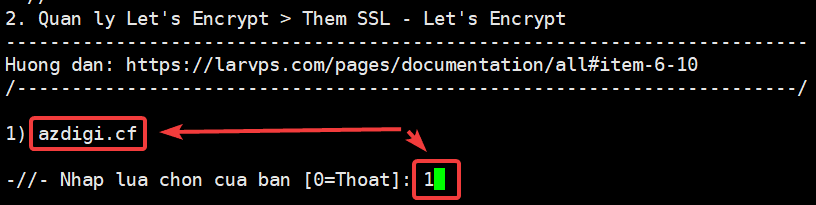
After entering the Add + Renew SSL section, you continue to choose the number corresponding to the website to be installed.
I need to install SSL for a website named azdigi.cf, then I will choose the corresponding number 1 as follows:
After selecting the website to be installed, you continue to fill in information such as email to receive notifications or renew later. At the same time, click Y (corresponding to Yes) to agree to the terms of Let’s Encrypt.
Saving debug log to /var/log/letsencrypt/letsencrypt.log Plugins selected: Authenticator nginx, Installer nginx Enter email address (used for urgent renewal and security notices) (Enter 'c' to cancel): kiendt@azdigi.vn- - - - - - - - - - - - - - - - - - - - - - - - - - - - - - - - - - - - - - - - Please read the Terms of Service at https://letsencrypt.org/documents/LE-SA-v1.2-November-15-2017.pdf. You must agree in order to register with the ACME server. Do you agree? - - - - - - - - - - - - - - - - - - - - - - - - - - - - - - - - - - - - - - - - (Y)es/(N)o: Y
- - - - - - - - - - - - - - - - - - - - - - - - - - - - - - - - - - - - - - - - Would you be willing, once your first certificate is successfully issued, to share your email address with the Electronic Frontier Foundation, a founding partner of the Let's Encrypt project and the non-profit organization that develops Certbot? We'd like to send you email about our work encrypting the web, EFF news, campaigns, and ways to support digital freedom. - - - - - - - - - - - - - - - - - - - - - - - - - - - - - - - - - - - - - - - - (Y)es/(N)o: Y Account registered. Requesting a certificate for azdigi.cf and www.azdigi.cf Performing the following challenges: http-01 challenge for azdigi.cf http-01 challenge for www.azdigi.cf Waiting for verification... Cleaning up challenges Deploying Certificate to VirtualHost /etc/nginx/conf.d/azdigi.cf.conf Deploying Certificate to VirtualHost /etc/nginx/conf.d/azdigi.cf.conf Redirecting all traffic on port 80 to ssl in /etc/nginx/conf.d/azdigi.cf.conf Redirecting all traffic on port 80 to ssl in /etc/nginx/conf.d/azdigi.cf.conf
- - - - - - - - - - - - - - - - - - - - - - - - - - - - - - - - - - - - - - - - Congratulations! You have successfully enabled https://azdigi.cf and https://www.azdigi.cf - - - - - - - - - - - - - - - - - - - - - - - - - - - - - - - - - - - - - - - - Subscribe to the EFF mailing list (email: kiendt@azdigi.vn). We were unable to subscribe you the EFF mailing list because your e-mail address appears to be invalid. You can try again later by visiting https://act.eff.org.
IMPORTANT NOTES: - Congratulations! Your certificate and chain have been saved at: /etc/letsencrypt/live/azdigi.cf/fullchain.pem Your key file has been saved at: /etc/letsencrypt/live/azdigi.cf/privkey.pem Your cert will expire on 2021-04-05. To obtain a new or tweaked version of this certificate in the future, simply run certbot again with the "certonly" option. To non-interactively renew *all* of your certificates, run "certbot renew" - If you like Certbot, please consider supporting our work by:
Donating to ISRG / Let's Encrypt: https://letsencrypt.org/donate Donating to EFF: https://eff.org/donate-le
nginx: the configuration file /etc/nginx/nginx.conf syntax is ok nginx: configuration file /etc/nginx/nginx.conf test is successful
So you have successfully installed SSL.
Step 3: Check the certificate after installation
To more accurately check if your website has successfully installed SSL, you can check more through the 2 methods below.
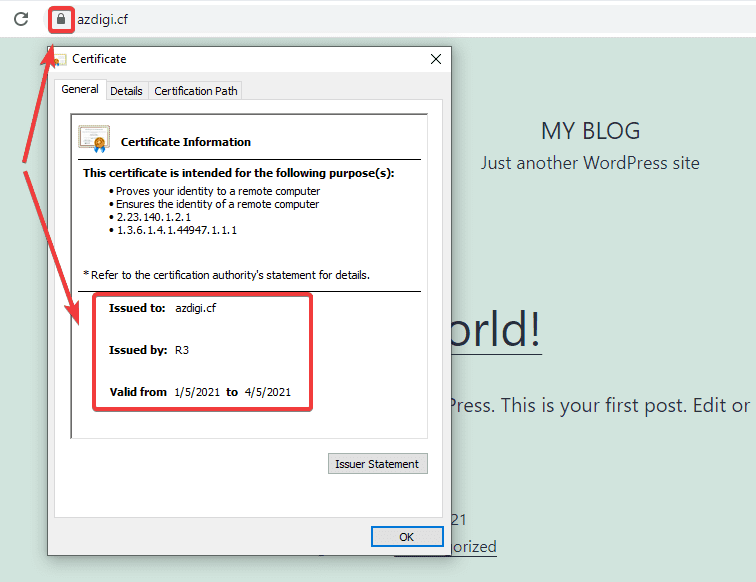
Method 1: Check from the browser
You can access your website in a browser and click on the padlock icon as shown below. It will display which company’s certificate the website uses and specify the issue date and expiration date.
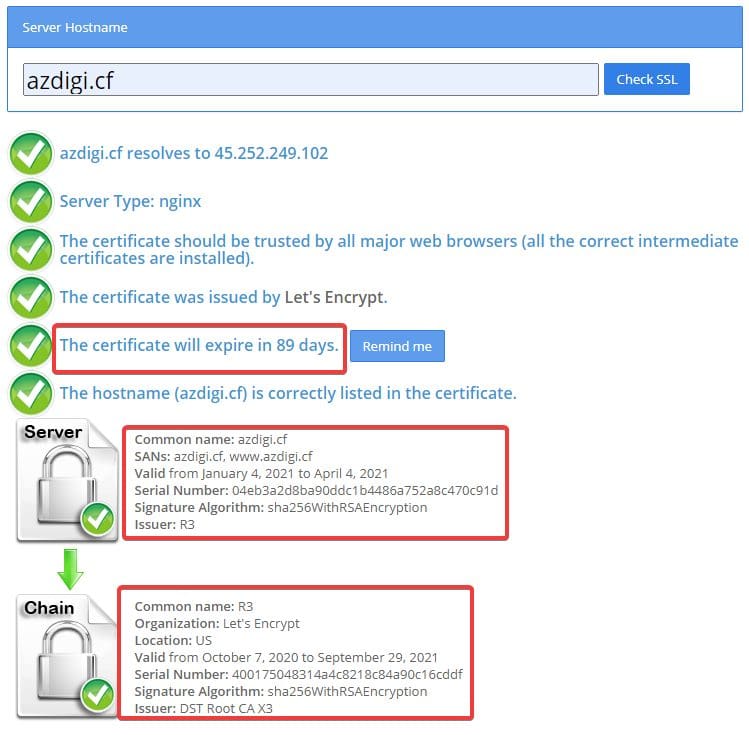
Method 2: Check from the SSL Shopper page
You can access the SSL Checker page by following the link: https://www.sslshopper.com/ssl-checker.html
Then you enter your domain and click Check SSL. At this point, all information about the website’s certificate will be fully displayed as below:
III. Summary
So in this article, AZDIGI showed you how to install SSL Let’s Encrypt on your website using the LarVPS script completed with just a few simple steps. Installing SSL may seem simple, but it can be quite helpful for your website in terms of security as well as being great for SEO. Hopefully, this article will help you to install Let’s Encrypt SSL successfully!
If you find the article helpful, please share it widely.
If you need assistance, you can contact support in the ways below:
- Hotline 247: 028 888 24768 (Ext 0)
- Ticket/Email: You use the email to register for the service and send it directly to: support@azdigi.com
About the author

Thạch Phạm
Đồng sáng lập và Giám đốc điều hành của AZDIGI. Có hơn 15 năm kinh nghiệm trong phổ biến kiến thức liên quan đến WordPress tại thachpham.com, phát triển website và phát triển hệ thống.