
Trong bài hướng dẫn này mình sẽ chỉ các bạn cách cài đặt MySQL trên Ubuntu 20.04.
I. Giới thiệu
MySQL là một hệ quản trị cơ sở dữ liệu mã nguồn mở, thường được cài đặt như một phần của hệ thống sử dụng bộ LAMP (Linux, Apache, MySQL, PHP/Python/Perl) phổ biến. Nó triển khai mô hình quan hệ và sử dụng Structured Query Language (hay còn được gọi tắt là SQL) để quản lý dữ liệu của nó.
Bài hướng dẫn này AZDIGI sẽ mô tả về cách cài đặt phiên bản MySQL 8.0 trên máy chủ Ubuntu 20.04. Sau khi hoàn thành quá trình cài đặt, bạn sẽ có một hệ cơ sở dữ liệu đang hoạt động mà bạn có thể sử dụng để phục vụ cho các trang web hoặc ứng dụng khác của mình.
Điều kiện cần có: Một máy chủ chạy hệ điều hành Ubuntu 20.04 với người dùng quản trị là root hoặc người dùng có quyền sudo và tường lửa được định cấu hình bằng UFW.
II. Cài đặt MySQL trên Ubuntu 20.04
Để cài đặt MySQL trên Ubuntu 20.04 chúng ta cần thực hiện 3 bước sau.
Bước 1: SSH vào hệ thống Ubuntu 20.04 của bạn
Để cài đặt MySQL trên Ubuntu 20.04, đầu tiên chúng ta cần SSH hoặc truy cập VPS hoặc máy chủ của bạn với quyền root trước hoặc ít nhất là với người dùng có quyền sudo. Nếu bạn chưa biết cách SSH vào VPS hoặc Server của bạn thì bạn có thể tham khảo bài viết hướng dẫn sau:
Sau khi đã SSH thành công với quyền root, chúng ta tiếp tục với bước 2 để thực hiện các lệnh cài đặt MySQL trên Ubuntu 20.04.
Bước 2: Thực hiện lệnh Cài đặt MySQL trên Ubuntu 20.04
Trên Ubuntu 20.04, bạn có thể cài đặt MySQL bằng cách sử dụng kho lưu trữ gói APT. Tại thời điểm viết bài này, phiên bản MySQL có sẵn trong kho lưu trữ Ubuntu mặc định là phiên bản 8.0.22.
Để cài đặt MySQL, chúng ta sẽ cần cập nhật chỉ mục gói trên máy chủ của bạn trong trường hợp gần đây bạn chưa làm như vậy:
sudo apt update
Sau khi quá trình cập nhật đã xong, chúng ta tiến hành cài đặt gói mysql-server với lệnh sau:
sudo apt install mysql-server
Khi được hỏi các bạn hãy chọn Y để cho phép quá trình cài đặt được tiếp tục.


Thao tác này sẽ cài đặt MySQL, nhưng sẽ không yêu cầu bạn đặt mật khẩu hoặc thực hiện bất kỳ thay đổi cấu hình nào khác. Vì vậy điều này sẽ khiến quá trình cài đặt MySQL của bạn không an toàn vì cấu hình chỉ ở mức mặc định, chúng ta sẽ giải quyết vấn đề này trong các bước tiếp theo.
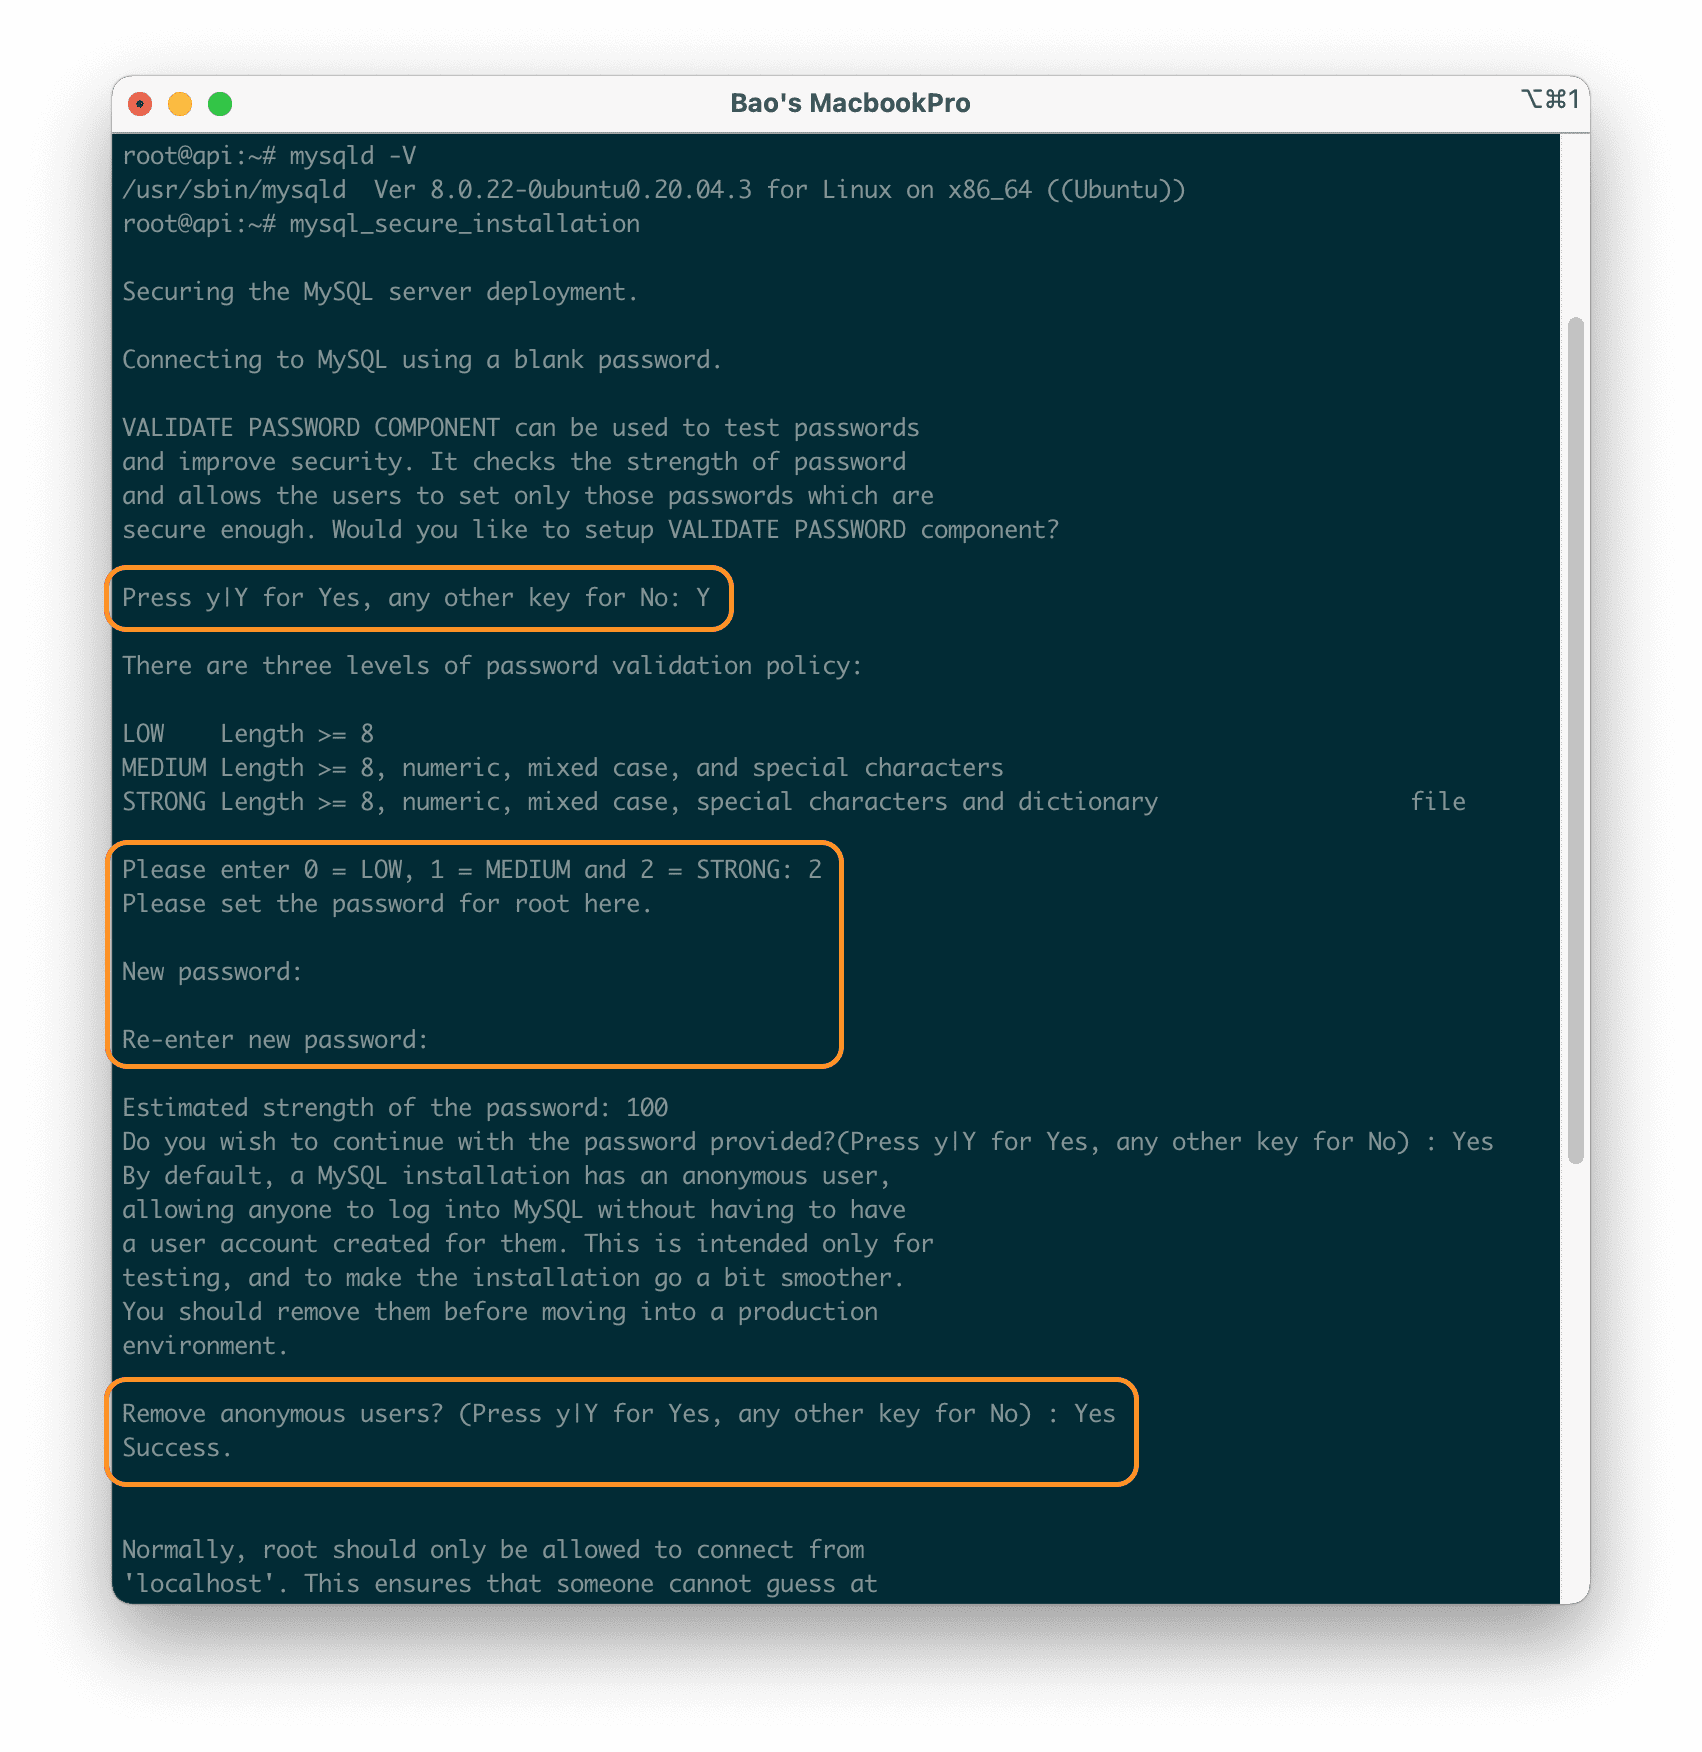
Sau khi cài đặt hoàn tất các bạn sử dụng lệnh mysqld -V để kiểm tra phiên bản MySQL đã được cài đặt.
Bước 3: Cấu hình MySQL ban đầu
Đối với các bản cài đặt mới của MySQL, bạn sẽ cần chạy tập lệnh bảo mật đi kèm của DBMS(Database Management System). Tập lệnh này sẽ giúp thay đổi một số tùy chọn mặc định kém an toàn hơn cho những thứ như thông tin đăng nhập, quyền cho phép từ xa, người dùng anonymous và database test.
Các bạn cần chạy lệnh sau:
sudo mysql_secure_installation
Điều này sẽ đưa bạn qua một loạt câu hỏi mà bạn có thể thực hiện một số thay đổi cấu hình đối với các tùy chọn bảo mật sau khi cài đặt MySQL.
Câu hỏi đầu tiên sẽ hỏi bạn có muốn thiết lập xác thực mật khẩu hay không ngoài ra bạn cũng có thể đặt mức độ khó của mật khẩu và sau khi bạn đặt mật khẩu thì hệ thống cũng sẽ kiểm tra độ mạnh mật khẩu mà bạn đã đặt cho người dùng MySQL mới trước khi cho là hợp lệ hay không.
Nếu bạn chọn thiết lập yêu cầu mật khẩu xác thực, bất kỳ người dùng MySQL nào mà bạn tạo sẽ cần xác thực bằng mật khẩu và được yêu cầu có mật khẩu đáp ứng chính sách mà bạn chọn. Để yêu cầu cấp chính sách sử dụng mật khẩu mạnh nhất – mà bạn có thể chọn bằng cách nhập 2 – sẽ yêu cầu mật khẩu phải dài ít nhất tám ký tự và bao gồm hỗn hợp các ký tự viết hoa, viết thường, số và đặc biệt.
Bất kể bạn có chọn thiết lập mật khẩu xác thực hay không, câu hỏi tiếp theo sẽ là đặt mật khẩu cho người dùng root MySQL . Nhập mật khẩu và sau đó xác nhận lại một mật khẩu một lần nữa.
Và câu hỏi tiếp theo là bạn có muốn xóa những người dùng anonymous hay không? Bạn nên xóa bỏ những người dùng này.
Ở ba tùy chọn tiếp theo bạn sẽ được hỏi các thông tin sau.
- Có muốn vô hiệu hóa truy cập từ xa với người dùng
roothay không? Cái này thì tùy theo nhu cầu của bạn. Nếu muốn bảo mật thì nên chọnNo. - Có muốn xóa bỏ cơ sở dữ liệu test hay không? Thông thường thì bạn nên chọn
Yesvì nó hầu như không có ứng dụng thực tiễn nào cả. - Có yêu cầu tải lại các đặc quyền hay không? Mặc định là
Yestrong hầu hết tất cả các trường hợp.
Sau khi đã cấu hình xong hết bạn hoàn toàn có thể truy cập vào quản trị MySQL với lệnh mysql -u root -p và điền mật khẩu root MySQL mà bạn đã cấu hình trước đó.
mysql -u root -p

Với quyền root bạn đã toàn quyền để có thể tạo người dùng, database và rất nhiều thao tác mà các bạn muốn.
Đến đây thì quá trình cài đặt MySQL trên Ubuntu 20.04 của chúng ta đã hoàn thành.
III. Tổng kết
Như bạn có thể thấy đó, việc cài đặt MySQL trên Ubuntu 20.04 tương đối dễ dàng phải không nào. Nếu có thời gian mình sẽ viết thêm một bài về cách sử dụng MySQL với lệnh để giúp các bạn có thể làm quen cách tạo cơ sở dữ liệu, người dùng cũng như cách bật truy cập từ xa cho người dùng đó.
Nếu các bạn cần hỗ trợ các bạn có thể liên hệ bộ phận hỗ trợ theo các cách bên dưới:
- Hotline 247: 028 888 24768 (Ext 0)
- Ticket/Email: Bạn dùng email đăng ký dịch vụ gửi trực tiếp về: support@azdigi.com.
About the author

Thạch Phạm
Đồng sáng lập và Giám đốc điều hành của AZDIGI. Có hơn 15 năm kinh nghiệm trong phổ biến kiến thức liên quan đến WordPress tại thachpham.com, phát triển website và phát triển hệ thống.