
Xin chào, đây là Bài 17, bài cuối cùng trong serie “Docker từ Zero đến Hero trên VPS”.
Suốt 16 bài trước, bạn đã đi từ những khái niệm cơ bản nhất : Docker là gì, container là gì , đến việc build image, viết Dockerfile, quản lý volume, network, Docker Compose, reverse proxy, CI/CD, monitoring, logging… bạn đã có đầy đủ kiến thức nền tảng để triển khai bất kỳ ứng dụng nào trên VPS bằng Docker.
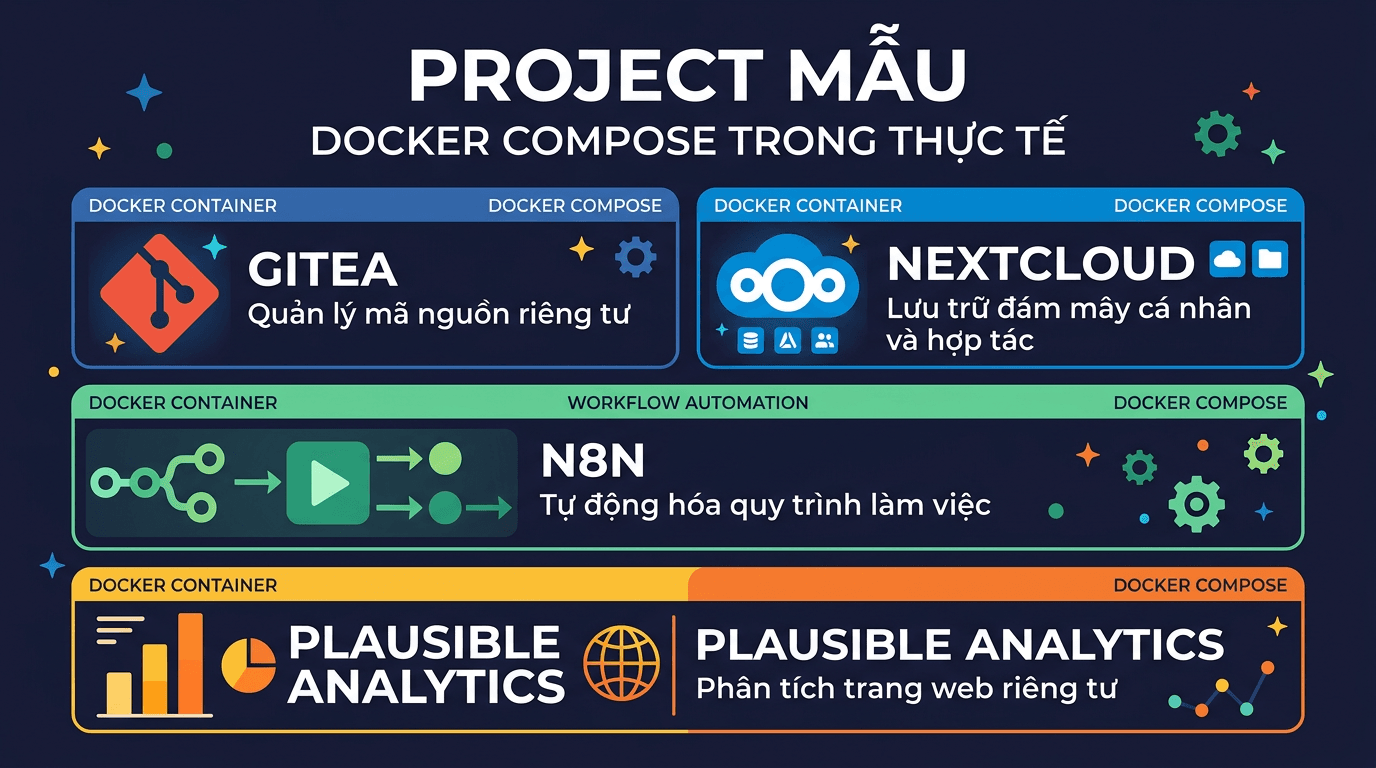
Bài cuối này, mình sẽ không dạy thêm lý thuyết nào mới. Thay vào đó, mình tổng hợp 5 project mẫu thực tế mà bạn có thể copy-paste docker-compose.yml → chạy ngay trên VPS. Mỗi project đều là ứng dụng self-hosted phổ biến, hữu ích, và minh họa rõ những gì bạn đã học trong serie.
Cuối bài, mình sẽ gộp tất cả lại thành một full VPS setup hoàn chỉnh với Nginx Proxy Manager, đúng kiểu production-ready.
Nhìn lại hành trình 16 bài
Trước khi bắt đầu, hãy cùng nhìn lại những gì bạn đã học:
- Bài 1-3: Docker là gì, cài đặt Docker trên VPS, các lệnh cơ bản (
docker run,docker ps,docker exec…). - Bài 4: Viết Dockerfile: build image riêng cho ứng dụng.
- Bài 5: Volume & Network: dữ liệu persistent và container giao tiếp với nhau.
- Bài 6-8: Docker Compose: từ cơ bản đến triển khai WordPress, LEMP stack hoàn chỉnh.
- Bài 9: Environment variables & secrets: cách quản lý cấu hình an toàn.
- Bài 10: Reverse proxy: một VPS, nhiều domain, SSL tự động.
- Bài 11: Deploy ứng dụng Node.js & Python với Docker.
- Bài 12: Backup & restore: bảo vệ dữ liệu Docker volume.
- Bài 13: Monitoring: Portainer, Uptime Kuma, cAdvisor.
- Bài 14: Centralized logging: thu thập và quản lý log container.
- Bài 15-16: CI/CD, Docker trong quy trình phát triển, multi-stage build, security best practices.
Tất cả những kiến thức trên sẽ được áp dụng trong các project bên dưới. Nếu bạn gặp khái niệm nào chưa rõ, hãy quay lại bài tương ứng để ôn lại nhé.
Project 1: Gitea – Self-hosted Git server
Gitea là gì?
Gitea là một Git server tự host, nhẹ và nhanh, có thể xem như phiên bản lightweight của GitHub hay GitLab. Gitea viết bằng Go, chạy cực nhẹ (chỉ cần ~200MB RAM), nhưng đầy đủ tính năng: quản lý repository, pull request, issue tracker, CI/CD tích hợp (Gitea Actions), và giao diện web dễ dùng.
Nếu bạn muốn tự host code riêng tư mà không phụ thuộc GitHub, hoặc cần Git server nội bộ cho team nhỏ, Gitea là lựa chọn tuyệt vời.
Cấu trúc thư mục
mkdir -p ~/apps/gitea && cd ~/apps/giteadocker-compose.yml
services:
  gitea:
    image: gitea/gitea:latest
    container_name: gitea
    restart: unless-stopped
    ports:
      - "3000:3000"
      - "2222:22"
    environment:
      - USER_UID=1000
      - USER_GID=1000
      - GITEA__database__DB_TYPE=postgres
      - GITEA__database__HOST=gitea-db:5432
      - GITEA__database__NAME=gitea
      - GITEA__database__USER=gitea
      - GITEA__database__PASSWD=gitea_secret_password
    volumes:
      - gitea_data:/data
      - /etc/timezone:/etc/timezone:ro
      - /etc/localtime:/etc/localtime:ro
    depends_on:
      gitea-db:
        condition: service_healthy
    networks:
      - gitea-net
  gitea-db:
    image: postgres:16-alpine
    container_name: gitea-db
    restart: unless-stopped
    environment:
      - POSTGRES_USER=gitea
      - POSTGRES_PASSWORD=gitea_secret_password
      - POSTGRES_DB=gitea
    volumes:
      - gitea_db_data:/var/lib/postgresql/data
    healthcheck:
      test: ["CMD-SHELL", "pg_isready -U gitea"]
      interval: 10s
      timeout: 5s
      retries: 5
    networks:
      - gitea-net
volumes:
  gitea_data:
  gitea_db_data:
networks:
  gitea-net:
Chạy và setup ban đầu
docker compose up -dTruy cập http://IP-VPS:3000 trên trình duyệt. Lần đầu tiên, Gitea sẽ hiển thị trang Initial Configuration. Hầu hết thông tin database đã được điền sẵn từ environment variables, bạn chỉ cần:
- Đặt Site Title theo ý bạn.
- Mở phần Administrator Account Settings ở cuối trang để tạo tài khoản admin.
- Click Install Gitea.
Port 2222 được map cho SSH, để bạn có thể clone repo qua SSH: git clone ssh://git@IP-VPS:2222/user/repo.git.
Điểm nhấn Docker: Compose file này áp dụng depends_on với condition: service_healthy (Bài 6), đảm bảo PostgreSQL sẵn sàng trước khi Gitea khởi động. Volume gitea_data chứa toàn bộ repositories và cấu hình, gitea_db_data chứa database.
Project 2: Nextcloud – Cloud storage cá nhân
Nextcloud là gì?
Nextcloud là nền tảng cloud storage tự host, giống Google Drive hay Dropbox, nhưng dữ liệu hoàn toàn nằm trên VPS của bạn. Ngoài lưu trữ file, Nextcloud còn có calendar, contacts, notes, office suite, và hàng trăm app mở rộng.
Đây là một trong những ứng dụng self-hosted phổ biến nhất thế giới, và Docker là cách triển khai nhanh nhất.
Cấu trúc thư mục
mkdir -p ~/apps/nextcloud && cd ~/apps/nextclouddocker-compose.yml
services:
  nextcloud:
    image: nextcloud:stable
    container_name: nextcloud
    restart: unless-stopped
    ports:
      - "8080:80"
    environment:
      - MYSQL_HOST=nextcloud-db
      - MYSQL_DATABASE=nextcloud
      - MYSQL_USER=nextcloud
      - MYSQL_PASSWORD=nextcloud_secret_password
      - REDIS_HOST=nextcloud-redis
      - NEXTCLOUD_TRUSTED_DOMAINS=your-domain.com
      - OVERWRITEPROTOCOL=https
    volumes:
      - nextcloud_html:/var/www/html
      - nextcloud_data:/var/www/html/data
    depends_on:
      nextcloud-db:
        condition: service_healthy
      nextcloud-redis:
        condition: service_started
    networks:
      - nextcloud-net
  nextcloud-db:
    image: mariadb:11
    container_name: nextcloud-db
    restart: unless-stopped
    command: --transaction-isolation=READ-COMMITTED --log-bin=binlog --binlog-format=ROW
    environment:
      - MYSQL_ROOT_PASSWORD=root_secret_password
      - MYSQL_DATABASE=nextcloud
      - MYSQL_USER=nextcloud
      - MYSQL_PASSWORD=nextcloud_secret_password
    volumes:
      - nextcloud_db_data:/var/lib/mysql
    healthcheck:
      test: ["CMD-SHELL", "healthcheck.sh --connect --innodb_initialized"]
      interval: 10s
      timeout: 5s
      retries: 5
    networks:
      - nextcloud-net
  nextcloud-redis:
    image: redis:7-alpine
    container_name: nextcloud-redis
    restart: unless-stopped
    command: redis-server --requirepass redis_secret_password
    volumes:
      - nextcloud_redis_data:/data
    networks:
      - nextcloud-net
volumes:
  nextcloud_html:
  nextcloud_data:
  nextcloud_db_data:
  nextcloud_redis_data:
networks:
  nextcloud-net:
Chạy và cấu hình
docker compose up -dTruy cập http://IP-VPS:8080. Lần đầu, Nextcloud sẽ yêu cầu tạo tài khoản admin. Vì đã cấu hình database qua environment variables, bạn chỉ cần đặt username/password cho admin rồi click Install.
Cấu hình Trusted Domains
Nếu bạn truy cập qua domain (ví dụ cloud.example.com) mà gặp lỗi “Access through untrusted domain”, cần thêm domain vào trusted list. Cách nhanh nhất:
docker exec -u www-data nextcloud php occ config:system:set \
  trusted_domains 1 --value="cloud.example.com"
Hoặc bạn đã set sẵn qua biến NEXTCLOUD_TRUSTED_DOMAINS trong compose file, chỉ cần thay your-domain.com bằng domain thực tế trước khi chạy.
Điểm nhấn Docker: Project này dùng 3 services (Nextcloud + MariaDB + Redis), đúng pattern multi-service mà bạn đã học ở Bài 6-8. Redis làm cache giúp Nextcloud chạy nhanh hơn đáng kể. Volume nextcloud_data được tách riêng để dễ backup (Bài 12).
Project 3: n8n – Workflow automation
n8n là gì?
n8n (đọc là “n-eight-n”) là nền tảng workflow automation tự host, tương tự Zapier hay Make.com, nhưng bạn kiểm soát hoàn toàn dữ liệu và không bị giới hạn số lượng workflow.
Với n8n, bạn có thể tự động hóa đủ thứ: nhận webhook → xử lý dữ liệu → gửi Telegram, đồng bộ data giữa các dịch vụ, scrape web, gọi API, chạy cron job… Tất cả qua giao diện kéo-thả trực quan.
Cấu trúc thư mục
mkdir -p ~/apps/n8n && cd ~/apps/n8ndocker-compose.yml
services:
  n8n:
    image: n8nio/n8n:latest
    container_name: n8n
    restart: unless-stopped
    ports:
      - "5678:5678"
    environment:
      - DB_TYPE=postgresdb
      - DB_POSTGRESDB_HOST=n8n-db
      - DB_POSTGRESDB_PORT=5432
      - DB_POSTGRESDB_DATABASE=n8n
      - DB_POSTGRESDB_USER=n8n
      - DB_POSTGRESDB_PASSWORD=n8n_secret_password
      - N8N_HOST=n8n.example.com
      - N8N_PROTOCOL=https
      - WEBHOOK_URL=https://n8n.example.com/
      - GENERIC_TIMEZONE=Asia/Ho_Chi_Minh
    volumes:
      - n8n_data:/home/node/.n8n
    depends_on:
      n8n-db:
        condition: service_healthy
    networks:
      - n8n-net
  n8n-db:
    image: postgres:16-alpine
    container_name: n8n-db
    restart: unless-stopped
    environment:
      - POSTGRES_USER=n8n
      - POSTGRES_PASSWORD=n8n_secret_password
      - POSTGRES_DB=n8n
    volumes:
      - n8n_db_data:/var/lib/postgresql/data
    healthcheck:
      test: ["CMD-SHELL", "pg_isready -U n8n"]
      interval: 10s
      timeout: 5s
      retries: 5
    networks:
      - n8n-net
volumes:
  n8n_data:
  n8n_db_data:
networks:
  n8n-net:
Chạy và cấu hình
docker compose up -dTruy cập http://IP-VPS:5678, tạo tài khoản admin, và bắt đầu tạo workflow đầu tiên.
Lưu ý về Webhook URL
Biến WEBHOOK_URL rất quan trọng, nó quyết định URL mà các dịch vụ bên ngoài sẽ gọi vào n8n. Nếu bạn dùng reverse proxy (Bài 10), hãy set đúng domain. Nếu chỉ test local, có thể bỏ biến này hoặc dùng http://IP-VPS:5678/.
Biến N8N_HOST và N8N_PROTOCOL cũng cần khớp với cách bạn truy cập n8n (qua domain + HTTPS hay IP + HTTP).
Điểm nhấn Docker: n8n mặc định dùng SQLite, nhưng dùng PostgreSQL sẽ ổn định hơn khi chạy nhiều workflow. Environment variables ở đây minh họa rõ cách cấu hình app qua biến môi trường (Bài 9), không cần sửa file config bên trong container.
Project 4: Uptime Kuma + Grafana + Prometheus – Monitoring stack
Tổng quan
Ở Bài 13, bạn đã làm quen với monitoring cơ bản. Giờ mình nâng cấp lên một monitoring stack hoàn chỉnh:
- Uptime Kuma: giám sát uptime các dịch vụ (HTTP, TCP, DNS, ping…), gửi alert qua Telegram/Discord/Email.
- Prometheus: thu thập metrics từ các exporter (node, container, app…).
- Grafana: dashboard trực quan, visualize metrics từ Prometheus.
Kết hợp 3 tool này, bạn vừa biết dịch vụ có up không (Uptime Kuma), vừa biết resource đang như thế nào (Prometheus + Grafana).
Cấu trúc thư mục
mkdir -p ~/apps/monitoring && cd ~/apps/monitoringTạo file cấu hình Prometheus
Trước khi chạy compose, cần tạo file cấu hình cho Prometheus:
cat > prometheus.yml << 'EOF'
global:
  scrape_interval: 15s
  evaluation_interval: 15s
scrape_configs:
  - job_name: "prometheus"
    static_configs:
      - targets: ["localhost:9090"]
  - job_name: "node-exporter"
    static_configs:
      - targets: ["node-exporter:9100"]
EOF
File này cấu hình Prometheus scrape metrics mỗi 15 giây từ chính nó và từ Node Exporter (cung cấp metrics về CPU, RAM, disk, network của VPS).
docker-compose.yml
services:
  uptime-kuma:
    image: louislam/uptime-kuma:latest
    container_name: uptime-kuma
    restart: unless-stopped
    ports:
      - "3001:3001"
    volumes:
      - uptime_kuma_data:/app/data
    networks:
      - monitoring-net
  prometheus:
    image: prom/prometheus:latest
    container_name: prometheus
    restart: unless-stopped
    ports:
      - "9090:9090"
    volumes:
      - ./prometheus.yml:/etc/prometheus/prometheus.yml:ro
      - prometheus_data:/prometheus
    command:
      - "--config.file=/etc/prometheus/prometheus.yml"
      - "--storage.tsdb.retention.time=30d"
    networks:
      - monitoring-net
  node-exporter:
    image: prom/node-exporter:latest
    container_name: node-exporter
    restart: unless-stopped
    pid: host
    volumes:
      - /proc:/host/proc:ro
      - /sys:/host/sys:ro
      - /:/rootfs:ro
    command:
      - "--path.procfs=/host/proc"
      - "--path.sysfs=/host/sys"
      - "--path.rootfs=/rootfs"
      - "--collector.filesystem.mount-points-exclude=^/(sys|proc|dev|host|etc)($$|/)"
    networks:
      - monitoring-net
  grafana:
    image: grafana/grafana:latest
    container_name: grafana
    restart: unless-stopped
    ports:
      - "3002:3000"
    environment:
      - GF_SECURITY_ADMIN_USER=admin
      - GF_SECURITY_ADMIN_PASSWORD=grafana_secret_password
    volumes:
      - grafana_data:/var/lib/grafana
    networks:
      - monitoring-net
volumes:
  uptime_kuma_data:
  prometheus_data:
  grafana_data:
networks:
  monitoring-net:
Chạy và kết nối
docker compose up -dSau khi chạy, bạn có 3 giao diện web:
- Uptime Kuma:
http://IP-VPS:3001: tạo tài khoản admin, thêm monitor cho các dịch vụ bạn muốn theo dõi. - Prometheus:
http://IP-VPS:9090: kiểm tra targets ở Status → Targets, đảm bảo cả prometheus và node-exporter đều UP. - Grafana:
http://IP-VPS:3002: đăng nhập bằng tài khoản admin đã set trong compose file.
Kết nối Grafana với Prometheus
Trong Grafana, thêm datasource:
- Vào Connections → Data sources → Add data source.
- Chọn Prometheus.
- URL:
http://prometheus:9090(dùng tên container vì cùng network). - Click Save & Test.
Sau đó, import dashboard có sẵn: vào Dashboards → Import, nhập ID 1860 (Node Exporter Full) → chọn Prometheus datasource → Import. Bạn sẽ có dashboard monitoring VPS đầy đủ ngay lập tức.
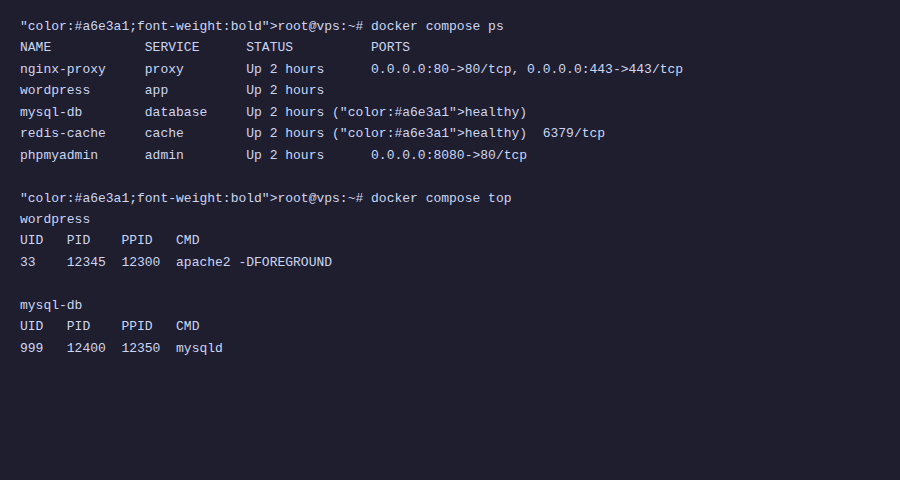
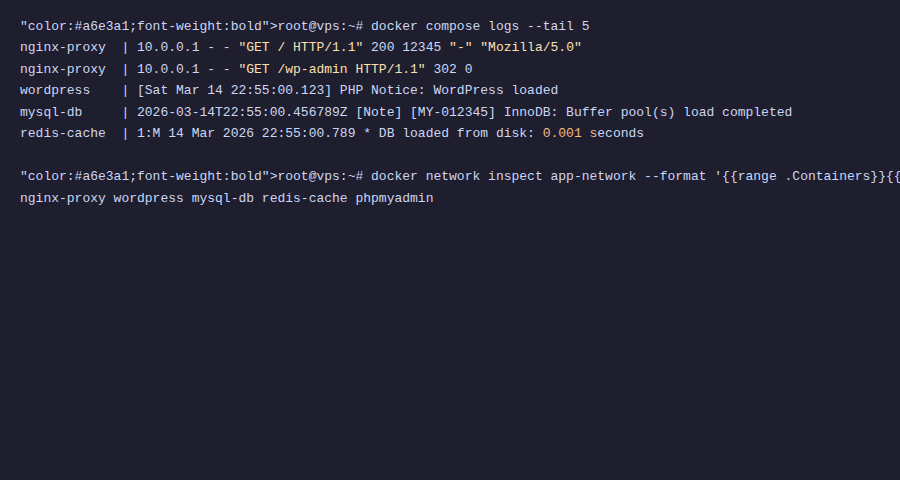
Điểm nhấn Docker: Đây là compose file nhiều service nhất trong bài : 4 services chạy cùng network, giao tiếp qua tên container. Prometheus mount file config từ host (bind mount , Bài 5), Node Exporter mount /proc và /sys để đọc metrics hệ thống. Tất cả hoạt động nhịp nhàng nhờ Docker network.
Project 5: Ghost Blog - Modern publishing platform
Ghost là gì?
Ghost là nền tảng blog/publishing hiện đại, viết bằng Node.js. So với WordPress, Ghost nhẹ hơn, nhanh hơn, và tập trung vào trải nghiệm viết bài. Ghost cũng hỗ trợ newsletter, membership, và thanh toán tích hợp, rất phù hợp cho blog cá nhân hoặc trang tin tức.
Cấu trúc thư mục
mkdir -p ~/apps/ghost && cd ~/apps/ghostdocker-compose.yml
services:
  ghost:
    image: ghost:5
    container_name: ghost
    restart: unless-stopped
    ports:
      - "2368:2368"
    environment:
      - url=https://blog.example.com
      - database__client=mysql
      - database__connection__host=ghost-db
      - database__connection__port=3306
      - database__connection__user=ghost
      - database__connection__password=ghost_secret_password
      - database__connection__database=ghost
      - NODE_ENV=production
    volumes:
      - ghost_content:/var/lib/ghost/content
    depends_on:
      ghost-db:
        condition: service_healthy
    networks:
      - ghost-net
  ghost-db:
    image: mysql:8.0
    container_name: ghost-db
    restart: unless-stopped
    environment:
      - MYSQL_ROOT_PASSWORD=root_secret_password
      - MYSQL_DATABASE=ghost
      - MYSQL_USER=ghost
      - MYSQL_PASSWORD=ghost_secret_password
    volumes:
      - ghost_db_data:/var/lib/mysql
    healthcheck:
      test: ["CMD-SHELL", "mysqladmin ping -h localhost"]
      interval: 10s
      timeout: 5s
      retries: 5
    networks:
      - ghost-net
volumes:
  ghost_content:
  ghost_db_data:
networks:
  ghost-net:
Chạy và truy cập
docker compose up -dTruy cập http://IP-VPS:2368 để xem blog. Trang admin ở http://IP-VPS:2368/ghost: tạo tài khoản admin lần đầu.
Lưu ý quan trọng: Biến url phải đúng với domain thực tế bạn sẽ dùng. Nếu chỉ test, dùng http://IP-VPS:2368. Khi đưa lên production với domain + SSL, đổi thành https://blog.example.com.
Volume ghost_content chứa toàn bộ themes, images, và file đã upload. Đây là volume quan trọng nhất cần backup.
Điểm nhấn Docker: Ghost dùng nested environment variables (database__connection__host), cách phổ biến trong nhiều app Node.js. Compose file tuy đơn giản nhưng đầy đủ cho production.
Full VPS Setup - Gộp tất cả với Nginx Proxy Manager
Giờ là phần hay nhất: gộp tất cả 5 project ở trên + Nginx Proxy Manager thành một hệ thống hoàn chỉnh trên VPS. Mỗi app truy cập qua subdomain riêng, SSL tự động, chạy song song không xung đột.
Cấu trúc thư mục recommended
~/apps/
├── nginx-proxy-manager/
│   └── docker-compose.yml
├── gitea/
│   └── docker-compose.yml
├── nextcloud/
│   └── docker-compose.yml
├── n8n/
│   └── docker-compose.yml
├── monitoring/
│   ├── docker-compose.yml
│   └── prometheus.yml
└── ghost/
    └── docker-compose.yml
Nguyên tắc: Mỗi app một thư mục, một compose file. Dễ quản lý, dễ backup, dễ xóa, không app nào ảnh hưởng app khác.
Bước 1: Tạo shared proxy network
Tất cả apps cần kết nối với Nginx Proxy Manager qua một network chung. Tạo network này trước:
docker network create proxy-networkNetwork này tạo thủ công bên ngoài compose file (external network), nên nó tồn tại độc lập, không bị xóa khi bạn docker compose down bất kỳ app nào.
Bước 2: Nginx Proxy Manager
mkdir -p ~/apps/nginx-proxy-manager && cd ~/apps/nginx-proxy-manager# ~/apps/nginx-proxy-manager/docker-compose.yml
services:
npm:
image: jc21/nginx-proxy-manager:latest
container_name: nginx-proxy-manager
restart: unless-stopped
ports:
- "80:80"
- "443:443"
- "81:81"
volumes:
- npm_data:/data
- npm_letsencrypt:/etc/letsencrypt
networks:
- proxy-network
volumes:
npm_data:
npm_letsencrypt:
networks:
proxy-network:
external: truedocker compose up -dTruy cập http://IP-VPS:81, đăng nhập lần đầu với email admin@example.com / password changeme, rồi đổi ngay thông tin đăng nhập.
Bước 3: Sửa compose file mỗi app
Để kết nối mỗi app với Nginx Proxy Manager, bạn cần sửa 2 thứ trong mỗi compose file:
1. Bỏ phần ports (không expose port ra ngoài nữa, proxy sẽ lo):
# Xóa hoặc comment dòng ports
# ports:
#   - "3000:3000"
2. Thêm proxy-network cho service chính:
services:
  gitea:
    # ... các config khác giữ nguyên ...
    networks:
      - gitea-net
      - proxy-network    # Thêm dòng này
# ... giữ nguyên phần networks nội bộ ...
networks:
  gitea-net:
  proxy-network:         # Thêm block này
    external: true
Làm tương tự cho từng app: nextcloud, n8n, ghost, uptime-kuma, grafana. Chỉ service chính (cái cần truy cập web) mới cần join proxy-network: database, redis không cần.
Ví dụ: Gitea với proxy-network
Đây là compose file Gitea đã sửa cho production:
services:
  gitea:
    image: gitea/gitea:latest
    container_name: gitea
    restart: unless-stopped
    # Không expose port HTTP — proxy sẽ forward
    ports:
      - "2222:22"  # Giữ SSH port
    environment:
      - USER_UID=1000
      - USER_GID=1000
      - GITEA__database__DB_TYPE=postgres
      - GITEA__database__HOST=gitea-db:5432
      - GITEA__database__NAME=gitea
      - GITEA__database__USER=gitea
      - GITEA__database__PASSWD=gitea_secret_password
      - GITEA__server__ROOT_URL=https://git.example.com/
    volumes:
      - gitea_data:/data
      - /etc/timezone:/etc/timezone:ro
      - /etc/localtime:/etc/localtime:ro
    depends_on:
      gitea-db:
        condition: service_healthy
    networks:
      - gitea-net
      - proxy-network
  gitea-db:
    image: postgres:16-alpine
    container_name: gitea-db
    restart: unless-stopped
    environment:
      - POSTGRES_USER=gitea
      - POSTGRES_PASSWORD=gitea_secret_password
      - POSTGRES_DB=gitea
    volumes:
      - gitea_db_data:/var/lib/postgresql/data
    healthcheck:
      test: ["CMD-SHELL", "pg_isready -U gitea"]
      interval: 10s
      timeout: 5s
      retries: 5
    networks:
      - gitea-net
volumes:
  gitea_data:
  gitea_db_data:
networks:
  gitea-net:
  proxy-network:
    external: true
Bước 4: Tạo Proxy Host trong NPM
Với mỗi app, vào Nginx Proxy Manager → Proxy Hosts → Add Proxy Host:
- Domain:
git.example.com - Forward Hostname:
gitea(tên container) - Forward Port:
3000(port nội bộ của container) - SSL: Request new SSL certificate → Force SSL → HSTS
Làm tương tự cho các app khác:
cloud.example.com→ containernextcloud, port80n8n.example.com→ containern8n, port5678status.example.com→ containeruptime-kuma, port3001grafana.example.com→ containergrafana, port3000blog.example.com→ containerghost, port2368
Nhớ trỏ DNS tất cả subdomain về IP VPS trước khi tạo proxy host.
Quản lý hàng ngày
Với cấu trúc này, mỗi app hoàn toàn độc lập:
# Restart chỉ Gitea (không ảnh hưởng app khác)
cd ~/apps/gitea && docker compose restart
# Update Ghost lên version mới
cd ~/apps/ghost && docker compose pull && docker compose up -d
# Xóa hoàn toàn n8n (giữ data nếu muốn)
cd ~/apps/n8n && docker compose down
# Xem log Nextcloud
cd ~/apps/nextcloud && docker compose logs -f nextcloud
# Backup tất cả volumes
for app in gitea nextcloud n8n monitoring ghost; do
  cd ~/apps/$app && docker compose stop
  # backup volumes...
  docker compose start
done
Tổng kết: Bạn đã học được gì từ 5 project này?
Mỗi project ở trên đều minh họa một hoặc nhiều concept từ serie:
- Multi-service compose: app + database + cache, quản lý bằng 1 file duy nhất.
- Named volumes: dữ liệu persistent, dễ backup, dễ migrate.
- Environment variables: cấu hình app mà không sửa code hay file config.
- Docker networks: services giao tiếp qua tên container, isolate traffic.
- Health checks & depends_on: đảm bảo thứ tự khởi động đúng.
- Reverse proxy: nhiều app, nhiều domain, một VPS, SSL tự động.
- External networks: chia sẻ network giữa các compose file riêng biệt.
Nếu bạn hiểu được tất cả những pattern này, bạn có thể triển khai hầu hết mọi ứng dụng trên VPS bằng Docker.
📚 Serie Docker từ A đến Z
- Bài 1: Docker là gì? Tại sao nên dùng Docker trên VPS
- Bài 2: Cài đặt Docker và Docker Compose trên VPS Ubuntu
- Bài 3: Làm quen với Docker – Các lệnh cơ bản cần biết
- Bài 4: Docker Image & Dockerfile – Tự tạo Image riêng
- Bài 5: Docker Volume & Network – Quản lý dữ liệu và mạng
- Bài 6: Docker Compose là gì? Cài đặt và cú pháp cơ bản
- Bài 7: Deploy WordPress + MySQL + phpMyAdmin bằng Docker Compose
- Bài 8: Deploy LEMP Stack (Nginx + PHP-FPM + MariaDB) bằng Docker Compose
- Bài 9: Biến môi trường & file .env trong Docker Compose
- Bài 10: Reverse Proxy với Nginx Proxy Manager + SSL tự động
- Bài 11: Deploy ứng dụng Node.js / Python với Docker Compose
- Bài 12: Backup & Restore dữ liệu Docker Volume
- Bài 13: Monitoring Docker với Portainer, Uptime Kuma và cAdvisor
- Bài 14: Docker Logging – Quản lý log hiệu quả
- Bài 15: Bảo mật Docker trên VPS
- Bài 16: CI/CD đơn giản – Auto deploy với Webhook + Docker Compose
- Bài 17: Docker Compose trong thực tế – Tổng hợp project mẫu (đang đọc)
Lời kết serie - Docker từ Zero đến Hero
17 bài viết. Từ câu hỏi "Docker là gì?" đến việc chạy cả một hệ thống multi-app trên VPS với reverse proxy, monitoring, logging, backup, và CI/CD.
Hãy nhìn lại hành trình bạn đã đi qua:
- Bài 1-3: Hiểu Docker, cài đặt, chạy container đầu tiên.
- Bài 4-5: Dockerfile, volume, network: nền tảng cốt lõi.
- Bài 6-9: Docker Compose, triển khai WordPress, LEMP, quản lý biến môi trường.
- Bài 10-11: Reverse proxy, deploy app Node.js/Python.
- Bài 12-14: Backup, monitoring, logging: vận hành production.
- Bài 15-16: CI/CD, security, multi-stage build: chuyên nghiệp hóa.
- Bài 17: Tổng hợp project mẫu: áp dụng thực tế.
Đó là một lượng kiến thức vững chắc. Bạn giờ đã có thể tự tin nói: "Mình biết dùng Docker."
Tiếp theo là gì?
Docker trên single VPS là nền tảng. Từ đây, có nhiều hướng để bạn tiếp tục:
- Docker Swarm: chạy Docker trên nhiều VPS, tự động cân bằng tải và failover. Nếu bạn đã quen Docker Compose, Swarm sẽ rất dễ tiếp cận vì dùng cùng format file compose.
- Kubernetes (K8s): orchestration ở quy mô lớn hơn. Phức tạp hơn Swarm nhiều, nhưng là tiêu chuẩn ngành cho production ở quy mô enterprise.
- CI/CD nâng cao: GitHub Actions, GitLab CI, hoặc Gitea Actions (tự host luôn!) để tự động build → test → deploy mỗi khi push code.
- Container security: scan image với Trivy, chạy container rootless, AppArmor/Seccomp profiles, image signing.
Tài liệu tham khảo
- Docker Docs: https://docs.docker.com/: tài liệu chính thức, luôn cập nhật.
- Awesome Docker: https://github.com/veggiemonk/awesome-docker: tổng hợp tools, resources, best practices.
- Awesome Self-Hosted: https://github.com/awesome-selfhosted/awesome-selfhosted: danh sách hàng ngàn ứng dụng self-hosted, hầu hết đều có Docker image.
- r/selfhosted: https://reddit.com/r/selfhosted: cộng đồng self-hosting lớn nhất, nơi tìm ý tưởng project mới.
Chọn VPS phù hợp cho Docker
Tất cả project trong serie này đều được thiết kế để chạy trên VPS. Để có trải nghiệm tốt nhất với Docker, bạn nên chọn VPS có:
- Tối thiểu 2GB RAM: đủ cho 3-5 app nhỏ. 4GB+ nếu chạy nhiều app như bài này.
- SSD/NVMe storage: Docker build và pull image nhanh hơn nhiều so với HDD.
- Network tốc độ cao: pull image nhanh, response time thấp cho reverse proxy.
- Ubuntu 22.04+ hoặc Debian 12+: hỗ trợ Docker tốt nhất.
VPS tại AZDIGI đáp ứng tất cả tiêu chí trên, SSD NVMe, network tốc độ cao, hỗ trợ kỹ thuật 24/7 tiếng Việt. Nếu bạn đang tìm VPS để thực hành Docker hoặc triển khai production, có thể tham khảo các gói VPS tại https://azdigi.com/x-platinum-vps/.
Cảm ơn bạn đã theo dõi serie "Docker từ Zero đến Hero trên VPS" từ Bài 1 đến Bài 17 của AZDIGI.
Mình hy vọng serie này giúp bạn nắm được Docker và áp dụng luôn vào công việc. Từ những lệnh docker run đầu tiên đến việc quản lý cả một hệ thống multi-app trên VPS, bạn đã đi được một chặng đường dài.
Docker không khó. Nó chỉ cần bạn bắt tay vào làm, dần dần sẽ thành thói quen. Và khi đã quen, bạn sẽ không muốn quay lại cách cài đặt thủ công nữa đâu. 😄
Chúc bạn deploy vui vẻ! 🐳
👈 Bài trước: CI/CD đơn giản – Auto deploy với Webhook + Docker Compose
Có thể bạn cần xem thêm
- Monitoring Docker với Portainer, Uptime Kuma và cAdvisor
- Reverse Proxy với Nginx Proxy Manager + SSL tự động
- Deploy ứng dụng Node.js / Python với Docker Compose
- Deploy WordPress + MySQL + phpMyAdmin bằng Docker Compose
- Docker Compose là gì? Cài đặt và cú pháp cơ bản
- CI/CD đơn giản – Auto deploy với Webhook + Docker Compose
Về tác giả

Thạch Phạm
Đồng sáng lập và Giám đốc điều hành của AZDIGI. Có hơn 15 năm kinh nghiệm trong phổ biến kiến thức liên quan đến WordPress tại thachpham.com, phát triển website và phát triển hệ thống.