Nếu bạn đã cài Ollama và Open WebUI theo các bài trước, có thể bạn đang truy cập qua http://IP:11434 hoặc http://IP:3000. Cách này hoạt động, nhưng có vài vấn đề: không có HTTPS nên dữ liệu truyền plain text, phải nhớ port number, và nếu mở ra internet thì ai cũng gọi được API của bạn.
Giải pháp là đặt Nginx làm reverse proxy phía trước. Bạn sẽ có domain riêng như ai.yourdomain.com, HTTPS miễn phí từ Let’s Encrypt, và có thể thêm authentication để bảo vệ API endpoint.
Bài này mình sẽ hướng dẫn setup Nginx reverse proxy cho cả Ollama API và Open WebUI, bao gồm SSL, basic auth, và một vài cách tối ưu hiệu năng.
Cài Nginx
Trên Ubuntu/Debian, cài Nginx đơn giản:
sudo apt update
sudo apt install nginx -y
Sau khi cài xong, Nginx tự chạy và listen port 80. Kiểm tra nhanh:
sudo systemctl status nginxNếu bạn thấy active (running) là OK. Truy cập http://IP-server trên trình duyệt sẽ thấy trang Welcome to Nginx.
Config reverse proxy cho Ollama API
Mặc định Ollama chạy ở port 11434. Mình sẽ tạo một server block để proxy request từ domain api.yourdomain.com về Ollama.
Tạo file config:
sudo nano /etc/nginx/sites-available/ollamaNội dung:
server {
    listen 80;
    server_name api.yourdomain.com;
location / {
        proxy_pass http://localhost:11434;
        proxy_set_header Host $host;
        proxy_set_header X-Real-IP $remote_addr;
        proxy_set_header X-Forwarded-For $proxy_add_x_forwarded_for;
        proxy_set_header X-Forwarded-Proto $scheme;
# WebSocket support — cần cho streaming response
        proxy_http_version 1.1;
        proxy_set_header Upgrade $http_upgrade;
        proxy_set_header Connection "upgrade";
# Tắt buffering để streaming hoạt động mượt
        proxy_buffering off;
        proxy_cache off;
# Timeout dài hơn vì LLM generate chậm
        proxy_read_timeout 600s;
        proxy_send_timeout 600s;
    }
}
Vài điểm cần chú ý trong config trên:
proxy_http_version 1.1và các headerUpgrade/Connection: bật WebSocket support. Ollama dùng streaming response, nếu thiếu phần này thì response sẽ bị buffer lại và trả về một lúc thay vì stream từng token.proxy_buffering off: tắt buffer của Nginx. Không tắt thì Nginx sẽ đợi Ollama generate xong toàn bộ response rồi mới gửi về client.proxy_read_timeout 600s: tăng timeout lên 10 phút. Model lớn có thể mất vài phút để generate response dài, timeout mặc định 60s sẽ bị ngắt giữa chừng.
Enable site và reload Nginx:
sudo ln -s /etc/nginx/sites-available/ollama /etc/nginx/sites-enabled/
sudo nginx -t
sudo systemctl reload nginx
Lệnh nginx -t kiểm tra syntax. Nếu báo syntax is ok thì reload an toàn.

Config reverse proxy cho Open WebUI
Tương tự, tạo server block cho Open WebUI (chạy ở port 3000):
sudo nano /etc/nginx/sites-available/openwebuiNội dung:
server {
    listen 80;
    server_name ai.yourdomain.com;
client_max_body_size 50M;
location / {
        proxy_pass http://localhost:3000;
        proxy_set_header Host $host;
        proxy_set_header X-Real-IP $remote_addr;
        proxy_set_header X-Forwarded-For $proxy_add_x_forwarded_for;
        proxy_set_header X-Forwarded-Proto $scheme;
# WebSocket — Open WebUI dùng cho real-time chat
        proxy_http_version 1.1;
        proxy_set_header Upgrade $http_upgrade;
        proxy_set_header Connection "upgrade";
proxy_buffering off;
        proxy_read_timeout 600s;
        proxy_send_timeout 600s;
    }
}
Config gần giống Ollama, chỉ khác server_name và proxy_pass. Mình thêm client_max_body_size 50M vì Open WebUI cho phép upload file (PDF, ảnh) lên chat, mặc định Nginx chỉ cho upload 1MB.
Enable và reload:
sudo ln -s /etc/nginx/sites-available/openwebui /etc/nginx/sites-enabled/
sudo nginx -t
sudo systemctl reload nginx
Trỏ domain về server
Trước khi tiếp tục, bạn cần tạo DNS record cho 2 subdomain. Vào trang quản lý DNS của domain và thêm 2 bản ghi A record:
ai.yourdomain.com→ IP server của bạnapi.yourdomain.com→ IP server của bạn
Đợi DNS propagate (thường vài phút, có thể lâu hơn tùy provider). Kiểm tra bằng lệnh:
dig ai.yourdomain.com +short
dig api.yourdomain.com +short
Khi nào thấy trả về đúng IP server thì tiếp tục bước SSL.
Cài SSL với Let’s Encrypt
HTTPS không chỉ để cho đẹp. Khi bạn gửi prompt qua HTTP, nội dung truyền plain text, ai bắt gói tin giữa đường đều đọc được. Với HTTPS, mọi thứ được mã hóa.
Cài Certbot:
sudo apt install certbot python3-certbot-nginx -yChạy Certbot cho cả 2 subdomain cùng lúc:
sudo certbot --nginx -d ai.yourdomain.com -d api.yourdomain.comCertbot sẽ hỏi email, đồng ý terms of service, rồi tự động cấu hình SSL vào file Nginx config. Sau khi chạy xong, bạn truy cập https://ai.yourdomain.com là thấy Open WebUI với ổ khóa xanh.
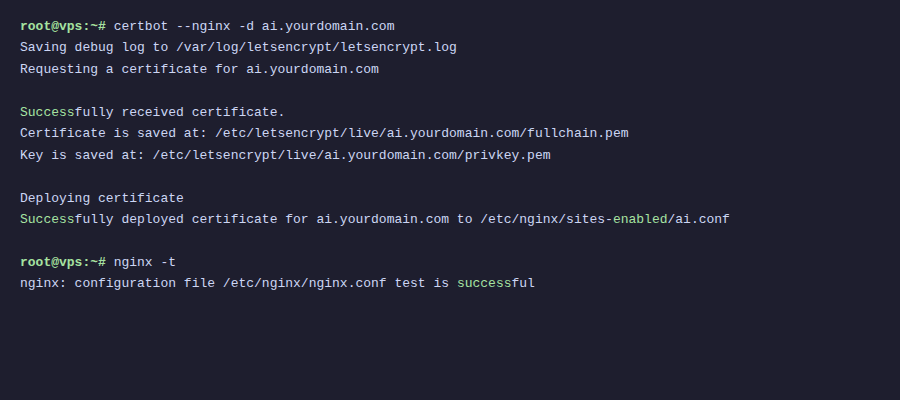
Certbot cũng tự thêm cron job để renew certificate trước khi hết hạn. Kiểm tra bằng:
sudo certbot renew --dry-runNếu không có lỗi gì thì auto-renewal hoạt động bình thường. Certificate Let’s Encrypt có hạn 90 ngày, Certbot sẽ tự renew khi còn khoảng 30 ngày.
Thêm Basic Auth cho Ollama API
Open WebUI đã có hệ thống login riêng, nên không cần thêm auth ở tầng Nginx. Nhưng Ollama API thì khác, mặc định nó không có authentication. Ai biết URL đều gọi được. Nếu bạn mở API ra internet, cần thêm basic auth.
Tạo file password:
sudo apt install apache2-utils -y
sudo htpasswd -c /etc/nginx/.htpasswd ollama-user
Lệnh trên tạo user ollama-user, bạn sẽ được hỏi nhập password. File .htpasswd lưu password đã hash.
Sửa file /etc/nginx/sites-available/ollama, thêm 2 dòng vào trong block location /:
    location / {
        auth_basic "Ollama API";
        auth_basic_user_file /etc/nginx/.htpasswd;
proxy_pass http://localhost:11434;
        # ... giữ nguyên các dòng còn lại
    }
Reload Nginx:
sudo nginx -t
sudo systemctl reload nginx
Giờ khi gọi API, bạn cần kèm credentials:
curl -u ollama-user:your-password https://api.yourdomain.com/api/generate \
  -d '{"model": "llama3.2", "prompt": "Hello"}'
Nếu Open WebUI kết nối tới Ollama qua Nginx (thay vì localhost), bạn cần cấu hình URL trong Open WebUI kèm credentials. Tuy nhiên, nếu cả hai chạy cùng server, nên cho Open WebUI kết nối trực tiếp qua http://localhost:11434 để tránh đi vòng qua Nginx.
Tối ưu hiệu năng Nginx
Một vài tối ưu nhỏ nhưng có ích. Thêm vào file /etc/nginx/nginx.conf, trong block http {}:
http {
    # Bật gzip cho API response
    gzip on;
    gzip_types application/json text/plain text/css application/javascript;
    gzip_min_length 1000;
# Keepalive tới upstream
    upstream ollama_backend {
        server localhost:11434;
        keepalive 32;
    }
upstream openwebui_backend {
        server localhost:3000;
        keepalive 16;
    }
# ... các config khác
}
Nếu dùng upstream block, sửa proxy_pass trong server block tương ứng:
# Trong /etc/nginx/sites-available/ollama
proxy_pass http://ollama_backend;
proxy_set_header Connection "";
# Trong /etc/nginx/sites-available/openwebui
proxy_pass http://openwebui_backend;
proxy_set_header Connection "";
Chú ý khi dùng upstream với keepalive, bạn cần set Connection "" thay vì "upgrade" cho request thường. Với WebSocket thì vẫn giữ header Upgrade. Cách xử lý là tách location block riêng cho WebSocket endpoint nếu cần.
Thực tế, nếu server chỉ phục vụ vài người dùng, config cơ bản ở các phần trên đã đủ. Upstream keepalive có ích hơn khi bạn có nhiều người cùng dùng.
Docker Compose kết hợp Nginx
Nếu bạn chạy mọi thứ bằng Docker, có thể gom Nginx vào cùng docker-compose.yml:
services:
  ollama:
    image: ollama/ollama
    volumes:
      - ollama_data:/root/.ollama
    deploy:
      resources:
        reservations:
          devices:
            - driver: nvidia
              count: all
              capabilities: [gpu]
    restart: unless-stopped
open-webui:
    image: ghcr.io/open-webui/open-webui:main
    environment:
      - OLLAMA_BASE_URL=http://ollama:11434
    volumes:
      - openwebui_data:/app/backend/data
    depends_on:
      - ollama
    restart: unless-stopped
nginx:
    image: nginx:alpine
    ports:
      - "80:80"
      - "443:443"
    volumes:
      - ./nginx/conf.d:/etc/nginx/conf.d
      - ./nginx/ssl:/etc/nginx/ssl
      - ./nginx/.htpasswd:/etc/nginx/.htpasswd
    depends_on:
      - ollama
      - open-webui
    restart: unless-stopped
volumes:
  ollama_data:
  openwebui_data:
Khi chạy trong Docker, Nginx proxy tới container name thay vì localhost. File config Nginx cũng thay đổi, proxy_pass trỏ tới tên service:
# File ./nginx/conf.d/ollama.conf
server {
    listen 80;
    server_name api.yourdomain.com;
location / {
        auth_basic "Ollama API";
        auth_basic_user_file /etc/nginx/.htpasswd;
proxy_pass http://ollama:11434;
        proxy_http_version 1.1;
        proxy_set_header Upgrade $http_upgrade;
        proxy_set_header Connection "upgrade";
        proxy_set_header Host $host;
        proxy_set_header X-Real-IP $remote_addr;
        proxy_buffering off;
        proxy_read_timeout 600s;
    }
}
# File ./nginx/conf.d/openwebui.conf
server {
    listen 80;
    server_name ai.yourdomain.com;
client_max_body_size 50M;
location / {
        proxy_pass http://open-webui:8080;
        proxy_http_version 1.1;
        proxy_set_header Upgrade $http_upgrade;
        proxy_set_header Connection "upgrade";
        proxy_set_header Host $host;
        proxy_set_header X-Real-IP $remote_addr;
        proxy_buffering off;
        proxy_read_timeout 600s;
    }
}
Open WebUI khi chạy trong Docker expose port 8080 (internal), không phải 3000. Nên proxy_pass trong Docker environment là http://open-webui:8080.
Với SSL trong Docker, bạn có thể mount certificate từ host vào container, hoặc dùng thêm container Certbot. Một cách đơn giản hơn là chạy Certbot trên host, rồi mount thư mục /etc/letsencrypt vào container Nginx.
Tổng kết
Sau bài này, bạn đã có:
-
- Nginx reverse proxy cho cả Ollama API và Open WebUI
-
- HTTPS miễn phí với Let’s Encrypt, tự động renew
-
- Subdomain riêng:
ai.yourdomain.comcho giao diện chat,api.yourdomain.comcho API
- Subdomain riêng:
-
- Basic authentication bảo vệ API endpoint
-
- Config streaming hoạt động đúng (không bị buffer)
Setup này phù hợp cho cả cài đặt trực tiếp trên server lẫn Docker. Với cá nhân dùng hoặc team nhỏ, basic auth kết hợp HTTPS là đủ an toàn. Nếu cần bảo mật hơn, bạn có thể thêm firewall rule chỉ cho phép IP nhất định, hoặc dùng VPN như WireGuard/Tailscale để giới hạn truy cập.
Có thể bạn cần xem thêm
- Bảo mật AI self-hosted - SSL, Authentication và Firewall cho Ollama
- Cách cài đặt n8n trên VPS - Hướng dẫn chi tiết từ A-Z
- Hướng dẫn cài đặt NGINX Proxy Apache 2.x
- Cài đặt Ollama trên VPS Ubuntu - Chạy AI riêng trong 15 phút
- Reverse Proxy với Nginx Proxy Manager + SSL tự động
- Cài Open WebUI + Ollama bằng Docker Compose - Tạo ChatGPT riêng trên VPS
Về tác giả

Trần Thắng
Chuyên gia tại AZDIGI với nhiều năm kinh nghiệm trong lĩnh vực web hosting và quản trị hệ thống.